Holux GPSmile 61CS User manual

GPSmile 61CS
Portable Automobile Navigation System
Product User Manual
Registered information
HOLUX and GPSmile are trademarks of HOLUX Technology,
Inc. All other trademarks elong to registered companies.
The contents of this manual will e modified
without further notice.
The operation temperature for the product is
etween -10℃~60℃.
Operating or recharging in an environment with a
temperature over 50℃ might cause the system to
malfunction. However, this should e considered a
normal phenomenon. Please do not operate under
extreme temperatures.

i
Safety Precautions
• Select the install location must e cautiously. HOLUX
will not ear any responsi ility if the user does not
follow the correct device installing procedure.
• A out the power adapter:
1. Do not use the power adapter in a wet environment.
When hands and feet are wet, do not touch the
power adapter.
2. While using the power adaptor, ensure that the area
is well ventilated. Do not let paper or other material
cover the power adaptor, as this will interfere with
cooling. Do not use the power adaptor whilst it is in a
ag.
3. Do not attempt to repair the device. If device is
damaged or is in a wet environment, replace the
device immediately.
• A out the attery:
1. Use only the original factory approved charger.
Note: Replacing with an incorrect attery may result
in an explosion. When disposing of the attery,
follow the instructions. The replacement attery
must e a factory approved original.
2. Regulations must e o served when recycling or
disposing of atteries.
3. The attery should only e used in this device.
• This device is waterproof (meets IP57 standard) ut
not protected against water immersion.

ii
Content
Preface ...................................................................... 1
Co yright ............................................................... 1
Precautions and Notices ............................................ 2
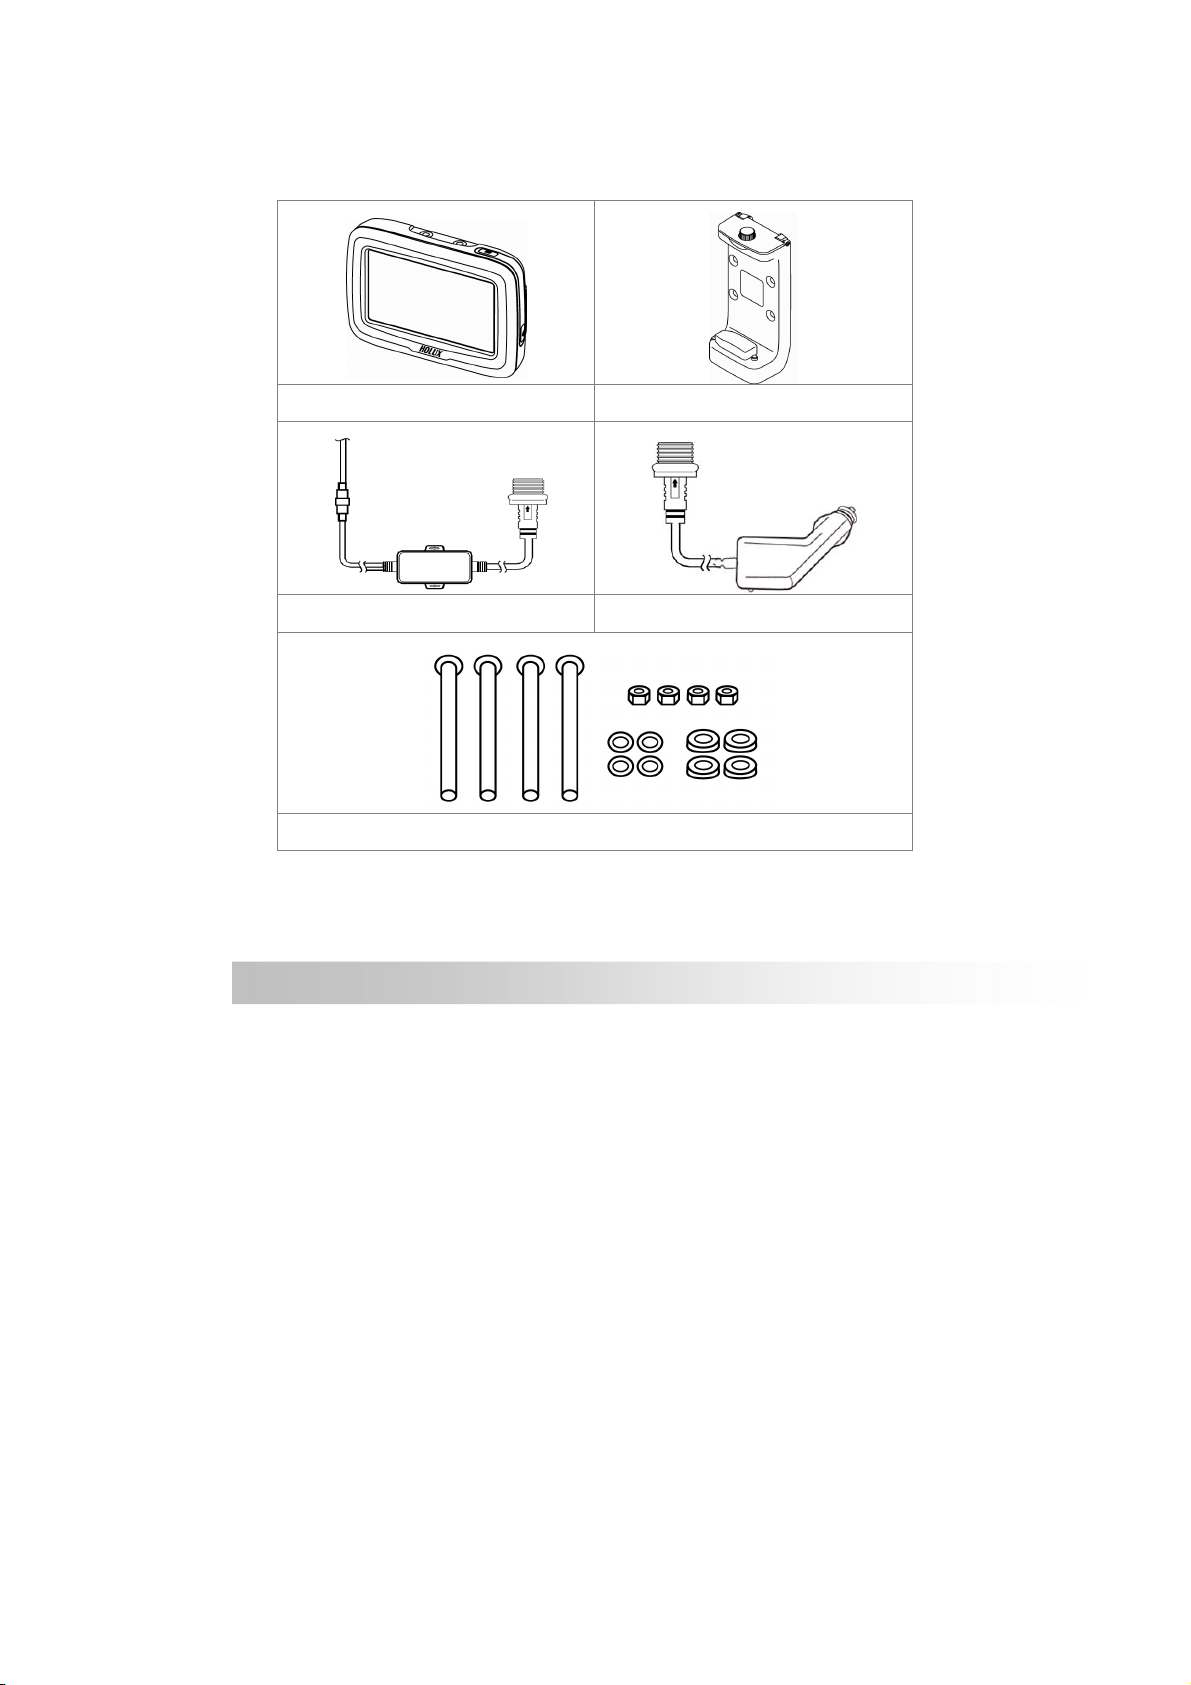
Package Contents...................................................... 3
Device and Main Accessory .................................... 3
Motorbike RAM Mount Accessory (O tional) .......... 4
O tional accessory ............................................. 4
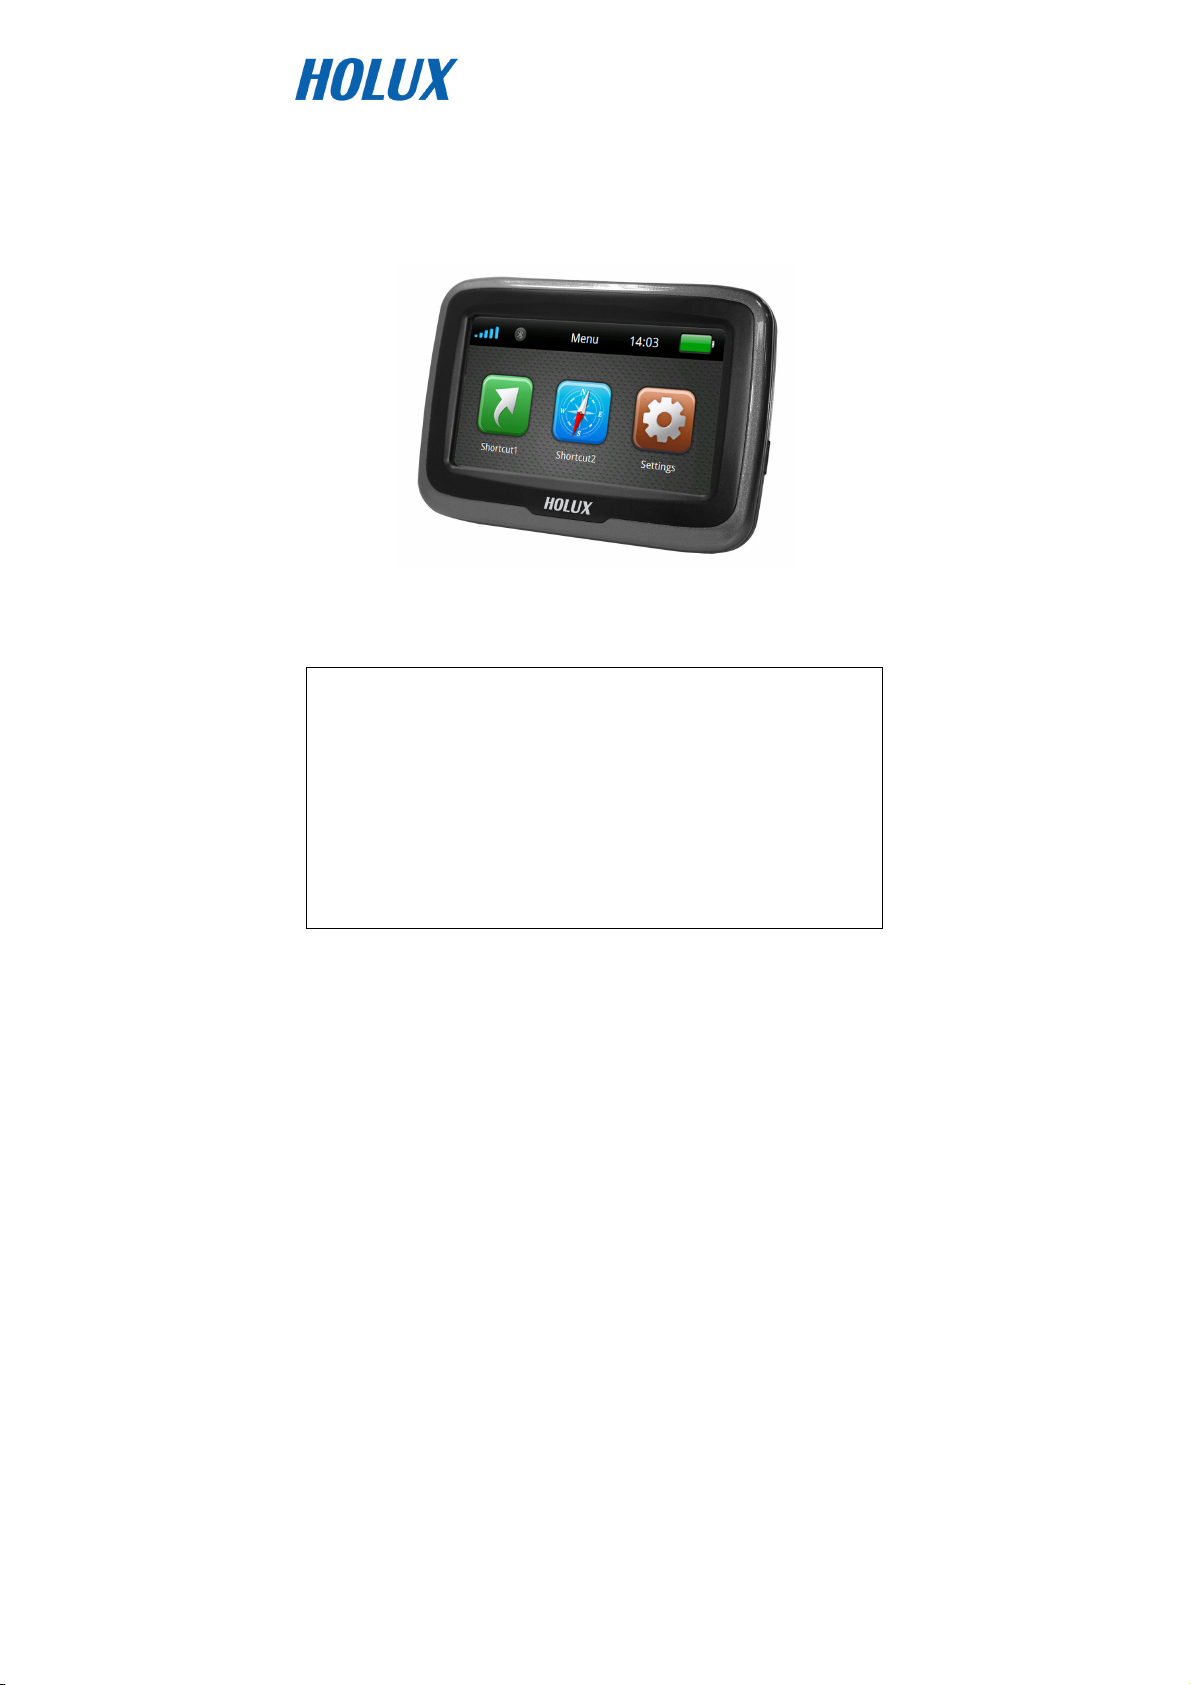
Basic O eration ......................................................... 5
Introduction........................................................... 5
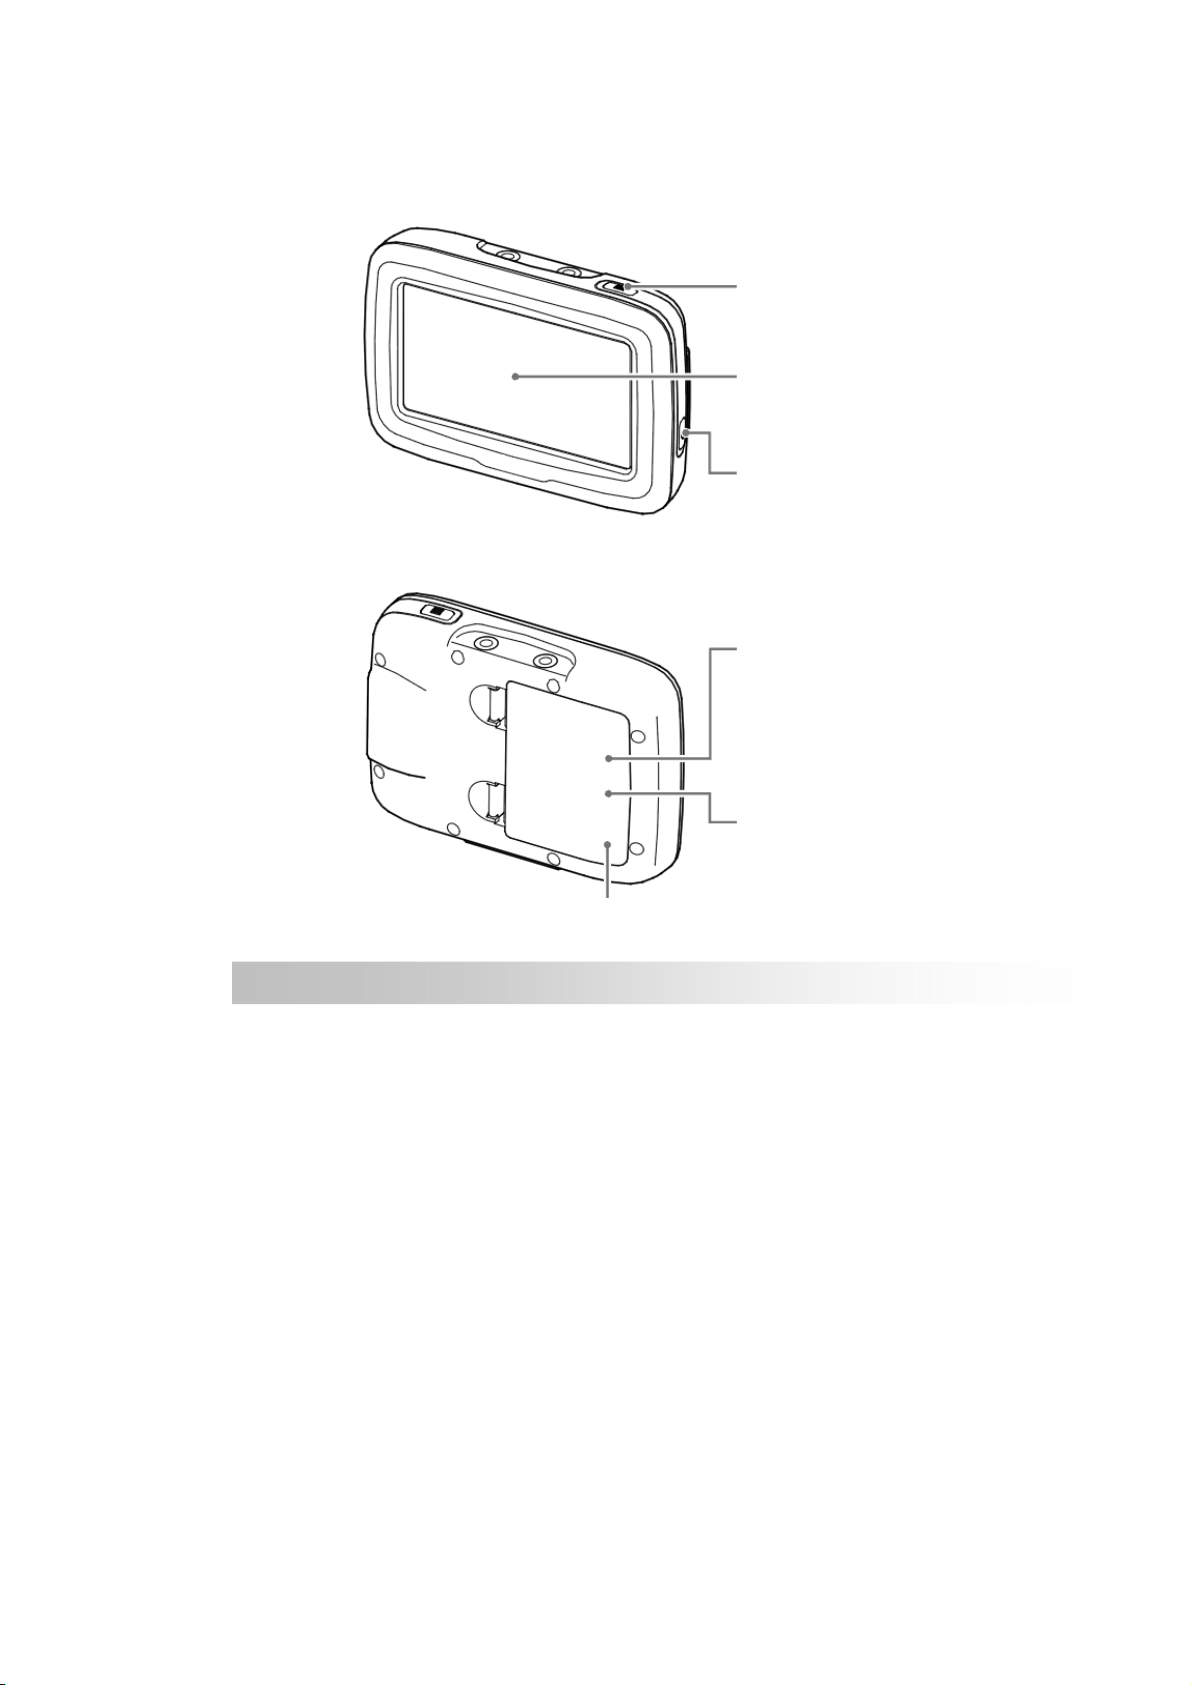
Front View .......................................................... 5
Rear View ........................................................... 5
Accessories ............................................................ 6
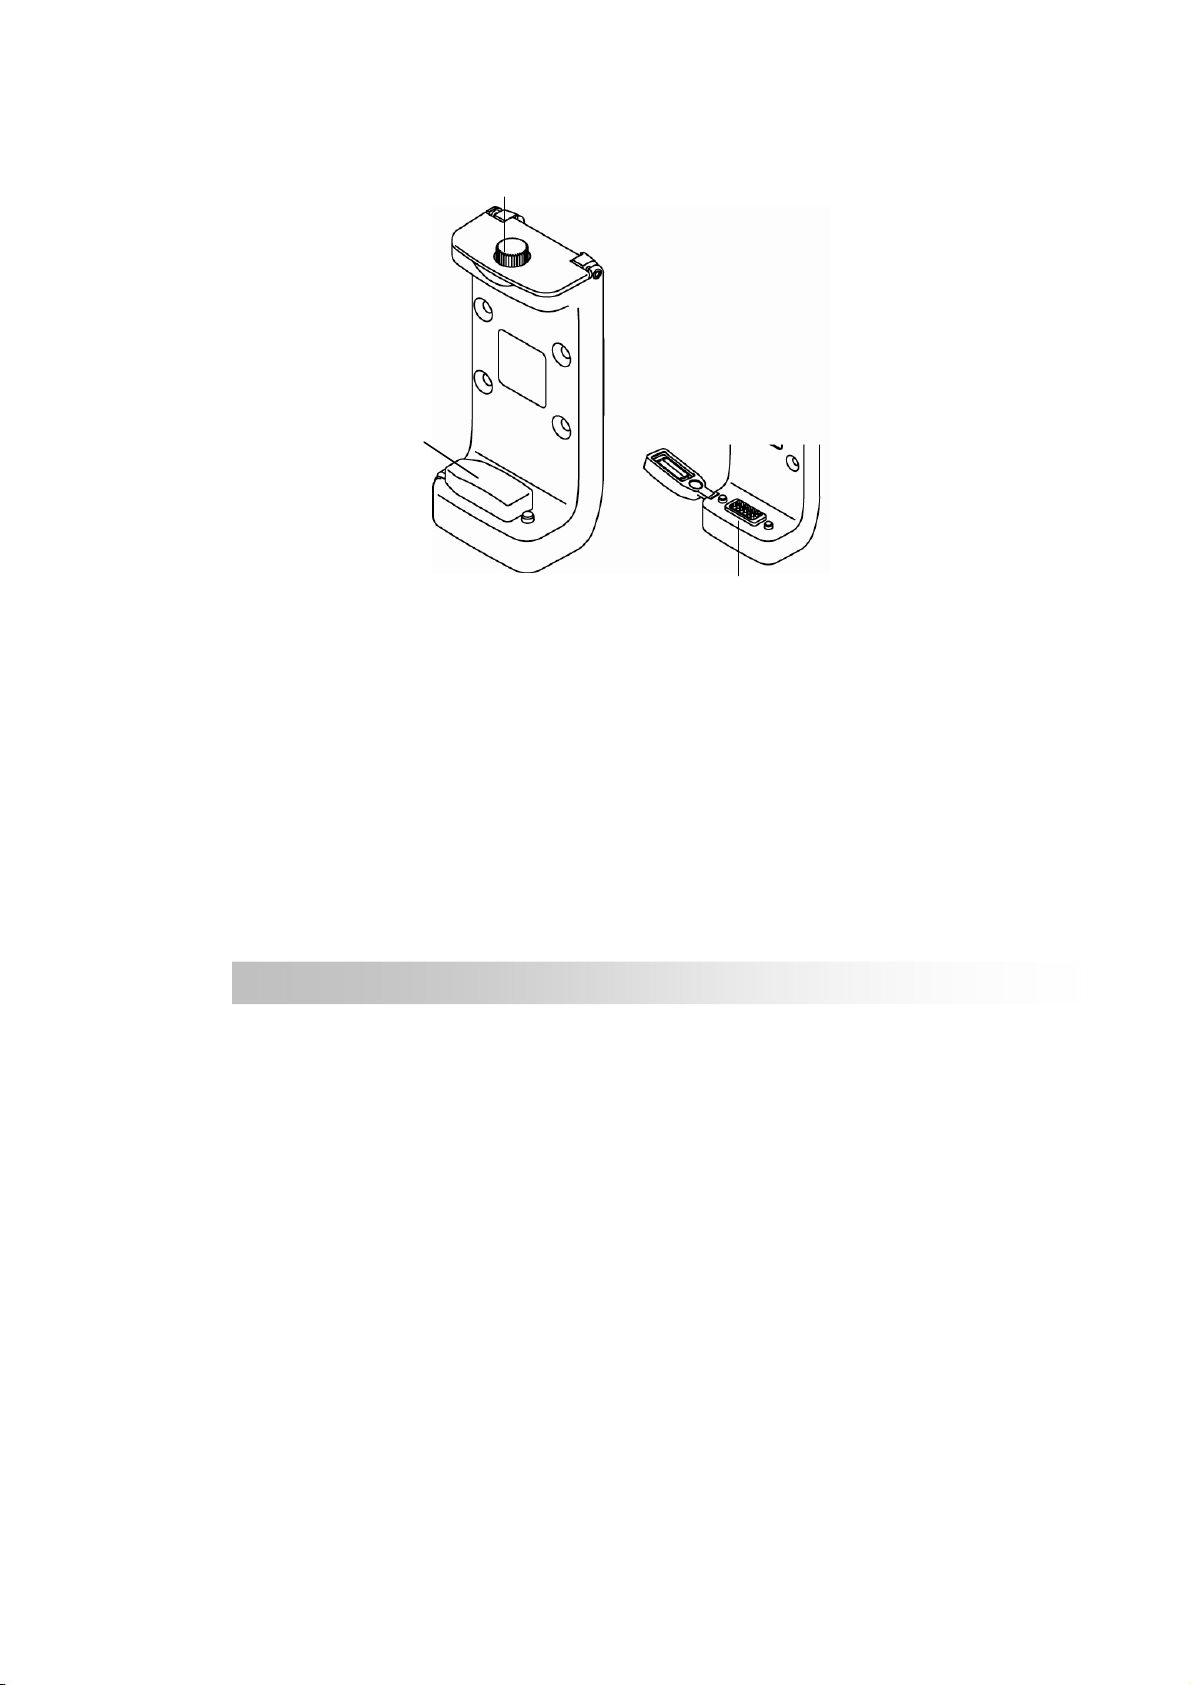
Cradle ................................................................. 6
Getting Started.......................................................... 7
Install Cradle ......................................................... 7
Remove Cradle ....................................................... 9
Install motorcycle RAM mount (O tional) ............ 10
Install/ Remove Battery ...................................... 16
Charging Battery .................................................. 17
Install SD Card (O tional).................................... 18
Device connection Diagram.................................. 20
O erating Methods .................................................. 21
Startu / Shutdown .............................................. 21
Hot key ................................................................ 22
Battery Status ...................................................... 23
Function Menu......................................................... 24
Settings ............................................................... 25
Brightness/ Volume.......................................... 26

iii
Time/ Language ............................................... 28
Time Format .................................................. 29
Time Zone ..................................................... 30
Language ...................................................... 31
Bluetooth.......................................................... 32
System setu .................................................... 36
GPS ............................................................... 37
Factory Reset ................................................ 39
Shortcut ........................................................ 40
Mass Storage Mode ....................................... 45
Version Information ...................................... 47
Calibrate Screen ............................................ 48
Warranty Statement ................................................ 49
Technical Su ort.................................................... 50
Maintenance Service ............................................... 50
Federal Regulations................................................. 51

1
Preface
We appreciate your purchase of the HOLUX motor ike
navigation.
Please read all instructions thoroughly for a full
understanding of the products’ features.
Co yright
Without the written consent of HOLUX Technology, Inc, this
manual, including the product and the software, may not e
duplicated, transmitted, recorded or saved on storage
devices. Furthermore, it shall not e translated under any
circumstances into any other languages.
Copyright ©2012 HOLUX Technology, Inc. All rights
reserved.

2
Precautions and Notices
Please thoroughly read this manual of operating instructions
and explanations. Only use original factory approved
atteries and accessories to prevent unexpected damage. If
the correct procedures were not followed for operation or
incompati le accessories were connected, this is a violation
of the warrantee agreement and will automatically void the
warrantee. This may also cause personal safety issues.
• For your own safety, do not operate the controls of the
product while driving.
• Use this product prudently. The product is intended to
e used only as a navigation aid. It is not for precise
measurement of direction, distance, location or
topography.
• The calculated route is for reference only. It is the user's
responsi ility to follow the traffic signs and local
regulations along the roads.
• GPS is operated y the United States government, which
is solely responsi le for the performance of GPS. Any
change to the GPS system can affect the accuracy of all
GPS equipments.
• When you are inside a tunnel or uilding, GPS
positioning is not availa le.
• A minimum of 4 GPS satellite signals is needed to
determine current GPS position. Signal reception can e
affected y situations such as ad weather or dense
overhead o stacles (e.g. trees and tall uildings).
• Other wireless devices in the vehicle might interfere with
the reception of satellite signals and cause the reception
to e unsta le.

3
Package Contents
Device and Main Accessory
Your product should include the following accessories:
GPSmile 61CS Cradle
DC-DC Adapter Car Charger
Screw kit (main accessory)

4
Motorbike RAM Mount Accessory
(O tional)
1. U- olt Rail Mount 2. Device Base Plate
3. Motorcycle Handle ar
Base 4. Dou le Socket Arm
5. Plastic Cushion 6. Square Ru er Neck
7. Screw kit ( olts, washers, spacers, nuts for motor ike
RAM mount)
Optional accessory
Bluetooth headset
1
3
4
2
5
6
7

5
Basic O eration
Introduction
Front View
Rear View
Main menu
utton
4.3’’ LCD
touch screen
Power utton
Micro SD card slot
(Under attery
cover)
Mini-USB connector
(Under attery
cover)
Battery cover

6
Accessories
Cradle
I/O
interface
I/O
cap
Screw

7
Getting Started
Install Cradle
1. Loosen the screw of
cradle top.
2. Open the cap of
cradle top.
3. Open the I/O cap.
screw

8
4. Insert the device
concave into the
cradle ta s.
※ Please make sure
the I/O pin is not wet
or dirty.
5. Slide the GPS into
the cradle fitting
holes to secure.
6. Make sure the
device is tightly
fixed with the
racket, and gently
close the cradle
cap.
7. Tighten the screw.
C
oncave
T
a

9
Remove Cradle
1. Loosen the screw of
cradle top.
2. Open the cradle
cap and remove the
device.
3. Restore the I/O cap

10
Install motorcycle RAM mount
(O tional)
「A」Device Base Plate
「B」Dou le Socket
Arm
「C」Motorcycle
Handle ar Base
Thread the olts and
nuts (screw kit of main
accessory) to attach
the「A」to cradle.
Tighten the nuts to
secure the「A」.
A
A
B
C

11
There are two solutions to install Motorcycle RAM mount:
「motorcycle handle ar」or 「rake/ clutch」.
Method 1:
To install at
handlebar with U-
bolt
(1) 「U- olt」slip into
「Square ru er
Neck」to protect
the handle ar from
scratching.

12
(2) Place the U- olt
around the
handle ar, and
thread the ends
through the 「C」.
(3) To avoid slip, place
「plastic cushion」
etween「U- olt」
and handle ar.
(4) Tighten the nuts to
secure the ase. Do
not over tighten.
C

13
Method 2:
To install at
clutch/brake clam
bracket
(1) Remove the two
factory olts on
your clutch/ rake
clamp racket.
(2) Thread the new
olts (Screw kit of
RAM mount)
through the
washers,「C」,
spacers, and clamp
racket.
(3) Tighten the olts to
secure the ase.
※ There are long
(QTY.2) and short
(QTY.2) olts in RAM
mount screw kit,
please select that you
need to install.
After install the「C」at proper location, install other
components.

14
Attach the all of the
「C」with one side of
「B」.
Align the all of the
「A」with the other
side of「B」.
Tighten the kno
slightly.
B
C
A
B

15
(1) Adjust「A」and
「C」for etter
viewing and
operation.
(2) Tighten the kno of
「B」to secure the
mount.
For your riding safety,
please loosen the kno
of「B」to adjust the
screen for etter
viewing and operation.
After confirm the
viewing, tighten the
kno of「B」to secure
the mount.
Remind you: do not
operate the device
when you ride.
※ Note:
Damage due to modifications, improper installation,
road hazards or accident, are not covered. HOLUX does
not lia le for any injury, loss, or damage, direct or
consequential, arising out of improper installation, or
ina ility to use product.
B
C
A

16
Install/ Remove Battery
Please make sure the attery is installed efore using the
device.
1. Open the attery
lid.
2. Install or Remove
the attery.
3. Restore the attery
lid.
Printing side
facing up
Table of contents
Other Holux GPS manuals

Holux
Holux GR-86 User manual

Holux
Holux GR-213 User manual

Holux
Holux GPSPORT 245 BIKE - User manual

Holux
Holux M-1200A User manual

Holux
Holux GM-120 User manual

Holux
Holux Tracker-005 User manual

Holux
Holux M-1000 User manual

Holux
Holux M-87 - User manual

Holux
Holux GR-91 SPECIFICATION V0.4 User manual

Holux
Holux GR-86 User manual

Holux
Holux GPSmile240 User manual

Holux
Holux GM-83 User manual

Holux
Holux 236 User manual

Holux
Holux M-1000C - Instruction Manual

Holux
Holux GPSmile 62ASAS Operational manual

Holux
Holux CR-100 User manual

Holux
Holux M-1000C - User manual

Holux
Holux GR-231 User manual

Holux
Holux M-1200XX User manual

Holux
Holux M-1000C - REV 1.1 User manual