Holzworth Instrumentation HA7701A User manual

HA7701A
PHASE NOISE
ANALYZER
User Manual 1.04
Holzworth Instrumentation Inc.
2540 Frontier Ave., Suite 200
Boulder, CO 80301 USA
www.holzworth.com

Page 1of 60
This page intentionally left blank.

Page 2of 60
Table of Contents
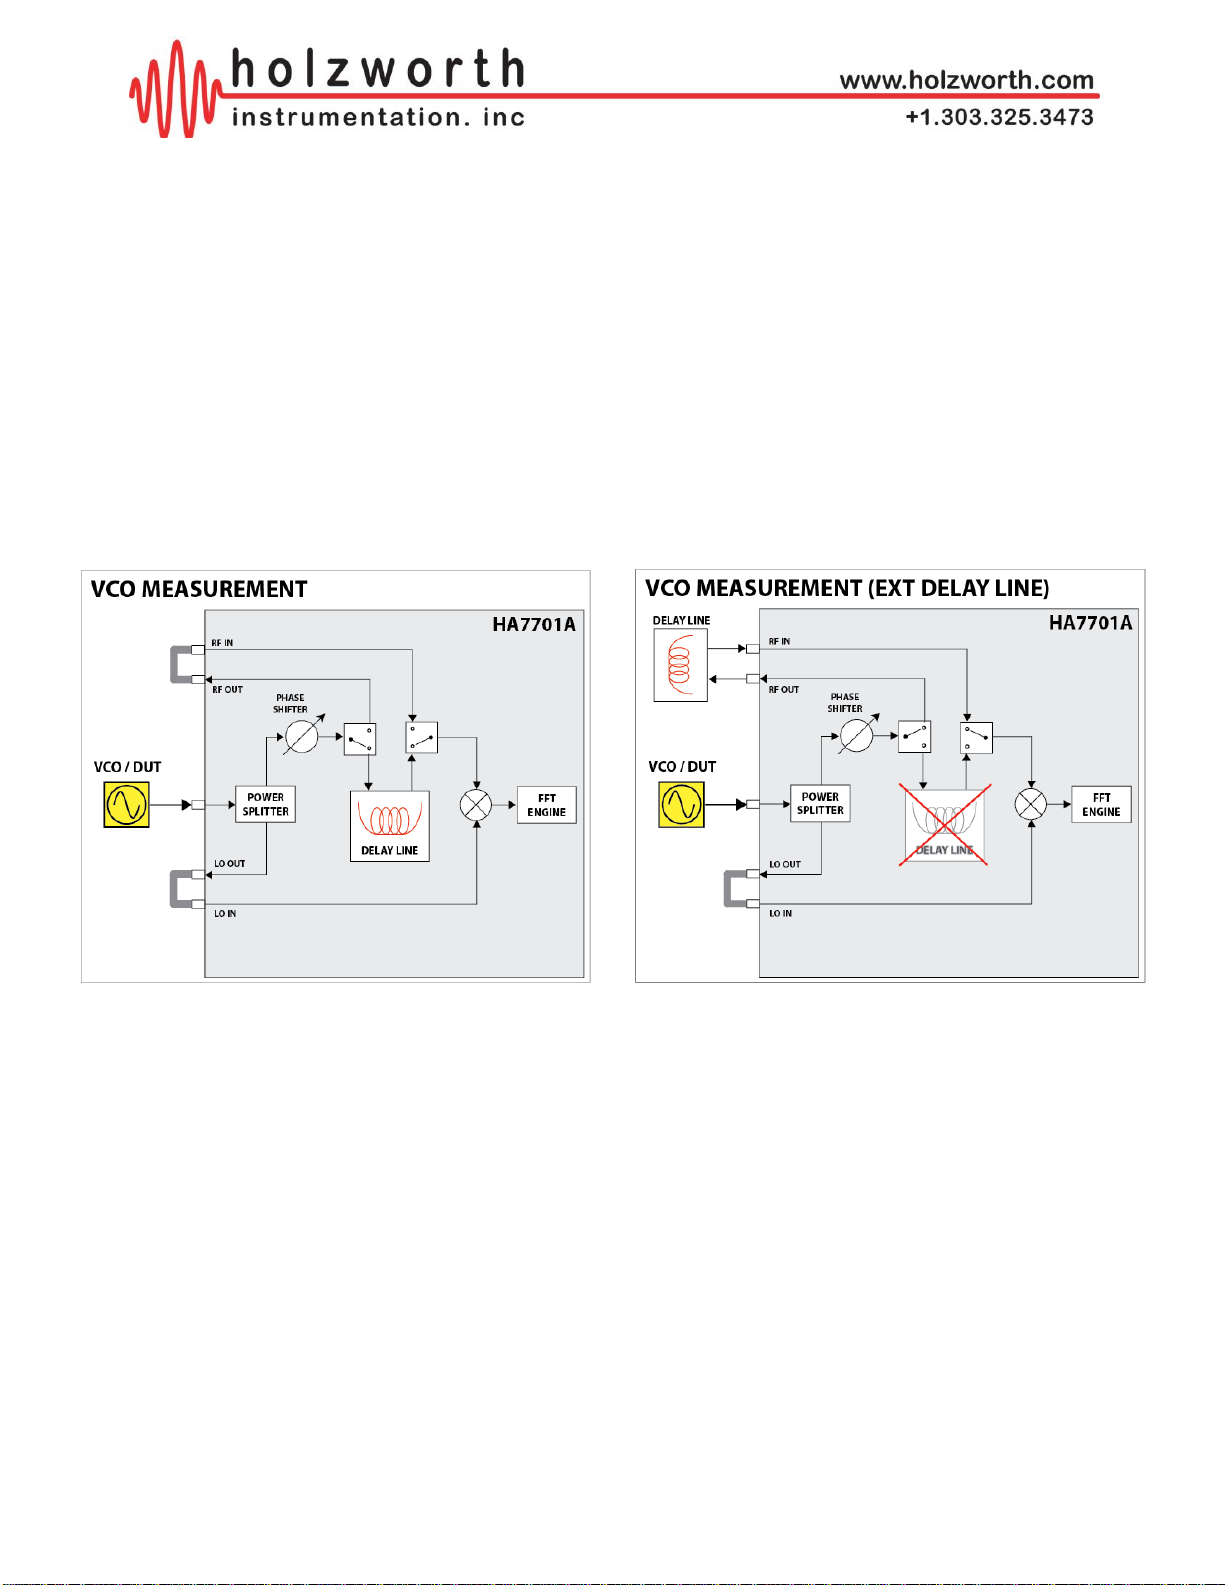
1.0 HA7701A CONFIGURATION SUMMARY................................................................................. 4
2.0 PERFORMANCE SUMMARY................................................................................................... 5
2.1 DUT INPUT (RF SIGNAL INPUT FOR ADDITIVE MODE)....................................................5
2.2 SUPPLY & TUNE VOLTAGE................................................................................................ 5
2.3 PHASE NOISE MEASUREMENTS.......................................................................................5
2.4 INPUT DAMAGE THRESHOLD.............................................................................................5
2.5 INSERTION LOSS DATA ...................................................................................................... 6
2.5.1 LO Insertion Loss (DUT/Signal Input to Internal Mixer LO port).......................................6
2.5.2 RF Insertion Loss - Absolute Mode (DUT Input to Internal Mixer RF port).......................7
2.5.3 RF Insertion Loss - Additive Mode (Signal Input to RF Mixer)..........................................7
2.5.4 RF Insertion Loss - Additive Mode (Signal Input to RF Output)........................................ 8
2.5.5 RF Insertion Loss - Additive Mode (RF IN to Mixer RF)................................................... 8
2.6 ABSOLUTE MEASUREMENT SENSITIVITY........................................................................9
2.7 ADDITIVE MEASUREMENT SENSITIVITY........................................................................ 11
2.7.1 Additive Measurement Sensitivity (+16dBm LO Power)................................................. 12
2.7.2 Additive Measurement Sensitivity (+13dBm LO Power)................................................. 13
2.7.3 Additive Measurement Sensitivity (+10dBm LO Power)................................................. 14
3.0 PHASE NOISE ANALYZER INSTALLATION ........................................................................ 15
3.1 HARDWARE INSTALLATION............................................................................................. 15
3.2 INSTRUMENT COMMUNICATION..................................................................................... 15
4.0 HOLZWORTH PNA SOFTWARE APPLICATION.................................................................. 16
4.1 USB, RS-232, AND GPIB COMMUNICATION..................................................................... 17
4.1.1 GPIB COMMUNICATION.............................................................................................. 17
4.1.2 DETERMINING INSTRUMENT VIRTUAL COM PORT................................................. 18
4.2 ETHERNET COMMUNICATION.......................................................................................... 19
4.2.1 LAN CONNECTION...................................................................................................... 19
4.2.2 DIRECT PC CONNECTION (DHCP)............................................................................. 19
4.2.3 ASSIGNING A STATIC IP ADDRESS........................................................................... 20
4.3 GUI OVERVIEW.................................................................................................................. 22
4.4 FIRMWARE UPDATES........................................................................................................ 24
4.5 MEASUREMENT................................................................................................................. 25
4.5.1 MEASUREMENT SETUP.............................................................................................. 25
4.5.2 FREQUENCY SPAN (OFFSET ADJUSTMENT)........................................................... 26
4.5.3 TRIGGER/AVERAGING/BANDWIDTH ......................................................................... 26
4.6 INPUTS ............................................................................................................................... 27
4.7 OUTPUTS............................................................................................................................ 27
4.8 ACQUIRING DATA.............................................................................................................. 28
4.9 TRACE/CALCS.................................................................................................................... 28
4.9.1 SMOOTHING................................................................................................................ 29

Page 3of 60
4.9.2 SPUR DISPLAY............................................................................................................ 29
4.9.3 RIGHT CLICK FUNCTIONS.......................................................................................... 30
4.10 MARKERS......................................................................................................................... 31
4.11 LIMITS (Pass/Fail Limit Lines) ........................................................................................... 32
4.11.1 LIMIT CONTROLS & CONFIGURATION .................................................................... 32
4.12 DISPLAY............................................................................................................................ 33
4.12.1 PLOT DISPLAY RANGES........................................................................................... 33
4.12.2 PLOT DISPLAY OPTIONS.......................................................................................... 33
4.12.3 PLOT DISPLAY LABELS ............................................................................................ 34
4.12.4 MISCELLANEOUS OPTIONS..................................................................................... 34
4.13 FILE MENU........................................................................................................................ 35
4.13.1 SAVE/LOAD DATA (HOLZWORTH TRACE FILE, .HTF)............................................ 35
4.13.2 IMPORT/EXPORT DATA (COMMA SEPARATED VALUE, .CSV) .............................. 35
4.13.3 GENERATE REPORT................................................................................................. 35
4.13.4 EXPORT PLOT AND PRINT....................................................................................... 35
4.14 SYSTEM MENU................................................................................................................. 36
5.0 MEASUREMENT EXAMPLES & GUIDELINES ...................................................................... 37
5.1 ABSOLUTE MEASUREMENT ............................................................................................. 37
5.2 ADDITIVE MEASUREMENT................................................................................................ 39
6.0 CONTACT INFORMATION .................................................................................................... 42
APPENDIX A: ASCII PROGRAMMING COMMANDS .................................................................. 43
APPENDIX B: ETHERNET CONFIGURATION COMMANDS....................................................... 56
APPENDIX C: GPIB CONFIGURATION COMMANDS................................................................. 58

Page 4of 60
1.0 HA7701A CONFIGURATION SUMMARY
A simplified block diagram of the HA7701A internal configuration is shown below. The HA7701A
was designed to accommodate two measurement modes, Absolute and Additive. The signal path is
internally switched to route the signal path for the selected measurement mode.
Absolute measurements utilize a delay line discriminator to allow for measurement of less stable
sources, such as free running VCO's. Additionally, the configuration allows for use of an external
delay line so that users can optimize the measurement for different DUT's.
Additive measurements bypass the internal delay line and route signal to the RF output on the front
panel where the DUT will be placed in the system. Care must be taken to optimize the power levels
presented at the internal mixer and also to account for phase shift caused by the DUT or lengths of
RF cable that are used in the measurement setup.

Page 5of 60
2.0 PERFORMANCE SUMMARY
The HA7701A is designed for high speed and precise phase noise measurements. The
specifications outlined here capture the baseline performance and features that are currently
available from the HA7701A phase noise analyzer.
2.1 DUT INPUT (RF SIGNAL INPUT FOR ADDITIVE MODE)
DESCRIPTION
SPECIFICATION
DUT Input Connector
SMA (female), 50 ohm
DUT Input Frequency Range
2GHz to 20GHz
DUT Input Power Level
+17 dBm to +24 dBm (frequency dependent , refer to section 2.4)
2.2SUPPLY & TUNE VOLTAGE
DESCRIPTION
SPECIFICATION
DUT Tune Voltage
Voltage Tune Range
Max Current
For Vcc control of some DUTs
0V to +20V
5mA
DUT Power Supply
Voltage Supply Range
Maximum Current
Integrated power supply
0V to +12V
500mA
2.3 PHASE NOISE MEASUREMENTS
DESCRIPTION
SPECIFICATION
Carrier Frequency Range
2GHz to 20GHz
Measurement Parameters
SSB Phase Noise
Offset Frequency Range
1 Hz –40 MHz (Settable to 0.1Hz Offset)
Absolute Measurement
VCO/RF Source measurement. Use internal or external delay line
Additive Measurement
Multi-port device measurement (amplifier, downconverter, etc.)
Spurious Analysis
Provides spurious performance data based on a user settable Spur Threshold
2.4 INPUT DAMAGE THRESHOLD
The HA7701A internal mixer (phase detector) will be the point of failure due to excessive RF power.
DESCRIPTION
SPECIFICATION
Phase Detector Damage Level
+23dBm @ 25C (derated linearly to +20dBm @ 100C)
The following section's insertion loss data should be used to set power levels for measurements
and ensure that the internal phase detector is not damaged due to excessive RF power.

Page 6of 60
-9
-8
-7
-6
-5
-4
2000 5000 8000 11000 14000 17000 20000
Loss (dB)
Frequency (MHz)
2.5 INSERTION LOSS DATA
Data in this section outlines the insertion loss through the signal pathways internal to the
instrument. Driving the internal mixer (phase detector) with appropriate power levels is essential to
both Absolute and Additive phase noise measurement modes.
2.5.1 LO Insertion Loss (DUT/Signal Input to Internal Mixer LO port)
Internal Mixer LO Drive Level: +10 to +16 dBm
NOTE: The loss through this path is shown as measured with the supplied copper jumper cable
installed connecting LO OUT to LO IN.

Page 7of 60
-24
-23
-22
-21
-20
-19
-18
-17
2000 5000 8000 11000 14000 17000 20000
Loss (dB)
Frequency (MHz)
-15
-14
-13
-12
-11
-10
-9
-8
-7
-6
-5
2000 5000 8000 11000 14000 17000 20000
Loss (dB)
Frequency (MHz)
2.5.2 RF Insertion Loss - Absolute Mode (DUT Input to Internal Mixer RF port)
The data below represents the insertion loss in Absolute (Delay Line) measurement mode with the
HA7701A internal delay line.
2.5.3 RF Insertion Loss - Additive Mode (Signal Input to RF Mixer)
NOTE: The loss through this path is shown as measured with the supplied copper jumper cable
connecting RF OUT to RF IN.

Page 8of 60
-6
-5.5
-5
-4.5
-4
-3.5
-3
2000 5000 8000 11000 14000 17000 20000
Loss (dB)
Frequency (MHz)
-9
-8
-7
-6
-5
-4
-3
-2
2000 5000 8000 11000 14000 17000 20000
Loss (dB)
Frequency (MHz)
2.5.4 RF Insertion Loss - Additive Mode (Signal Input to RF Output)
NOTE: Account for the loss in this path to ensure an appropriate input power level is set for the
DUT.
2.5.5 RF Insertion Loss - Additive Mode (RF IN to Mixer RF)

Page 9of 60
2.6 ABSOLUTE MEASUREMENT SENSITIVITY
Absolute measurement sensitivity is inherently affected by delay line length. Sensitivity can be
optimized for different DUT's by using an external delay line. This section will demonstrate the
effect of the delay line on the measurement sensitivity and useful offset frequency.
Consider the measurement offset frequency range of concern for the DUT when determining
whether an external delay line is necessary. As delay line length increases, performance is
increased at lower offset frequencies, however the maximum useful offset frequency is reduced.
The opposite is also true: as delay line length decreases the performance is decreased at lower
offsets, however performance at higher offset frequencies is increased. The following measurement
illustrates the affect of different delay line lengths on Absolute phase noise measurements.
The example measurements uses an ultra low phase noise Holzworth HSM synthesizer as the
DUT. The hardware configurations are shown in the block diagrams below.
Measurement details and results begin on next page...

Page 10 of 60
Measurement Details:
DUT Information
DUT
Holzworth HSM18001B Synthesizer
Frequency
14GHz
Power
+20dBm
Measurement Results:
14GHz - Holzworth HA7062C (blue trace): Used as a reference, this trace shows the HSM18001B phase noise as measured
with the Holzworth HA7062C Phase Noise Analyzer, which uses the 'PLL Method' and thus requires the DUT be relatively stable
for phase locking. The PLL method is ideal for lower noise DUT's and measurements across a very wide frequency offset range,
but it cannot measure sources that tend to be noisier. Without the limitation of a delay line the HA7062C is able to measure the
HSM18001B phase noise across the entire 10Hz - 40MHz offset range and provide a baseline for this demonstration.
14GHz INT Delay Line - HA7701A (red trace): With the internal delay line in use (T = 19.5ns), the HA7701A was able to
measure the HSM18001B phase noise at approximately 1MHz offset and beyond. At < 1MHz offset the delay line limits the
measurement sensitivity.
14GHz EXT Delay Line - HA7701A (orange trace): With an external delay line now in use (T = ~120ns), it can be seen that the
measurement sensitivity improved by approximately 10-20dB depending on offset frequency, however the first measurement null
can now be seen at ~10MHz offset.
Longer Delay Lines
Shorter Delay Lines
Greater sensitivity at lower offset freq's
Reduced sensitivity at lower offset freq's
Lower useful measurement offset freq
Higher useful measurement offset freq

Page 11 of 60
2.7 ADDITIVE MEASUREMENT SENSITIVITY
Additive measurement sensitivity (noise floor) is affected by the power levels achieved at HA7701A
internal mixer. Careful approach is required to ensure suitable measurement sensitivity for the DUT.
This can be demonstrated with the hardware configuration below.
The following measurements used an amplified 2.78GHz VCO as a source and show the change in
sensitivity for different LO drive levels, and as the attenuator in the RF path is varied.
Initially +21dBm was driven into the DUT Input port in order to achieve +16dBm at the mixer LO
port. From there the power was adjusted in order to show the effect of LO drive level on
measurement sensitivity. Attenuation was also varied in the RF path to completely illustrate the
effect of signal power on phase detector sensitivity.
Measurement details and results begin on next page...

Page 12 of 60
2.7.1 Additive Measurement Sensitivity (+16dBm LO Power)
Measurement details:
Measurement Statistics
DUT
ZCOMM VCO
Frequency
2.78GHz
DUT Pwr
+21dBm
LO Pwr
+16dBm
RF Pwr
+13dBm (no attenuation)
-7dBm (20dB attenuation)
Measurement results:

Page 13 of 60
2.7.2 Additive Measurement Sensitivity (+13dBm LO Power)
Measurement details:
Measurement Statistics
DUT
ZCOMM VCO
Frequency
2.78GHz
DUT Pwr
+18dBm
LO Pwr
+13dBm
RF Pwr
+10dBm (no attenuation)
-10dBm (20dB attenuation)
Measurement results:

Page 14 of 60
2.7.3 Additive Measurement Sensitivity (+10dBm LO Power)
Measurement details:
Measurement Statistics
DUT
ZCOMM VCO
Frequency
2.78GHz
DUT Pwr
+15dBm
LO Pwr
+10dBm
RF Pwr
+7dBm (no attenuation)
-13dBm (20dB attenuation)
Measurement results:

Page 15 of 60
3.0 PHASE NOISE ANALYZER INSTALLATION
This section outlines the basic requirements and procedures for the HA7701A Phase Noise
Analyzer hardware and software installation.
The hardware purchase includes a C++ compiled GUI for hardware operation and viewing/saving
data.
The HolzworthPNA software application is included on the thumb drive that ships with the
HA7701A. If the thumb drive is missing another can be mailed or the software can be downloaded
after contacting Holzworth support via email at: support@holzworth.com or by phone at
+1.303.325.3473 (option 2).
The HA7701A performs all data processing internally. Measurement settings can be changed
using serial commands sent to the HA7701A using any of the included communication options.
Alternatively, measurement results can be read from the instrument directly without requiring a
specific operating system. This capability provides unparalleled operational flexibility.
3.1 HARDWARE INSTALLATION
Prior to initializing the analyzer, connect the standard AC power
cable between an AC outlet and the rear panel AC inlet. The
instrument is shipped with the appropriate power cord for the final
destination country/region.
The master power switch located at the right side of the front panel
is equipped with a blue indicator light which illuminates when the DC
power is active.
3.2 INSTRUMENT COMMUNICATION
The HA7701A comes with USB, Ethernet, RS-232 and GPIB communication standard. All
communication ports are accessible from the rear panel of the instrument.
HA7701A Communication Ports

Page 16 of 60
4.0 HOLZWORTH PNA SOFTWARE APPLICATION
NOTE: The HA7701A application GUI does not require any driver installation. Simply run the
Holzworth7701 executable file to launch the software.
Analyzer GUI Application Folder

Page 17 of 60
4.1 USB, RS-232, AND GPIB COMMUNICATION
With the HA7701A USB and RS-232 communication are handled similarly in Windows. USB
communication requires FTDI drivers. Windows should install these drivers automatically when the
instrument is connected to the computer via USB. If the instrument is not recognized, Windows
may need to install updated USB drivers. These are also included on the thumb drive that ships
with the instrument.
Click the Devices button on the right side of the GUI, followed by the Locate Devices button in the
menu:
The software will then scan for instruments connected via Ethernet and via serial port. It will display
serial port devices as shown below:
Identify your instrument by either serial # or COM port and select it. If the connection is successful
the window above 'Devices' will turn blue to indicate a USB connection, and it will display the
instrument serial number:
4.1.1 GPIB COMMUNICATION
Appendix C contains ASCII commands that can be used to configure the HA7701A GPIB settings.

Page 18 of 60
4.1.2 DETERMINING INSTRUMENT VIRTUAL COM PORT
The COM port associated with the USB connection to the HA7701A can be manually located using
the Windows Device Manager. Steps to do this are as follows.
STEP ONE
Open the Windows Control
panel from the start menu.
Click on "Hardware and
Sound"
STEP TWO
Under "Devices and Printers,"
select Device Manager
STEP THREE
Under Ports (COM & LPT)
locate COM port associated
with the HA7701A (identified as
"USB Serial Port")

Page 19 of 60
4.2 ETHERNET COMMUNICATION
Ethernet communication can be established with the HA7701A by connecting the instrument to a
local area network or directly to a PC. Locating the instrument is handled differently depending on
the method of connection and DHCP settings that have been assigned. By default, the HA7701A is
set to utilize DHCP when connected over a network. A TCP/IP socket is always opened using port
9760.
4.2.1 LAN CONNECTION
Communication with the HA7701A over a LAN connection defaults to the use of DHCP. If
connected to a network with no DHCP server the HA7701A will default to the IP address of
169.254.117.11 and the instrument will need to be assigned an appropriate static IP address for the
network. This default DHCP address can be used with the Console window or the Holzworth
Ethernet Finder software to assign static network settings to the instrument.
To search for devices, click the Devices button and then click Locate Devices in the sub-menu.
The software will then scan for instruments connected via Ethernet by sending out a UDP
broadcast via port 30303. It will display detected Ethernet devices as shown below. Identify the
instrument by either serial # or IP address and select it. If the connection is successful the window
above 'Devices' will turn green (Ethernet) and display the instrument serial number:
Users can also enter the instruments IP address manually to connect. Enter the IP address into the
'Device IP Address' field and then press the Connect button.
4.2.2 DIRECT PC CONNECTION (DHCP)
When the HA7701A is connected directly to a PC and it is set to DHCP, the instrument's default IP
address is: 169.254.117.11
Table of contents
Other Holzworth Instrumentation Measuring Instrument manuals
Popular Measuring Instrument manuals by other brands

Fuji Electric
Fuji Electric ZKJ7-5 instruction manual

Sola
Sola PROTON Series operating instructions

Envertech
Envertech EnverBridge EVB202 User's operating manual

VWR
VWR AVANTOR IS 2100 L operating manual

Analytical Technology
Analytical Technology Q46F/82 manual

Precision Digital Corporation
Precision Digital Corporation Loop Leader PD6600 Series instruction manual