Home Aide Diagnostic Easy Trak II G-425-3 User manual

Blood Glucose Meter
Model: G-425-3
User Manual
Distributor:
HOME AIDE DIAGNOSTICS, INC.
1072 S. Powerline Rd.
Deerfield Beach, FL 33442
ww.homeaide.us
1-800-915-0116 Easy Trak II
Blood Glucose Monitoring System

Changes or modifications not expressly approved by
the party responsible for compliance could void the
user's authority to operate the equipment.
If this equipment does cause harmful interference to
radio or television reception, which can be determined
by turning the equipment off and on, the user is
encouraged to try to correct the interference by one or
more of the following measures:
-- Reorient or relocate the receiving antenna.
-- Increase the separation between the equipment and
receiver.
-- Connect the equipment into an outlet on a circuit
different from that to which the receiver is connected.
-- Consult the dealer or an experienced radio/TV
technician for help.

BEFORE YOU BEGIN……………………………………………5
ABOUT YOUR SYSTEM…………………………………………6
INTRODUCTION TO THE SYSTEM……………………..6
ABOUT ALTERNATIVE SITE TESTING (AST)………………..7
CONTENTS OF THE KITS………………………………………9
SETTING THE METER AND DELETING THE MEMORY......13
1. Memory Function …………………………………..…..13
2. Deleting the Memory…………………………………..13
THE TWO MEASURING MODES……………………………..13
TESTING WITH BLOOD SAMPLE…………………………….14
Comparing Meter and Laboratory Results……………..20
CONTROL SOLUTION TEST………………………………….21
CARE AND STORAGE FOR YOUR SYSTEM………………23
Cleaning and Disinfection……………………………….23
METER SPECIFICATION………………………………………24
DISPLAY MESSAGE………………………………………..….27
……………………..….……..….30
……………..….31
……..….…………..….………..…32
1
.
Do not place the device in liquid, nor put it where it could fall
into liquid.
2
.
3
. Use the device only for the intended use described in this
manual.
4.
Do not use adjunct which are not supplied by the producer.
5
.
Do not make the device come into contact with surfaces
which are too hot to touch.
6.
Do not use the device where aerosol sprays are being used.
7.
Do not use the device if it is not working properly, or if it has
been damaged.
8.
Read all the manual, and practice the test, and then use the
product to test your blood glucose. Do all quality control
checks as directed and consult with a diabetes expert.
DANGER - Misuse of this electrical device can cause
electrocution, burns, fire and other HAZARDS.
Basic safety precautions should always be taken, including
all those listed below.
Close supervision is necessary when equipment is used by,
on, or near children, handicapped persons or invalids.
KEEP THE INSTRUCTIONS IN A SAFE PLACE
Performance Characteristics
ELECTRIICAL AND SAFETY STANDARDS
SYMBOLS INFORMATION
9.Do not use the expired blood glucose test strips and sterile
lancet.
Disregard of these notices will void warranty.

BEFORE YOU BEGIN
Installing the battery
2. If replacing the batteries, please remove the used batteries.
3. Insert 2 new (AAA) batteries with correct +/- direction.
4. Close the battery cover.
Environment Protection – Waste electrical products should not
be disposed of with household waste. Please recycle where
facilities exist. Check with your local Authority or retailer for
recycling advice.
■The system is intended for use outside the body (in vitro
diagnostic use). It is for single-patient use. It should be used only
for testing glucose (sugar) and only with fresh capillary whole
blood samples taken from the finger and the alternative sites
including the palm, the forearm.The system is intended for use
at home. It should not be used for the diagnosis of diabetes or
for the testing of newborns.
■The System is to be used by a single person and should not be
shared.
■The System is intended for self-testing outside the body (in vitro
diagnostic use) by people with diabetes at home as an aid to
monitor the effectiveness of diabetes control. The System should
not be used for the diagnosis of or screening for diabetes, nor for
neonatal use. Alternative site testing should be done only during
steady–state times (when glucose is not changing rapidly).
■The “
Easy Trak II
” Test Strips are for use with the Easy Trak II
Meter to quantitatively measure glucose in fresh capillary
whole blood samples drawn from the fingertips, palm and
forearm.
■The control solutions is intended for use with Easy Trak II
System, to check that the glucose meter and test strips are
working properly and that you are doing the test correctly. These
solutions contain a known range of glucose, as indicated on the
strips vial bottles.
1. Open the battery cover on the back of meter.

AST in this system can be used only during steady-state blood
glucose conditions described in the section of “About AST”.
Test principle
The test is based on the measurement of electrical current gen-
erated by the reaction of glucose with the reagent of the strip. The
meter measures the current and displays the corresponding blood
glucose level. The strength of the current produced by the reaction
depends on the amount of glucose in the blood sample.
ABOUT ALTERNATIVE SITE TESTING (AST)
Important: There are limitations for doing AST.
Please consult your healthcare professional before you do AST.
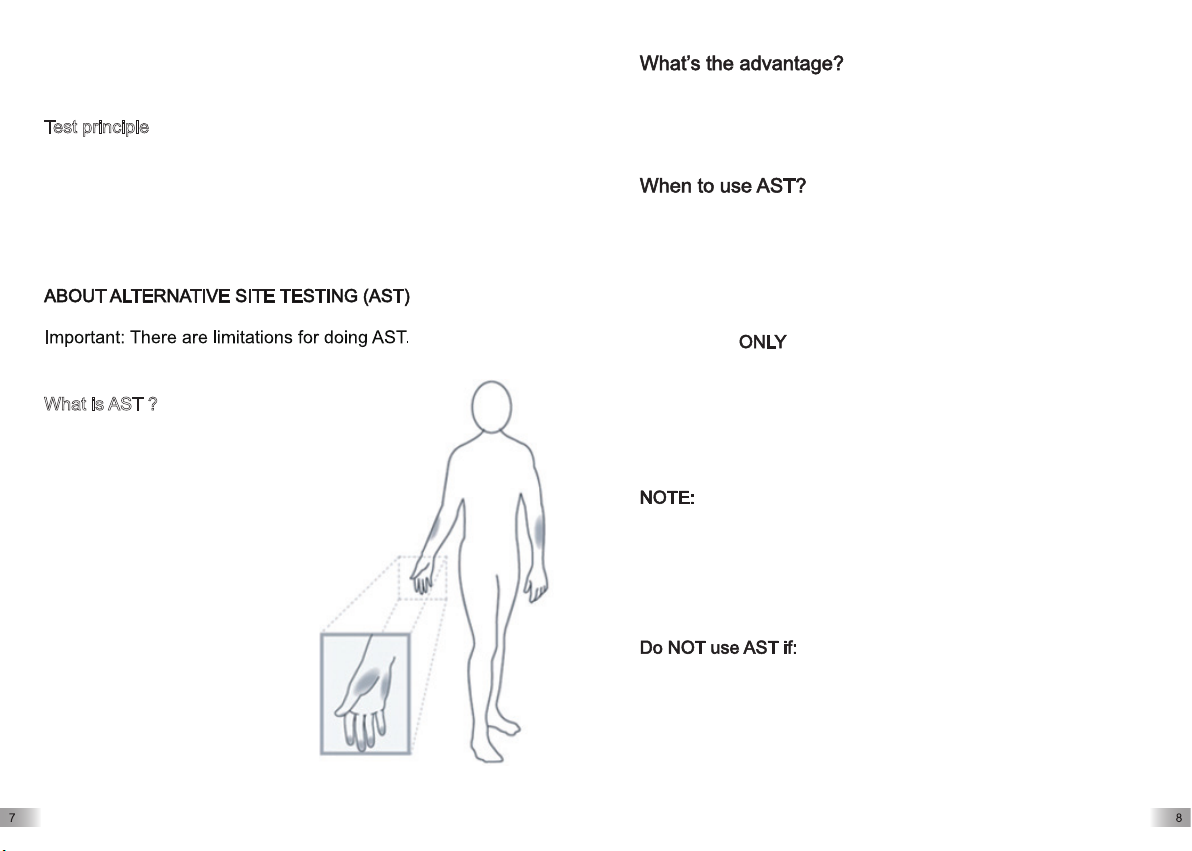
What is AST ?
Alternative site testing (AST)
means that people use parts of the
body other than the fingertips to
check their blood glucose levels.
This system allows you to test on
the palm, the forearm with the
equivalent results to fingertips
testing.
Fingertips feel pain more readily because they are full of nerve
endings (receptors). At other body sites, since nerve endings are
not so condensed, you will not feel as much pain as at the fingertip.
Food , medication , illness, stress and exercise can affect blood
glucose levels. Capillary blood at fingertip reflects these changes
faster than capillary blood at other sites. Therefore when testing
blood glucose during or immediately after meal, physical exercise,
or any other event, take a blood sample from your finger only.
You do AST in the following instances:
● In a pre-meal or fasting state (more than 2 hours since the
last meal).
● Two hours or more after taking insulin.
● Two hours or more after exercising.
■ Alternative site testing(AST) should not be used to calibrate
continuous glucose monitoring systems (CGMs).
■ Results from alternative site testing should not be used in
insulin doses calculations.
● You think your blood glucose is low.
● You are unaware of hypoglycemia.
● You are testing for hyperglycemia.
● Your AST results do not match the way you feel.
● Your routine glucose results are often fluctuating.

User Manual
■ A Meter
■
If any items are missing from your kit or opened prior to use,
please contact local customer services or place of purchase for
assistance.
2
4
6
1
1
3
5
MEASUREMENT UNIT
Appears with the test
result in mg/dL
BLOOD DROP SYMBOL
Flashes when it is ready
to apply the blood sample
TEST RESULT AREA
Displays glucose results
3
5
2
DAY AVERAGE
Indicate that the displayed
test result is an average
value
6
4
CTL SYMBOL
Appears when doing a
control test and indicates
that the result won't be
stored in the memory.
LOW BATTERY
SYMBOL
Appears when the battery
power is low

Blood Glucose Meter
STRIP PORT
Where you insert the test strip. The meter will turn on
automatically
STRIP EJECTOR
Slide forward to eject the test strip after test
LCD DISPLAY
It guides you through the test using symbols and simple
messages
1
3
4
2
1
3
2
4“M” BUTTON
It is used to turn on the meter, enter the memory mode
Test Strip
Each strip can be used only once. The test strip consists of the
following parts:
Absorbent Hole
Apply a drop of blood here. The blood will be
drawn in automatically.
Confirmation window
This is where you confirm if enough blood has
been applied to the absorbent hole of the strip.
Test Strip handle
Hold this part to insert the strip into the slot.
Contact bars
Insert this end of the test strip into the meter.
Push it in firmly until it will go no further.
Attention!
Test results might be wrong if the contact
Bar is not fully inserted into the test slot.
The front side of the test strip should face
up when inserting the test strip.

Short press "M" button, then device will appear the most recent
test result after full display for 1 Sec.;Short press "M" button to
appear the next most recent test result, you can use such way
to review all 20 memories.
1. Memory Function:
THE TWO MEASURING MODES
The meter provides you with two modes for measuring, General
and CTL. The CTL mode should be used when a control solution
is being tested. See the table below.
CTL testing with the control solution
You can switch between each mode by:
1. Start with the meter turned off. Insert a test
strip to turn on the meter, the screen will dis-
play a flashing blood drop.
2. Press “M” to select General or CTL mode.
TESTING WITH BLOOD SAMPLE
o reduce the chances of infection:
● Choose a clean, dry work surface.
●
● Always use a new and sterile lancet. Lancets are for single
use only.
●
● Avoid getting lotion、oils、dirt or debris in or on the lancet
and lancing device.
Note: Before testing, please read the following steps thoroughly
and carefully, please relax and do the test step by step. Simplif-
ying or changing the test procedure may produce inaccurate
results.
2.Deleting the memory
Press and hold "M" button for 5 seconds,
device will appear "Del", release "M" button,
"Del" will flash, press "M" button within 5
seconds to delete all memories, otherwise
device will turn off.

If your lancing device differs from the one shown here, please
refer to the manufacturer’s manual to ensure proper usage.
To reduce the chance of infection:
● Never share a lancet or the lancing device.
● Always use a new, sterile lancet. Lancets are for single use
only.
● Avoid getting hand lotion, oils, dirt, or debris when handling
the lancets.
Stimulating blood perfusion by rubbing the puncture site prior to
blood extraction has a significant influence on the glucose value
obtained. Blood from a site that has not been rubbed exhibits a
measurably different glucose concentration than blood from the
finger. When the puncture site was rubbed prior to blood
extraction, the difference was significantly reduced.
On the lancets and the lancing device.
Please follow the suggestions below before obtaining a drop
of blood:
● Rub the puncture site for about 20 seconds before penetration.
● Select the puncture site either at the fingertips or another
body part (please see section “Alternative Site Testing”
(AST) on how to select the appropriate sites).
● Clean the puncture site using cotton moistened with 75%
alcohol and let it air dry.
Overview of a generic Lancig Device

Fingertip testing
Hold the lancing device firmly against the side
of your finger. Press the release button. You
will hear a click, indicating that the puncture
is complete.
Choose a different spot each time you test. Repeated
punctures at the same spot may cause soreness and calluses.
■
■
■
Please consult your health care professional before you
begin AST.
It is recommended to discard the first drop of blood as it
might contain tissue fluid, which may affect the test result.
Performing a Blood Glucose Test
Step 1.
Wash hands with soap and warm water.
Step 2.
Remove a test strip from its vial. With clean, dry hands, you may
touch the test strip anywhere on its surface. Do not bend, cut or
modify the test strips in any way. Remove the test strip from the
vial and use it instantly.
Step 3.
Insert the test strip into the meter's test port and the meter is
turned on.
NOTE: Be sure to use “ G-425-3S ” test strips, other test strips
may not produce accurate results.
Step 4
When the blood drop symbol flashes on the
screen, you may select the appropriate measure-
ment mode, for selecting the measurement mode
of Control(CTL) or General, please refer to the
“THE TWO MEASURING MODES” section.
Step 5
Apply your blood to the absorbent hole of the test strip.
Step 6
As soon as enough blood has filled the confir-
mation window of the test strip, you will hear a
beep letting you know the test has begun. A
countdown of 5 seconds starts.
Note: make sure the confirmation window of the Test Strip is
completely filled with your blood sample.
Step 7
Your blood glucose level, along date and time
appears on the display. Blood glucose results
are automatically stored in the memory.

The results obtained from this meter are plasma-calibrated. This
helps you and your physician or other qualified healthcare
provider to compare your meter results with laboratory tests.
Reference to the instructions given by your physician or other
qualified healthcare provider, do not deviate from these instructions
on the basis of the result without first consulting your physician.
Step 8
Eject the used test strip and remove the lancet. To
eject the test strip, point the strip at a disposal
container for sharp objects. The meter will switch
itself off automatically after the test strip is ejected.
Please wash hands thoroughly with soap and
water after handling the meter, lancing device, or
test strips.
Reference value:
Time of day People without diabetes
Before breakfast (fasting) <100 mg/dL
Two hours after meals <140 mg/dL
Source: American Diabetes Association. Standards of Medical
Care in Diabetes-2012.Diabetes Care 2012,35(Suppl.1)S11-S63.
Please work with your doctor to determine a target range that
works best for you.
The meter provides you with plasma-equivalent results. The
result you obtain from your meter may differ somewhat from your
laboratory result due to normal variation. Meter results can be
affected by factors and conditions that do not affect laboratory
results in the same way. To make an accurate comparison
between meter and laboratory results, follow the guidelines below.
Before going to the lab:
■ Do a control solution test to make sure that the meter is
working properly.
■ Fast for at least eight hours and then do comparison tests,
if possible.
■ Take your meter with you to the lab.
While staying at the lab:
Make sure that the samples for both tests test are taken and
tested within 15 minutes of each other.
■ Wash your hands and then obtain a blood sample
■ Never use your meter with blood that has been collected in
a gray top test tube.
■ Use fresh capillary blood only.

CONTROL SOLUTION TEST
Material needed:
● Glucose Meter
● Test strips
● TaiDoc Control solution
When to do a control solution test:
◆ When you suspect that the meter or test strips are not
working properly.
◆ If your blood glucose test results are not consistent with
how you feel.
◆ After the test strips are exposed to extreme conditions.
◆ After dropping the meter.
The control solution is to check that the meter and the test
strips can work together as a system and work correctly.
Step 1
Insert the test strip to turn on the meter. Insert the test strip into
the meter. Wait for the meter to display the drop symbol.
Step 2
You may press “M” button to select CTL mode, for
selecting the CTL mode, please refer to the “THE
TWO MEASURING MODES” section.
Step 3
Apply the control solution
Shake the control solution vial thoroughly before use.
Squeeze out a drop and wipe it off, then squeeze another drop
and place it on the tip of the vial cap.
Hold the meter to move the absorbent hole of test strip so it
touches the drop. Once the confirmation window fills completely,
the meter will begin counting down.
To avoid contaminating the control solution, do not directly
apply control solution onto a strip.
The result of the control solutions test appears on the display.
The result will not be stored under CTL mode.
The result of the control solutions test should be within the range
printed on the test strip vial label. If the test results falls outside
the specified range printed on test strip vial label, repeat the test.
Results falling outside the specified range may be caused by:
■ Error in performing the test
■ Expired or contaminated Control Solution
■ Expired or contaminated Test Strip
■ Malfunction of your Meter
If you continue to get control solution test results that fall outside
of the range printed on the vial, the system may not be working
properly, Do not use the meter. Please contact your customer
support immediately
NOTE:
Do not use the expired control solution.
Only use the TaiDoc control solution, you can purchase
this product through visits the website: www.taidoc.com

CARE AND STORAGE FOR YOUR SYSTEM
◆ Handle the meter with care. Dropping or throwing the meter
may cause damage to the device.
◆ Don't expose the Blood Glucose Monitoring System, Test strip,
and Control Solution, to extreme conditions, such as high
humidity, heat, freezing cold or dust. The storage conditions
for the test strips are 4°C~30°C, Humidity 10~80%. Storage
conditions for the meter are -20
°C~55°C
, Humidity ≤93%.
◆ Always wash your hands with soap and water and rinse and
dry completely before handling the Blood Glucose Monitoring
system and Test strip.
◆ Use CaviWipes (see below) to clean the Blood Glucose Monit
oring System.
◆ Discard the used lancet into a container for sharp objects.
Cleaning and Disinfection
The cleaning and disinfection is absolutely necessary for
the test procedure, because cleaning can insure the meter
works well (for example, display will be clear to see after
cleaning); and disinfection can avoid the infection to you
or to the other people, and the cross-infection. We strongly
warn that the device should be cleaned and disinfected
following use on every patient. And we suggest you use the
following product: CaviWipes (EPA registration number :
46781-8). You can purchase this product according to the
following information: visit the web site: www.metrex.com or
contact Metrex at 800-841-1428 for product or technical
information. CaviWipes are also available at www.amazon.
com or via a Google search.
The meter for single-patient use and the lancing devices
may be cleaned 5-6 times per day (Test 5-6 times every day),
so the meter will be cleaned and disinfect about 11000 cycles
that include cleanings plus disinfections (1 cycle = 1 cleaning
+ 1 disinfection) during its 5 years life cycle.
1. Before the test, the user should clean and wash hands. If you
are a caregiver, (not the patient), the please use disposable
gloves.
2.
After test, take one wipe to clean the meter’s housing, buttons,
lens, mark, usb cover and support block, including its front and
back for 10 seconds for cleaning until there is no soil on the
surface. Then disinfect the meter’s housing, buttons, lens, mark,
usb cover and support block use another wipe for 2 min, keep
the surface wet for 2 min.
3. Take off the glove; discard carefully according to your health-
care provider’s instruction.
Note:
1. Each disinfection step requires a pre-cleaning step.
2. If the meter is being operated by a second person who is pro-
viding testing assistance to the user, the meter and lancing
device shall be cleaned and disinfected first.
3.
The users should wash hands thoroughly with soap and water
after handling the meter, lancing device, or test strips.
1. Model: G-425-3 (with “ G-425-3S ” test strips and TaiDoc
2. Machine size: 91mm (L)×57mm (W)×22mm(H)
3. Weight: 63g (including batteries)
4. Measuring method: Amperometric technology using glucose
oxidase
control solution)

5. Result range: 20 mg/dL ~600 mg/dL
6. Glucose Units: mg/dL
7. Memory : 20 blood glucose tests
8. Display: LCD display
9. Power source: DC 3V (AAA×2 alkaline batteries)
10. Battery Life: Approx. 500 normal tests
1
1. Storage Condition: Blood glucose Monitoring system (meter
and test strips):
4℃~30℃ , Humidity 10~80%
12. Transport and storage Condition (meter):
-20℃~55℃,
Humidity≤93%
13. Operating conditions:
10℃~40℃ , Humidity≤80%
14. Blood Source: Fresh capillary whole blood
15. Blood Volume: Minimum 0.7 micro liter.
16. Use life: five years
※
※
The blood Monitoring System is not intended for use on neo-
nates.
※ The blood Monitoring System is not intended for use on
artery blood, neonates’ serum and plasma.
※ The Blood Glucose Meter should be used with “ G-425-3S ”
test strip.
※ The system can be used up to an altitude of 10744 feet.
※ The following substances at levels greater than normal or
therapeutic levels may cause significant interference (affect
the result by greater than 10%) resulting in an inaccurate
may affect test results in high concentration. Do not use hae-
molysis sample, icterus sample or high lipemia samples.
result: ascorbic acid, uric acid, hemoglobin,acetaminophen,
Dopamine, L-dopa, L-dopa and Tolbutamide etc. These sub-
stances do not affect test results in normal concentration but
Limitations of use:
※ The following compounds, when determined to in excess of
their limitation, may produce inaccurate results:
Compound Limitation
Acetaminophen ≤8.0mg/dL
Ascorbic Acid ≤5.0mg/dL
Bilirubin ≤90mg/dL
Cholesterol ≤500mg/dL
Creatinine ≤5.0mg/dL
Dopamine ≤2.0mg/dL
EDTA ≤360mg/dL
Galactose ≤900mg/dL
Gentisic Acid ≤5.0mg/dL
Glutathione ≤53mg/dL
Haemoglobin ≤500mg/dL
Heparin ≤8000U/dL
Lbuprofen ≤50mg/dL
Icodextrin ≤13mg/dL
L-dopa ≤10mg/dL
Maltose ≤900mg/dL
Methyldopa ≤3.0mg/dL
Pralidoxime Iodide ≤25mg/dL
Salicylate ≤60mg/dL
Tolazamide ≤100mg/dL
Tolbutamide ≤400mg/dL
Triglycerides ≤2000mg/dL
Uric Acid ≤8.0mg/dL
Xylose ≤100mg/dL
The blood icodextrin concentration higher than 13mg/dL
would interference to the test result.

28
※ Patients undergoing oxygen therapy may yield falsely lower
results.
※ Not for use for patients in a hyperglycemic-hyperosmolar
state, with or without ketosis.
※ Not for use on critically ill patients.
※ Not to be used for patients who are dehydrated, hypertensive,
hypotensive or in shock.
※ Very low (less than 20%) or very high (more than 60%) red
blood cell count (hematocrit) can lead to incorrect test results.
If you do not know your hemarocrit level, please consult your
health care provider.
MESSAGE
WHAT IT MEANS
Blood glucose level is
lower than 20mg/dL
Blood glucose level is
higher than 600mg/dL
Meter is ready to test
control solution under
the CTL state.
Battery power is low.
ACTION
The message indicates
very low blood sugar. You
should consult with your
healthcare professional.
This indicates sever
hyperglycemia (high
blood glucose).
You should seek imme-
diate medical assistance.
Please place a drop of
control solution onto the
test well of test strip.
Please change the
battery.
MESSAGE
WHAT IT MEANS
Use a used test strip.
Error massage indicates
that you may remove the
strip after applying blood
to the absorbent hole.
Pull out strip during the
testing.
Environmental tem-
perature is lower than
10 (50 ) or higher
than 40 (104 )
ACTION
Please use a new strip
and re-test.
Try again with a new
test strip.
Re-test with a new test
strip.
Please test at an envi-
ronmental temperature
Display remains
blank after the
test strip has
been inserted
into the Meter.
1. Battery may be
installed improperly.
2. Battery power is
too low for use.
3. Too much time has
passed between
inserting the Test
Strip and perfor-
ming the test.
1.Install the Battery
correctly.
2.Replace with new
Battery.
3.Reinsert the Test
Strip into the
Meter.
DISPLAY MESSAGE
The meter self-inspection
is failure.
Turn on the meter after
calibration again.

29 30
4. Test Strip has not
been fully inserted
into the Meter.
4. Reinsert the Test
Strip into the Meter.
Test results
are incon
sistent or
Control
Solution test
results are
not within
the specified
range.
1. Not enough sample
in the Test Strip.
2. Test Strip or Control
Solution has expired.
3. Test Strip has been
damaged due to
heat or humidity so
that sample cannot
be applied or the
speed of applying
sample is too slow.
4. System is not per-
forming due to the
environment being
above or below
room temperature.
1. Redo test with new
test strip and make
sure that enough
sample has been
added.
2. Redo test with new
test strip.
3. Perform a Control
Solution test using a
new Test Strip. If
results are still out of
range, replace with
new vial of Test Strips.
4. Bring System to a
room temperature
environment and
wait approximately 30
minutes before per-
forming a new test.
The Meter co-
untdown did
not start.
Test Strip has not
been inserted
correctly.
Use a new Test Strip
and redo the test.
Performance Characteristics
Measurement Precision
Repeatability
Mean (mg/dL) 44.7 102 138 210 330
SD (mg/dL) 3.0 4.4 6.2 7.2 13.1
CV (%) - 4.3 4.5 3.4 4.0
Mean (mg/dL) 47.0 108 348
SD (mg/dL) 3.30 4.2 9.3
CV (%) - 3.9 2.7
Within±5mg/dL Within±10mg/dL Within±15mg/dL
104/180 (57.78%) 168/180 (93.33%) 178/180 (98.89%)
Within±5% Within±10% Within±15%
195/420 (46.43%) 327/420 (77.86%) 411/420 (97.86%)
Within±15 mg/dL or ±15%
589/600 (98.17%)
System Accuracy
For glucose concentrations<100mg/dL
For glucose concentrations≥100mg/dL
For glucose concentrations between 47mg/dL and 548mg/dL
Intermediate precision

31 32
ELECTRIICAL AND SAFETY STANDARDS
This meter complies with CISPR 11: Class B (Radiated Only).
Emissions of the energy used are low and not likely to cause
interference in nearby electronic equipment. The meter has
been tested for immunity to Level 3 electrostatic discharge as
specified in IEC 61326.This meter complies with immunity to
radio frequency interference over the frequency range 80MHz
to 2.5GHz at 3V/m as specified in IEC 61326-1 or 61326-2.
The meter meets the requirements for immunity to electrical
interference at the frequency range and test level specified in
international standard ISO 15197.
CAUTION: Do not use the equipment where aerosol sprays
are being used, or when oxygen is being administered.
SYMBOLS INFORMATION
Symbol SymbolReferent Referent
Consult instructions
for use
Date of manufacture
Batch code
Catalogue number
Serial number
Control
Keep away from
sunlight
Keep dry
Temperature limitation
Use by
CAUTION In vitro diagnostic
medical device
Traceability of glucose monitoring system
The results of G-425-3/G-425-3S glucose monitoring system
were compared to parallel results obtained on YSI-2300, which
is the manufacturer's standard measurement procedure.
User Performance
A study evaluating glucose values from fingertip, palm and
Forearm capillary blood samples obtained by 100 lay persons
showed the following results:Fingertip 100% , palm 98.1% and
forearm 98.1% within ±15mg/dL of the medical laboratory
values at glucose concentrations below 100 mg/dL, and
fingertip 98.6% , palm 97.3% and forearm 97.3% within ±15%
of the medical laboratory values at glucose concentrations at
or above 100mg/dL.
The device was approved and met EN 1SO 15197: 2015. Manufacturer
Authorised representative
in the european community
Table of contents
Other Home Aide Diagnostic Blood Glucose Meter manuals