HOME THEATRE MASTER Universal Touch Screen Remote Control Docking... User manual

Owner’s Manual
HOME THEATRE MASTER
Universal Touch Screen Remote Control
Docking Charger

5. LED indicator
6. Power connector
7. USB jack
1. Docking charger
2. Remote holder
3. Connection pins
4. Release button
Introduction
Thank you for choosing your Home Theatre Master Touch Screen
remote and this Docking Charger.We hope you love them and take
them as your Personal Digital Assistant for your HomeTheatre system.
Before operating the Docking Charger, please read thoroughly this
manual.Then, reserve it for future reference.
1
1.1 Key Features
• Fast charging device for your HomeTheatre Master Universal
Touch Screen Remote Control
•Connecting your Home Theatre Master Universal Touch
Screen Remote Control to home computer system for remote
advanced editing and data back up (PC Link)
• LED indicator for charging status display
• USB cable included for PC connection
Note:
This equipment has been tested and found to comply with limits
for a Class B digital device, pursuant to Part 15 of the FCC Rules.
These limits are designed to provide reasonable protection against
harmful interference in a residential installation.This equipment
generates radiate radio frequency energy and, if not installed and
used in accordance with the instruction, may cause harmful
interference will not occur in a particular installation.If this equipment
does cause harmful interference to radio or television reception,
which can be determined by turning the equipment off and on, the
user is encouraged to try to correct the interference by one or more
of the following measures:
– Reorient or relocate the receiving antenna.
– Increase the separation between the equipment and receiver.
–Connect the equipment into an outlet on a circuit different from
that to which the receiver is connected.
–Consult the dealer or an experienced radio/TV technician for
help.
“Modifications not authorized by the manufacturer may void users’
authority to operate this device.”
1
1.2 Getting to know your Docking Charger
2
1
2
3
4
5
7
6

1.3 Specifications
Design for Home Theatre Master Universal Touch Screen
Remote Control
Power requirement: DC 9V, 400mA, 3.6VA
Charging time: 3-4 hours
Dimensions: 225 x 100 x 45mm
Weight: 130g approx.
Included accessory: USB cable
For improvement purposes, specifications and functions are subjected
to change without priority notice.
3 4
How to perform quick charge function
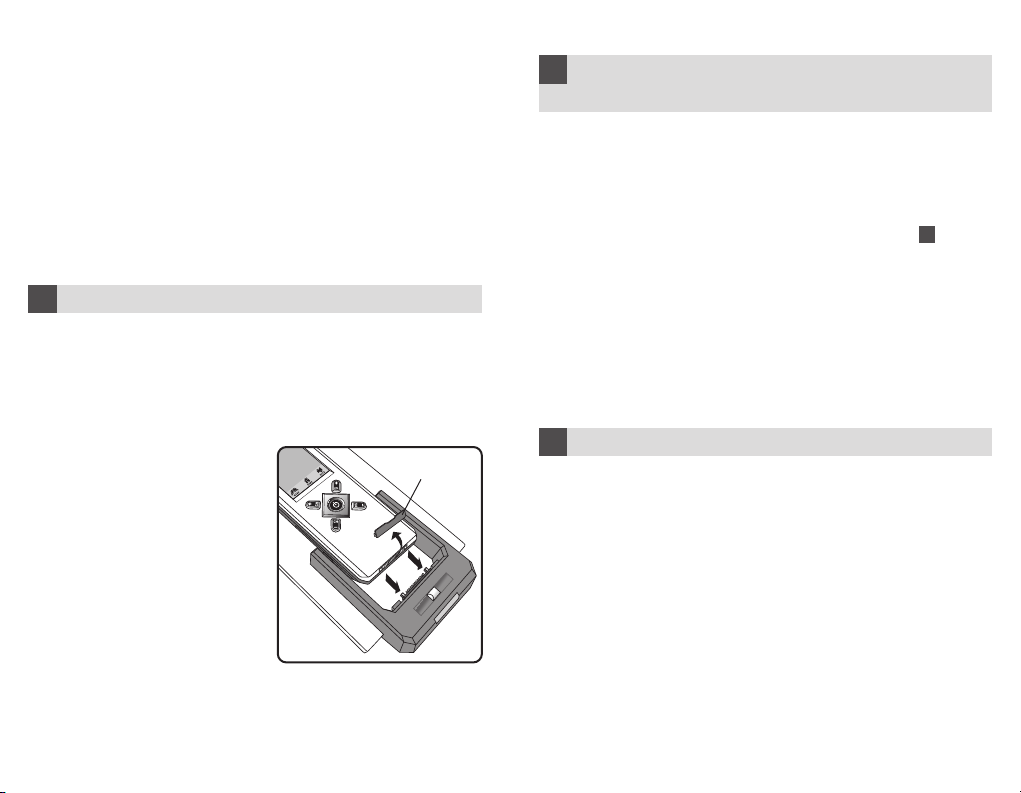
1. Make sure that your Home Theatre Master Touch Screen Remote
is installed with 4 pcs AAA NiMH rechargeable batteries and
remove the rubber protector.
2. Make sure you have the DC power adaptor from the HomeTheatre
Master Touch Screen Remote package.
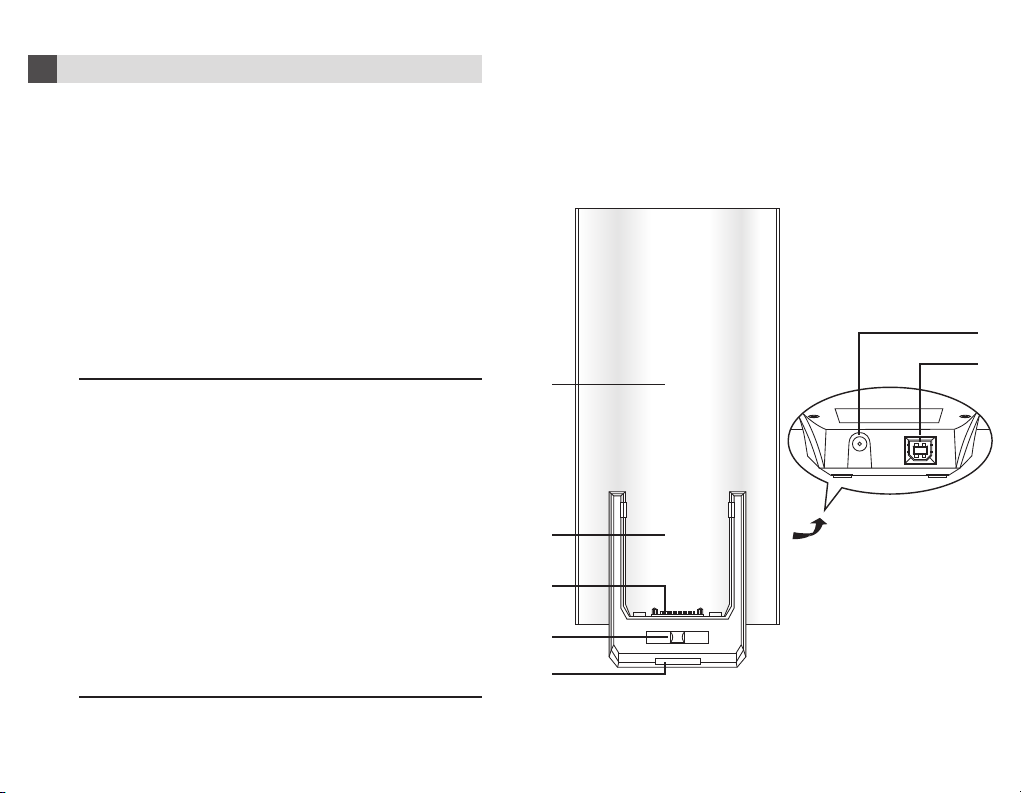
3. Put the power adaptor into AC wall outlet, insert the DC jack to
the power connector of the Docking Charger.
2
Remove the rubber
protector
4. Now, slide your Home Theatre
MasterTouch Screen Remote onto
the Docking charger until the
connection pins are locked.
5. The Green LED of the Docking
Charger lights up.
6. It takes about 3 to 4 hours to fully
charge the remote.
7. When the charging process is
completed, the Green LED of the
Docking Charger will be turned off.
8. Press the “Release Button”of the
Docking Charger to release the
Home Theatre Master Touch
Screen Remote.
How to perform remote advanced
editing via computer
1. Make sure that your computer is loaded with one of the following
operating system:Windows 98SE, Windows 2000, Windows NT
or Windows XP.
2. Download the REMOTE ENGINE software from the suggested
website.Install the program and reboot your system.
3. Make sure your Home Theatre Master Touch Screen Remote is
connected with the Docking Charger.See section “ 2How to
perform quick charge function ” – step 4.
4. Connect the supplied USB cable to the USB jack of the Docking
Charger and one of the available USB connector of your computer
system.
5. Activate the PC Link function on the HomeTheatre Master Touch
Screen Remote by tapping “Menu” and then, select “PC Link”.
6. Run the REMOTE ENGINE software from your computer system.
For operating the REMOTE ENGINE software, please follow the instruction
manual from the software package.
3
Maintenance
–Do not expose your Docking Charger to dust, strong sunlight,
humidity, high temperature, or mechanical shock.
–Do not use corrosive or abrasive cleansers on your Docking
Charger.
– Keep the unit dust free by wiping it with a soft, dry cloth.
–Do not disassemble your Docking Charger, it contains no user-
serviceable parts.
4

5
Troubleshooting
5
Q : My Docking Charger does not charge my remote!!!
A : Make sure that your Docking Charger is connected properly
with the Home Theatre Master Touch Screen Remote, see
section “ 2How to perform quick charge function ”.
A : Check whether your Home Theatre Master Touch Screen
Remote is loaded with packaged NiMH rechargeable batteries
and are inserted properly in correct +/– marks.
A. Make sure that you have connected the DC power supply
with your Docking Charger and an available AC outlet.
Q : How can I connect my HomeTheatre Touch Screen Remote
with my computer system?
A : Please refer to section “ 3. How to perform remote advanced
editing via computer ”.
A : After proper connection, make sure that you have activated
the PC Link function from the Home Theatre Touch Screen
Remote.
Table of contents