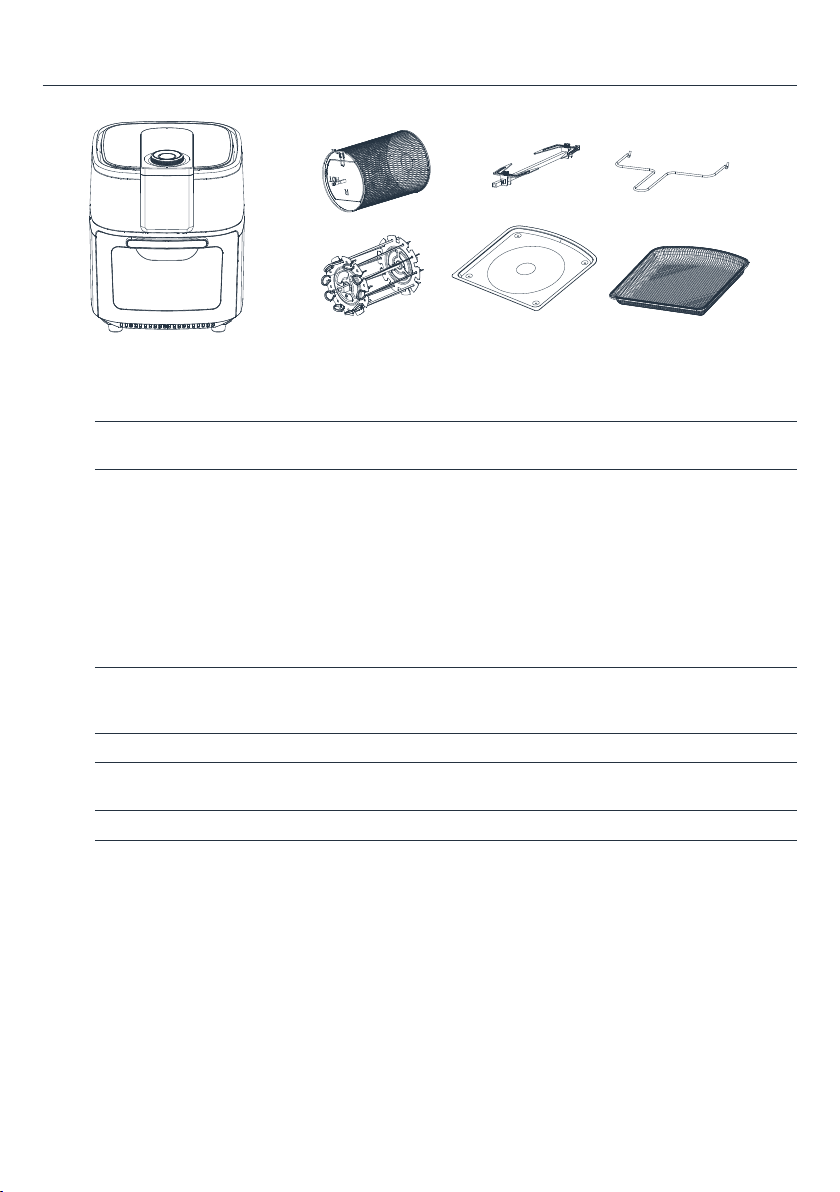
Home HME010387N User manual

Air Fryer Oven
HME010387N
Thank you for selecting our quality appliance. Please be sure to read this user manual
carefully before using. Any question, please contact the professional service for help.

In the event this product malfunctions or customer believes
it is defective, the customer should contact Customer Service
and retain the defective product pending further instructions.
Defective product should be clearly marked or stored where it
cannot be used again by mistake. Failure to retain the product
may impede hOme™’s ability to correct any legitimate problem
and may limit the extent to which hOme™may provide recourse.

Important Safety Instructions
Operating Instructions
Cleaning and Maintenance
Troubleshooting
Question and Answer
Warranty
Manufacturing Info
Warning
Contact Us
6
7-12
13
13
14
15
15
15
15
TABLE OF CONTENTS


on bringing home your new appliance!
Congratulations
Don’t forget to register your product at homelabs.com/reg
for updates, coupons, and other relevant information.
Although greatly appreciated, product registration is not
required to activate any warranty.

6
• This appliance is not intended for use by
persons with reduced physical, sensory, or
mental capabilities, or lack of experience and
knowledge, unless they are under the supervision
of a responsible or have been given proper
instruction in using the appliance. This appliance
is not intended for use by children.
• Children younger than 8 years must be kept
away from the device and the connecting cable.
• The device is not intended to be operated with
an external timer or a separate remote control
system. Do not operate the device unattended.
• Do not immerse the appliance in water or any
other liquid, nor rinse it under the tap.
• When using this device, make sure that it is
placed on a at surface and not directly on
an edge. Do not place the device under wall
cabinets.
• Always put the ingredients to be fried in the
basket to prevent them from coming into
contact with the heating elements.
• Do not cover the air inlet and air outlet openings
while the appliance is operating.
• Do not use this unit if the plug, the power cord,
or the appliance itself is damaged in any way.
• If the power cord is damaged, you must have it
replaced by the manufacturer, its service agent,
or a similarly qualied person in order to avoid
hazard.
• To prevent food contact with the interior upper
screen and heating element, do not overll the
rotating mesh basket.
• Do not pour oil into the rotating mesh basket as
this may cause a re hazard.
• While cooking, the internal temperature of the
unit reaches several hundred degrees centigrade.
To avoid personal injury, do not place hands
inside the unit unless it is thoroughly cooled
down.
• Make sure that you do not come into contact
with the hot surfaces of the device.
• Keep the mains cord away from hot surfaces of
the device.
• Before plugging in the mains plug, ensure that
the voltage indicated on the device corresponds
to the local power voltage.
• Do not place the appliance against a wall or
other appliances. Leave at least 4 inches free
space on the back and sides and 4 inches
free space above the appliance. Do not place
anything on top of the appliance.
• Do not place the appliance on or near a hot gas
stove or all kinds of electric stove and electric
cooking plates, or in a heated oven.
• Be careful when cleaning the upper area of the
cooking chamber, hot heating element, edge of
metal parts.
• Do not use the appliance for any other purpose
than described in the user manual. Only use the
original accessories.
• Never plug in or unplug the mains plug when
your hands are wet.
• Arrange the cord so that no one can pull it or trip
over it inadvertently.
• Do not use this appliance with extension cord of
any kind.
• Do not operate this appliance on or near
combustible materials such as tablecloths and
curtains.
• When in operation, air is released through the air
outlet vent. Keep your hands and face at a safe
distance from the air outlet vent. Also avoid the
air while removing the rotating mesh basket from
the appliance.
• The unit’s outer surfaces may become hot during
use. The rotating mesh basket will be hot. Wear
oven mitts or use the fetch tool when handling
hot components.
• Always operate the appliance on a horizontal
surface that is level, stable, and noncombustible.
• This appliance is intended for normal household
use only. It is not intended for use in commercial
or retail environments.
• If the air fryer is used improperly or not used
according to the instructions in the user manual,
the warranty becomes invalid and we will not be
held liable for damages.
• Always unplug the appliance after use.
• Disconnect the device and leave the unit cool
before any cleaning or maintenance. Let the
appliance cool down for approximately 30
minutes before handling, cleaning, or storing.
Important Safety Instructions
SAVE THESE INSTRUCTIONS
For Household Use Only

7
PARTS & ACCESSORIES
1. Main unit
2. Rotating basket Great for fries, roasting nuts and other snacks. Use the rotisserie
fetch tool to place the basket into unit.
3. & 4. Rotisserie sha, forks &
set screws
Used for roasts and whole chicken. Force the shaft lengthwise
through the meat, making sure the shaft is at the center of the meat.
Slide the forks onto the shaft from either end of the shaft, then lock
them in place with set screws. There are indentations on the shaft
for the set screws. You can adjust the screws closer to the middle of
the shaft if needed, but do not slide the screws outward towards the
ends from the indentations.
Note: Make sure roast or chicken is not too large to rotate freely
within the air fryer. The largest chicken or roast should not exceed
4lbs.
5. Rotisserie fetch tool Fetch the cooked roast and chicken that cooked by rotisserie or
skewer methods. Place the fetch tool under the rotisserie shaft and
lift left rst, then gently extract the food.
6. Skewers Great for all your kebab recipes, meat, sh and veggies.
7. Adjustable skewer rack Used for making kebab.
Use the set screws to t the skewer racks to the shaft.
8. Removable drip tray Cook with the removable drip tray in place for easy clean-ups.
9. Dehydrating racks Can be used not only for dehydration but also for cooking crispy
snacks or reheating pizza.
Note:
• Make sure that your rotisserie air fryer has been shipped with the components that you ordered
(as some accessories may be sold separately). Check everything carefully before use. If any part is
missing or damaged, do not use this product. Contact the local dealer that you buy this product.
• Some accessories may not be included with the purchase.
Operating Instructions
1 2 3
45
98
7
6

8
Operating Instructions
1. LED Digital
Display
The display will switch between temperature and time remaining during the
cooking process.
2. Running Lights The Running Lights will blink in sequence during cooking and continue blinking
up to 20 seconds once the unit is shut down.
3. Cooking Presets Set time and temperature to a default setting for a particular food. You may over-
ride these presets with Time and Temperature buttons.
4. Internal Light The internal light helps you check cooking progress while the unit is in operation.
Note: When you open the door during cooking, the cooking will be paused. The
internal light will illuminate.
5. Rotation Buon Select this button when using the rotisserie mode. The icon will blink while the
unit is in use.
6. Temperature
Control Buons
Raise or lower cooking temperature by 10°F intervals starting from 150°F to
400°F. Dehydration is from 90°F to 170°F.
7. Time Control
Buons
Set the cooking time from 1 to 60 minutes in all modes except when in
dehydrating. It will take 30 minute intervals and an operating time from 2 to 24
hours to dehydrate the food.
8. Power/Start/
Stop Buon
Once the unit is plugged in, the Power button will light up. Press the Power button,
the full panel will be illuminated. Press the Power button again, the cooking starts
at the default temperature of 370°F and will cook for 15 minutes. Press the Power
button at any time during the cooking process to shut down the unit, with the
display going dark immediately and the running light going dark within 20 seconds.
The fan will continue running for 20 seconds to cool down the unit and then stop.
9. Time & Temp
Control Dial.
Rotate the Time and Temperature dial (on the top of the air fryer) clockwise to increase
the time/temperature and counterclockwise to decrease the time/temperature.
CONTROL PANEL
1
2
3
4567
9
8

9
BEFORE USING FOR THE FIRST TIME
• Read all warning stickers and labels.
• Remove all packing materials, labels and stickers.
• Wash the parts and accessories used in the cooking process with warm soapy water. Only the
accessories can be washed in dishwasher.
• Wipe the inside and outside of the cooking unit with a clean moist cloth.
Note:
• Do not wash or submerge the unit in water.
• When using this unit, do not ll any cooking vessel with oil or liquid of any kind. This unit cooks with
hot air only.
PREPARING FOR USE
1. Place the appliance on a stable, level, horizontal and heat resistant surface.
2. Select the cooking accessory for your recipe.
3. The rotisserie air fryer is designed to cook a wide variety of foods. The below table provided within
this manual and will help you get great results. Please refer to this information for proper time/
temperature settings and proper food quantities.
4. Use the Preset button to select the cooking mode by referring to below cooking chart.
Preset Icon Preset Buon Temperature Time
French Fries 400°F 15 mins.
Roast 370°F 25 mins.
Fish 390°F 15 mins.
Shrimp 320°F 12 mins.
Chicken 370°F 40 mins.
Rotisserie 400°F 30 mins.
Cake 350°F 30 mins.
Dehydrator 90~170°F 2-24 hours
Note:
• Once you are familiar with the rotisserie air fryer you may want to experiment by yourself.
• Cooking time for whole roasted chicken will vary by weight. Use meat thermometer to check internal
temperature as per chart above.
Operating Instructions

10
COOKING WITH THE ROTISSERIE AIR FRYER
1. Place the ingredients on the air ow rack, or in the rotating mesh basket or other rotisserie
accessories.
2. Put the air ow rack, rotating mesh basket or rotisserie spit into the unit and shut the unit door.
Connect the power cord to an outlet.
3. Put the food into the rotating mesh basket or the rotisserie, then press the Power button.
4. Select the Preset mode or manually set the temperature & the time.
5. Press the Power button to start the cooking.
6. When cooking is completed, use the rotisserie fetch tool or wear mitts to take the food out. Fetch
tool can also be used with the rotisserie spit.
Note:
• When time is up, cooking will stop. The fan will continue to run for 20 seconds to cool down the unit.
• Disconnect the device and leave the unit cool down completely before any cleaning or maintenance.
• Make sure the ingredients cooked to a golden-yellow color rather than dark or brown. Remove burnt
remnants.
• You may open the air fryer door to view the rotisserie at any time during the process to check the
progress.
• Foods that are smaller in size usually require a slightly shorter cooking time than the larger ones.
• Large quantities of food only require a slightly longer cooking time than smaller quantities.
• Flipping or turning the smaller size foods halfway through the cooking process, assure that all the
pieces are evenly red.
• Mist a bit of vegetable oil to fresh potatoes before cooking for a crispier result.
• Snacks normally cooked in air fryer can also be cooked in this rotisserie air fryer.
• Place a baking tin or air fryer dish in the rotisserie air fryer when baking a cake, quiche, or other
fragile / lled foods.
• You can use the rotisserie air fryer to reheat foods by setting the temperature to 300°F degree.
Warning:
• If the unit emits black smoke, unplug the unit immediately. Do not remove the foods until the
smoking stops emitting.
• To avoid product damage & personal injury, do not use the air fryer door as a place to rest a hot fry
basket lled with food. The hot fry basket could damage the air fryer door or cause the unit to tip.
• During the cooking process, the rotating mesh basket and other accessories will become very hot.
When you remove it to check on the progress, make sure you have a trivet or a heat resistant surface
nearly to set it down on. Do not place the rotating mesh basket directly on a counter top or table.
• Cooking accessories will get hot during the air frying. Wear mitts and handle with care to avoid any
injuries.
• Do not put anything on top of the appliance.
• Do not cover the air vents on the top and back of the unit.
• Do not ll any cooking vessel with oil or liquid of any kind.
Operating Instructions

11
PLACE AIR FLOW RACKS INTO THE UNIT
1. Insert the drip tray into bottom of the unit.
2. Place the air ow racks into the unit by sliding through the side grooves and onto the back lip.
3. To cook food faster or more crisply, place the air ow racks closer to the top heating element.
4. Place the air ow racks at middle height for even cooking.
PLACE THE ROTISSERIE SHAFT AND SKEWERS RACKS
1. Place the two skewer racks at each end of the rotisserie shaft. Make sure the set screws are on the
outer side of the rotisserie shaft.
2. Slightly tighten the set screws. Do not over tighten the set screws, as you may need to adjust the
tightness after inserting the skewers.
3. Carefully poke the skewers through the food.
Operating Instructions
SKEWER
RACKS
SET SCREW
RIGHT SIDE
SET SCREW
RIGHT SIDE
ROTISSERIE
SHAFT
FINAL ASSEMBLY
FRONTAL VIEW

12
ASSEMBLE THE ROTISSERIE SPIT
1. Insert each skewer point through the holes on the left skewer rack.
2. Squeeze the clip-end of each skewer as you insert into the opposite skewer rack slot to secure.
3. Release the clip to securely rest in slot.
4. Repeat step 3 through step 6 in a uniform manner around the skewer rack. Make sure the skewers
are evenly spaced.
5. Tighten the set screws to make sure they are securely in place.
6. Use caution while inserting the spit into the unit to prevent getting poked by the skewer ends.
PLACE THE ROTISSERIE SPIT OR ROTATING MESH BASKET INTO THE UNIT
1. Insert the left side of the assembled spit or basket rst into the rotisserie shaft socket. Make sure
the rotisserie shaft is in place to engage rotation.
2. Place the right side onto the hanger.
REMOVE THE ROTISSERIE SPIT OR ROTATING BASKET FROM THE UNIT
1. Open the unit door to pause cooking cycle or turn the unit off by pressing the Power button.
2. Insert the rotisserie fetch tool beneath the rotisserie shaft.
3. Lift the right side of the rotisserie fetch tool at a slight angle to clear the bracket, then shift the right
until the left side of the shaft slides out of the rotisserie.
4. Carefully remove the rotisserie food from the air fryer.
Operating Instructions

13
Clean the rotisserie air fryer after each use. The rotating mesh basket and other accessories are made of
durable stainless steel and are dishwasher safe. Do not use abrasive solvents or utensils to clean any part
of the appliance.
1. Remove the power cord from the wall socket. Make sure the appliance is thoroughly cooled before
the cleaning.
2. Wipe the housing of the appliance with a warm moist cloth and mild detergent.
3. Clean both sides of the unit door with a cloth damped by warm soapy water. Do not soak or
submerge the door in water. Do not wash the door in dishwasher.
4. Clean the interior of the appliance with a nonabrasive sponge.
5. Remove the food residue from the upper screen with a cleaning brush if needed.
6. Dry the appliance parts completely.
7. Store the appliance in a clean and dry place.
Cleaning and Maintenance
Troubleshooting
PROBLEM POSSIBLE CAUSE SOLUTION
The Rotisserie air
fryer does not work.
The appliance is not plugged in.
You haven’t set the preparation time &
temperature.
Plug the power cord into the wall
socket.
With the mesh basket in place, set
the temperature and time of the unit.
Check that the door is closed.
Food is not cooked.
The rotating mesh basket is over
loaded.
The temperature is set too low.
Use smaller batches for more even
frying.
Set the temperature higher.
Food is not fried
evenly.
Some foods need to be turned during
the cooking process.
Turn the foods during the cooking
process.
White smoke comes
out from the unit.
Oil is being used.
Accessories have excess grease
residue from previous cooking.
Wipe down the accessories to
remove the excess oil.
Clean the unit accessories after each
use.
French fries are not
fried evenly.
Wrong type of potato is being used.
Potatoes are not rinsed properly
during the preparation.
Use fresh and rm potatoes.
Use cut sticks and pat dry to remove
the excess starch on the potatoes.
Fries are not crispy. Raw fries have too much water.
Dry potato sticks properly before
misting oil.
Cut sticks smaller. Add a bit more oil.

14
Question and answer
QUESTION ANSWER
Can I prepare foods other
than fried dished with my
rotisserie air fryer?
You can prepare a variety of dishes including steaks, chops, burgers,
and baked foods.
Is the rotisserie air fryer good
for making or reheating soups
and sauces?
Do not cook or reheat liquids in the rotisserie air fryer.
Is it possible to shut off the
unit at any time? Press the Power button or open the unit door.
What do I do if the unit shuts
down while cooking?
The appliance has an auto shut-Off function that prevents the
damage from overheating. Unplug the appliance and allow the unit
to cool down. Then Plug in and restart the unit.
Does the unit need time to
heat up?
Preheating is needed when you are cooking from a “cold start”. Add 3
minutes to the cook time to compensate.
Can I check the food during
the cooking process?
You can remove the rotating mesh basket at any time during the
cooking. During this time, you can “ip” the contents on the air ow
racks if need to ensure even cooking. Time and temperature will
resume where you left off.
Is the rotisserie air fryer
dishwasher-safe? Only the accessories are dishwasher safe.
What happens if the unit still
does not work after I have
tried all the troubleshooting
suggestions?
Never aempt a home repair. Contact the manufacturer and follow
the procedures set forth by the warranty. Failure to do so could
render your warranty null and void.

15
hOme™offers a limited two-year warranty (“warranty period”) on all of our products purchased new
and unused from hOme Technologies, LLC or an authorized reseller, with an original proof of purchase
and where a defect has arisen, wholly or substantially, as a result of faulty manufacture, parts or
workmanship during the warranty period. The warranty does not apply where damage is caused by
other factors, including without limitation: (a) normal wear and tear; (b) abuse, mishandling, accident,
or failure to follow operating instructions; (c) exposure to liquid or inltration of foreign particles; (d)
servicing or modications of the product other than by hOme™ ; (e) commercial or non-household use.
The hOme™ warranty covers all costs related to restoring the proven defective product through
repair or replacement of any defective part and necessary labor so that it conforms to its original
specications. A replacement product may be provided instead of repairing a defective product. hOme™
’s exclusive obligation under this warranty is limited to such repair or replacement.
A receipt indicating the purchase date is required for any claim, so please keep all receipts in a safe
place. We recommend that you register your product on our website, homelabs.com/reg. Although
greatly appreciated, the product registration is not required to activate any warranty and product
registration does not eliminate the need for the original proof of purchase. The warranty becomes
void if attempts at repair are made by non-authorized third parties and/or if spare parts, other than
those provided by hOme™ , are used. You may also arrange for service after the warranty expires at an
additional cost.
These are our general terms for warranty service, but we always urge our customers to reach out to
us with any issue, regardless of warranty terms. If you have an issue with a hOme™ product, please
contact us at 1-800-898-3002, and we will do our best to resolve it for you.
This warranty gives you specic legal rights, and you may have other legal rights which vary from state
to state, country to country or province to province. The customer may assert any such rights at their
sole discretion.
HME010387N
Warranty
Manufacturing Info
This manual is to be used with all items with the model number
SKU# : HME010387N
Power/Rated voltage/Frequency: 1700W / AC 120V / 60Hz
Keep all plastic bags away from children.
Warning
Contact Us
homelabs.com/chat
Mon–Fri 10AM–5PM EST
1-(800)-898-3002
Mon–Fri 10AM–5PM EST
Respond within twelve hours
CHAT W ITH US CALL U S EMAIL US

© 2016 hOme Technologies, LLC
37 East 18 Street, 7th Floor
New York, NY 10003
For household
Use Only
1-800-898-3002
homelabs.com/help
All rights reserved, hOme®. Printed in China.
Table of contents
Other Home Fryer manuals