HOME8 WTS3100 User manual

Wi-Fi 3-IN-1 Trio Sensor User Manual
V1 2018
home8alarm.com
1-844-800-6482 | support@home8alarm.com
Wi-Fi 3-IN-1 Trio Sensor
(WTS3100)
UserManual

Wi-Fi 3-IN-1 Trio Sensor User Manual
V1 2018
Table of Contents
Chapter 1. Introduction.................................................................................2
1.1 System Requirements..............................................................................................3
Chapter 2. Hardware Overview.....................................................................4
Chapter 3. Device Setup...............................................................................5
3.1 Power On the Device ................................................................................................5
3.2 Adding the Device to the System..............................................................................5
3.3 Testing and Installing the Device...............................................................................8
Chapter 4. Starting to Use the Device..........................................................9
4.1 Edit Sensor..............................................................................................................9
4.2 Contact, Motion and Temperature Setting................................................................9
4.3 Notification.............................................................................................................10
4.4 Activity Log.............................................................................................................11
4.5 Reset .....................................................................................................................12
4.6 Change Battery......................................................................................................12
Appendix – Glossary of Terms...................................................................13

Wi-Fi 3-IN-1 Trio Sensor User Manual
V1 2018
Chapter 1. Introduction
A multifunctional device that offers elaborate security and ambient sensing options. It can be used to detect
intruders or to measure a room’s ambient temperature. It will alert the system when a door or window is
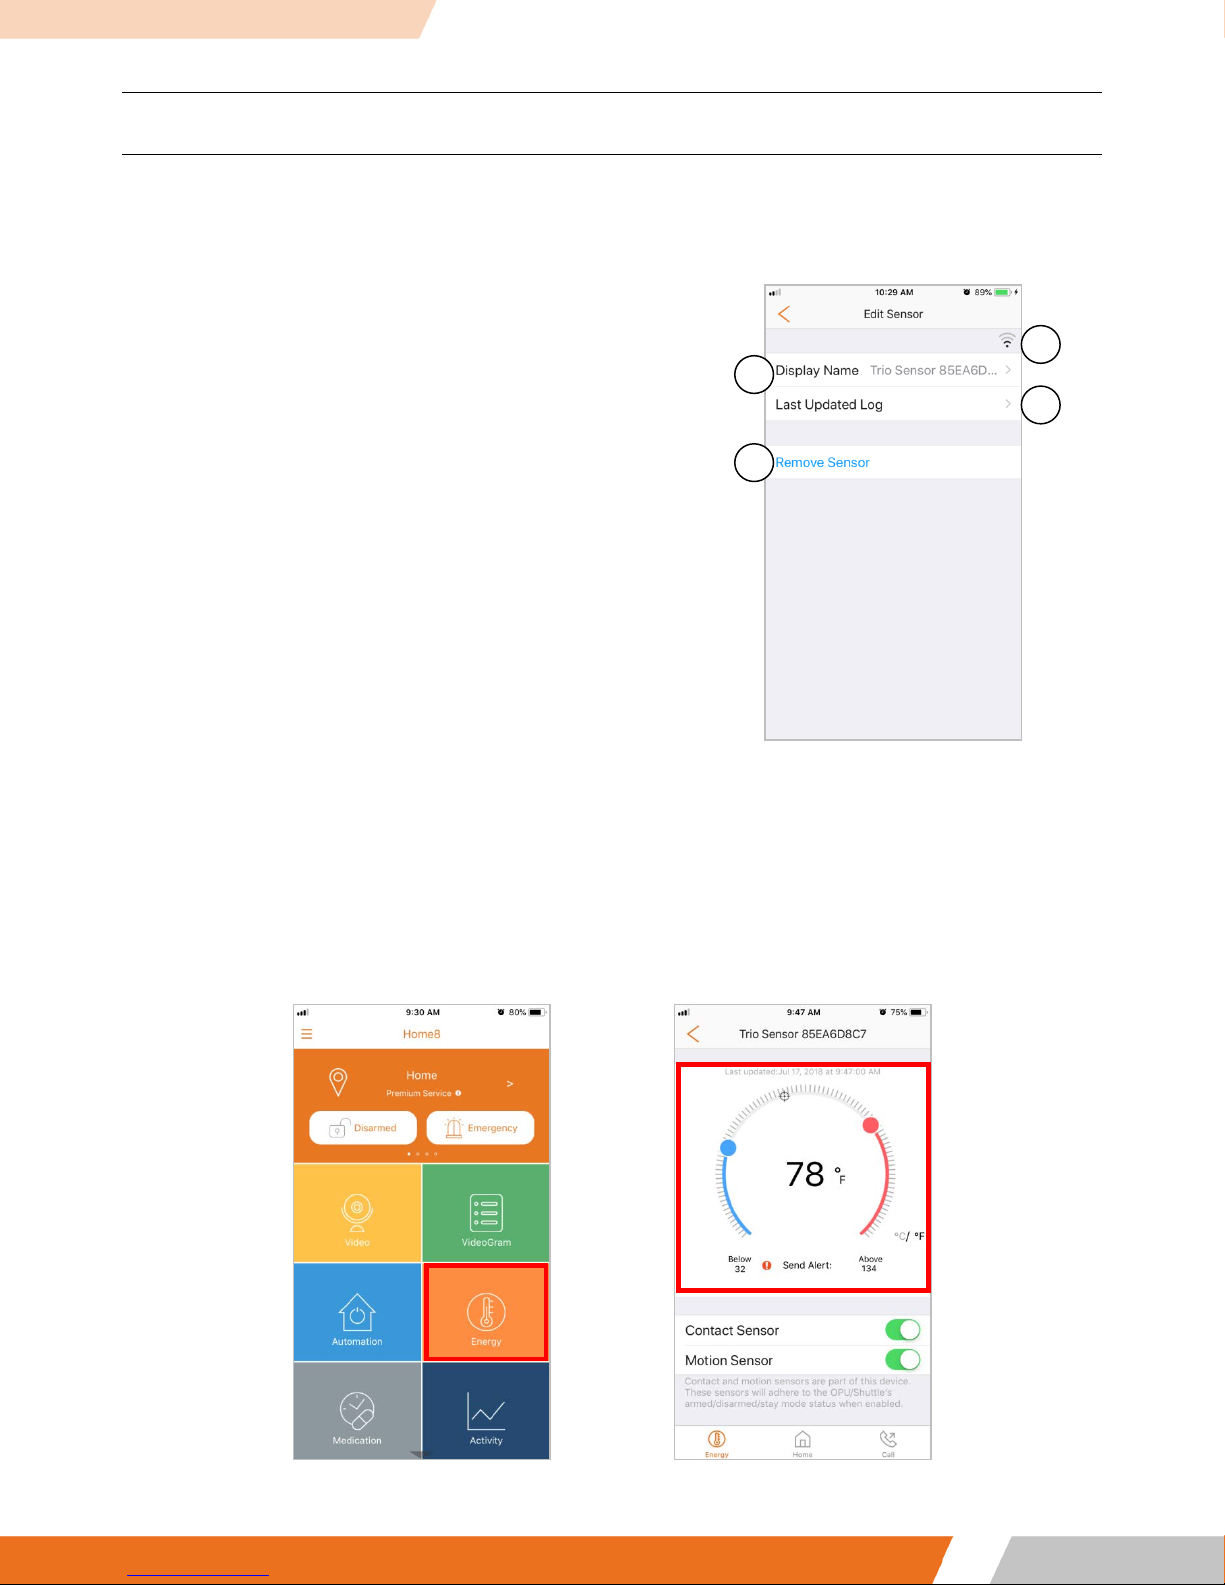
opened, when motion is detected or when temperature reaches a preset temperature threshold. The
temperature feature helps prevent pipes from freezing and bursting from the low temperatures. The
temperature sensor also can be used to automatically trigger other devices when activated. Equipping the
Trio Sensor with the IP-camera can assist the owner and authorized video users to monitor and verify
through real-time video for utmost peace of mind. The service can be easily added into the Home8 system in
minutes.
KEY FEATURES
•Self-Configuring and easy installation
•Door/window open/close detection
•Motion detection
•Temperature detection & Temperature change detection
•If equipped with embedded IPCAM, one can get an interactive video for verification
•Video-verified collaborative alert to multiple tier group of users/mobiles with supervisory video
access control
•Direct local 1st responder calling for a prioritized response
•Systems are easily scalable and upgradable to “video-verified” alarm for utmost peace of mind
SPECIFICATIONS
•Wi-Fi Security: IEEE 802.11 b/n/g with WAP/WAP2 PSK
•Wi-Fi Range: 300 feet (90m) line of sight
•Operating Temperature: 14°F to 140°F (-10°C to 60°C)
•Temperature Limits Alert: Over 135°F+/-5°F (57°C+/-3°C)
•1/2-inch standard gap distance allowed between sensor and magnet
•Motion Detection Range: 1ft to 42ft (0.3m~13m)
•Motion Detection angle: 90°
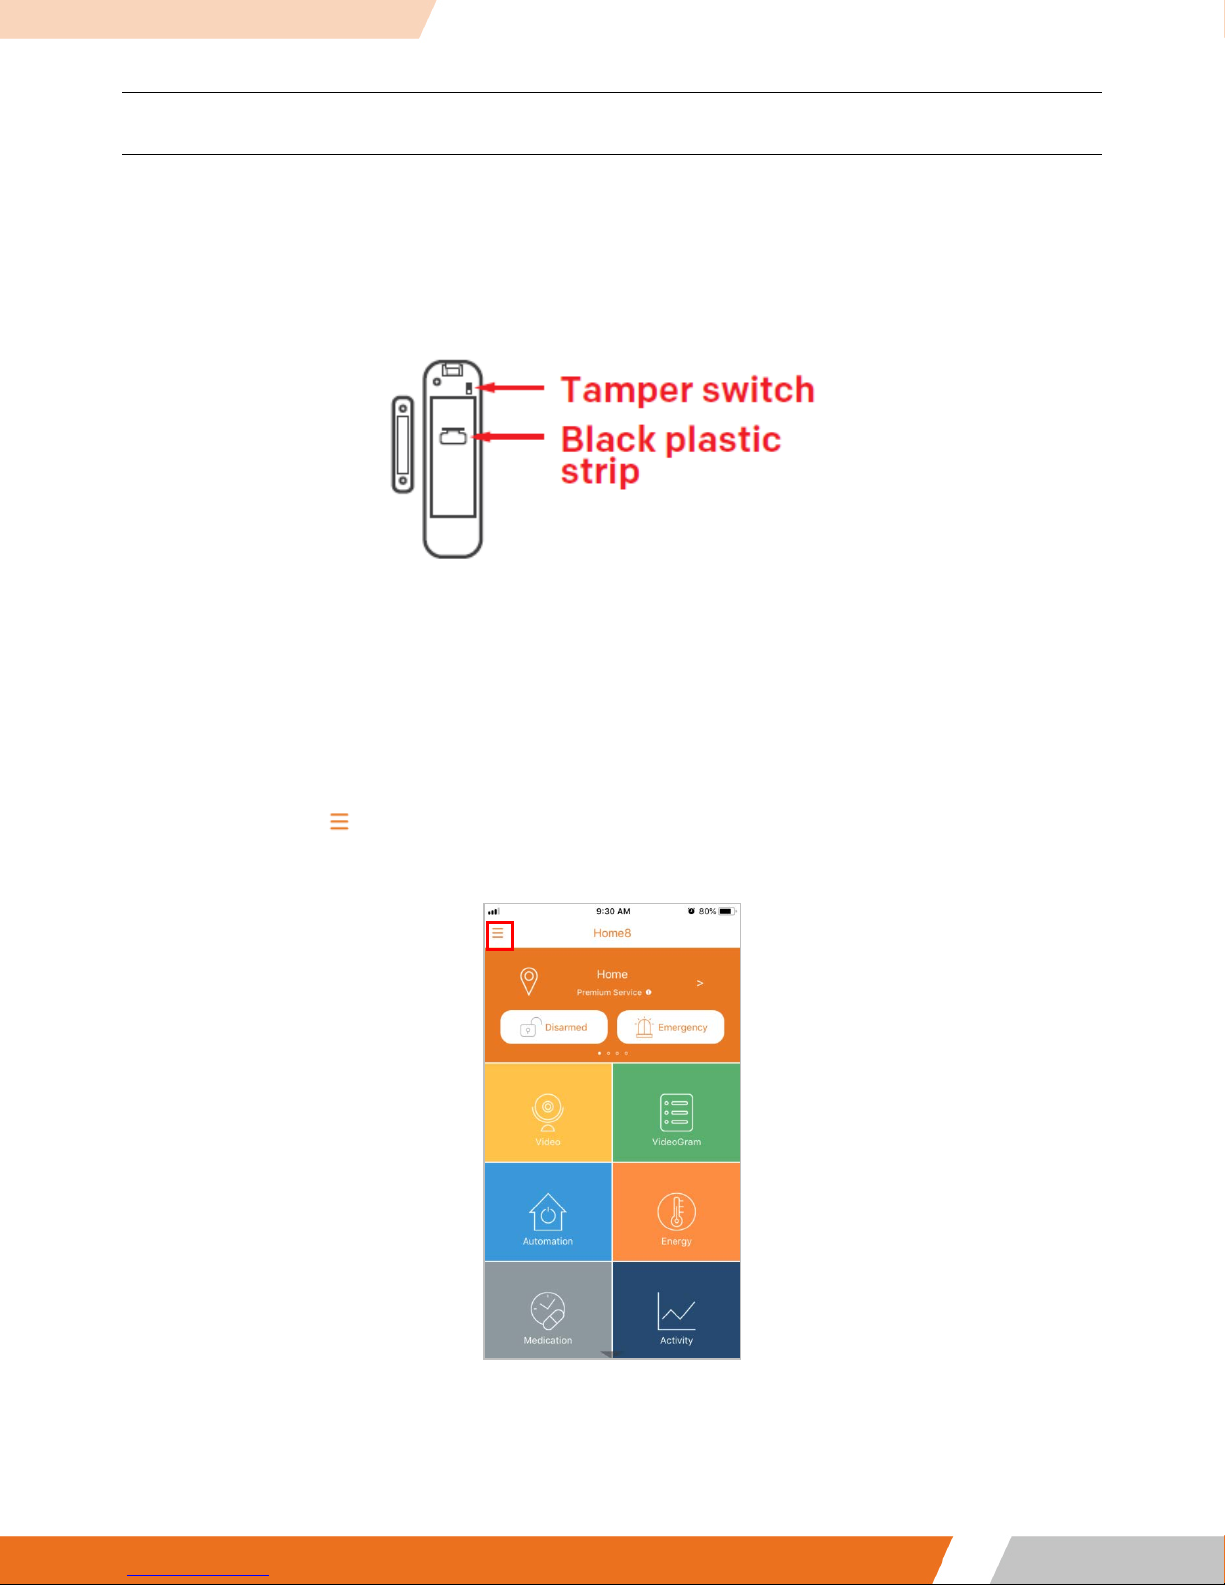
•Tamper Alarm: Tamper Switch
•Low battery status alarm
•Battery: CR123A

Wi-Fi 3-IN-1 Trio Sensor User Manual
V1 2018
1.1 System Requirements
This section explains the system requirements when using the device.
Network
Router with
- 10/100Mbps RJ45 LAN port
- DHCP service
Mobile Device
Apple iPhone, iPad, or Android device with:
- iOS 8.0 or later
- Android 4.0.3 and up
* See Appendix – Glossary of Terms.

Wi-Fi 3-IN-1 Trio Sensor User Manual
V1 2018
Chapter 2. Hardware Overview
This section provides an overview of the Device.
Sensor
Magnet

Wi-Fi 3-IN-1 Trio Sensor User Manual
V1 2018
Chapter 3. Device Setup
3.1 Power On the Device
Pull and remove the black plastic strip in the back of the device to initiate battery contact. The LED will flash
red for a second.
3.2 Adding the Device to the System
Before you begin using the device, it will need to be added to the system first. To activate the device,
complete the following steps.
Note: Make sure the Security Shuttle/Hub is powered on and connected to your router.
1. Tap the menu icon to show the sidebar menu.

Wi-Fi 3-IN-1 Trio Sensor User Manual
V1 2018
2. Tap “Device Management”. If you have more than one Security Shuttle/Hub, you may need to swipe left
more than once to find the one you wish the sensor to connect to. After selecting the Security Shuttle/Hub,
tap the plus icon “+” located to the right of “Sensor”.
3. Select “Sensor”.

Wi-Fi 3-IN-1 Trio Sensor User Manual
V1 2018
4. Follow the on-screen instructions to scan the QR code located on the device, the “sensor adding” process
will begin.
If your device isn’t communicating with the Security Shuttle, your app may ask you to reset your device.
Go to Chapter 4. section 4.5 Reset for instruction.
5. When the activation is completed, the device will be added to the device management page. In the
illustration shown below, the name of the sensor is “Trio Sensor 85Exxxxxx”.

Wi-Fi 3-IN-1 Trio Sensor User Manual
V1 2018
3.3 Testing and Installing the Device
After the “sensor adding” process has been completed, to make sure the connection of the device is working,
take your device to the room you want to use it in. Test the device by pressing the tamper switch for 5
seconds and then release it. If you get a notification that says your device has been tampered with, it’s within
range.
Now you can mount the device with the included double-sided tapes.
To ensure proper contact, the distance between the sensor and magnet should be within 1/4 inch.
Please ensure the tops of the two pieces line up and be mounted in a vertical/upright position.
The recommended mounting height is 6.6 ft (2M).
Don’t let the device face a window or sunlight.
Don’t let the device face a source of heat. For example: a he ater.

Wi-Fi 3-IN-1 Trio Sensor User Manual
V1 2018
Chapter 4. Starting to Use the Device
At this stage, your sensor is now ready for use.
4.1 Edit Sensor
Go to “Device management”, and select the sensor you
want to edit.
1. Rename Sensor
Tap “Display Name” to rename the sensor.
2. Remove Sensor
To remove the sensor from the current Security
Shuttle, tap “Remove Sensor”.
3. Last Updated Log
Check the communication history between Security
Shuttle and Sensor.
4. Wi-Fi Signal strength
See the signal strength of wireless communication
between Security Shuttle and Sensor.
4.2 Contact, Motion and Temperature Setting
Go to the "Energy" tile to set up the device.
Temperature Setting
The number shown is the current ambient temperature. The number will update while there is a change in
temperature. You can move the temperature bar freely to set the Below/Above threshold of when to send
the notification alert.
1
2
3
4

Wi-Fi 3-IN-1 Trio Sensor User Manual
V1 2018
Contact & Motion Setting
Here you can enable/disable the function of contact and motion sensor by turning on/off the button next to
the feature.
4.3 Notification
When the door/window state has changed, motion has been detected or temperature has reached the
threshold, a notification will be sent to all authorized users.

Wi-Fi 3-IN-1 Trio Sensor User Manual
V1 2018
4.4 Activity Log
You can check the contact & motion activity log from the app.
Go to the "Activity" tile and select the sensor.
Contact
Different colors are used to show the status of the door/window. Detailed information can be seen in "See
All Data".

Wi-Fi 3-IN-1 Trio Sensor User Manual
V1 2018
Motion
Shows the result of motion detected with 15-minute intervals in a scatter chart. Detailed information can be
seen in "See All Data".
4.5 Reset
If your device isn’t communicating with the Security Shuttle, your app may ask you to reset your device.
• Press the tamper switch four times within 1.5 seconds and during the 4th press, hold the tamper switch
until the LED lights up. After 3 seconds the LED will turn OFF, and after the next 2 seconds, release the
tamper switch. If the reset was successful, the LED will light on for 1 second. Otherwise, the LED will flash
once.
• Return to the app and follow the onscreen instructions.
4.6 Change Battery
When the device reports the low battery message you should replace the battery with a new one. The
battery type is CR123A, 3.0V.

Wi-Fi 3-IN-1 Trio Sensor User Manual
V1 2018
Appendix – Glossary of Terms
Arm: The cameras and other security related sensors in the system are actively monitoring the surroundings. Any
suspicious activity that has been detected by the camera or sensor will prompt the app to immediately send a
notification. A recording will also be performed by the camera(s) that witnessed the event.
Disarm: The cameras and other security related sensors in the system are no longer actively monitoring the
surroundings. The system will not react to any suspicious activity detected by these devices. No notification will be
sent.
Event: An event is created when any camera or sensor detects an activity, or is manually triggered by the user.
Security Shuttle: Functions as a secure and intelligent hub to manage the devices and communicate with the cloud
server. Currently, there are three types – OPU1120, OPU2120, and OPU3120.
Other manuals for WTS3100
2
Table of contents
Other HOME8 Accessories manuals

HOME8
HOME8 WPS1200 User manual

HOME8
HOME8 WTS3100 User manual

HOME8
HOME8 ADS1303 User manual

HOME8
HOME8 ADS1301 User manual

HOME8
HOME8 GDS1300 User manual

HOME8
HOME8 PIR1301 User manual

HOME8
HOME8 SNH1300 User manual

HOME8
HOME8 WTS3100 User manual

HOME8
HOME8 PIR1301 User manual

HOME8
HOME8 WLS1300 User manual
Popular Accessories manuals by other brands

Georg Fischer
Georg Fischer 3-2250-21U User's product manual

ISYGLT
ISYGLT LS-05-HF-WH Technical Data/Instruction Manual

Keating Of Chicago
Keating Of Chicago Flame Switch Service instructions

Proceq
Proceq Zehntner ZG8150 Technical manual

Troy Lee Designs
Troy Lee Designs RAID Product owners manual

Rega
Rega Bias 2 owner's manual