Homeworx HWA-5000 User manual


HWA5000
User manual Ver.2
2
SAFETY PRECAUTION
CAUTION:
The lightening flash with
arrowhead symbol, within an
equilateral triangle, is intended
to alert the user to "dangerous
voltage" and to prevent from a
risk of electric shock.
Warning:
To reduce the risk of electric
shock, don't open the cabinet.
Refer servicing to qualified
personnel only.
The exclamation point within an
equilateral triangle is intended to
alert the user to important
operating and
maintenance(servicing).
Danger of explosion if battery is incorrectly replaced. Replace only with the same or equivalent type.
WARNING: The apparatus shall not be exposed to dripping or splashing and that no objects filled with
liquids, such as vases, shall be placed on the apparatus.
WARNING: Do not place naked flame sources, such as lighted candles on the apparatus; otherwise, there
is the danger of fire.
WARNING: The unit should be connected to a power supply only of the type descry bed in the operating
instructions or as marked on the unit. If you are not sure of the type of power supply(for example: 120 or
230V) to your home, consult your local dealer or local power company.
WARNING: Do not open the cabinet or touch any parts in the inner mechanism. Consult your local dealer
for technical service if the opening is required.
WARNING: The mains plug is used as the disconnect device, the disconnect device shall remain readily
operable.
WARNING: Take attention to the environmental aspects of battery disposal. The batteries shall not be
exposed to excessive heat such as sunshine, fire or the like.
WARNING: Maintenance man must use the appointed screw in the rear plate.
WARNING: Ensure a minimum distance of 5 cm around the apparatus for sufficient ventilation.
WARNING: Ensure that the ventilation is not impeded by covering the ventilation openings with items
such as newspapers, table-cloths, curtains, etc.

HWA5000
User manual Ver.2
3
WARNING: Use the apparatus only in moderate climates (not in tropical climates).
Note: Do not open the cabinet to avoid the unit direct exposure to radiation.
Unit Cleaning: After the unit power is turned off, you can clean the cabinet, panel and remote control
with a soft cloth lightly moistened with a mild detergent solution.
Attachments: Never add any attachments and/or equipment without the manufacturer consent; as such
additions may result in the risk of fire, electric shock or other personal injury.
Locating: Slots and openings in the cabinet are provided for ventilation to protect it from overheating. Do
not block these openings or allow them to be blocked by placing the STB on a bed, sofa or other similar
surface, nor should it be placed over a radiator or heat register.
Power-Cord Protection: Place the power-supply cord out of the way, where it will not be walked on.
Please take special attentions to cords at plugs, convenience receptacles and the point where they exit
from the unit.
Object and Liquid Entry: Never put objects of any kind into this STB through openings, as they may
touch dangerous voltage points or short-out parts that could result in a fire or electric shock. Never spill
any liquid on the STB.
Note: Moisture may be formed inside the unit in the following conditions:
When the unit is suddenly moved from a cold environment or an air-condition room to a warm place.
Immediately after a heater has been turned on.
In a steamy or very humid room.
If the moisture forms inside the unit, it may not operate properly. To correct this problem, turn on the
power and wait about two hours for the moisture to evaporate.
Parts Replacement: When the unit parts need to be replaced, user should make sure the service
technician use the replacement parts specified by the manufacturer or having the same characteristics as
the original part. Unauthorized replacement may put the unit in the risk of fire, electric shock or other
hazards.
Safety Check: After all the maintenances and repairs are done, user is required to request the service
technician to conduct the overall safety check to ensure the machine is in the proper condition.

HWA5000
User manual Ver.2
4
Main Features
OS : Android 4.4.2
Built-in WIFI & WIFI Hotspot
Support own Android Launcher
Support Time Shift and PVR.
Extended EPG and program reservation on EPG.
Support H.265 HW decoding
Support DVB frontend and sharing Live TV channels to PC/Mobile Device
Miracast on Smartphone or Tablet.
Mirroring same HDMI output to Smartphone or Tablet via network
Support Webserver, NAS, samba, UPNP
Support various Addon from XBMC, KODI
Support WebBrowser(HTML5Support), Skype other Android Apps.
Support 2.4G wireless mouse and keyboard

HWA5000
User manual Ver.2
5
Packing contents
1. Set-Top Box with external WIFI Antenna
2. Remote Control Unit
3. HDMI cable
4. AV cable
5. 2 batteries for RCU ( AAA x 2pcs )
6. Quick Install Guide
7. Power Adapter
Quick
GUIDE

HWA5000
User manual Ver.2
6
Front & Side panel
1. Red/Geen LED : Indicator to Power on/off and working status.
2. IR/LED : To support external IR cable [Optional].
3. AV out : To support AV RCA output.
4. Micro SD Slot : To support Micro SD memory..
5. USB Port : To support USB 2.0/3.0 device like USB Stick, HDD Camera etc. .
Rear Panel
1. ANT IN : ATSC turner input from the Terrestrial antenna
2. S/PDIF : digital audio output for digital audio devices
3. External WIFI Antenna :
4. HDMI : A/V output for high-definition TV which has this input
5. Ethernet : Ethernet connection for IP networking
6. Power Supply : DC 12V, 1.5A Max.

HWA5000
User manual Ver.2
7
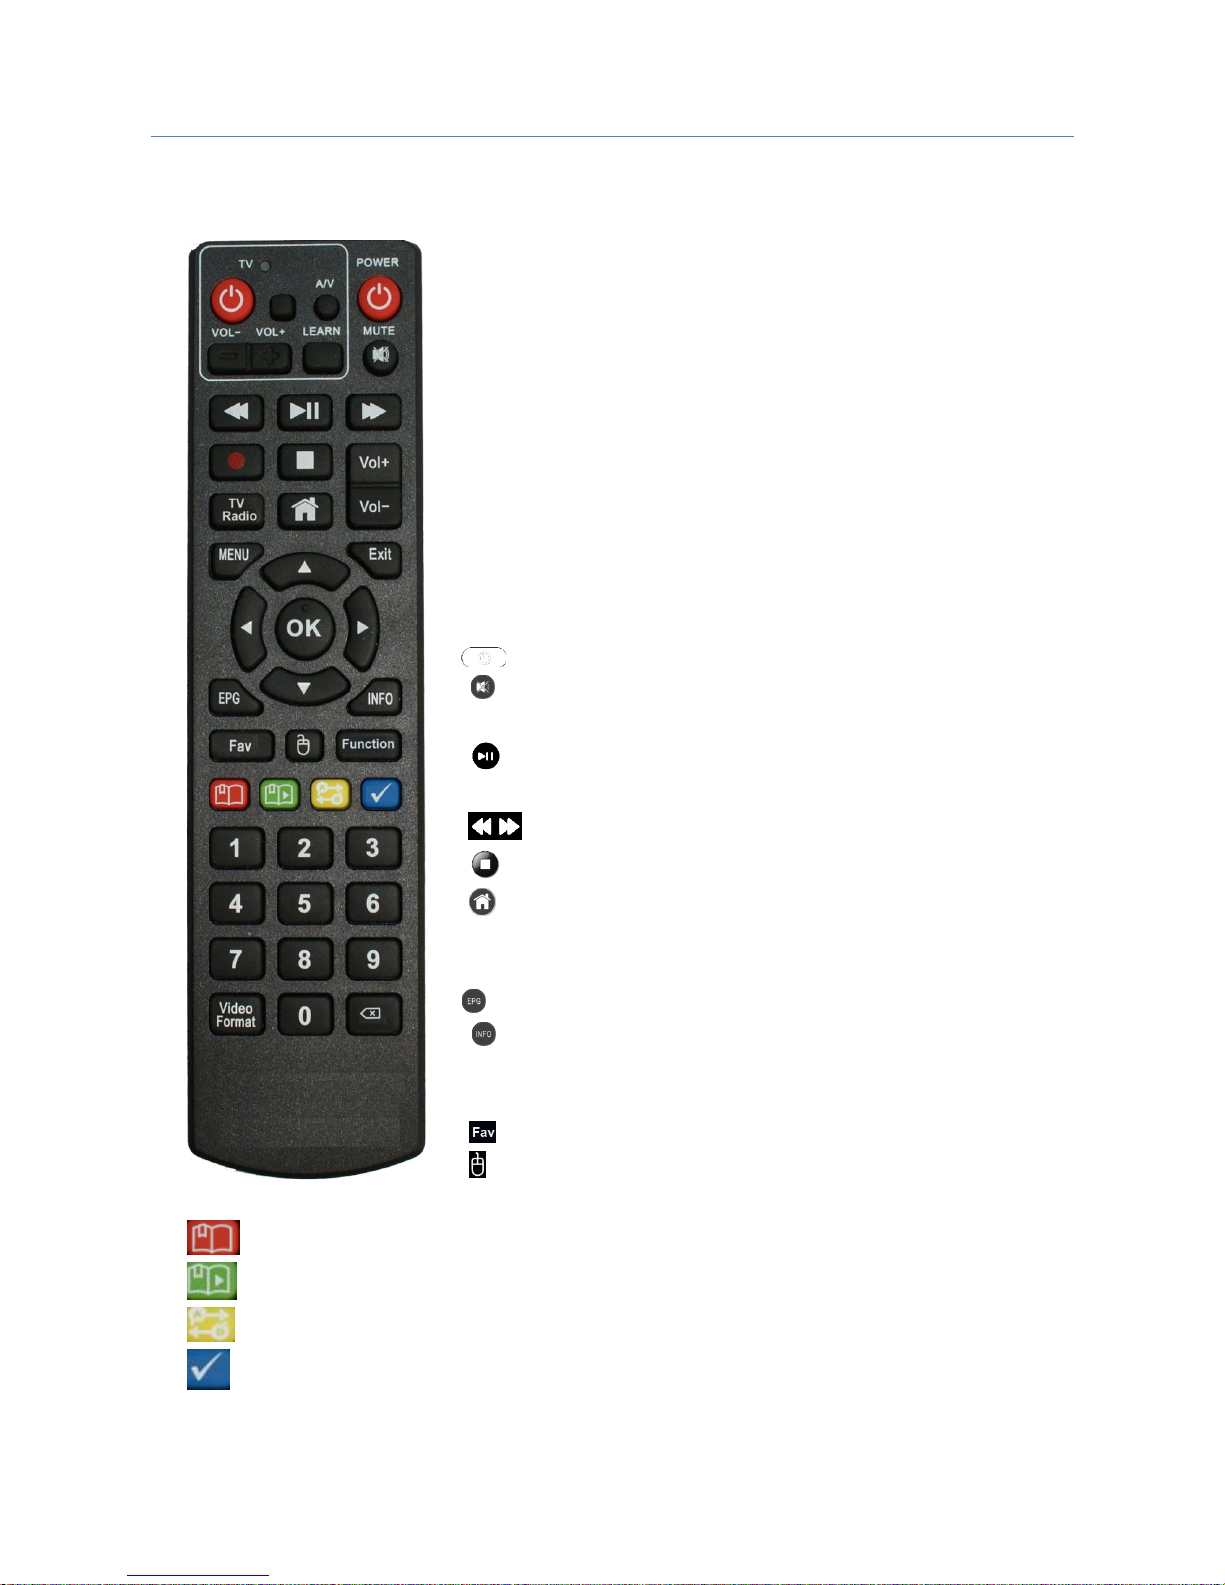
Remote Control (RCU)
TV section
Programmable Remote control:
1. Press over 5 seconds “LEARN”button, then Red LED will thicken
2. Press Power button on RCU, then Red LED will flicker.
3. Face TV RCU to this STB RCU, and press Power button on TV
RCU
4. If STB RCU recognizes power button of TV RCU, then red LED
will flicker two times.
5. Press “LEARN”button, then program of power button for your
TV will be finished.
6. Do same way for Volume and A/V button.
Box section
1. POWER : Power On/Off the set top box
2. Mute : Mute the sound, there should be the sign shown on the
screen
3. Play/Pause : Play Media file and Pause file and enter Time shift
mode
4. : Rewind/Fast Forward
5. : Stop play
6. Home : Go Android Launcher from anywhere.
7. Menu : Open the Popup menu, press again to clean the popup menu
8. Exit : Go back to the up-layer menu.
9. EPG : Open the EPG page
10. INFO : Press once to show the channel bar(should be with
Current/Next EPG title),press twice to show the current EPG with an
extended window
11. Fav : Open/Edit Favorite channel list
12. Mouse : To use Mouse control
13. Function : To use special purpose
14. : Red Control button and Use it in PVR mode
15. : Green Control button and Use it in PVR mode
16. : Yellow Control button and Use it in PVR mode
17. : Blow Control button and Use it in PVR mode
18. Video Format : Change Video Format like 720i,720p,1080i,1080p,2160p etc,

HWA5000
User manual Ver.2
8
Connecting Cable
1. Terrestrial Antenna Connection
Connect the cable from Terrestrial/Cable signal
2. HDMI Connection
Connect the receiver’s HDMI output connectors to the TV’s HDMI input connector using an HDMI
cable.
3. Composite Video Connection
Insert a jack-to-RCA cable’s jack into the A/V OUT socket on the receiver, then insert the RCA plugs
on the other end into the TV’s composite video and audio input sockets. Make sure to match the
connector colors properly.
4. AV Receiver Connection
Use an AV receiver for better audio quality. Connect the receiver’s SPDIF connector to the AV
receiver’s digital audio input connector using an optical audio cable.
5. Network Connection
Connect the receiver LAN port to the router using a network cable. For details, please refer to the
Network Settings on.
6. Power Up
A power cord with an adapter is provided in an accessory.
Plug the round end of the adapter power cord into the power input.

HWA5000
User manual Ver.2
9
Menu Structure
TV
Live TV : To watch Live TV
EPG
Multiple : To go Multiple EPG Guide
Single : To go Single EPG Guide
File Manager : To manage files on USB/SD card, Network
Fav App : Favorite App list.
All App : Android App list and Register Favorite App list
Setup
Config
Network
Misc
System
Service Scan

HWA5000
User manual Ver.2
10
Home > Setup > Config > Service Scan
1. Search Mode:
•Auto Scan: Auto-scanning based on broadcasting type & country.
2. Broadcasting type (your Antenna type)
•Terrestrial/ Cable: check a signal where you get
3. Country : Select country where you are scanning channels
4. Filtering options : TV/Radio,
5. Press Red button to scan
6. After scanning channels, press “Exit”button, then channel will be stored and go to Live TV to enjoy
Live TV channels
Live TV

HWA5000
User manual Ver.2
11
1 Channel list
Press “OK”on RCU, You can manage channel list.
1) Sort
In channel list, press “Menu”button, you can sort channels
By Numbering
By Alphabet
By FTA(Free to Air)/Scrambled
By Frequency
2) Favorite List
In channel list, press “Fav”button, you can make Favorite channel list.
Move to All services and select channel to put Favorite List.
And you can rename FAV1~ FAV5 to other name.
After select FAV1 mode, you can keep on FAV list mode.
When you press “Info”button on RCU, you can see information for LIVE TV channel.
Popup Menu in Live TV
Press Menu button in LIVE TV mode. Then you can see Popup Menu
1. Timer List
2. Recording information
3. Tuner information
4. Color setting
5. Sound Track
6. Closed Caption
7. Sleep timer

HWA5000
User manual Ver.2
12
Timer List
-Press Green button to add Timer :
-You can select “View”or “Record”
-Set channel/time/duration/storage to record channel or change channel
Color Setting : you can adjust color
Sleep Timer : you can set sleep timer
PVR
To record channel, On live mode, press “ ” button then you can see recording menu
Select option like duration, storage device. Then press “Accept”button then will start recording.
It will record on staorage Device.
To stop recording press “ ” button

HWA5000
User manual Ver.2
13
Time Shift
To use Time shift function, you need to designate storage.
-Enable Time Shift
-Designate Storage device.
After setting Time shift function,
To use time shift function, in Live TV mode, press “ ” button then you can enter time shift mode
In time shift mode, you can use button to control for Timeshift feature
Closed Caption
To activate Closed caption, press “Blue”button on RCU when you see CC mark in information bar
Or use Popup menu after press “Menu”button on RCU
Audio Sound
When you have multi Audio sound track, then you can see Green Sound mark.
Press Green button on RCU and change sound track.

HWA5000
User manual Ver.2
14
File Manager
You can manage files to
Install App
Watch movies
See photos
Listen Music
Edit file/Folder
Setup
Config
Language
Change your language
Time
You need to set up your local time.
Select your time zone.
A/V output
HDMI Resolution : changing/Select HDMI output resolution.
Screen Size Setting : Adjust OSD screen size.
Color Setting : Adjust color for your TV
Aspect Ratio : Adjust Aspect for your TV.
Network
WIFI : setting your WIFI network environment
Ethernet : setting your wire internet environment
3G : setting your 3G Dongle internet environment
Misc

HWA5000
User manual Ver.2
15
OSD
Help Box Display : Help box On/OFF flag
EPG Help Display : EPG Help box On/OFF flag
Local Channel Number : LCN(Local Channel Numbering) On/OFF
Access Control
PVR
Time Shifting : On/Off
Time Shift Warning : warning message On/Off
Time Shift Storage Device : storage device selection
Time Shift Period : To adjust timeshift period
File Player
Resume Play
Automatic play for Next
Filter Default
Skip Left/Right contents
Skip Up/Down contents
Preference
Keyboard Order
System
Firmware
Information : firmware Information
Upgrade : To upgrade firmware
Backup
Backup CH DB : To backup channel Database
Restore CH DB : To Restore channel Database
Reset
Reset CH DB : To reset channel Database
Factory Reset : To reset all data include Android part

HWA5000
User manual Ver.2
16
How to use Android App
Press “Home”button on RCU to use Android App
Go “All App”
Make Favorite App List
-Press OK button over 5 seconds, then you can see Delete, Information, Favorite option
-Select Favorite then your App will move on Favorite list.
Delete App
-Press OK button over 5 seconds, then you can see Delete, Information, Favorite option
-Select Delete then your App will remove.
Check Information of App
-Press OK button over 5 seconds, then you can see Delete, Information, Favorite option
-Select Information then you can know information of app..
FAV App
After adding Favorite App in App App menu, you can use this App on Menu.
System Upgrade
1.1 From Android Setting menu.
Prerequisite
1) Copy Update.zip into your USB memory stick.
2) Insert USB memory stick on USB slot
Android System Upgrade

HWA5000
User manual Ver.2
17
Select “Setup System Upgrade ”.
Select D: (Drive).
Upgrading procedure will start after Rebooting.
1.2 System Urgent Recovery
If you can’t see Android UI, then you can recover box via bootloader.
Case 1 : Press tact switch on bottom on box.
1) Power off Box.
2) Copy the update zip to an USB stick
3) Put it in the USB slot.
4) Power On, at the same time, Press a tact switch on bottom on box until update screen change.
Table of contents