HONBIKE Uni4 User manual

1
EN
Owner's Manual

IMPORTANT
This manual contains important information regarding the safe operation
and maintenance of your bicycle. Read all sections before you ride your new
HONBIKE, and carefully follow the instructions. If you have any questions or do
not understand something in this manual, take responsibility for your safety and
consult HONBIKE. Keep your owner’s manual and any other documents that came
with your HONBIKE for future reference. All content in this update and the manual
is subject to change or withdrawal without notice. Visit www.honbike.com to
view and download the latest version. HONBIKE makes every effort to ensure
the accuracy of its documentation and assumes no responsibility or liability
if any errors or inaccuracies appear within. This manual is not intended as a
comprehensive use, service, repair or maintenance guide.
WARNING
Riding any type of bicycle involves risks which can’t be predicted or avoided and
that are the sole responsibility of the rider. This manual makes no representations
about the safe use of bicycles under all conditions. Off road riding, jumping or
acrobatic tricks can cause frame damage which may result in death or serious
injury of the rider. It is the sole responsibility of the rider to become properly
educated and prepared to ride safely.
Pay particular attention to the following symbols:
Indicates a potentially
dangerous situation that,
if not avoided, could
result in injury or death.
Indicates a potentially
dangerous situation that,
if not avoided, could result
in damage to the bicycle or
the voiding of your warranty.
Indicates specific safety
instructions or procedures on
how to handle the product,
or refers to the section of the
operating instructions that
deserves your special attention.
CAUTIONWARNING SAFETY INSTRUCTION
Register your HONBIKE Uni4
Before using your HONBIKE Uni4, you need to register it via the HONBIKE
app to activate the electric system of your Uni4. You can scan the QR code
or go to www.honbike.com to download the app and learn how to register
your HONBIKE Uni4. Once registration succeeds, you become the owner
of your HONBIKE Uni4 in our record, which serves as proof of ownership if
your bike is ever lost or stolen.

TABLE OF CONTENTS
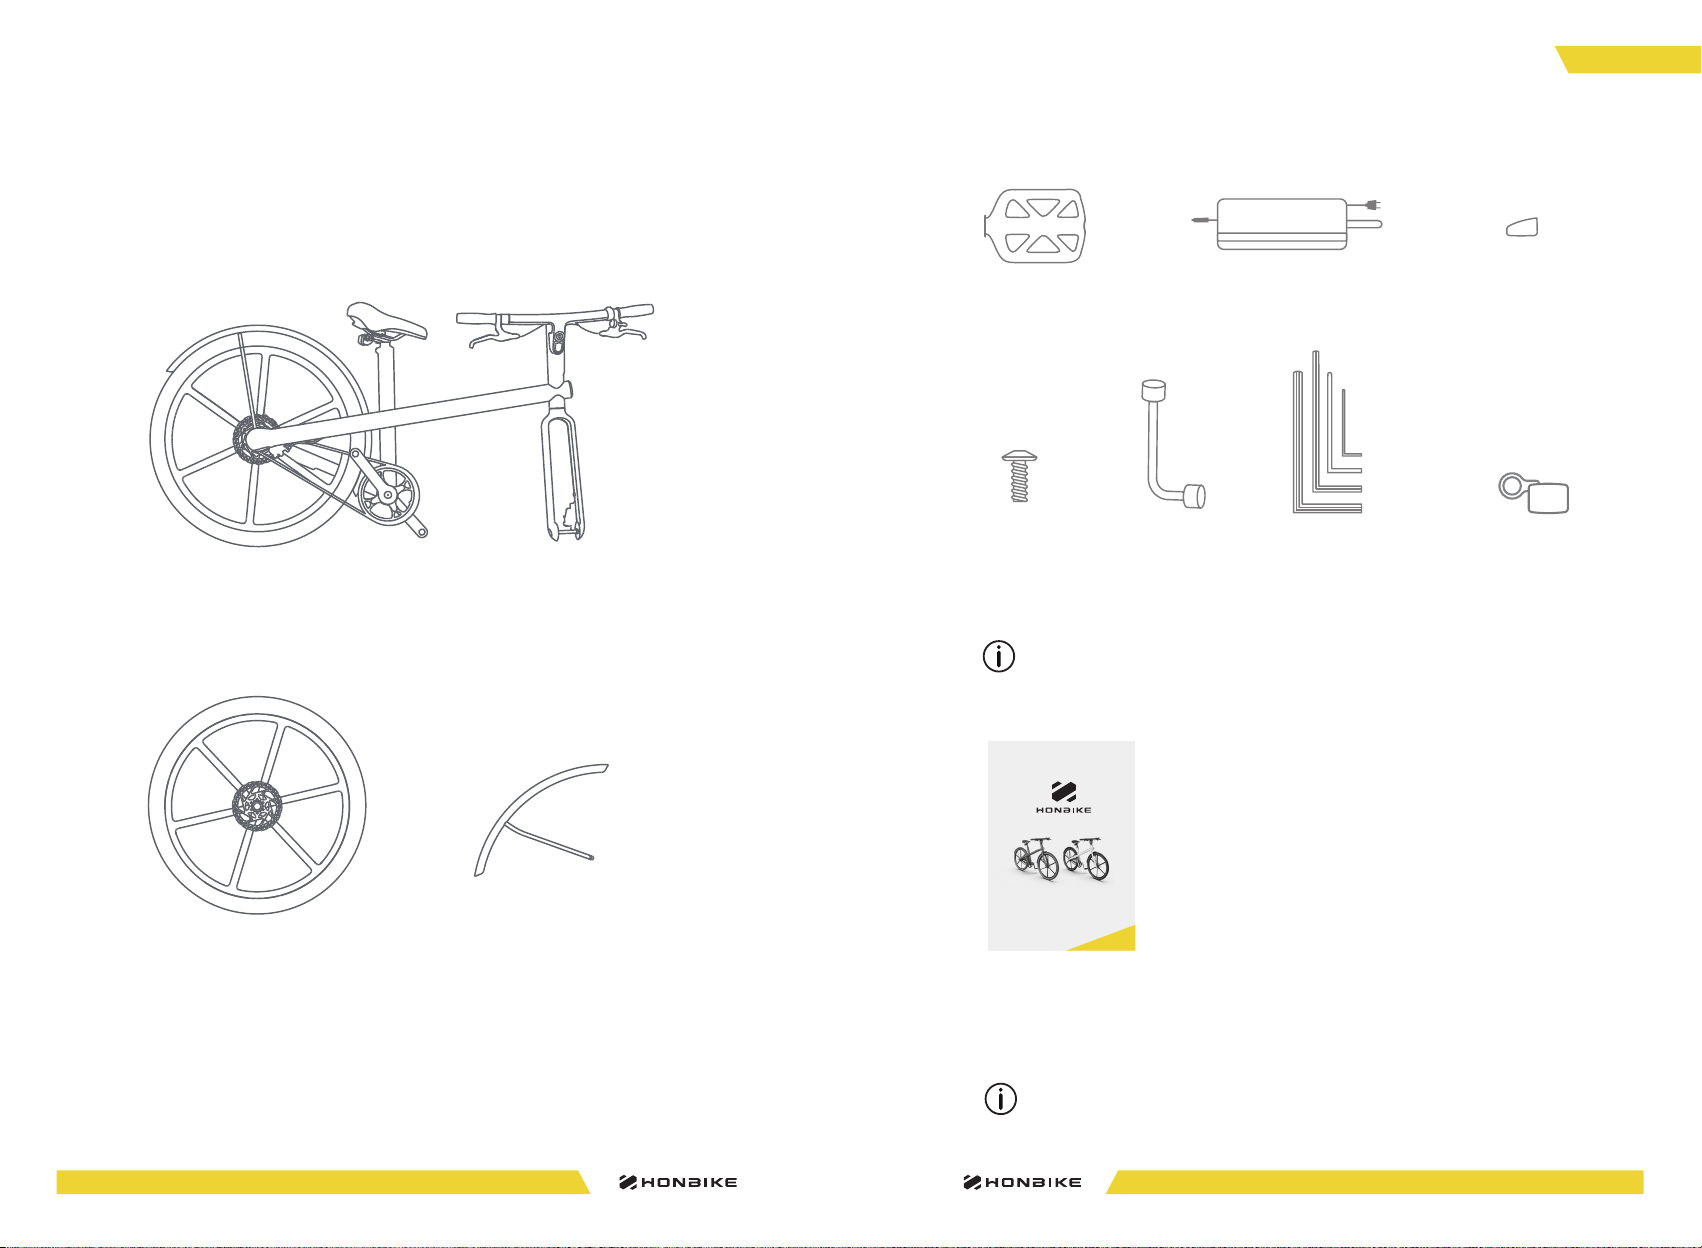
What’s in the box ................................................................................................ 1
Accessories & Tools ......................................................................................................2
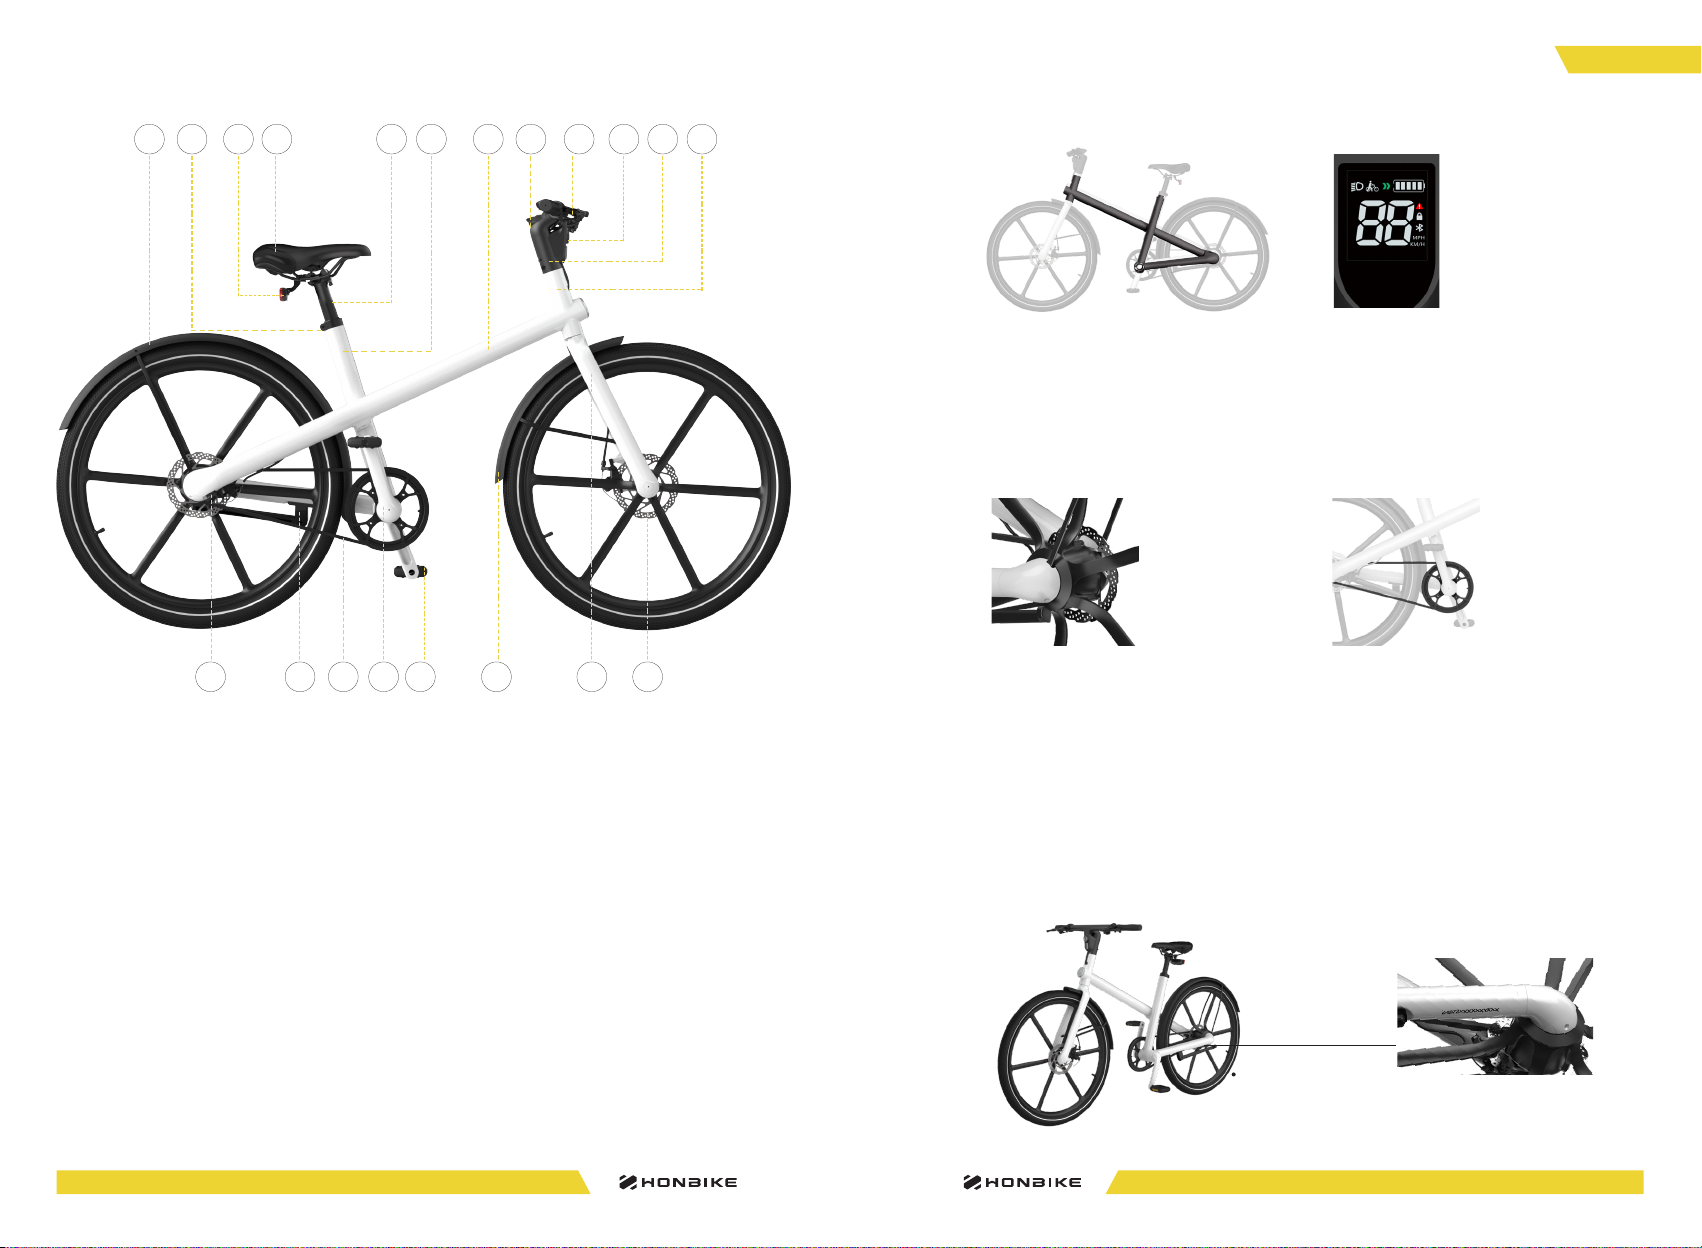
Key features ................................................................................................................. 4
Frame number ................................................................................................................ 4
Get your HONBIKE ready ................................................................................. 5
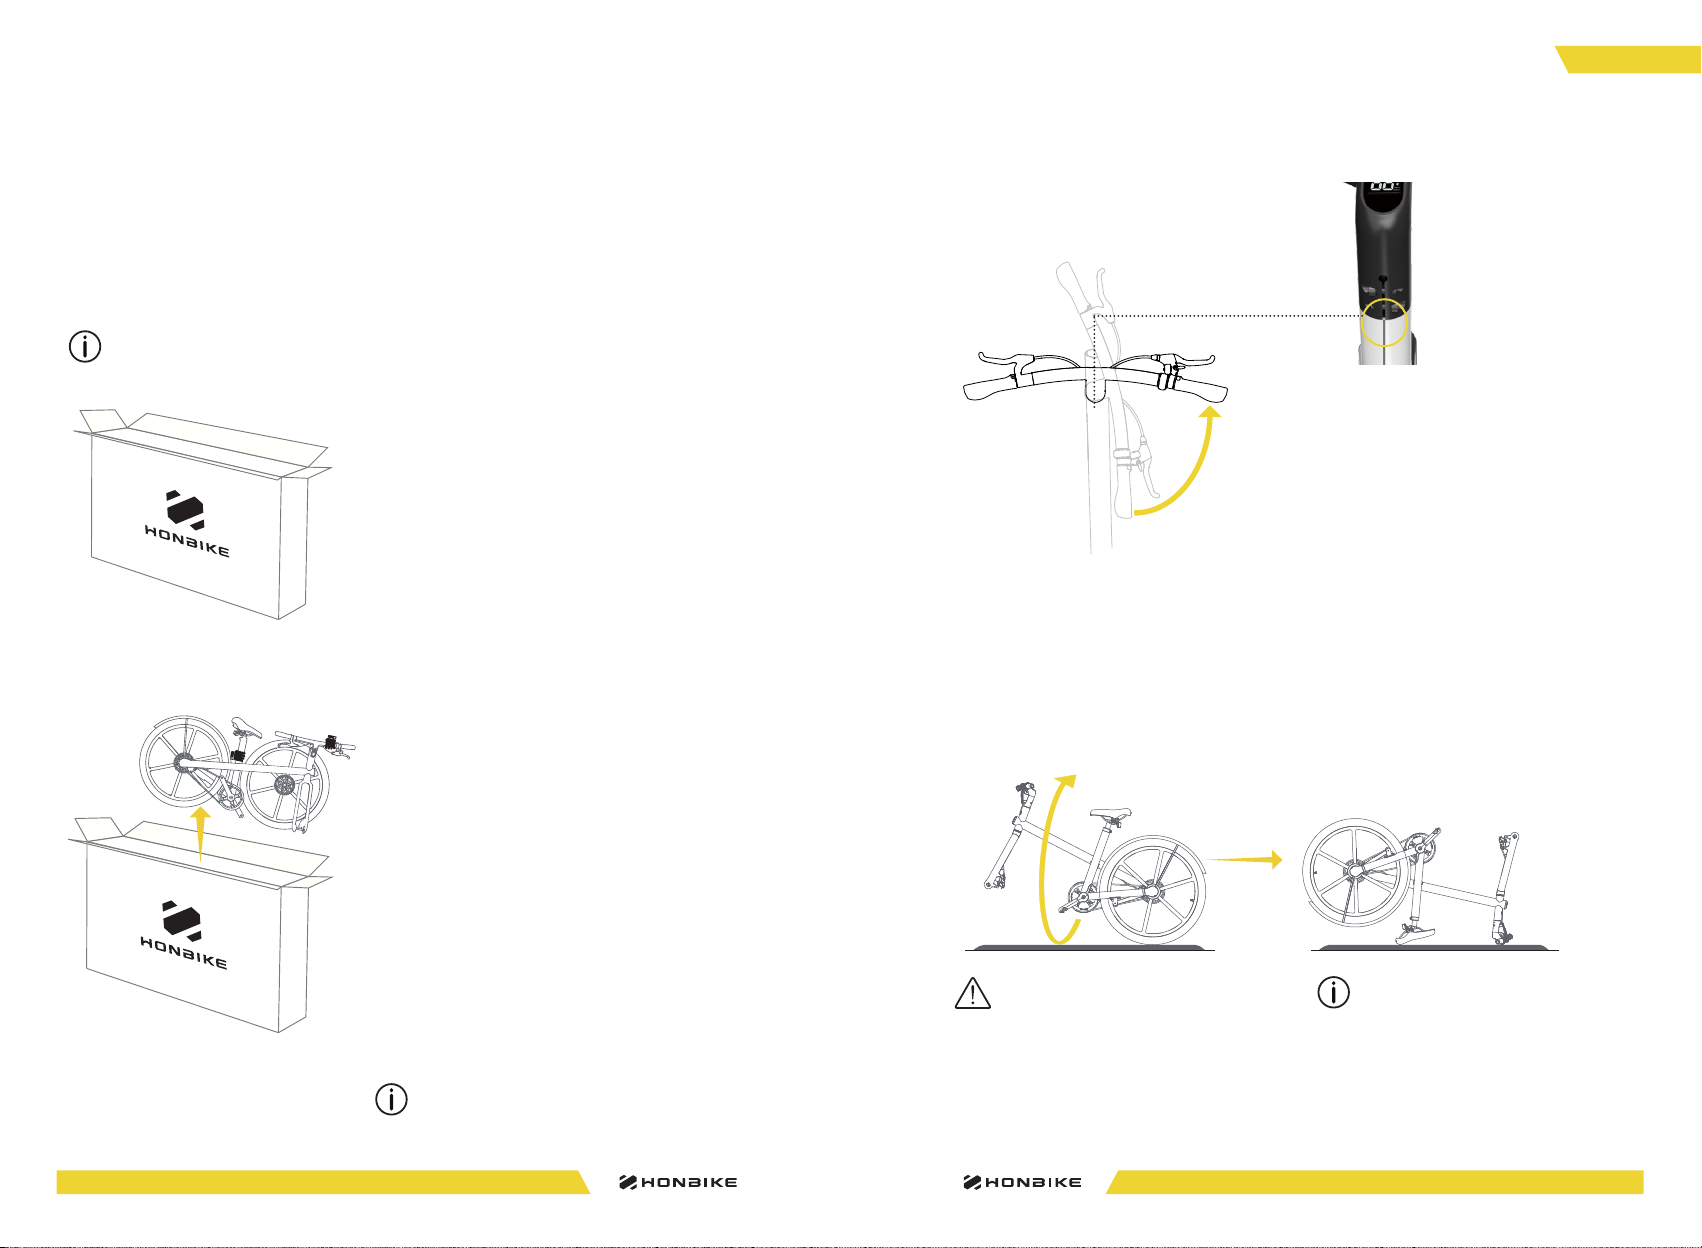
Unboxing ...........................................................................................................................5
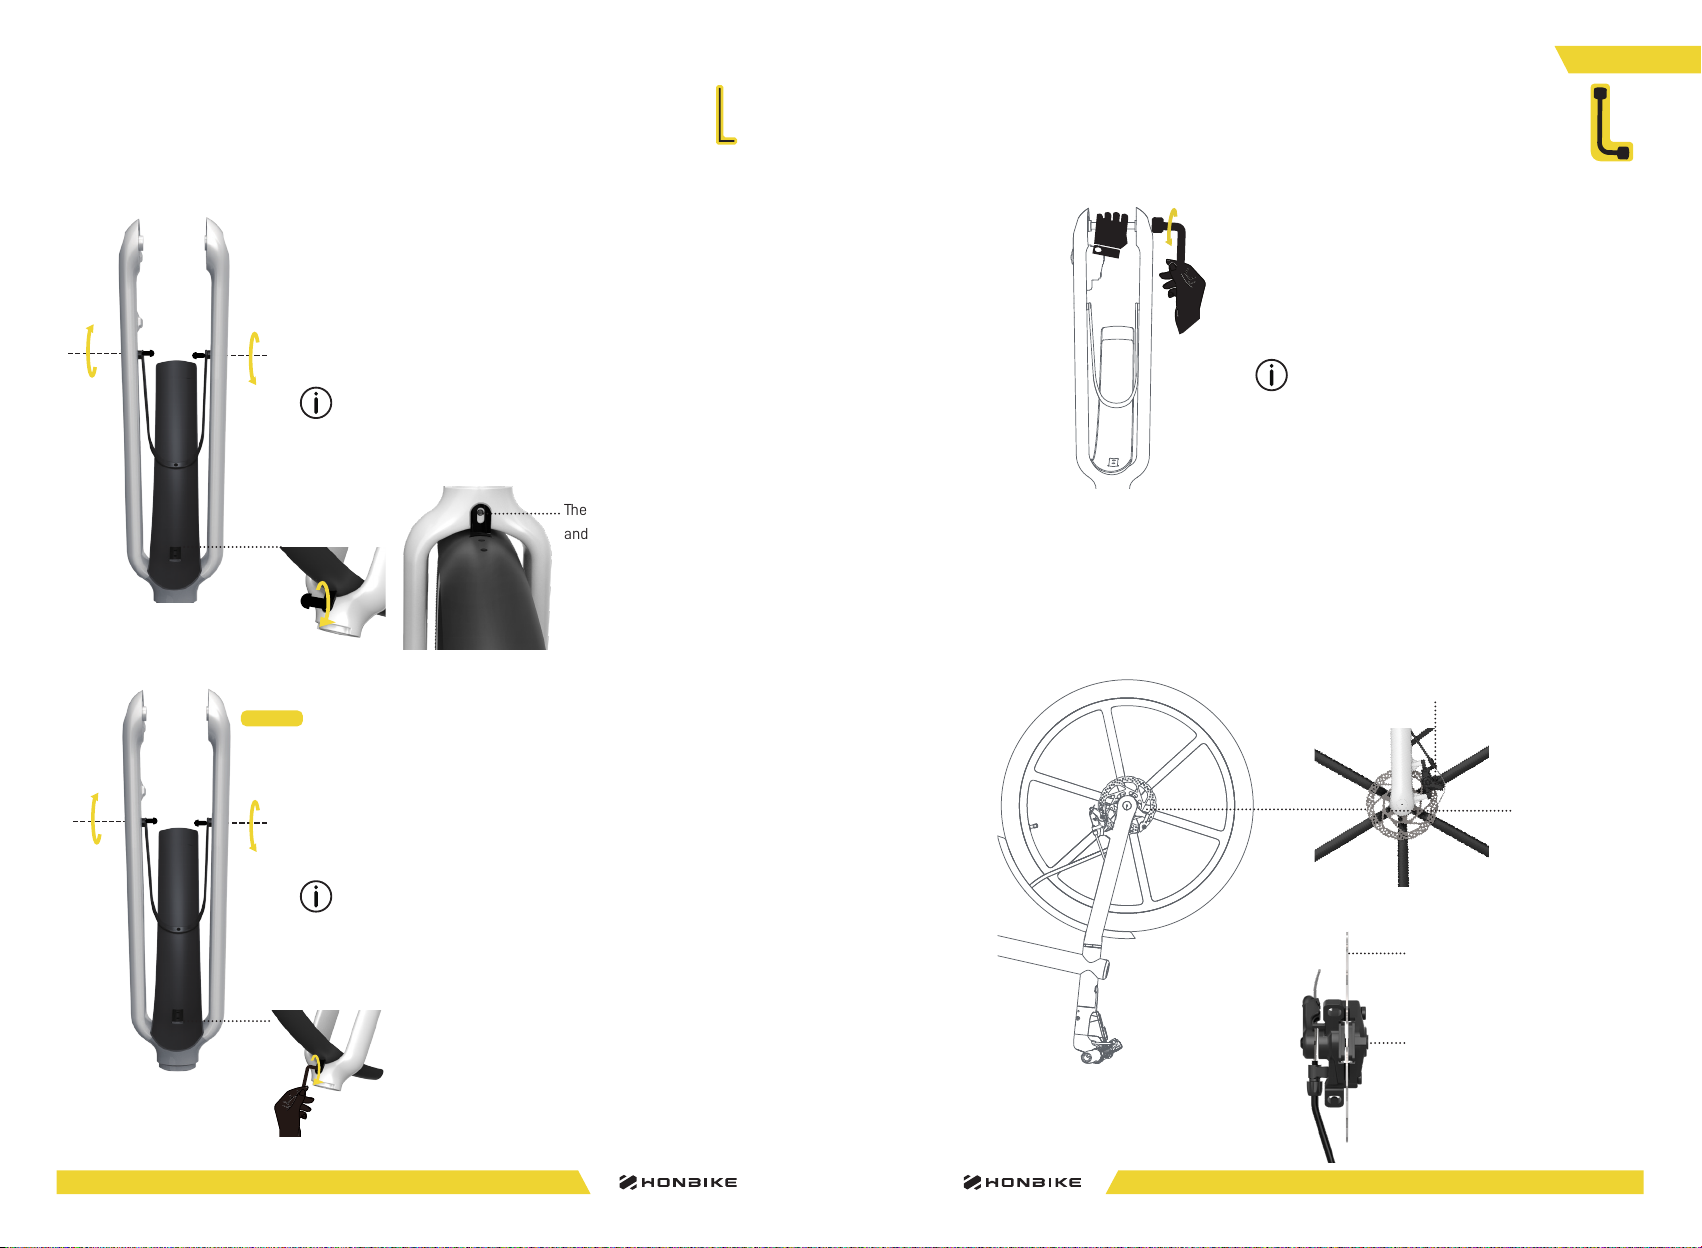
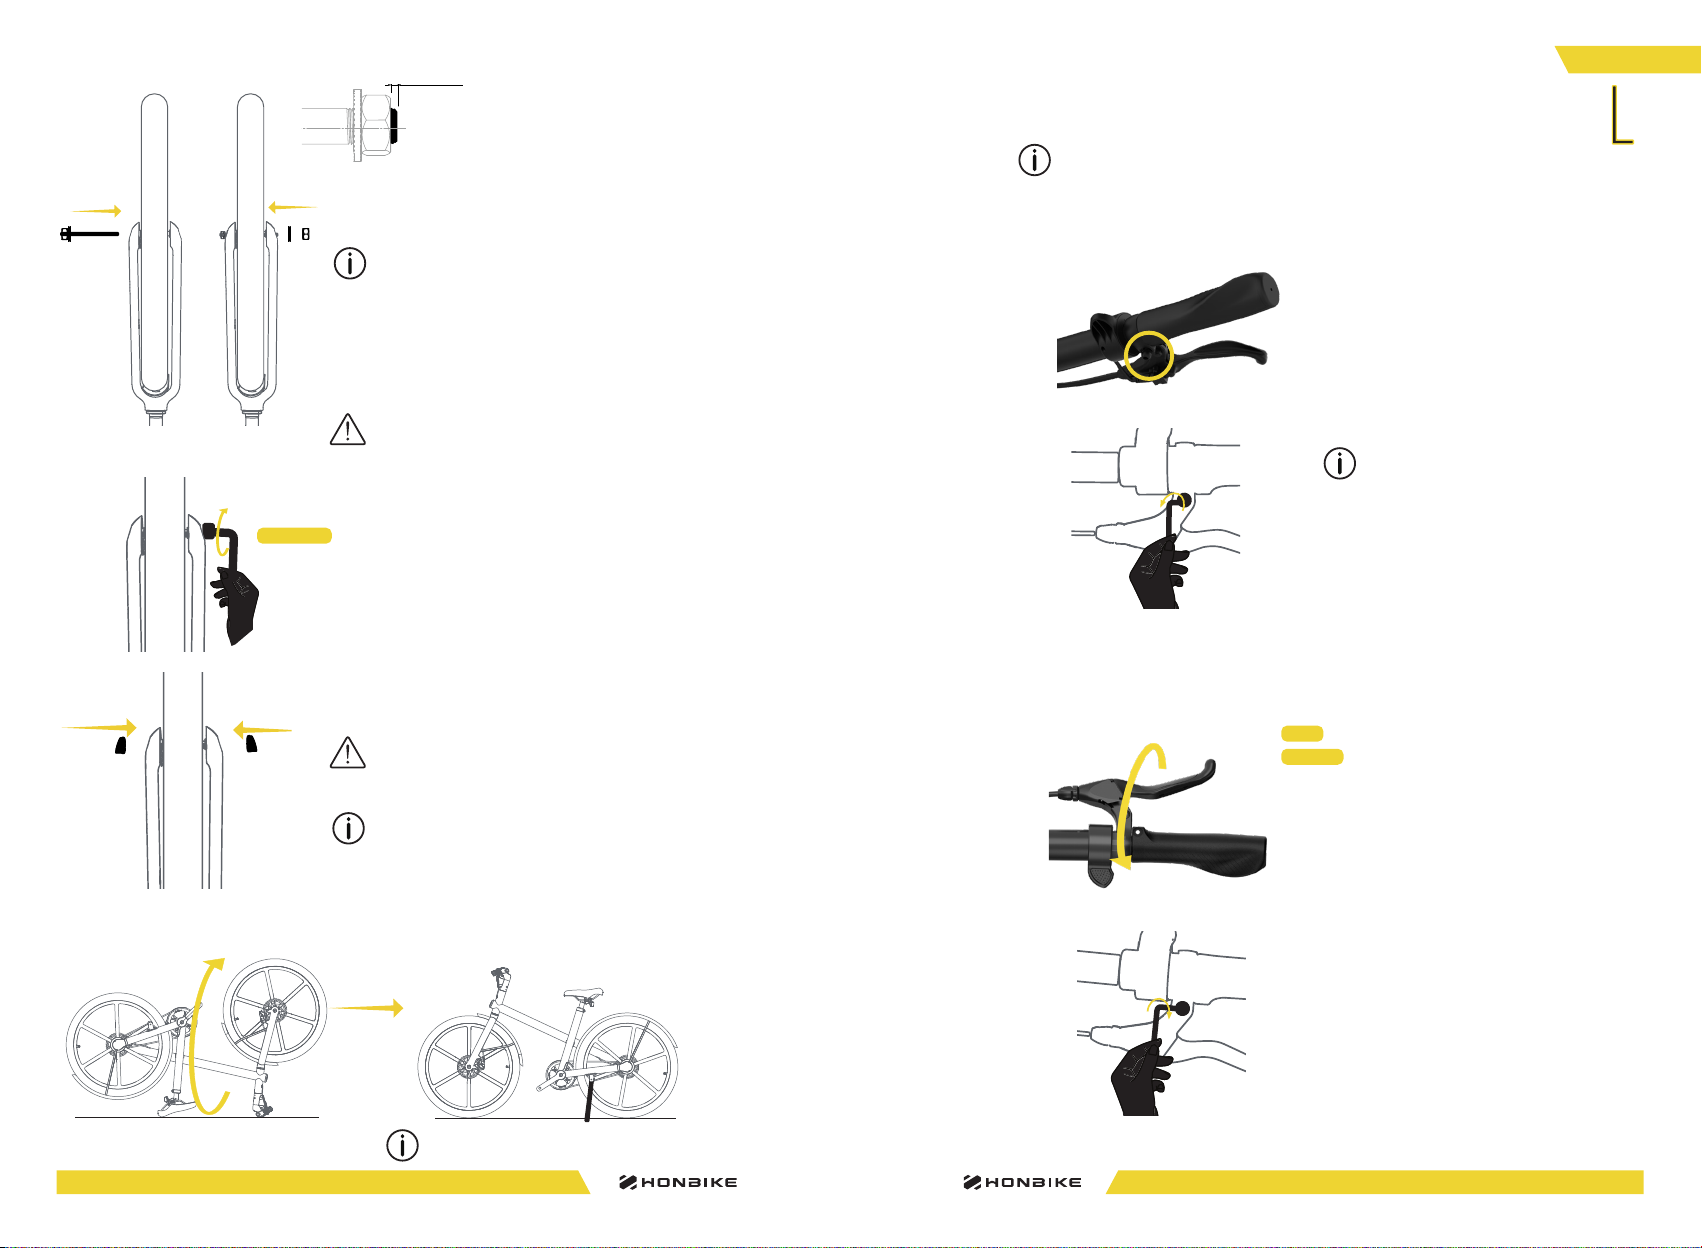
Install the front fender ...............................................................................................7
Install the front wheel ................................................................................................ 8
Adjust the right brake lever .....................................................................................10
Install the pedals .......................................................................................................... 11
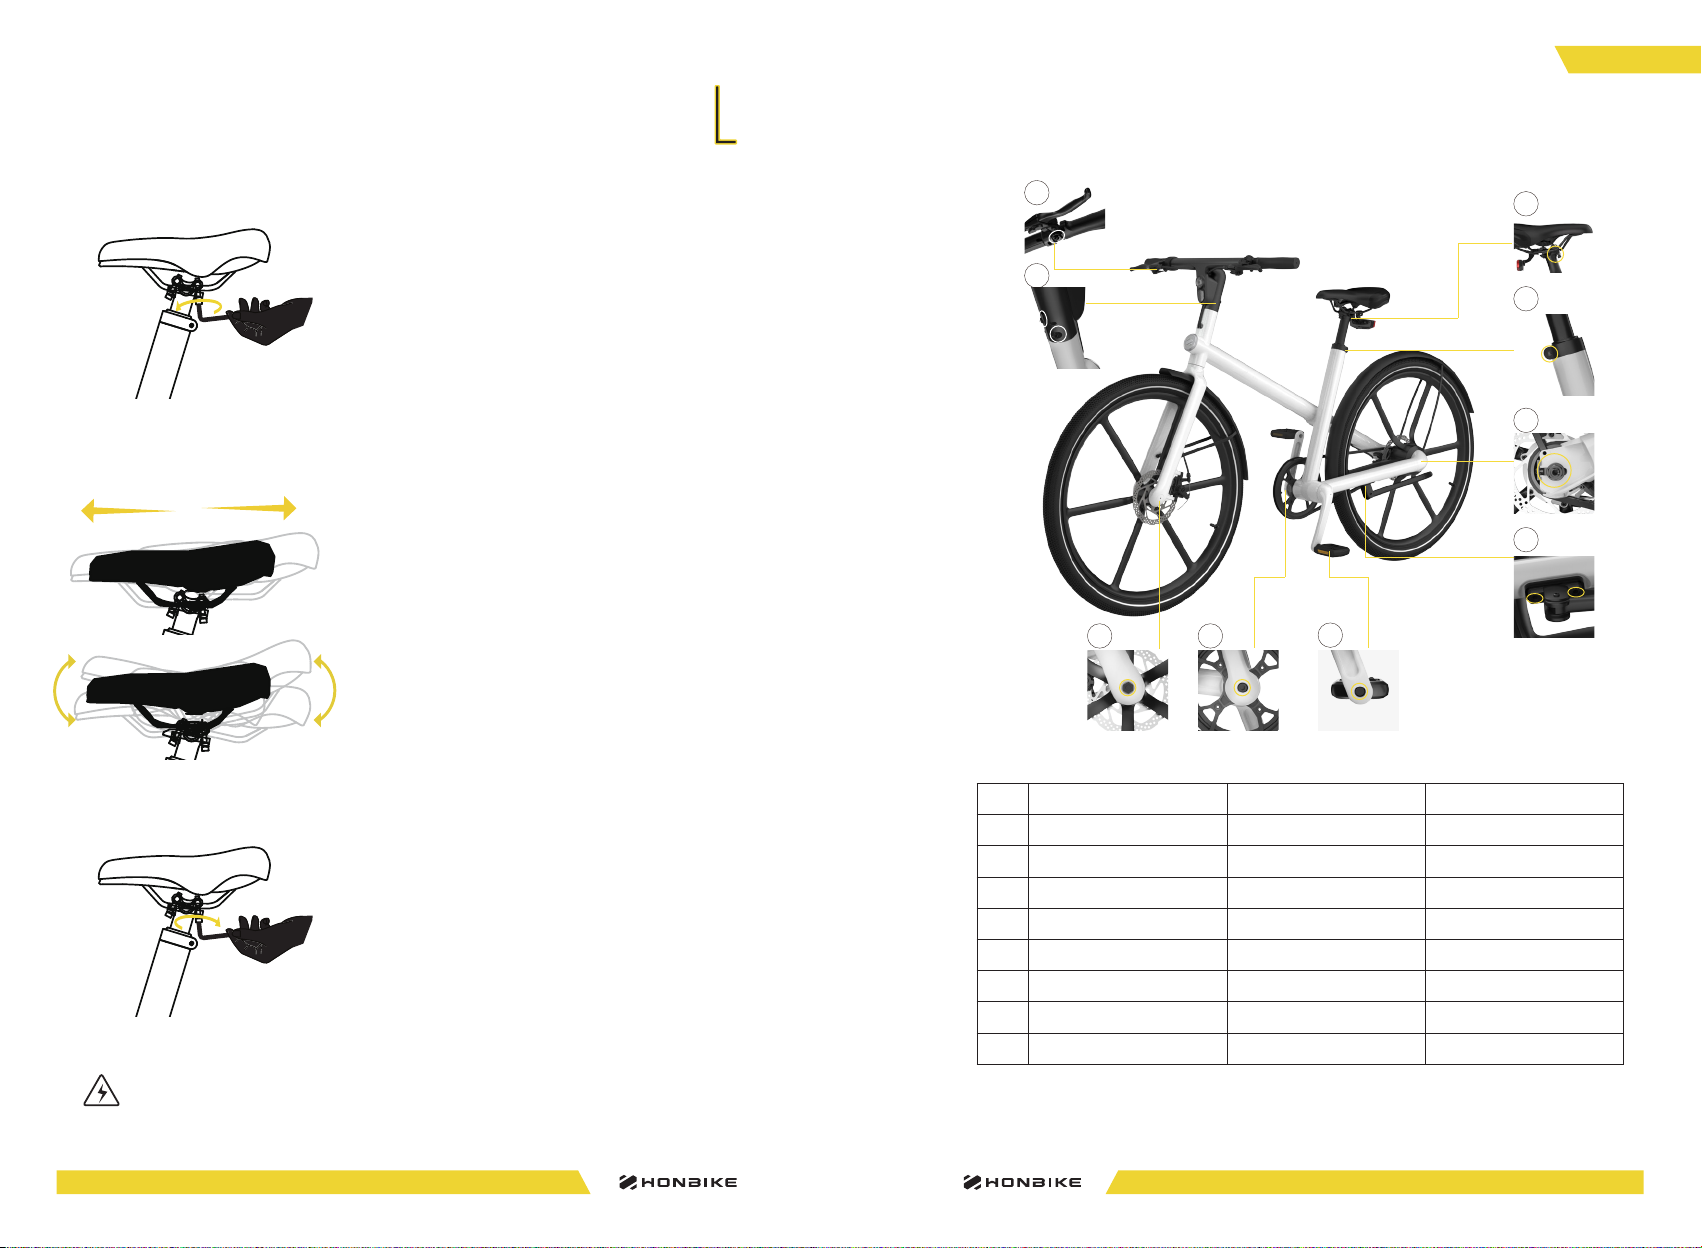
Saddle height adjustment ........................................................................................12
Adjusting the saddle position and angle ...........................................................13
Recommended torque values ................................................................................14
Getting started ................................................................................................... 15
Display operations ........................................................................................................16
Walk mode .......................................................................................................................18
Throttle ..............................................................................................................................18
Display advanced settings .......................................................................................19
Battery ...............................................................................................................................21
Charging the battery................................................................................................21
Battery & Charger safety information............................................................ 22
Proper frame sizing .................................................................................................... 23
Intended use .................................................................................................................. 24
Road conditions suitable for this model ........................................................... 24
Maximum permitted overall weight .................................................................. 25
How to increase riding mileage ............................................................................ 25
Before the first ride .................................................................................................... 26
Rear light ......................................................................................................................... 27
The front reflector installation instructions (US Version) ....................... 27
Before every ride .......................................................................................................... 28
Safety ...................................................................................................................... 29
Thebasics ....................................................................................................................... 29
Saferiding ...................................................................................................................... 30
Ridinginbad weatherconditions .........................................................................31
Ridingin low light conditions ..................................................................................31
Maintaining your Honbike .............................................................................. 32
Serviceinterval ............................................................................................................ 33
Replacingparts ........................................................................................................... 34
Maintenancenotes .....................................................................................................34
Warranty ............................................................................................................... 35
Warranty notes ............................................................................................................36
Exclusions ......................................................................................................................37
Specialnotes ................................................................................................................37
Disclaimer ........................................................................................................... 38
Declaration of conformity .......................................................................................38
Federal Communications Commission (FCC) Compliance Statement for USA
.............38
ISED Statement .............................................................................................................39
Liability Disclaimer .....................................................................................................39
Legal ..................................................................................................................... 40

1 2
EN
Charger& cable *1
Accessories & Tools
Pedal * 2
Hex Key Front Reflector
(US Only)
The front reflector is only compatible with the US version of HONBIKE Uni4, therefore the
above accessories are not included in the toolkit in countries and regions outside the US.
3pcs Socket spanner *1
Dropout cover *4
Owner‘s Manual
M5
#3
#4
#5
#6
After unpacking, please take all items out of the package and make sure that everything
listed above is included. If anything is missing or damaged, please contact HONBIKE
immediately for assistance.
Owner's Manual
Manuel du propriétaire
Benutzerhandbuch
-EN
-FR
-DE
What’s in the box
Front wheel *1 Front fender *1

3 4
EN
1. Rear Fender
2. Saddle Clamp
3. Rear Light/Reflector
4. Seat
5. Seat Post
6. Seat Tube
7. Frame
8. Display
9. Brake Lever
10. Front Light/Reflector
11. Stem
12. Head Tube
13. Front Disc Brake
14. Front Fork
15. Front Fender
16. Pedal
17. Crank
18. Carbon Belt Drive
19. Kickstand
20. Charging Port
1 2 3 4 765 8 9 10
17 15 14 131819 1620
11 12
Example: 24872XXXXXXXXXX
Rear Hub Motor
High efficiency
High reduction ratio 1:13
Handlebar Integrated display
LCD screen
Built-in bluetooth
Riding status display
Carbon Gates Belt Drive
11,000km maintenance free
Gates Carbon Drive belt delivers a
smooth and quiet ride. It’s lightweight
and low-maintenance.
Frame
Aircraft-grade 7000 series
aluminum material enables sturdy
and minimalist frame design.
Key features
Frame number

5 6
EN
1. Open the carton carefully and try
not to damage it. Take out the foam.
2. Take the bicycle out of the
carton carefully by holding the
seat tube and handlebar (as
shown in the picture). Please do
not hold on to the front wheel and
the fender when lifting upwards.
3. Rotate the handlebar
anticlockwise, as shown in the
figure. Make sure the groove on the
stem is aligned with the mark on
the head tube.
Please assemble the bicycle on a smooth indoor surface or carpet to avoid scratching it.
Visit www.honbike.com to view corresponding videos to install and use
HONBIKE Uni4 correctly. HONBIKE packaging is delicately designed for the safe
transportation of electric bicycle. We recommend that you keep HONBIKE original
packaging for at least one month in case you need to send your HONBIKE Uni4 for
service or maintenance.
Unboxing
Get your HONBIKE ready
It is recommended to operate by two people.
4. Flip the bicycle 180 degrees and place
it on levelled ground. Ensure that the
bicycle does not fall.
Before the front wheel is installed, the
bicycle may not maintain balance.
Please add auxiliary support when you
encounter similar problems.
Place the bicycle frame on a soft carpet
or lay a cloth on the ground to prevent
damage to the frame body.

7 8
EN
CB
Install the front fender
1. Take out the front fender and attach it to
the front fork, as shown on the left. Loosely
tighten the three M5 bolts to the front fork in
the order of ABC.
Do not fully tighten for subsequent adjustment
of position.
The axle nut and washer on the other side can
be removed with the axle. You don’t have to
loosen them.
Make sure that the front fender is not skewed or
tilted. Make sure it does not shake at the center
of the front fork.
2. Firmly tighten each bolt in the order of
ABC in the arrow direction until all bolts are
secured.
CB
A
A
The fender can move up
and down in a small scope.
6~8 Nm
H4
Install the front wheel
2. Remove the plastic guard that protects the
brake disc. Put the front wheel into the front
fork. Make sure the brake disc is aligned with
the brake pad.
brake disc
brake disc
brake pad
brake pad
1. Hold on to the middle part of the axle tightly
with one hand, and loosen the axle nut on any
side anticlockwise with a socket spanner.
Remove the axle nut, washer, and axle and set
them aside for later use.

9 10
EN
3. Install the axle on the front fork.
4. Place the washer and nut you removed in
step 1 in sequence.
5. Tighten up the nut on the outside clockwise
using the socket spanner.
6. Cover the dropout cover on both sides.
After the front wheel is installed, make sure that the
front fender fits the curvature of the front wheel.
There are 4 dropout covers totally in the tool box,
two for loading and two spare ones.
It is recommended to operate with two people.
Please follow the instructions shown in the
diagram. Install the washer first, then screw on
the nut.
The exposed part of the axle shall be about 1.5mm
when the spacer nut is strung on the axle.
7. After the front wheel is installed, flip the
bicycle 180 degrees, land it correctly on the
ground and put down the kickstand.
AB
AB
1.5mm
35~40Nm
3 4
Adjust the right brake lever
1. Use Hex Key #5 to loosen the bolt on
the right brake lever anticlockwise.
2. Once the bolt is adequately loose,
adjust the brake lever to an appropriate
and comfortable position. Use Hex Key #5
to tighten the bolt clockwise.
5~8Nm
M6*1
The left brake lever of HONBIKE Uni4 is adjusted at the factory.
Please follow the steps below to adjust the right brake lever.
The bolt is under the brake lever.
H5

11 12
EN
Apply some anti-rust oil or grease on the pedal threads if necessary.
Take the right pedal with the label R.
Screw it clockwise onto the crank by
hand. Use Hex Key #6 to tighten it.
Right:
Take the left pedal with the label L.
Screw it anticlockwise onto the
crank by hand. Use Hex Key #6 to
tighten it.
Left:
Install the pedals
20~25Nm
20~25Nm
Saddle height adjustment
1. Use Hex Key #5 to loosen the clamp bolt
anticlockwise until the saddle can be moved
with little force.
2. Lift the saddle upward to an appropriate
height.
3. Tighten the bolt clockwise with Hex Key #5.
Be careful not to loosen this bolt too much.
When you see the “Minimum Insertion”
warning mark, the saddle has been raised
to its highest position.
MIN.INSERTION
1
2
3
4
5
6
7
8
9
10
MIN.INSERTION
1
2
3
4
5
6
7
8
9
10
13~15Nm
H6 H5

13 14
EN
1 Brake lever bolts 5-8 N·M Hex Key #5
2 Handlebar bolts 13-15N·M Hex Key #5
3 Saddle adjustment bolts 20-25N·M Hex Key #5
4 Saddle clamp bolt 13-15N·M Hex Key #5
5 Rear wheel nuts 35-40N·M adjustable wrench
6 Kickstand bolts 13-15N·M Hex Key #5
7 Pedals 20-25N·M Hex Key #6
8 Crank arm bolts 40-45N·M Hex Key #8
9 Front wheel nuts 35-40N·M Socket spanner *1
9
1
2
87
6
5
4
3
Recommended torque values
Ensure correct setup, tightening, and torquing to recommended torque values
is performed on your bicycle before first using it and check the setup, tightening,
and condition of components and hardware regularly.
Adjusting the saddle position and angle
H5
1. Remove the rubber plugs on the
bolts and keep them safe. Use
Hex key #5 to loosen the saddle
adjustment bolts.
2. Once the bolts are adequately
loose, the saddle can be moved
forward or back and angled up or
down.
3. Move the saddle to the desired
position, and tighten the bolts to
20-25Nm. Install the rubber plugs
to protect the bolts.
Do not exceed the maximum limit marking on the saddle rail when you
move the saddle.

15 16
EN
1. Power button
2. Plus button/ Light button
3. Minus button/ Walk mode
4. Light
5. Speed
6. Walk mode
7. Riding Mode
8. Battery power
9. Error indicator
10. Lock indicator
11. Bluetooth
12. Switch between km/h and mph
13. Throttle
Gettingstarted
The remaining battery capacity is an estimated value according to the current riding,
the actual capacity is closely related to the user's riding habits, road conditions, and
power-assist level selection.
1
5
4
6 7 8 9 10
11
12 13
2
3
Display operations
Power on/off
Press and hold the Power button for 3 seconds until the display is
on/off.
The power will automatically shut down if the bike hasn’t been used
for more than 5 minutes.
Speed unit by default
US version: mph, non-US version: km/h
Turn on/off the front light
The front light of the bicycle is turned off by default.
Press and hold the "+" button for 2 seconds to turn the headlights
on. At the same time, the brightness of the screen backlight
will be reduced to level 1. To turn off the headlight, press and hold
the “+” button again for 2 seconds.
When the ambient brightness is low or when riding at night-time, please turn on the
headlights.
Bicycle mode
(no arrow)
Eco mode
(green arrows)
City mode
(blue arrows)
Sport mode
(red arrows)
Riding Mode
Short press the Plus or Minus button to switch between different riding
modes. Uni4 is equipped with four riding modes.

17 18
EN
When riding the bicycle for the first time, we advise you to start from the Eco mode. When
you are familiar with the bicycle and have experience riding it, then try higher levels. Higher
levels mean higher speeds, so please keep your mind focused when riding the bicycle.
Do not step on the pedals before sitting in the saddle, select the lowest drive
assistance and be ready to brake when you set off. Risk of falling!
When you are finished riding, please turn OFF the power so you do not accidentally
touch the throttle getting off the bike.
Eco
mode
City
mode
Bicycle
mode
Sport
mode
Power on
Bicycle mode
:
The motor will not offer any assistance, but the display and
lights will still function.
Eco mode: Most efficient mode for maximum range while offering a
small level of power assist.
City mode:
Medium power mode, medium range.
Sport mode
:
Maximum power mode for high-speed riding.
Eco mode is the default configuration when your Uni4 is first turned on.
In the Eco mode, short press the Plus button to switch to the City mode, and
short press the Minus button to switch to the Bicycle mode.
In the City mode, short press the Plus button to switch to the Sport mode, and
short press the Minus button to switch to the Eco mode.
In the Sport mode, short press the Minus button to switch to the City mode,
and short press the Minus button one more time to switch to the Eco mode.
Walk mode
Throttle
Non-US version: Press and hold the "walk mode" button for 2
seconds or twist the throttle, the bicycle will automatically go into
6km/h walk mode, and the screen will display walk mode symbol at
the same time.
Release the "walk mode" button or reset the throttle, the bicycle
will automatically turn off the walk mode.
US version: Press and hold the "Walk mode" button for 2
seconds,then the bicycle will automatically goes into 6km/h walk
mode. The screen will display the walk mode symbol at the same
time; release the button, the walk mode will automatically turn off.
HONBIKE Uni4 is equipped with a throttle on the right side of the
handlebar. You can engage the throttle by twisting back slowly,
including from a complete stop, while in any mode. However, we
strongly encourage you to pedal first before engaging the throttle.
The throttle can propel you at speeds up to 32km/h (20mph) in the
US version. While in the non-US version, the speeds supported by
the throttle are only up to 6km/h (3.7mph), following EU regulations.
In order to ensure the safety, the walk mode is recommended to be used while
pushing the electric bike. Please do not use it in riding state.

19 20
EN
Enter/exit settings
When the power is on, press the "+" button and the "-"
button at the same time and hold for 3 seconds, to enter the
parameter setting mode;
Setting menu selection: short press "+" button or "- " button
to switch between different parameter settings.
Short press the "power button" to save current parameters
and exit to the setting menu interface.
Long press "-" button to quit the setup mode.
P1—Metric/English system switching
When the interface displays P1, the metric unit and
imperial unit can be switched.
Short press the "+" or "-" button to switch between mile
and km.
After the setting is completed, long press the "- " button to
save the setting.
P4—Backlight brightness
When the interface displays P4, the backlight brightness
can be adjusted.
Short press "Power" button to enter or exit backlight
brightness setting interface.
Short press "+ " button or "-" button to set the backlight
brightness.The brightness level is scored from 1 to 3, where 1
means the darkest, and 3 means the brightest.
After the setting is completed, long press the "-" button to
save the setting.
Display advanced settings
If no operation is carried out within 30 seconds, it will automatically exit
the setting interface, and any adjustments will be automatically saved
The default backlight brightness is 3.
Fault Indication
In the case of an electronic control system fault, an alarm icon will
be displayed, and the corresponding error code will be flashed in the
speed interface. Please check www.honbike.com for particular error
code meanings and solutions. When the alarm icon and error code
are displayed, you must consider your bike unsafe to ride. Please
stop using it and contact us promptly.
P5—Auto power-off timer
*The default sleep/shutoff time is set to 5 minutes
Short press "Power " button to enter or exit automatic power-off
setting interface. Press the "+" or "-" button to switch the
automatic power-off time in minutes. It can be adjusted between
0~9minutes. After the setting is completed, long press the "-"
button to save the setting.
0 means that automatic power off function is disabled.

21 22
EN
Make sure that your bicycle, battery and charger are dry without any moisture visible before
charging. If the bicycle, battery and charger are wet, wipe them with a clean cloth and wait
until they are completely dry before charging.
Do not move the bicycle during the charging process, as this may tangle the wires
and cause danger.
Please use the HONBIKE Uni4 charger to charge the battery. Do not charge the battery with
chargers other than the charger provided by HONBIKE. HONBIKE shall not be held responsible
for any accidents caused by using other chargers not approved by us.
Battery
Charging the battery
When the battery is running out, the last grid of the battery indicator would
flash, which means the battery needs to be charged immediately. Gently open
the rubber cover and insert the charger plug into the charging port. It takes
about four hours to complete charging, and when the color of the charger
light turns from red to green, the battery is fully charged.
• In order to get the maximum life from your battery you should take care to use,
store and recharge it correctly.
• The battery is generally not fully charged when the bicycle is stored and
transported. So be sure to fully charge the battery before using it. If the battery is
used without fully charging, its service life will be compromised.
• Disconnect the battery after it is fully charged, and do not charge it for more
than 5 hours each time.
• Do not leave the bicycle unattended when it is being charged.
• Never charge your bicycle in a room that does not have an appropriate smoke
detector. Make sure you can hear your smoke detector throughout your house.
• When charging, please place the bicycle in a safe place inaccessible by children.
• Battery charging and discharging conditions: the battery shall be charged at
0°C~45°C and discharged at 0°C~60°C; If the bicycle is used in cold weather, leave
it indoors for at least an hour to reach room temperature before charging.
• When the battery is not used for a long time, please charge it for 30 minutes or to
75% every three months, to prevent over-discharging. Over-discharging will lead
to permanent damage to the battery.
• The bicycle shall be protected from impacts, rain, water immersion, heat ources,
destruction of appearance and short circuit of terminals.
• Please do not disassemble the bicycle and the battery without permission.
HONBIKE is not responsible for any problems caused by unauthorized disassembly.
• Riding in cold weather will reduce the range of the battery by up to 50%.
• The battery provided for HONBIKE Uni4 shall not be used in an empty state.
HONBIKE is not responsible for any problems caused by customers using empty
batteries without permission. Do not dispose of any battery packaging materials.
• Please dispose of used batteries according to local laws and regulations. Do not
dispose of any used batteries randomly to prevent environmental pollution.
• Please place the charger on a solid surface for charging and do not to cover it
during charging. Do not place it on a carpet or textile surface or block its vents, as
the charger may heat up during charging (up to 40-50°C).
•
When using the charger, make sure there is no debris or flammable items around.
• The charger contains a HV circuit, so it is prohibited to disassemble or tamper
Battery & Charger safety information

23 24
EN
•
This is a city e-bike equipped with city tires. This model is not intended for off road use.
• HONBIKE Uni4 are only designed for one person riding with both wheels in contact
with the ground on paved roads only. They are not intended for racing, jumps, hops,
wheelies or anything of the kind. Using the bicycle for off-road riding, jumps or
stunts may cause damage to the frame and risk injury or death to the rider.
• Please do not ride it on potholed sidewalks. Otherwise, falls or damage to the
frame and wheels may be caused.
• If you are in a state of discomfort or recovering from a medical condition, consult
your physician about the possibility of using an e-bike.
As the HONBIKE Uni4 saddle adjustment range is limited, there is a certain
restriction on the rider's height. HONBIKE Uni4 is more suitable for riders in the
height range of 1.6 m to 1.9m (5’3” - 6'2"), and we suggest you follow the method
below for adjustment before riding. If the HONBIKE Uni4 is not the right size for
you, please do not try to maneuver it to avoid accidents. The minimum height of
the bike is 850mm. It refers to the distance from the center of the saddle to the
ground when it’s set at the lowest position.
Adjust the saddle height so that you can ride your bicycle comfortably. Sit on the
saddle and place your foot on the pedal at its lowest point. Your leg should be
mostly straight at this point with a slight bend at the knee.
Proper frame sizing
with its power management system without permission; when using and storing
the charger, liquid and metal particles should be prevented from penetrating into
the charger, and the charger shall be protected from drops and impacts.
• Check the charger, charger cables, and battery for damage before beginning
each charge. Do not use any damaged charger or plug for charging.
• Do not attempt to disassemble the battery. Risk of fire.
The manufacturer and dealer are not liable for damage or failures caused due to any direct or
indirect use of HONBIKE Uni4 which falls outside what is deemed intended or proper use.
Road conditions suitable for this model
HONBIKE Uni4 is an electric bicycle developed in accordance with the
requirements outlined in the Electric Bicycle Standard EN 15194. It is intended as a
power-assisted bicycle for sensible use by physically competent consumers.
HONBIKE products have been developed and designed for leisure and commuting
usage in fair weather conditions, at speeds relevant to safe and appropriate travel
in an urban or suburban environment, including but not limited to information
contained in technical specifications, HONBIKE Owner’s Manual, Assembly and
Operation Guides, service communications and media accessible from www.
honbike.com
The warranty will be void if your pedelec is not used in accordance with the
intended usage.
Laws and regulations for e-bikes vary from country to country and region to region.
We strongly recommend that you contact your local e-bike authority before riding
it in public so that you are aware of the relevant laws and regulations.
Intended use
Saddle Height

25 26
EN
Maximum permitted overall weight
How to increase riding mileage
HONBIKE Uni4 can carry a maximum load of 120kg. Riding range and speed will
be affected by the load carried by it, power assist settings, road conditions, tyre
pressure and weather conditions.
Many conditions may affect the range of the bicycle, including load, riding speed,
rider's pedal power, tire pressure and type, road conditions and weather conditions.
Continuous use of motor assist and/or selecting the highest speed mode while
riding will reduce the HONBIKE Uni4 range.
To maximize the range of HONBIKE Uni4, you can try the following method:
• Try to pedal as much as possible
• We recommend you to use the low power assist level to ride the bicycle on flat
roads or downhill roads and select the high power assist level when riding against
the wind, uphill, and with heavy loads.
• Try to keep the load to a minimum level
• Inflate the tires properly and keep the tire pressure within the normal range
• In case of poor road conditions (e.g., bad pavement, potholes or speed bumps),
reduce the speed and adjust the riding modes.
Exceeding the loading capacity will void all warranties and may result in unsafe operation of the
product, which in turn may affect your life safety.
Ambient temperatures below +10 °C/50 °F and above +40 °C/104 °F can reduce the range.
Make sure you have good control of the e-bike carrying your luggage and keep it balanced. If you
can't control it well, please reduce the weight of the luggage. Sudden shifts in load while riding
can affect your balance and lead to serious injury or death. We recommend that you practice
how to control the HONBIKE Uni4 with luggage in a safe area before riding on public roads.
1. Check if the front fender bolts, front wheel nuts, brake lever bolts, saddle
adjustment bolt, and saddle clamp bolt are tightened before riding.
2. Electrical system
• Make sure that you are familiar with the functions of all buttons and the
meanings of the display information by referring to the content in the relevant
sections of the electrical system.
• Before you set off for the first time, check whether the battery is fully charged.
• Check if the front light and rear light can be turned on normally and if the front
and back reflectors are not damaged.
• Check if the display works normally.
3. Transmission system
• Push the bicycle forward and backward, check whether the front and rear
wheels can rotate smoothly to ensure that there is no stalling or unsteadiness
during riding.
•To inspect the belt, rotate the rear wheel and check the inside and outside
surfaces, looking for cracks, missing teeth, tears, or holes.
4. Tires
• Check tire pressure. Press the tires with your thumbs, which shall be solid and
firm. If the tire pressure is insufficient, inflate to an air pressure of at least 3.4 - 3.6
bar (50 Psi), but over-inflation(4.2 bar) should be avoided.
5. Handlebar
• Check whether the handlebar and front wheel are straight. Make sure the groove
on the stem is aligned with the mark on the head tube.
6. Saddle
• Adjust the saddle to a proper height. Check that you can reach the floor with the
tip of your toes when sitting on the saddle.
• Check if the seat post is locked tightly before riding to ensure that the saddle
and seat tube are securely fastened.
7. Brake
• During the assembly at HONBIKE, the right brake lever is used to control the rear
brake and the left brake lever is used to control the front brake. Check if the brake
setting could match with your habit. Try to use the rear brake first when braking.
Before the first ride
Before riding the bicycle, please read the manual carefully to make sure you understand each
section of the manual. Familiarize yourself with the bicycle and its controls before riding in traffic.
In the UK, China and Japan, the brake setting is different with the left brake lever for rear brake
and the right brake lever for front brake.

27 28
EN
1. Please unplug rear light plastic washer before using, otherwise the rear light
will not light up.
2. Press the switch to turn on or turn off the rear light.
on/off button
• Stand next to the bicycle, pull the left and right brake levers at the same time
and push the bicycle forward, the brake discs should be able to prevent the
wheels from moving.
• You need to try braking on a flat, non-slip surface to make sure you can get used
to the braking effect of the HONBIKE Uni4 before riding it in traffic on a public
road.
8. Pedals
• Check whether the pedals are tightened onto the cranks.
plastic washer
Rear light
The front reflector installation instructions (US Version)
1. Take out the front reflector from the accessory box, loosen the bolts on the
rack/fixture/ retention mechanism, break open at a certain angle and mount the
reflector on the right side of the handlebar, and tighten the bolts of the rack/
fixture/ retention mechanism.
2. Adjust the position of the reflector so that the front of it faces straight
forward, and then tighten the reflector bolts to complete the installation.
Before every ride
Your HONBIKE will be double checked at the factory, but due to factors such as
potential shipping or tampering by a third party, we recommend you check the
following items before each ride to troubleshoot any faults:
• Check if the loose joints are tightened.
• Check if the battery is fully charged and capable of supporting your planned trip.
• Check if the bicycle can move forward and backward smoothly.
• Check if the belt is in good condition.
• Check if the front light and rear light can be turned on normally and the front
and rear reflectors are not damaged.
• Check if the tires are in good condition, and have sufficient pressure.
• Check the display for any warnings or error messages. Resolve the error before
riding. Check if the display buttons can be operated normally.
• Check if the brakes work normally.
• If you decide to cycle on public roads, you should equip your bicycle according to
the legal requirements in your country.
• Make sure the kickstand is fully lifted before riding, otherwise there is a risk of
falling.

29 30
EN
•Please comply with the local road and traffic laws in your country or region.
•Wear a helmet that meets the latest safety testing standards, and follow the
helmet manufacturer's instructions for use. It may help prevent injury in an
accident.
•Wear appropriate safety equipment according to the riding you plan to do.
•Do not ride while intoxicated or while using medications that can make you
drowsy or less attentive.
•Refer to the previous two sections to check the bicycle before riding it.
•Brake disc will become hot during use and will stay hot for a short period of time.
Ensure you do not touch the discs right after use.
•Do not park the bicycle in building lobbies, on evacuation stairs, fire exits or on
sidewalks.
•Once you have come to a stop, do not apply pressure to the pedals, this could
engage the power assist function. Or you can hold the brake lever firmly to ensure
that the power is cut off.
•It is recommended that the bicycle shall be used by users over 16 years
old,younger users must use the bicycle under the guidance of an adult or guardian.
•Only use the supplied charger cable and plug. Ensure the charger cable is fully
inserted in the charger before connecting the charger to a power outlet. Plug the
charger's plug into an outlet (100-240V), using the appropriate plug / adaptor for
the country's standards, then connect to the charging socket on the battery.
•Keep away from combustibles when charging, and do not leaving charging for an
extended period of time.
•If there is any damage to the protective layer of the wire harness of the bicycle,
please contact HONBIKE as soon as possible to prevent injury to the user.
•Do not exceed the maximum load of 120kg (265lbs)and no more than one rider at
a time.
•Please do not disassemble the bicycle and the battery without permission.
HONBIKE is not responsible for any problems caused by unauthorized disassembly.
Safety
This section covers safety-related information, so please read it carefully before riding.
Thebasics
• During the ride, please stay focused, watch out for passing pedestrians and
vehicles, and keep a safe distance.
• During the ride, please do not hang anything on the handles to avoid losing
control of the bicycle and causing an accident.
• When braking, please avoid sudden braking, try to reduce speed slowly. Please
use the rear brake first, and then the front brake. Do not brake too hard. Braking
sharply on the front wheel may cause the bicycle and rider to loose grip and cause
injury, and braking sharply on the rear wheel may cause a change of direction and
injury.
• Please keep a reasonable safe distance while riding between yourself and motor
vehicles. Do not follow them too closely as they may slow down and turn at any
time.
• When riding, keep a distance from motor vehicles parked on the roadside and be
aware of car doors opening suddenly to avoid crashing into them.
• Please do not wear earphones or headphones that can affect your hearing during
the ride.
• Please ride along in a straight line in designated bicycle lanes. Please ride with
the flow of traffic and do not travel against it.
•
It is prohibited to ride up and down stairs or jump over any obstacles on HONBIKE Uni4
.
• It is forbidden to ride without holding the handles or when holding an umbrella.
Failure to keep your balance may result in an accident.
• Do not use HONBIKE Uni4 with bicycle trailers, mounts, frames or accessories
that have not been tested for safety and compatibility standards by HOBIKE.
• After any accident, you must consider that the current HONBIKE Uni4 is unsafe.
Contact HONBIKE for a maintenance check, and confirm that it is safe before the
HONBIKE Uni4 It again.
• Ride defensively. Make others aware of your presence and avoid entering any
vehicle's blind spot. Remember to avoid accidents by using your bicycle bell and
brakes.
• Do not ride while intoxicated or while using medications that can make you
drowsy or less attentive.
Saferiding

31 32
EN
• Rain, snow, slippery roads and other conditions will affect the braking effect
and increase the braking distance, so please brake early in advance in these
situations.
• Riding on slippery roads can make it difficult for you and other riders to control
speed, and you are more likely to slip in turns. So you need to stay alert, watch
out for oncoming vehicles, reduce your speed and make sure you can brake
safely.
• When you are wearing a raincoat, pay close attention to avoid the raincoat
being caught in the wheels or being hooked by any stationary moving vehicles.
• Try not to ride in heavy rain and standing water. If it is cold, and the temperature
is near or below the freezing point, pay attention to ice on the road and avoid
drain/ manhole covers.
• HONBIKE Uni4 can withstand light rain and small splashes. The electrical parts
of HONBIKE Uni4 have an Ingress Protection rating of IP65. But it does not mean
that the bicycle and its mechanical and electrical components are waterproof.
We do not recommend storing or using the bicycle in excessively wet conditions.
The warranty for the HONBIKE Uni4 does not cover water damage.
• Riding at dusk, at night, or in any poorly lighted conditions is much more
dangerous than in daytime, please ride more slowly and cautiously, and choose
appropriate products to aid your vision and make yourself more visible.
• Ensure your front and rear light are turned on and adjusted such that other
people on the road can see them clearly.
• Make sure both front and rear reflectors are clean, undamaged and visible
before riding off.
Ridinginbad weatherconditions
Ridingin low light conditions
Removing lights and reflectors can reduce your visibility to others and could result in an
accident that may cause injury or death.
MaintainingyourHonbike
Compared with conventional ebikes, the HONBIKE Uni4 is low maintenance with
fewer complicated parts that require less attention for simplicity. After riding for
a period of time, like any bicycle, some parts may loosen, wear or become
damaged, so inspection and maintenance at regular intervals will extend the
service life of your HONBIKE Uni4 and prevent damage and potential accidents.
Store your HONBIKE Uni4 in a clean, dry place to avoid rust and corrosion.
The maintenance of HONBIKE Uni4 is generally divided into the following tasks:
• Cleaning: Wipe the whole bicycle and parts with a damp rag and a low residual
cleaner. Clean the belt when it’s visibly dirty. Dry thoroughly after cleaning to
prevent corrosion and rust.
Remove any oil residue on the brake discs.
• Inspection: Brakes, tires, lights, and belt should be inspected regularly.
Please refer to the sections “Before the First Ride” and “Before Every Ride”.
• Tightening: The fasteners of the whole bicycle should be tightened periodically
by referring to the section of Recommended torque Values.
• Lubricate: Clean and lubricate the joint between the pedal and the crank.
• Adjustment: Brakes should be adjusted periodically. Ensure front anad rear
brakes work properly. Check brake cable tension, replace brake cables if
necessary.
• Replacement: If a part is damaged or unusable or has any cracks, scratches
or color changes, the part has reached the end of its service life and should be
replaced promptly.
Please visit the official website at www.honbike.com for the latest and important information
about products, manuals and maintenance activities before trying to maintain your HONBIKE.
Front brake Rear brake

33 34
EN
This maintenance interval is based on normal usage. If you ride your HONBIKE Uni4 more than
average, or in rain, snow, or bad road conditions, maintain your bicycle more often than the
suggested interval.
The user shall be responsible for safe riding and regular maintenance. Your bicycle
needs a regular service. Below is our recommended service frequency based on
how often you ride.
Monthly (or every 500kms/ 300 miles )
• Check tire pressure. Press the tires with your thumbs, which shall be solid and
firm. If the tire pressure is insufficient, inflate to an air pressure of 3.4-3.6 bar,
avoid over inflating your tyres.
• Clean and lubricate moving parts regularly.
• Check that all hardware is tightened to the torque specifications listed in the
Recommended Torque Values section of this manual.
• Check your brake pads for signs of wear. Replace if necessary.
• Check the frame, front fork, kickstand, and belt for any damage, deformation, or
cracks.
• Check all wiring harnesses (such as brake wires, front light wires ) of the whole
bicycle for any damage or wear.
• Check the charger and its wiring harness for damage and check if the bicycle
can be charged normally.
Quarterly (or every 1500kms/ 900miles)
• Check all items on the monthly service list above.
• Check tire tread for excessive wear. Replace if necessary.
• Check and update to the latest firmware version.
The maintenance interval of the belt of HONBIKE Uni4 is about 11,000 km.
Please do not replace it without permission. To replace, please find a professional
organization or designated maintenance location of HONBIKE brand for
replacement. Or you can contact HONBIKE after-sales team at support@honbike.
com.
Serviceinterval
• Please do not replace any parts or change battery capacity or motor power unless
instructed to do so by HONBIKE to avoid damage and danger. If you have made any
changes without permission, you shall solely be responsible for any consequences.
• HONBIKE Uni4 is equipped with a high speed motor, when you roll the bicycle backward,
you will feel resistance at the rear hub motor and may accompany with a sound, which is
normal; when you are pushing the bicycle forward, this phenomenon will not occur. If the
motor makes a sound when the bicycle is pushed forward, it means the internal clutch of
the motor is malfunctioning, please contact us as soon as possible.
• When cleaning HONBIKE Uni4, do not use steam or high-pressure water guns to prevent
water from entering some parts and affecting the performance and life of the bicycle.
• After cleaning the bicycle or riding it in water, pay special attention to the working
condition of the brakes. Cleaning it with water or riding it in water may reduce the braking
effect. In such case, you should ride slowly and pay attention to your safety.
Maintenancenotes
Except for the tires, brake cable, brake discs, brake pads, Gates belt, saddle, seat
post, and pedals that are commercially available in the market, all *other parts of
HONBIKE Uni4 are specially designed by HONBIKE. If your parts fail, please contact
HONBIKE for support. (Tire: 27.5 x 2.0 inch; Brake disc: diameter φ 160mm)
*Other Parts: brake levers, grips, bell, front fender, rear fender, front light, rear
light, kickstand, charger.
Replacingparts
Please use HONBIKE original parts only. If you use parts not approved by HONBIKE, you will
solely be responsible for any consequences, damage or accidents caused.
Front brake pad
Thickness:4mm
Rear brake pad
Thickness:4mm
23.1mm
18.5mm
35mm
30.7mm
Table of contents
Other HONBIKE Bicycle manuals