Klever X SPEED User manual

Range
User manual
models:
X SPEED
X SPEED LTD
Klever X Speed
km/h


3
www.klever-mobility.com
Index
Contents:
. QuickStart ..............................................................................................................................
. Introduction ...........................................................................................................................
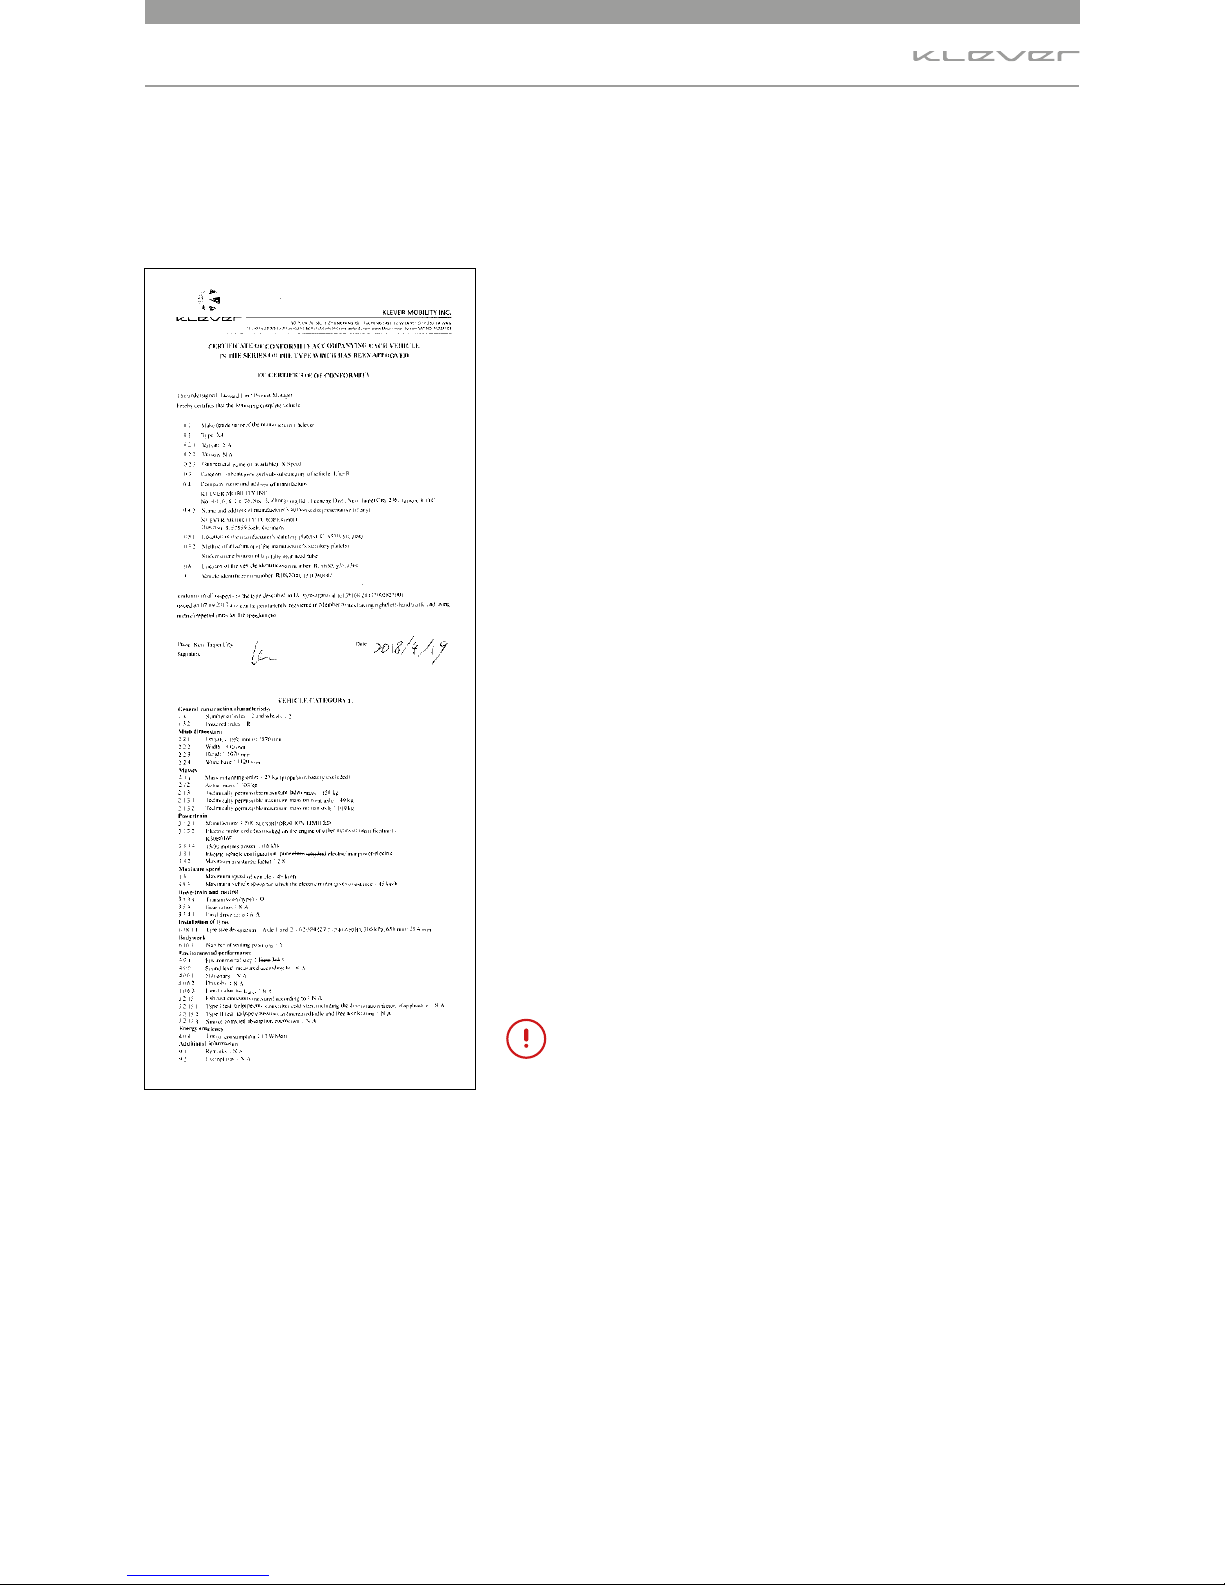
. Type approval and EC Certificate of Conformity CoC...............................................................
. Getting started and safety check.............................................................................................
. Behaviour in road trac ........................................................................................................
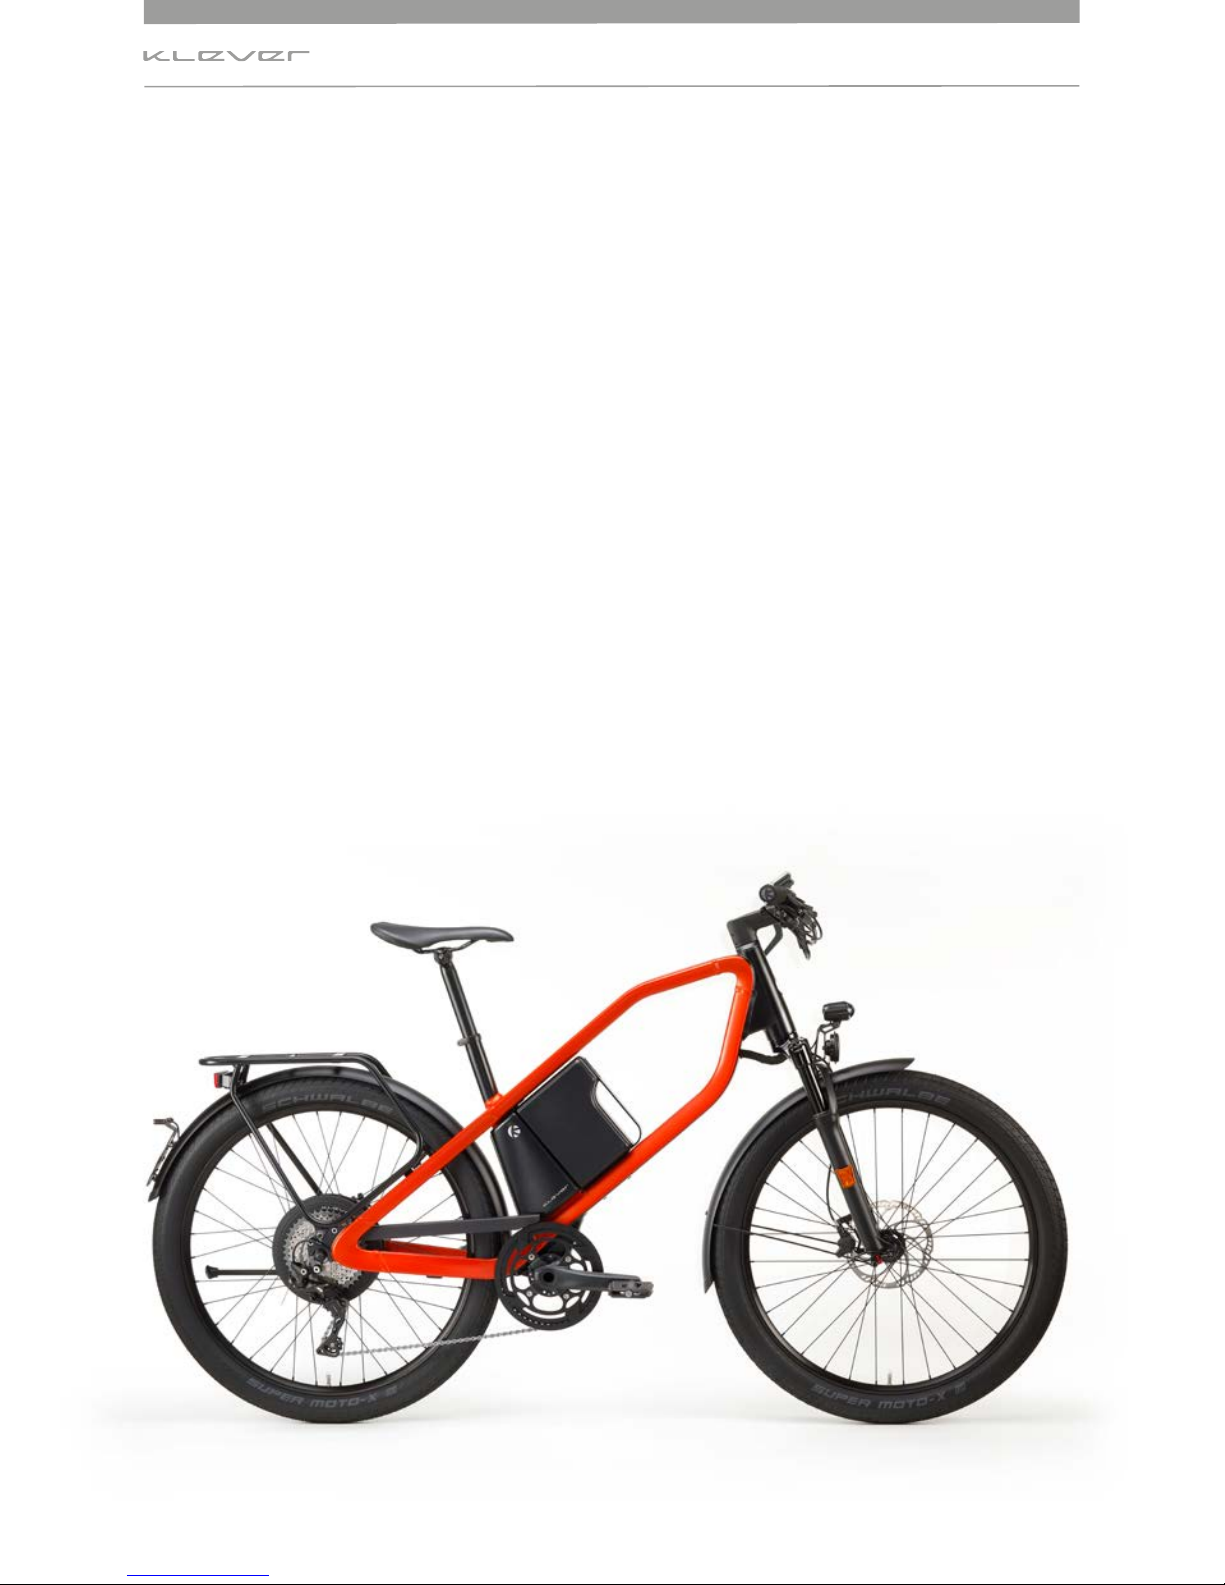
. The Klever Mobility propulsion the BIACTRON system ...........................................................
. Sensors and their function....................................................................................................
. Levels of pedal assistance .....................................................................................................
. The battery pack ..................................................................................................................
.. Charging of the battery .....................................................................................................
.. Range ..............................................................................................................................
.. Removing the battery from its docking and putting it back..................................................
.. Transport of the battery ....................................................................................................
. Diagnostics and troubleshooting .........................................................................................
. The Speed Pedelec .................................................................................................................
. Type approval vehicle with dedicated equipment ...................................................................
.. Horn ................................................................................................................................
.. Brake light .......................................................................................................................
.. Wing mirror .....................................................................................................................
. Saddle and handlebar adjustment ........................................................................................
. Headset ..............................................................................................................................
. Rigid and suspension front fork ............................................................................................
. Disc brakes .........................................................................................................................
. Drive train and gearshift ......................................................................................................
. Lighting ..............................................................................................................................
. Wheels and tyres .................................................................................................................
. Luggage carrier and the transport of luggage ........................................................................
. Lock and theft protection ...................................................................................................
. Accessories .......................................................................................................................
. Transport of your X Speed ......................................................................................................
. Maintenance, care and storage...............................................................................................
. Disposal and transportation ................................................................................................
. Technical data .....................................................................................................................
. Product liability and warranty ..............................................................................................
. Intended use of your X Speed ................................................................................................
. Wear ...................................................................................................................................
. Legal requirements for participation in trac on public roads.................................................
. Regular maintenance and inspection ....................................................................................
. FAQ’s...................................................................................................................................
. Bicycle passport ..................................................................................................................
19. Inspection plan .....................................................................................................................52
20. Appendix ..............................................................................................................................53
21. Imprint ..................................................................................................................................55

4
www.klever-mobility.com
Quickstart

5
www.klever-mobility.com
Quickstart
1. QuickStart
Dear customer,
On the first pages of this comprehensive instruction manual
you will find this QuickStart guide, which gives you a quick
overview of the main features of the Speed Pedelec. For
further information please read the additional instructions
on the following pages.
There you will find all the important technical issues and
details and further relevant information. Should you have any
further questions, please ask one of our authorised dealers
or contact our technical hotline, whose contact details are at
the end of the manual.
Enjoy your Speed Pedelec and we wish you a lot of fun.
The Klever Mobility team.
Image 2

6
www.klever-mobility.com
Quickstart
Security check:
Before starting the bike please always check the operation of
the brakes and the tyre pressure.
Launch of the electric drive
To start the propulsion system the display must be mounted
in the bracket. There are two ways to activate the system:
1. Press and hold for 1 second the start button (Image 3) –
the system runs for 3 sec through a systems check - now the
system is activated.
or
2. When You start pedalling the system will wake up
automatically. After 3 sec. of system check, the electrical drive
will support you.
Use the + (top left) and - (bottom left) buttons to select the
desired level of support. The support level is indicated by
the 3 horizontal bars at the top of the display.
0 bar UL (Ultra Low) No support; system is
activated
1 bar L (Low) Low support
2 bars M (Medium) Medium support
3 bars H (High) High support
The Walk/Turbo(á) button has 3 functions:
1. Walk-assist when walking next to your Speed Pedelec.
2. Turbo WITHOUT pedalling of the cyclist
3. Turbo WITH pedalling of the cyclist
1. Actuate the Walk/Turbo (á) button when walking
next to your vehicle. The maximum speed depends on
the selected support rate in your display. Therefore, we
recommend to use the Walk-assist mode only when
you selected the L support rate.
< 4 km/h Pushing aid while
taking your Speed
Pedelec by the hand
2. Turbo mode WITHOUT pedalling of the cyclist. The
maximum speed depends on the selected support rate
in your display.
At L < 4 km/h
At M < 12 km/h
At H < 18 km/h
Additional support at
standstill or in case you
do not want to pedal
3. Turbo mode WITH pedalling of the cyclist.
When actuating while riding in L support rate
When actuating while riding in M support rate
When actuating while riding in H support rate
L < 45 km/h
H (High)
H (High)
Not applicable
Additional support
while riding hills or
strong headwinds
Caution! We recommend that you use the Walk-assist
mode only in case you also selected the L support rate.
+
_
MENU
TURBO
km
/h
Image 3

7
www.klever-mobility.com
Quickstart
In case you preselected the M or H support rate, then the
maximum speed of the vehicle is too high to be able to
walk comfortably and safely alongside the X Speed.
Charging the battery:
Caution! The battery should only be charged with the
appropriate, supplied charger (Image 4).
The battery can be charged on (image 7a) and o bike (image
7b). For removal of the battery see section 6.3.3.
Connect the charger with the power cable and the power
plug to the wall socket. If the LED on the charger shows
constant red light, the charger is ready for use (image 6).
Connect the charger plug from the charger to the charging
socket on the battery (images 5 + 6 + 7a/7b).
The charging process starts automatically. Once the LED on
the charger constantly lights green the operation is complete
and the battery is charged. Unplug from wall first, then
remove the charger lead from the battery charger.
Charging
status
Indicator LED Charger Indicator LED Battery Remark
Flashing red Error Check connections
Steady red Charger is ready
0% Flashing yellow Flashing red Capacity very low; charging starts
<35% Steady yellow Flashing red Normal charging
35 – 75% Steady yellow Flashing yellow Normal charging
75 – 90% Steady yellow Flashing green Normal charging
>90% Flashing green Flashing green Final charging
100 % Steady green No LED colour
Fully charged
The charging of an empty rechargeable battery of 570 Wh (from 0% to 96%) will take about 2.3
hours with a quick charger. For an 850 Wh battery the process will take about 3.5 hours.
Charging socket
LED
Power
cable
Power plug
Charger
Image 4
Image 5
Image 6
Image 7AImage 7B

8
www.klever-mobility.com
Introduction
2. Introduction
Congratulations
With the purchase of a Pedelec of Klever Mobility you have
made the right purchase decision and you got a high-
quality product with what you will have much pleasure in
everyday life.
Technically and functionally up to date, it is carefully
manufactured using the highest quality materials and
components. An excellent design and excellent value for
money distinguishes this Speed Pedelec.
For a trouble free, pleasurable riding experience with the new
product, please read this manual carefully.
Everything you need to know in terms of technical
specifications, operation, maintenance and care, have been
carefully compiled in this manual .
Please note the additional information in the instructions
supplied with the components.
Pay particular attention to sections in bold which
are additionally marked with "Caution". The most
important information is again summarised. It should
be observed to avoid possible accidents and danger to
your life and limb.
Bold sections marked with this symbol contain
information about the X Speed and its accessories and
its handling.
Operations marked with this sign are to be performed
by an authorised Klever dealer. They require a lot of
experience and special tools.
Furthermore, if you need any further information or advice,
please contact our technical hotline at ++49 (0)223-4933420
(Monday-Friday from 8-17 clock), or contact an authorised
retailer.

9
www.klever-mobility.com
Introduction
The latest available information on our products and other
technical information and videos can be found on our
website: www.klever-mobility.com.
Your pedelec is equipped according to EC Type Approval
Regulation 168/2013 and rated as a vehicle in category L1e-B.
You can use it safely on public roads.
The Speed Pedelec must be equipped with a well audible
horn, a wing mirror (LH-side), a lighting system with quality
marks for the head light and the tail light with integrated
brake light, reflectors and with 2 sets of brakes independently
actuating the front and rear wheel.
The additional electric drive is limited to max. 45 km/h, and
thus complies with the statutory requirements for an L1e-B
vehicle.
Due to the fact that the X Speed is a type approval vehicle in
the L1e-B category it must be registered at your national road
safety authority (e.g. KBA in Germany, DIV in Belgium, RDW
in the Netherlands, DREAL in France or DVSA in the United
Kingdom). In addition, you will need a license plate (as proof
of your local registration and your liability insurance), an
insurance and a driving license. Moreover, you will need to
wear an approved Speed Pedelec helmet as well.

10
www.klever-mobility.com
Certificate of Conformity
3. Type approval and EC
Certificate of Conformity (CoC)
The Manufacturer:
Klever Mobility Inc.
No. 8, Ln.76, Sec.3, Zhongyang Rd.,
Tucheng Dist.; New Taipei City 236
Taiwan
Represented in Eurobe by:
Klever Mobility Europe GmbH
Dieselstr. 8
D-50859 Köln
Tel.: +49 2234 93342 0
info@klever-mobility.com
www.klever-mobility.com
Represented in
Benelux
by
:
Klever Mobility NL b.v.
Afslag 8
3981 PD Bunnik
Tel.: +31 30 210 2905
infoNL@klever-mobility.com
Hereby confirms for the product: X Speed model year 2018
conformity with the applicable European Regulation EC 168/2013.
Your X Speed comes with a Klever Certificate of Conformity (CoC)
with which your vehicle can be registered.
Klever will register your X Speed at your local road safety
authority (e.g. KBA in Germany, DIV in Belgium, RDW in the
Netherlands, DREAL in France or DVSA in the United Kingdom).
After registration, your Klever dealer will receive the license plate
and the code for the name of the registrant. Your dealer will then
assemble the license plate and ascribe the vehicle to your name
and to your liability insurance.With the code for the name of the
registrant you can organise the assignment to your name and
insure yourself as well.
Please note! With a maximum speed of 45 km/h. the X Speed is
NOT a regular electric bicycle, but it is a so-called Speed Pedelec.
According to the Type approval Regulation it is an L1e-B vehicle
and therefore it has to comply with dierent road trac
regulations and it has a dierent position and dierent place
within the trac. Make sure you understand the local road
trac and safety regulations in your country. Also, you will
need a license plate (as proof of your local registration and your
liability insurance), Insurance and a driving license. Moreover, you
will need to wear an approved Speed Pedelec helmet as well.
Technical documentation by:
Klever Mobility Europe GmbH - Manager Techniek
Dieselstr. 8
D-50859 Köln
*** The image of the Certificate of Conformity
(CoC) of the X Speed (45 km/h.) Please see page
54 of this manual for the full size image.

11
www.klever-mobility.com
Getting started - Safety check
4. Getting started - Safety check
Although your X Speed has been subjected to a final check
during assembly and by the dealer, the transport and the
time may have caused changes.
Therefore, before your first ride, and every ride, you should
consider some important things and check the vehicle.
1. Make yourself intensely familiar with the Speed Pedelec and
the functioning of the electric drive, before the first ride in
public trac.
2. Check the correct setting of the saddle and the handlebars
(see section 7.1).
3. Check the correct function of the brakes
4. Check the air pressure and the profile depth of the tyres.
5. Check the lighting system for proper operation.
6. Check the tightness of the bolts and nuts of the wheels.
7. Check the minimum insertion of the seat post.
Caution: Do not start when you identify deficiencies in one
of these points. While riding a defective Speed Pedelec this
can cause serious accidents and endanger your live. If in
doubt, please contact your dealer or our technical hotline.
Your bike suers wear and tear in everyday riding
through extreme weather and road bumps. Through
constant dynamic loads all parts of the bike experience
material fatigue and wear. Therefore, examine your
bike regularly for wear of the components and other
changes such as scratches, cracks or discoloration. These
symptoms may be signs of damage and a future failure
of the accessory. Bring your bike to your dealer regularly
and comply with the plan of inspection, so he can fix or
replace these parts.
Please note! The everchanging road and weather
conditions will constantly fatigues the X Speed
and its components and parts. This may cause
fatigue and wear. Therefore, it is recommended to
inspect your Speed Pedelec on a regular basis and
look for wear of parts and changes in scratches or
cracks, or the discolouring of parts. These could
possibly indicate damage of the part. Following
the inspection plan in section 19, you best bring
your X Speed to your Klever dealer for inspection,
service, maintenance and repair.

12
www.klever-mobility.com
Getting started - Safety check
Please note! be sure to only use original Klever
spare parts. In case you are not sure whether to
use certain spare parts or not, please contact
your ocial Klever dealer or otherwise call our
technical hotline.

13
www.klever-mobility.com
Behavior in road traffic
5. Behaviour in road trac
Due to the electric auxiliary propulsion you reach high speeds
and accelerate much faster than you are used to with a
regular bike. Therefore, you should intensively familiarise
yourself with the Speed Pedelec only on a trac free road
before you go in public trac. During riding on the road, you
should follow these tips:
• Always wear a helmet during riding.
• Make yourself familiar with the trac rules and stick to
the rules.
• Be ready to brake at any time and expect misconduct of
others.
• Ride defensively and be considerate to other road users.
• Always keep your bike in a perfect condition.
• Use your bike only in accordance with its intended purpose
(see chapter 13."normal use").
• Don't use a mobile phone nor a headset while riding.
• Be sure to observe the maximum weight of 150 kg of the
bicycle (see chapter 11. Technical Data).
• Please have your Speed Pedelec checked regularly by an
authorised Klever dealer, according to the recommended
service intervals.

14
www.klever-mobility.com
The Klever Mobility propulsion
6. The Klever Mobility
propulsion – the BIACTRON
system
You have purchased a Speed Pedelec that helps you improve
your day to day mobility, with its electric propulsion system.
Slopes can be better managed and the wind resistance can
be better overcome.
This electric auxiliary drive consists of the following
components: 1. Battery; 2. Motor; 3. Control unit/Display; 4.
Motor controller; 5. Torque sensor ; 6. Pedal Sensor ; 7. Charger
(Image 8a).
Once you have turned on the system and you start pedalling
the motor will support you as long as you pedal, up to a max.
speed of 45 km/h.
Due to its maximum speed, the X Speed is no longer
considered as a normal bicycle. It is obliged to be insured
and does need a license. Likewise, it is compulsory to wear a
helmet and we strongly recommend it for your own safety.
The five (dierent) levels of support you can select according
to the external circumstances (e.g. level four (high level) on
climbing uphill or headwind) or your personal preferences.
Image 8A
Image 8
3. Display/
dashboard
1. Battery
2. Motor
4. Motor
controller
6. Pedal sensor
5. Torque sensor

15
www.klever-mobility.com
The Klever Mobility propulsion
Please note that a high level of support also means a higher
consumption of current and reduces the range of the system
and the battery.
When you ride faster than 55 km/h., the automatic energy
recovery (technical recuperation) is activated. The motor
operates as a generator and re-charges the battery.
In case the technical recuperation has been activated,
you will hear an acoustic signal. During the process of
recuperation the bars on the display representing the
battery state of charge will start to flash and the LED
light on the battery will once flash red, yellow and green
consecutively.
6.1. Sensors and function
The Speed Pedelec is equipped with a torque sensor in the
dropout, and it is electronically controlled. This sensor
accurately measures the change in chain force at every
pedal stroke (left or right) and informs the system about the
force you exert during pedalling. A computer in the control
unit then calculates these values, and manages precisely
the amount of support from the motor, hence generating a
perfect synergy between the cyclist and the X Speed.
During pedalling, the torque and the pedal sensor measure
very sensitively and exactly the rider’s input and enable
the motor controller to operate the additionally support
of the motor tailored to the needs and riding conditions of
the cyclist.
You can also define the amount of motor support by yourself
choosing between the five levels of support (Turbo, High,
Medium, Low, Ultra Low).
This makes the system very ecient and economic, saving
power consumption and maximizing range. The additional
speed sensor sets the power of the electric motor to zero
once you have reached 45 km/h. Above 45 km/h. speed, the
Speed Pedelec works like a conventional bicycle, the only
way to maintain the propulsion of the vehicle is by pedalling
solely.
The electric motor will only activate if you pedal, therefore,
from a standstill, to start, either you have to pedal, or
actuate the Walk/Turbo button. Without pedalling, by
pressing the Walk/turbo button, the electric motor support
will take you to a maximum speed of 18 km/h. The Walk/
Turbo button was designed as an aid when starting uphill
or in case the bike has to be pushed.

16
www.klever-mobility.com
6.2 Levels of support
The propulsion system provides five levels of support.
Depending on topography, weather conditions and your own
preferences, you can choose the motor support using the plus
(+) and minus (-) keys and the boost button on the control
panel (see the separate manual of the LCD-display).
System Level Support
Driving situation (recommended)
UL (Ultra Low) No support, system is
activated
Downhill
L (low) Low support On the plain
M (medium) Medium support Slight hill / headwind
H (High) Strongest support Steep hill / fierce headwinds
T (High) while pedalling
< 45 km/h
Strongest support Steep ramps / violent gusts
T (High) without pedalling
< 18 km/h
Strongest support Starts on hill / pushing uphill
T (High) walking with the X
Speed < 4 km/h
Walk assist (á)While walking with your X Speed
or pushing out of your garage.
Please note! In case you actuate the Turbo button (á),
there are 3 options depending on the situation:
1. You walk alongside the X Speed and/or you push it out
of your garage.
Make sure the support level you select is L. While
pushing the Walk/Turbo
(á)
button you will activate
the Walk-assist mode and you will trigger a moderate
electric motor power up to 4 km/h. In this way you can
walk with your vehicle comfortably and easily.
Warning: In case you preselected the M or H support
levels, then the maximum speed of the vehicle will
be too high to be able to walk comfortably and safely
alongside the X Speed
.
2. You are sitting on your X Speed and intend to start
from standstill on a ramp without pedalling. Push the
Turbo button (á) and you will get the strongest support
up to 18 kph/. provided you preselected the M or H level.
3. You are sitting on your X Speed and you are pedalling
with for instance M level support and you need strongest
support momentarily. Push the Turbo button (á)while
pedalling and you will trigger the strongest support
regardless your speed (from 0 to 45 km/h).
The Klever Mobility propulsion

17
www.klever-mobility.com
Please note! These 3 options will only function while you
keep the Turbo button pushed. As soon as you release the
Turbo button, the electric power support will stop. Except
in the case of pedalling: in that case after releasing the
Turbo button the level of electric power support will go
back to the preselected level (level M as the example in
option 3).
In order to save battery power, the support level will
automatically be limited to the M level when the battery
capacity drops to 10%.When the battery capacity drops to 5%
the support level will be limited to the L level and in the case of
a battery capacity of 2% or less the level will be UL.
6.3 Rechargeable battery
Your Pedelec has a high-quality lithium-ion battery of the
newest generation. For technical details, please refer to
section 11 Technical data.
The status of the battery can always be checked through the
LED light button, next to the charging socket of the battery
(image 9). If you press the button, the LED will shine either
red, yellow or green. If light stays o, then the battery could
be broken. Please have your local dealer check the battery.
red capacity <35%, battery should be charged
yellow capacity 35 - 75%; battery can be charged
green capacity> 75% battery can be charged
The battery is automatically protected from overheating,
overcharging and deep discharging. It is very user-friendly,
very practical, very easy and simple to handle.
Nevertheless, you should consider some important things in
order to maximise the life and performance of the battery.
Since the lithium ion battery has no memory eect, you can
charge it at any time, even if it is not completely discharged.
In practice, it has been shown that it is even better to charge
it again after short distances.
Your battery has a lifetime of 700 charging cycles. One
charging cycle means a full charge of the battery (0-100%
capacity). Partial loads can be done more often.
When the battery is not being used for a long time (more
than 2 months) is not used, it should be recharged as a low
self-discharge is normal. Store the battery, if possible, in a
dry, cool and dark place. The ideal storage temperature is
between 5-20° C.
The Klever Mobility propulsion
Charging
socket
LED
Image 9

18
www.klever-mobility.com
Avoid exposing the battery to direct sunlight over a long
time. Temperatures over a longer period of more than 45° C
or below - 10° C can cause permanent damage.
In winter, you should never start with a cold battery. The
capacity of a cold battery is significantly reduced and
consequently will have a lower range.
A battery which is exposed for a long time to frost, should
be gently heated in the ambient temperature of a heated
room, before starting.
Caution! Never place the battery on the heater and never
try to heat it with a hair dryer.
In case you need to park the bike outside for a long time
during the cold season, remove the battery and store it in a
heated room. Since the battery is very easy to remove, this
will be no problem.
Do not expose the battery to humidity, to prevent corrosion
of the charging socket and the plug contacts. Protect
the battery against mechanical damage and don't drop
it. Mechanical damage can also cause overheating and
spontaneous ignition of the battery
Also, the battery should be charged at moderate
temperatures (15-25° C). Avoid charging in direct sunlight or
near heaters, as well as charging outside in winter at low
temperature. A cold battery should be gently heated to room
temperature before charging. Never place the battery on the
heater and never heat it with a hair dryer!
Caution! Charge the battery exclusively with the proprietary
and dedicated charger which comes with the X Speed.
Do not use any other type of charging unit since this may
damage the battery and may cause overheating or catch
fire. During loading, neither the charger nor the battery
should be exposed to humidity, in order to prevent short
circuits and electric shocks.
The battery is maintenance-free. Should it be broken or
become defective contrary to expectations, seal the contacts
with tape and take it to your dealer or contact our technical
hotline. Never under any circumstances open up the battery
yourself. This is dangerous and can damage the battery and
may lead catch fire. The warranty will be void if you do so!
The Klever Mobility propulsion

19
www.klever-mobility.com
Do not dispose of batteries into household waste.
It must be disposed of properly. It's best to take it to one
of our dealers, who can take care of the proper disposal.
Caution!
• Charge the battery only with the proprietary battery
charger
• The battery can be recharged any time, even after
short trips
• Avoid temperatures below -10 ° C and above 45 ° C for
a long time
• Never start with a cold battery
• After an extended period (about two months) of
storage, the battery should be recharged
• Protect the battery from humidity
• Protect the battery from mechanical damage
• Never open the battery yourself.
Used batteries do not belong in the household waste,
they must be disposed of properly.
The Klever Mobility propulsion

20
www.klever-mobility.com
6.3.1 Charging the battery
You can charge the battery on or o your bike (e.g. important
in winter time) (image 11A & 11B). Charging at any time, even
after a partial discharge (e.g. after a short distance of a few
kilometres) is possible. There is no need to wait until it is
completely discharged, as it has no memory eect.
To remove the battery pack, refer to section 6.3.3.
Caution! Charge the battery only with the supplied and
proprietary battery charger.
For the technical data of the charger please read section 11,
Technical data on page 41.
To charge the battery, do the following: You can monitor the
charging process on the basis of the indicator LEDs on the
charger and battery.
• Connect the power cable to the charger.
• Insert the power plug of the charger into the wall socket,
the LED will start to flash red.
• The charger is ready for charging once the LED lights
steady red.
• Connect the socket of the charger into the socket of the
battery. The charging process will start automatically.
• The LED on the charger switches to flashing yellow light,
charging begins.
• The LED indicator turns to yellow continuous light, the
battery is charged to about 35%, The charging is in progress.
• The LED changes to flashing green, the battery is to about
75 - 90% charged.
• The LED steady green, the battery is now fully charged, the
charging is complete.
• Disconnect the power plug from the Wall socket.
• Unplug the socket of the charger from the battery socket.
The Klever Mobility propulsion
Power cable Power plug
Charger
Image 10
Image 11B
Image 11A
This manual suits for next models
1
Table of contents
Other Klever Bicycle manuals