Trek FUEL EXE 2023 User manual

2023 FUEL EXE
SERVICE MANUAL
Rev 3 January 2023

2023 Fuel EXe
1
Contents
2023 FuelExe
18
Specications
Chainline (1x only)
55mm
Chainring (1x only)
Minimum Maximum
30T 34T Round
Oval rings of any size are not recommended as they will
affect motor performance.
Rear brake mount
Minimum Maximum
180mm, direct mount Adaptable to 203mm
Maximum tire size
29" x 2.5"
Notice: Measurements of actual tires may vary. Always
verify there is sufcient clearance between the tire and
the frame. Improper tire size could damage the bicycle
frame. Trek recommends 6mm clearance above and on
the sides of the tire.
Seat post
WARNING
Always follow the seatpost manufacturer’s minimum
insertion recommendation. Failure to follow the recom-
mendation could cause damage to the seatpost and
result in injury to the rider.
Minimum insertion 75mm
Maximum insertion
Small 190mm
Medium 225mm
Large 250mm
Extra Large 285mm
Seat tube inside diameter 22.5mm
Seat tube post clamp outer diameter 39.7mm
Fork
WARNING
Exceeding the recommended maximum fork length could
damage the bicycle and result in injury to the rider.
Travel
Sag
Axle to Crown
Frame/Size Axle to Crown (mm) Travel(mm)
S, M, ML, L, XL Recommended 557 150
Maximum 567 160
Recommended sag: Refer to the suspension setup card
included with your bike or the suspension calculator at
Trekbikes.com/suspension-calculator.
TK_Fuel_Ex-e_ServiceManual_MY23.indd 18TK_Fuel_Ex-e_ServiceManual_MY23.indd 18 4/11/2022 4:17:10 PM4/11/2022 4:17:10 PM
Safety Main pivot and
chainstay
Guards and water
bottle mounts
Drive unit and
cranks
Battery Specications
Derailleur hanger Rear shock Remote, display, and
Smart Box
Adjust the
compensation
screws
Remove and install
the battery
Active Braking
Pivot (ABP)
Adjust the
geometry
Charge port cover Re-installing the
cranks
Ride the bike
without the battery
Rocker pivot and
seatstay
Brake, derailleur,
and dropper post
routing
Wiring harness and
cable tray organizer
Speed sensor Connect lights to
the TQ Smart Box
Copyright 2022 Trek Bicycle Corporation All Rights Reserved

2023 Fuel EXe
2
Safety
WARNING
Properly tighten hardware
Always tighten hardware to the specied torque.
Over-tightening hardware could deform or break the
hardware or components. Under-tightening hardware
could cause hardware or components to become loose.
Either situation could damage the bicycle and result in
injury to the rider.
WARNING
Reapply threadlocker
All reused-fasteners with pre-applied threadlocker must
be cleaned with isopropyl alcohol and have new thread-
locker applied before re-assembly. If threadlocker is not
applied, the fasteners may loosen which could damage
the bicycle and result in injury to the rider.
Legend
Apply grease
Do not apply grease
Apply threadlocker
Nm Torque
Hex tool
Torx tool
Drift size
Zip tie

2023 Fuel EXe
3
Derailleur hanger
3
1
2
8
25Nm
1Derailleur hanger
– W5271425
2Washer, 30mm
3Bolt
Tools
• 8mm hex tool
• Torque wrench (left-hand thread) with 8mm hex bit
WARNING
Do not apply grease to the derailleur hanger or bolt.
This bicycle frame is designed to use a Universal Derailleur
Hanger (UDH).
NOTICE: The washer is frame-specic. Install only the
washer size specied.
NOTICE: Do not over-tighten. Over-tightening the bolt
could cause the hanger to break.
For additional information about the UDH, refer to the
SRAM user manual at sram.com.

2023 Fuel EXe
4
Active Braking Pivot (ABP)
2
3
4
5
10Nm
15Nm
7
NOTICE: Thread
must be at least
12.7mm
184mm
1
20x30 20x30
12.7mm
6
1Lever — W573860
2Thru axle — W583469
— W5272776
3Non-driveside ABP bolt —
W5251141
4Retaining ring — W5251279
5Bearings — W5256340
6ABP Non-driveside guide nut —
W5269707
7Spacers (for use with carbon frame
only) — W583422
Tools
• Bearing press
• Cassette lockring tool
• Grease
• Threadlocker

2023 Fuel EXe
5
Rocker pivot and seatstay
Important: Install driveside
bearing rst.
Torque order
Important: Loosely tighten all screws and bolts, then torque
in the order shown below. To achieve proper torque on all
bolts, rocker link pinch bolts (8) must be torqued last.
8Nm
4mm
2
3
32
12x21
12x21
2
7
4
5
8
8Nm
4mm
2
6
6
3
12x21
3
9
12x21
5Nm
5Nm
4mm
1
1
1Screws — W5270150
2Concave washers — W5270027
3Bearings — W5256341
4Hat style washers — W5270030
5Mino link nuts — W5270028
6Frame spacers — W290057
7Rocker pivot axle — W5271369
8Rocker link pinch bolts — W5256244
9Seatstay — 40468
Search trekbikes.com to nd the color-matched
part for your bike.
Tools
• Bearing press
• 4mm hex wrench
• Torque wrench with 4mm hex bit
• Grease
• Threadlocker
1
2
3
8Nm
17Nm
5Nm
Non-drive sideDrive side

2023 Fuel EXe
6
Main pivot and chainstay
1
2
3
4
3
2
56
17x26
17x26
15Nm
15Nm
5mm
7
Important: Install driveside
bearing rst
5mm
1Main pivot axle — W5270022
2Frame spacers — W440921
3Bearings — W5256338
4Main pivot sleeve — W600642
5Concave washers — W5270024
6Screws — W5270149
7Chainstay — 40466
Search trekbikes.com to nd the color-matched
part for your bike.
Tools
• Bearing press
• 5 mm hex tool
• Torque wrench with 5mm hex bit
• Grease
• Threadlocker
2023 Fuel EXe
7
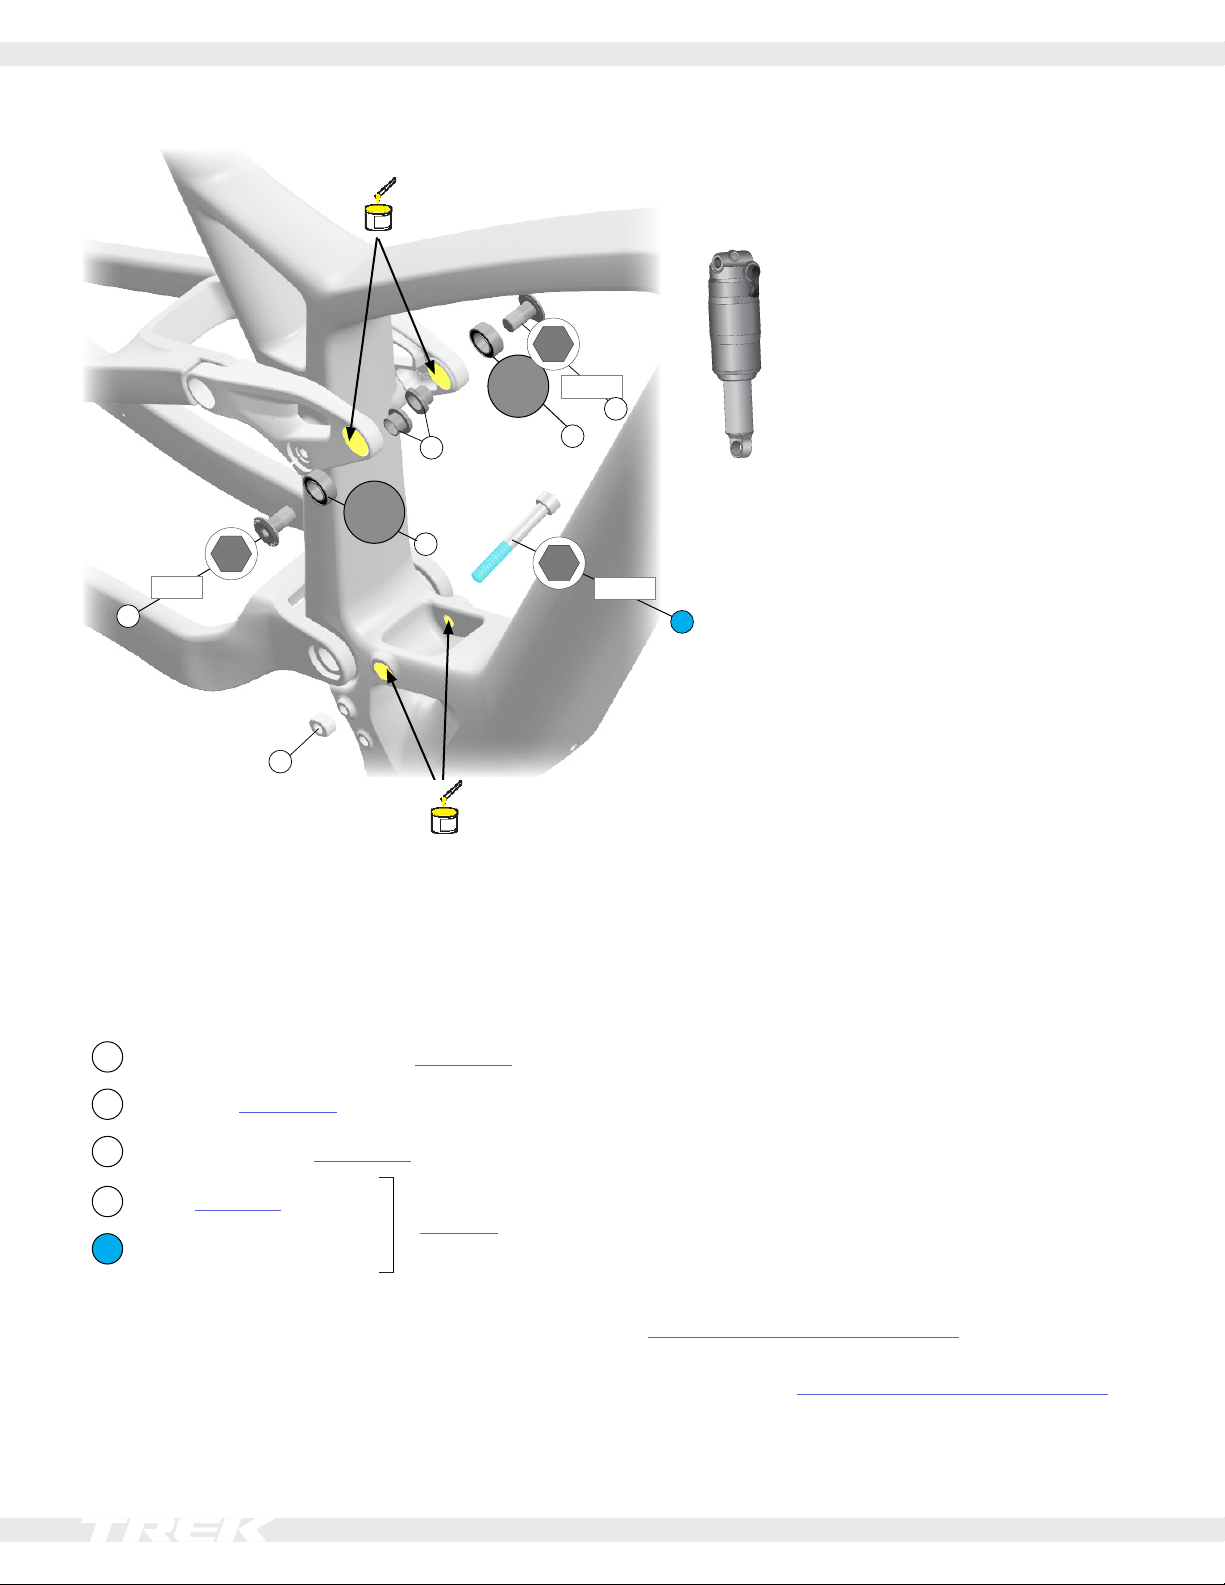
Rear shock hardware and dimensions
Shock Dimensions
Eye-to Eye-length: 205mm
Stroke length: 60mm
Upper width: 54mm x 10mm
Lower width: 40mm x 8mm
15Nm
3
2
2
5
6mm
12x21
6mm
17Nm
1
12x21
6mm
1
17Nm
4
1Upper bolts, M10 x 1 x 19mm — W5270031
2Bearings — W5256341
3Hat-style washers — W5270030
4Nut — W286347
— 5272748
5Lower bolt, M8 x 1 x 60mm
Tools
• Bearing press
• 6mm hex wrenches
• Torque wrench with 6mm bit
• Grease
• Threadlocker
Setup
Recommended sag: 30%, 18mm
Refer to the suspension setup card included with your bike
or the suspension calculator at
trekbikes.com/suspension-calculator.
For recommended rebound settings refer to the suspen-
sion calculator at trekbikes.com/suspension-calculator.
2023 Fuel EXe
8
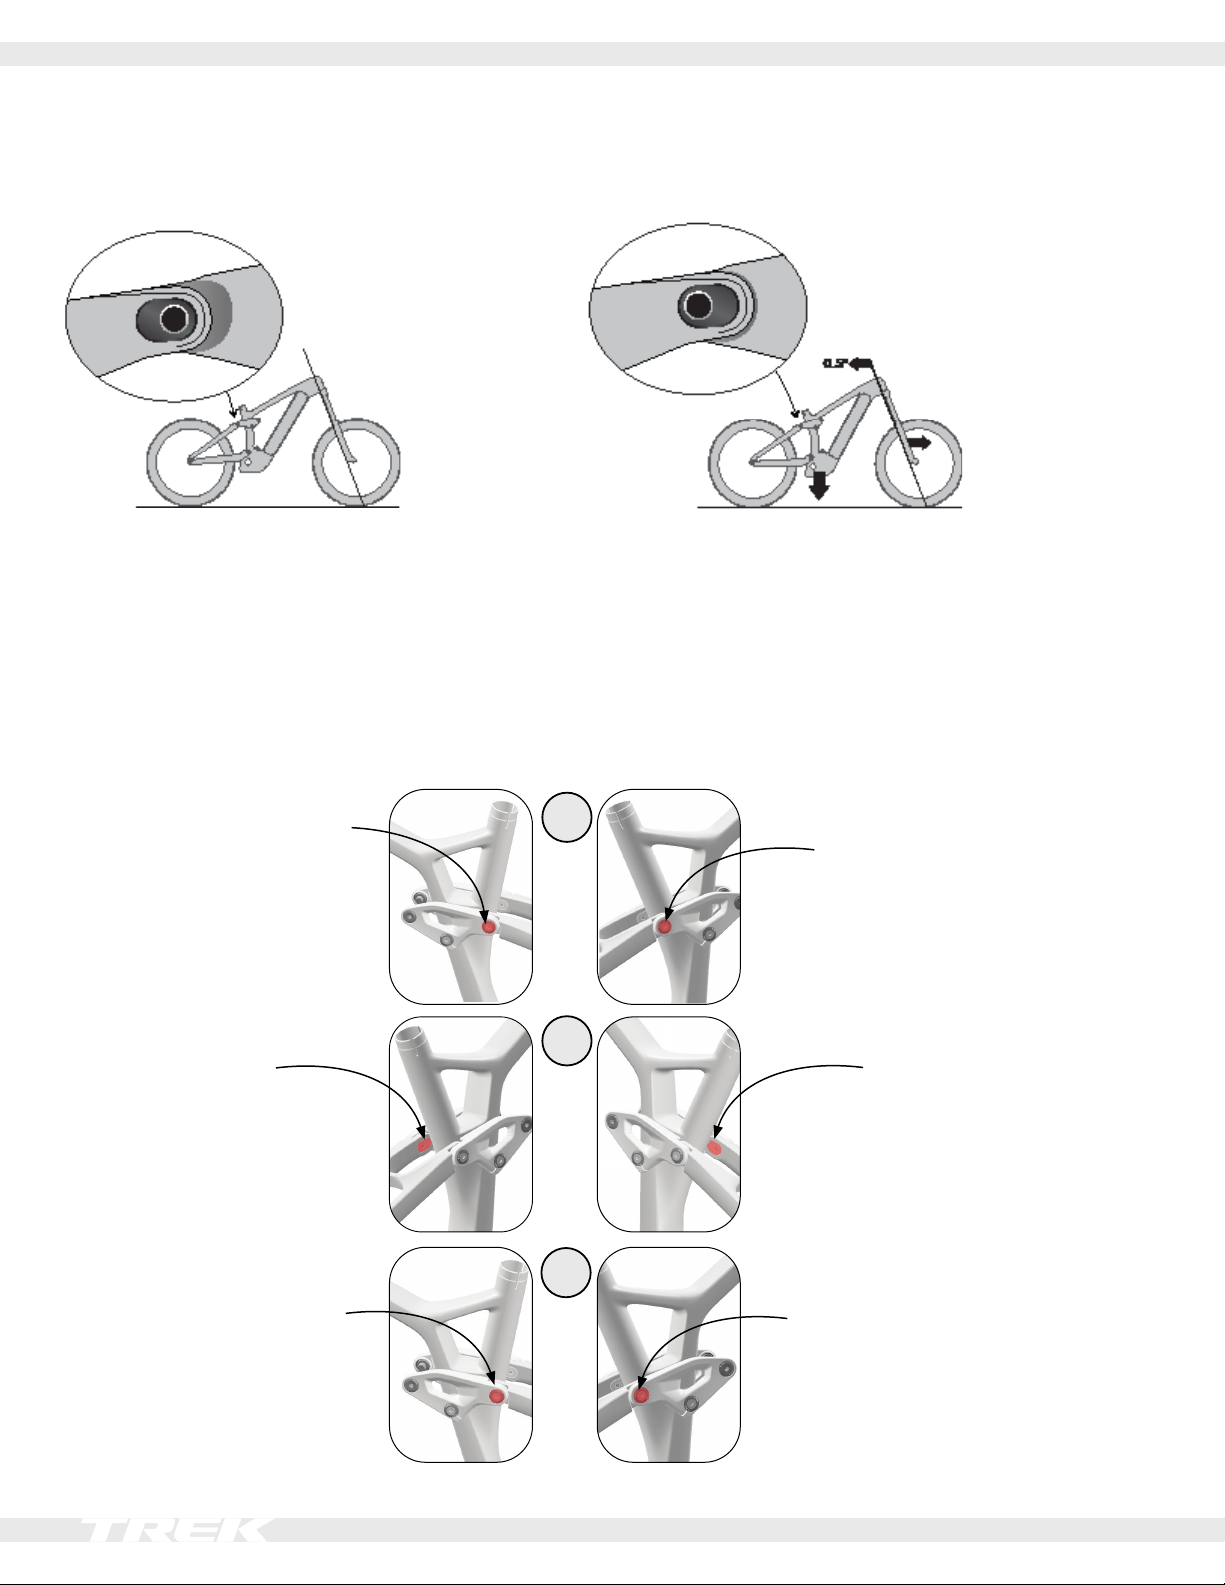
Adjust the geometry
Flip the Mino link to change the bike’s geometry to t your riding style or the terrain.
Steeper head tube angle Slacker head tube angle
Mino link in the high position Mino link in the low position
• Pulls in the front fork for quicker steering
• Raises the bottom bracket for improved climbing
• Pushes the head tube angle back 0.5° and pushes out the
front fork for slower steering that is more stable at high speed
• Lowers the bottom bracket up to 9mm for more stability
Tools
• 4mm hex tool
• Torque wrench with 4mm hex bit
Loosen
Torque 8Nm
Loosen
Flip Flip
Torque 8Nm
1
2
3
Drive sideNon-drive side

2023 Fuel EXe
9
Brake, derailleur, and dropper post routing
1Dropper post cable
1. Remove the battery cover, access cover and
battery (See Remove and install the battery on
page 19.
2. Route the cable from the bottom up through the
seat post and up through the cable tray in the
down tube.
2Brake hose
1. Remove the display from the top tube for easier
access.
2. Route the brake hose back to front.
3Derailleur cable housing
1. Remove the display from the top tube for easier
access.
2. Route the cable housing back to front.
4Speed sensor cable
5Exit guide — W519232
6Bolts — W532763
Zip tie
1
3
2
52.5
0.5Nm
5
2.5
0.5Nm
6
Cable tunnels
Dropper post cable routing
(See pages 9 and 11 for part information)
6
4

2023 Fuel EXe
10
Guards and water bottle mounts
10
7
6
9
1Nm
2.5
5Nm
5Nm
5
5
1
8
3
13
2Nm
5
12
5
4
2Nm
3
3
11
2Nm
2
13
M4 x 6M6 x 20
9
M5 x 8
5
1 Seatstay adhesive guard — W5271371
2Brake hose adhesive guard — W326986
3Rotor guard — W580881
1. To improve adhesion, use sandpaper to roughen the
backside of the guard and the area of the frame where
epoxy will be applied.
2. Attach the guard with a two-part epoxy.
3. Allow the guard and epoxy to cure for 24 hours.
4Main pivot mud ap — W5275234
5Accessory mount screws — W598484
6Shuttle adhesive guard (optional) — W5280162
7Down tube adhesive guard — W5273589
8Chain guard with bolts — W5276728
9Battery mount bolt — W5275266
10 Chainstay guard — W5271370
11 Clip nut (Use when battery is not installed) — W5284890
12 Battery cover — W5271937
13 Button head screws — W575056
Adhesive Guards 1278
Use isopropyl alcohol to clean the frame surface where the
guard attaches. Wait for the alcohol to dry before applying
the guard.
Notice: Do not clean the entire frame with isopropyl
alcohol. Isopropyl alcohol could damage the paint.
2023 Fuel EXe
11
Charge port cover
2
0.8Nm
T8
1
Tip: Not sure if you have a T8 Torx
wrench? Before you buy a new one
check your SRAM bleed kit to see if
one is included with the kit.
1 Bolts — 5305632
— 5289578
2Charge port cover
Tools
• T8 Torx wrench
• 5mm hex wrench
Replacement tip
T8
5
Tip: Use a 5mm hex wrench
inserted through the top battery
mount hole to hold the charge
port into place while tightening
the screws.

2023 Fuel EXe
12
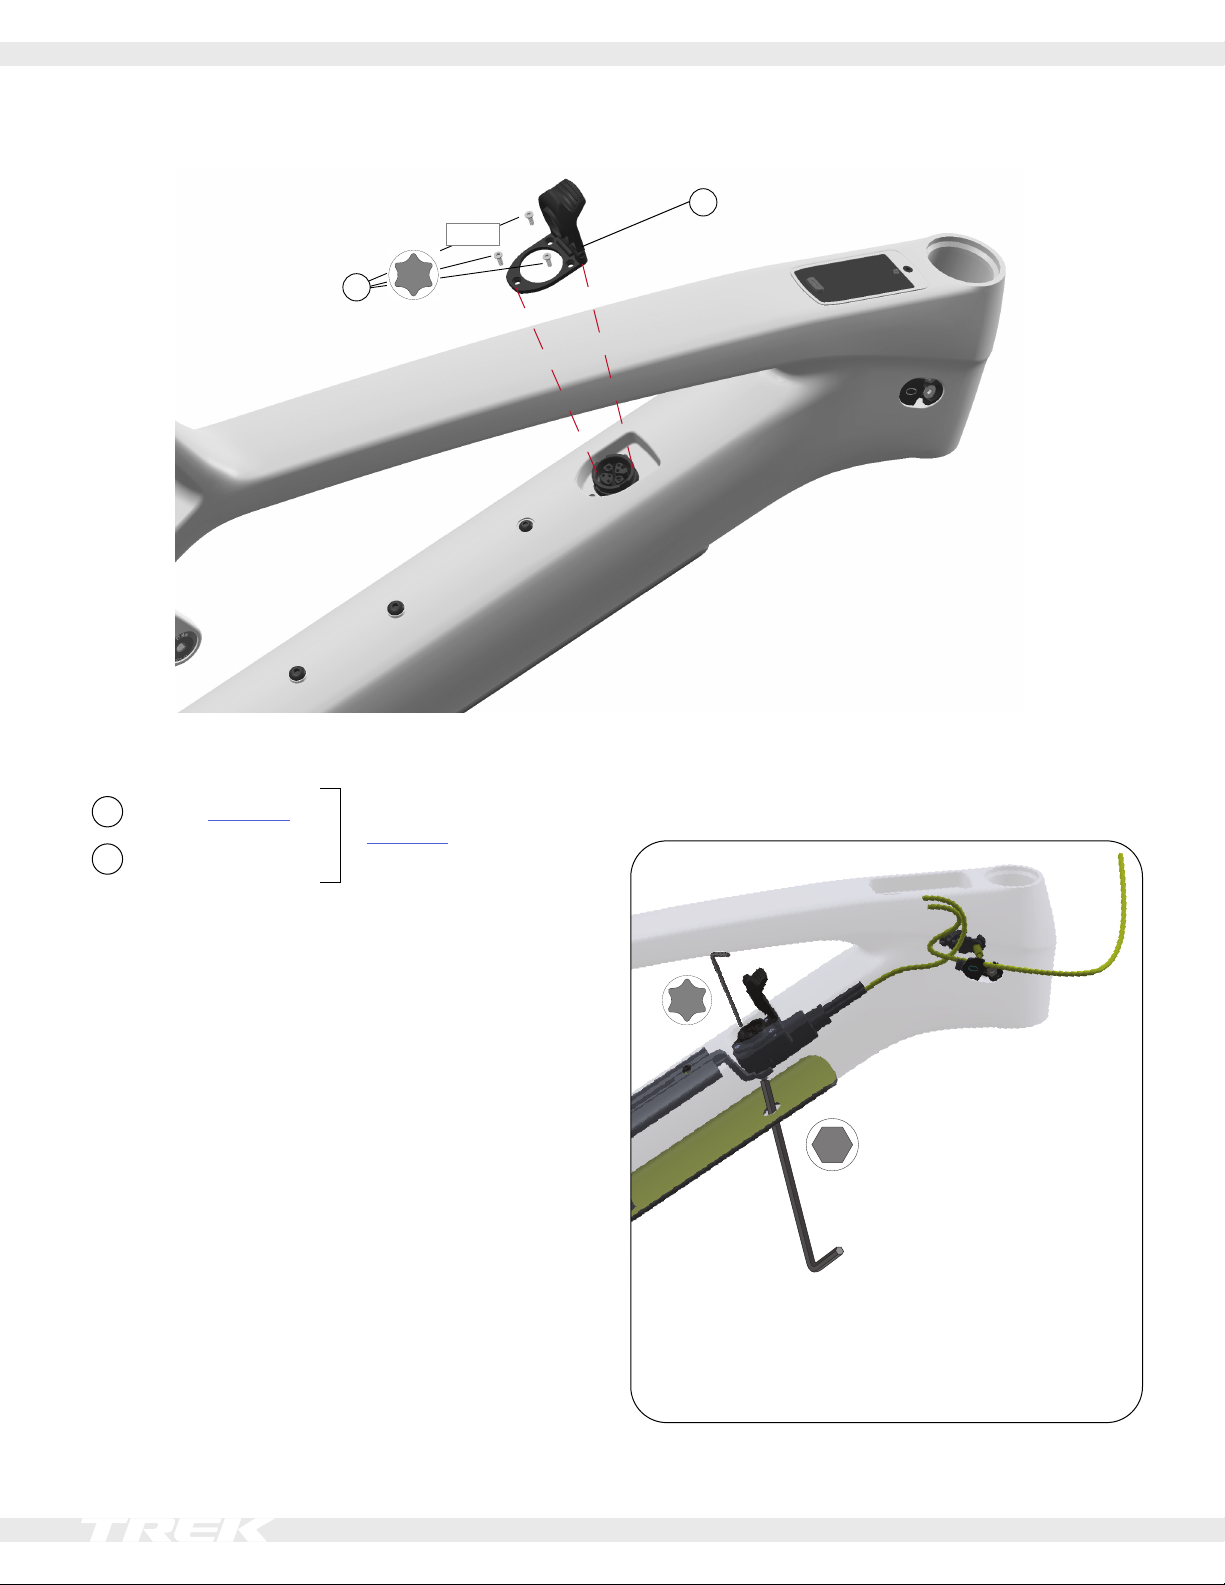
Remote, display, and Smart Box
For detailed service instructions:
Refer to the TQ service manuals found on tq-ebike.com/en/support/manuals.
Bikes without a TQ Smart Box
0.5Nm T10 3
2
1Nm
2.5
1
Bikes with a TQ Smart Box
0.5Nm T10 3
To derailleur
4
5
2.5
2
AXS-equipped bikes include the TQ
Smart Box. It has connections for front
light, rear light, aux 12, and electronic
shifting.
1
1Nm
6
1Remote, including screw — 5289561
2Display — 5289562
— 5289562
3Socket head bolt — 5305631
4Smart box — 5289564
5Foam blocks, set of two — 5305634
6AXS derailleur cable — 5289566
2023 Fuel EXe
13
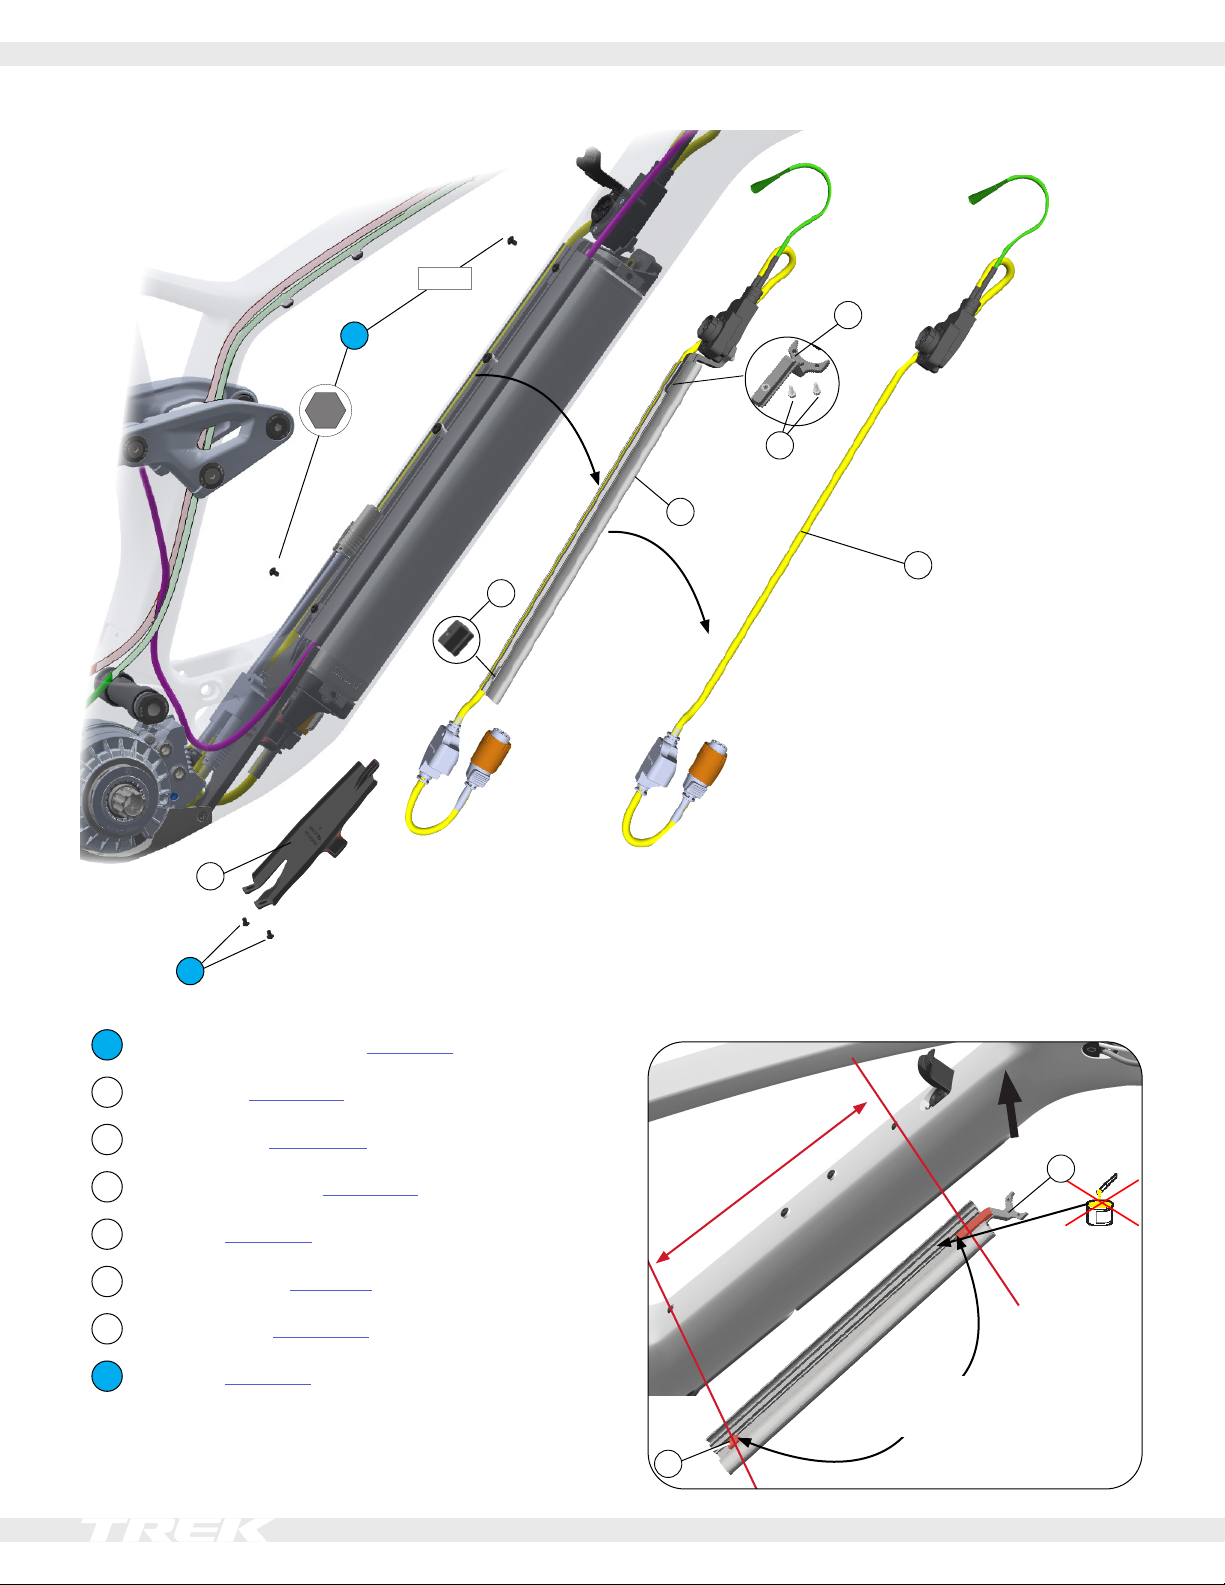
Wiring harness and cable tray organizer
1
2.5
1Nm
7
3
2
5
4
6
8
1Button head cap screws — W575056
2Cable tray — W5274993
3Sliding T nut — W5283261
4Charge port holder — W5274996
5Screws — W545633
6Wiring harness — 5289573
7Access cover — W5271943
8Screws — W575056
Cable tray replacement tip
Measure
Measure, then position parts
to align with frame holes.
Do not
grease the
track.
3
4

2023 Fuel EXe
14
Drive unit
For detailed service instructions:
Refer to the TQ service manuals found on tq-ebike.com/en/support/manuals.
20Nm
6
1
6
1Nm
3
20Nm
2Apply grease to the shaft seal and
o-ring of the lockring.
Non-drive side
T20
Notice: Before assembling the chainring (spider) or lock-
ring, place the included protective sleeve over the bottom
bracket spindle. Failure to use the sleeve could damage the
seal on the lockring and allow water to damage the motor.
Remove after assembly.
Drive side
5
4
50Nm
6
SRAM
drivetrain
Shimano
drivetrain
7
Tools
• 6mm hex wrench
• T20 Torx wrench
• Torque wrench with 6mm bit
• BB-UN55 bottom bracket tool — part number 536183
1 Front motor bolt, 73mm
— 5289570
2Rear motor bolt, 62mm
3Screws, 4-pack — 5269023
4Motor guard — W5271938
5Lockring — 5289572
6FSA spider for SRAM spec models — W5275013
7e*Thirteen chainring for Shimano Spec models —
W5272388
Notice: To disconnect the speed sensor from the drive
unit, hold each connector and gently pull them apart. Do
not pull the cable. Pulling the cable could damage the
speed sensor.Notice: Do not carry the drive unit by the
cables because this could damage the drive unit.

2023 Fuel EXe
15
Adjust the compensation screws
Before mounting a replacement drive unit, adjust the com-
pensation screws (tighten or loosen) to match the frame as
shown
=
T55
NOTE: Only adjust the compensation screws if you are replac-
ing the drive unit.

2023 Fuel EXe
16
Re-installing the cranks
Note: a CWP-7 Crank Puller be helpful to remove some types of crank arms.
The TQ system is designed for cranks to be installed in the UP position and in alignment with the notches on spindle. Installing
the cranks in a different position will cause the drive unit to run rough for a few hundred meters until the system re-learns the
position of the cranks.
Notch at 12 0’clock
Crank in UP position
1. Locate the notch on the spindle. There are notches on
the driveside and non-driveside.
2. Rotate the spindle until one notch is at the 12 o’clock
position.
3. Install the crank in the up position.
2023 Fuel EXe
17
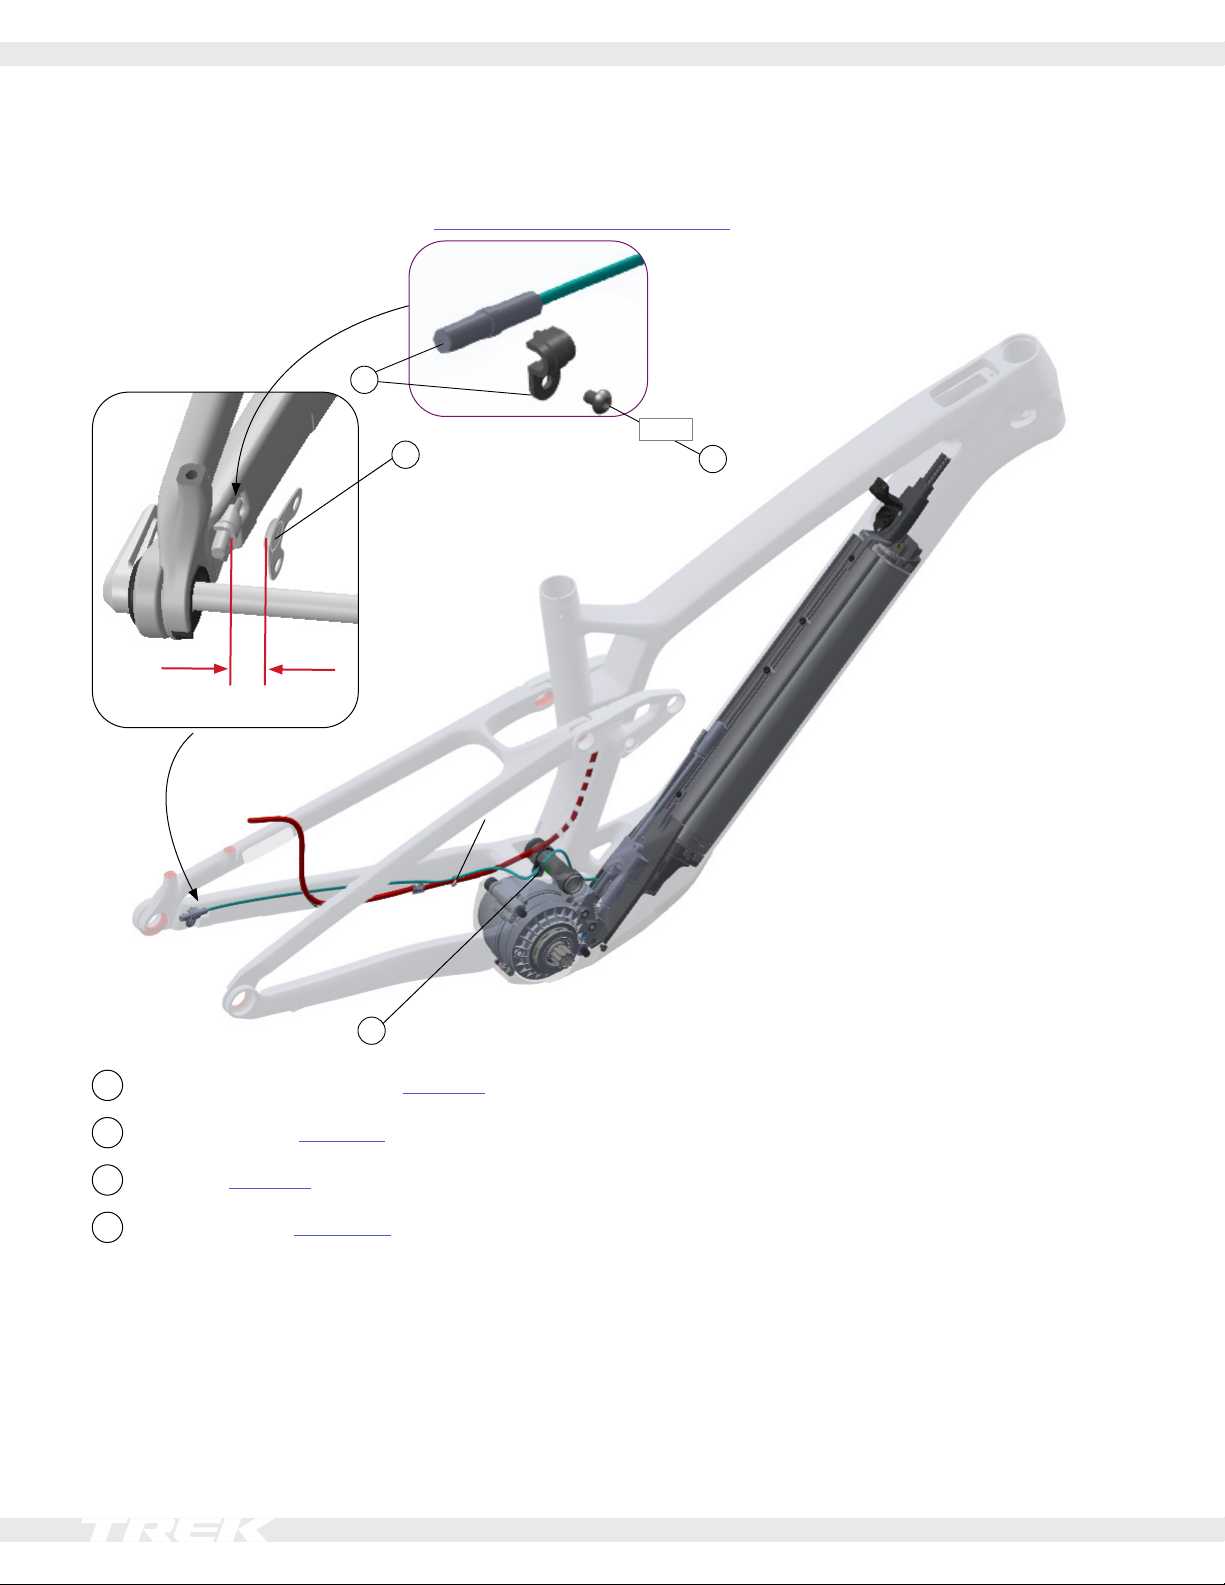
Speed sensor
For detailed service instructions:
Refer to the TQ service manuals found on tq-ebike.com/en/support/manuals.
4
1-8mm
3
1
1Nm
2
1 Speed sensor cable and clip — 5289567
2Bolt, M4 x 6mm — W575056
3Magnet — 5289568
4Cable grommet — W5255861
Notice: To disconnect the speed sensor from the drive
unit, hold each connector and gently pull them apart. Do
not pull the cable. Pulling the cable could damage the
speed sensor.
Replacement tip
1. To aid in removing the cable, use an internal routing
tool to chase the cable as you remove it.
2. Attach a new wire and reverse the process.

2023 Fuel EXe
18
Battery
For detailed service instructions:
Refer the TQ service manuals found on tq-ebike.com/en/support/manuals.
1
6
4
1Nm
2.5
1
3
2
51Nm
2.5
Light sensor
Charge level LEDS
1Bolts — W581747
2Upper battery end cap — W5298492
3Battery — 5289554
4Lower battery end cap — W5273187
5Bolts — 5305635
6Battery pull handle — W5273188
Tools
• 2.5mm hex tool
Assembly
Notice: Assemble the handle in the orientation shown
above, and with the battery positioned so the LEDs will be
on the drive side. The battery will not install properly if it is
assembled incorrectly.
Charge level LEDs
The LEDs on the battery indicate the charge level. To
refresh the status, place a nger over the LEDs for a few
seconds, then uncover. Each LED represents 20% of the
battery charge.

2023 Fuel EXe
19
Remove and install the battery
Remove the battery
1
2
Re-install and partially
tighten the screw to
hold the battery.
3
4
5
NOTICE: Guide the battery out of the frame. When the last
battery mount screw is removed, the battery will slide out
of the frame. To prevent the battery from falling, place one
hand under the battery to support it while removing the last
screw.
Install the battery
1. Insert the battery.
2. Install the top mounting screw to hold the battery in
place.
3. Plug in the battery.
4. Rotate the battery lock to the closed position.
5. Gently tug the battery handle to verify the battery is
locked into place.
6. Install the battery cover.
7. Torque the top and bottom mountings screws to 5Nm.
Table of contents
Other Trek Bicycle manuals

Trek
Trek 2022 SESSION Operating manual

Trek
Trek MADONE 2019 User manual

Trek
Trek Domane SL User manual

Trek
Trek ROSCOE 7 Operating manual

Trek
Trek SUPERCALIBER SL User manual

Trek
Trek 2022 CHECKPOINT SL Operating manual

Trek
Trek DOMANE SL 2023 User manual

Trek
Trek DOMANE+AL 2023 User manual

Trek
Trek Powerfly HT Sport EQ 4 User manual

Trek
Trek DOMANE SLR 2017 User manual

Trek
Trek FX SPORT CARBON 2022 Operating manual

Trek
Trek RIDE+ User manual

Trek
Trek Ride Plus User manual

Trek
Trek MY22 Top Fuel User manual

Trek
Trek RIDE+ User manual

Trek
Trek Rail 9.5 Gen 4 User manual

Trek
Trek MADONE SL 2022 Operating manual

Trek
Trek 2022 E-CALIBER Operating manual

Trek
Trek RIDE+ User manual

Trek
Trek MARLIN 6 User manual


