manuals.online logo
Brands
  1. Home
  2. •
  3. Brands
  4. •
  5. Hope
  6. •
  7. Bicycle Accessories
  8. •
  9. Hope Mono Trial User manual

Hope Mono Trial User manual

HYDRAULIC DISC BRAKE SYSTEM
UK Head Office :
Hope Technology Ltd.
Fernbank Mill, Fernbank Avenue
Barnoldswick
Lancashire,
United Kingdom
BB18 5UY
Phone: +44 (0) 1282 851200
Fax: +44 (0) 1282 851201
E-mail: info@hopetechnology.com
This MonoTrial brake system has been specially designed to be used on Trial
bikes.
The Mini lever will give a smooth and progressive feel, it features a split clamp
for easy fitting, integrated reservoir for bleeding and adjustable lever reach.
The two piston, one piece MonoTrial caliper is machined from a solid billet of
aluminium which is designed to offer both power and stiffness.
The MonoTrial brake comes with a braided hose as standard to deal with any
eventual damage or crushing of the hose.
The rotor is only available in stainless steel but in several different diameters.
Please bear in mind that this brake system is only designed to use on trial bikes
and must not be use for any other purpose.
· Don’t overestimate your technical capabilities. This brake system must
be fitted by a competent cycle mechanic using the correct tools. Incorrect
installation could result in brake failure that could cause serious or fatal
injuries.
· Your brake system will generate heat during braking. Never touch either
the disc or caliper after a long braking period as this could cause severe
burns.
· Before each ride always check the brake for proper function, the brake
pads for wear and that there is no system damage resulting in fluid leaks.
· It’s common practice to also check that your wheel quick release skewers
are securely installed and tightened.
· Your braking performance will improve in almost all conditions, please
take time to become familiar with your new brake. Always ride within your
own abilities.
· Brake pads contaminated with brake fluid, chain lubricant or unsuitable
bike cleaner will need replacing because the overall brake performance will
be greatly diminished.
· Please refer to the complete manual for more information including
servicing and maintenance.
· If you have any doubts or questions please contact your dealer or the
appropriate distributor for your country.
DESCRIPTION
WARNING
BOX CONTENTS
Before first use please check the contents of the box are described as below.
Once again, don’t overestimate your technical skills. If you are not familiar with
this sort of installation we advise that this brake system should be fitted by a
competent cycle mechanic.
. Torx T25 driver
. 5mm Allen key
. 4mm Allen key
. 2mm Allen key
. Flat blade screw driver
1
2
3
4
1: Brake system, fully bled
(no5 caliper shown)
2: 2x M6x18 caliper bolts
and shims
3: Rotor (φ160mm shown)
4: 6x Torx T25 disc bolts
TOOLS REQUIRED
QUICK INSTALLATION
GUIDE
Mono Trial
www.hopetech.comwww.hopetech.com
3.2 Mounting the caliper
3.1 Facing off the brake mounts
b) With IS type caliper
2. Attaching the lever to the bars
3. Attaching the caliper to the fork or frame
4. Centralise the pads over the disc
6. Break in period
5. Personal settings
CLEANING
Avoid situations that could damage the brake hose and/or your bike frame
and components.
Note: In the first intance it is recommended that you install your brake as supplied
without disconnecting and routing the hose through frame guide (if present) or
attempting to shorten the hose.
a) Attach the lever assembly
to the handlebars. When you are
happy with the orientation of
the lever, tighten alternatly the
M5 clamp bolts using a 4mm
Allen key. Recommended
tightening torque: 4Nm.
b) Route the hose and caliper
down to the fork disc mount or
along the frame to the rear disc
mount.
This step is very important and
mustn’t be ignored.
Gently pump the lever in order to
bring the pads closer to the disc. One pad
might enter in contact with the disc
before the other. If this happens, hold the
disc against the pad that is already in
contact with the disc to allow the other
one to move.
For an optimized lever feel, both pads
must enter in contact with the disc at the
same time and allow the same clearance
(see arrows) when retracted. The disc
should not be flexing at any time.
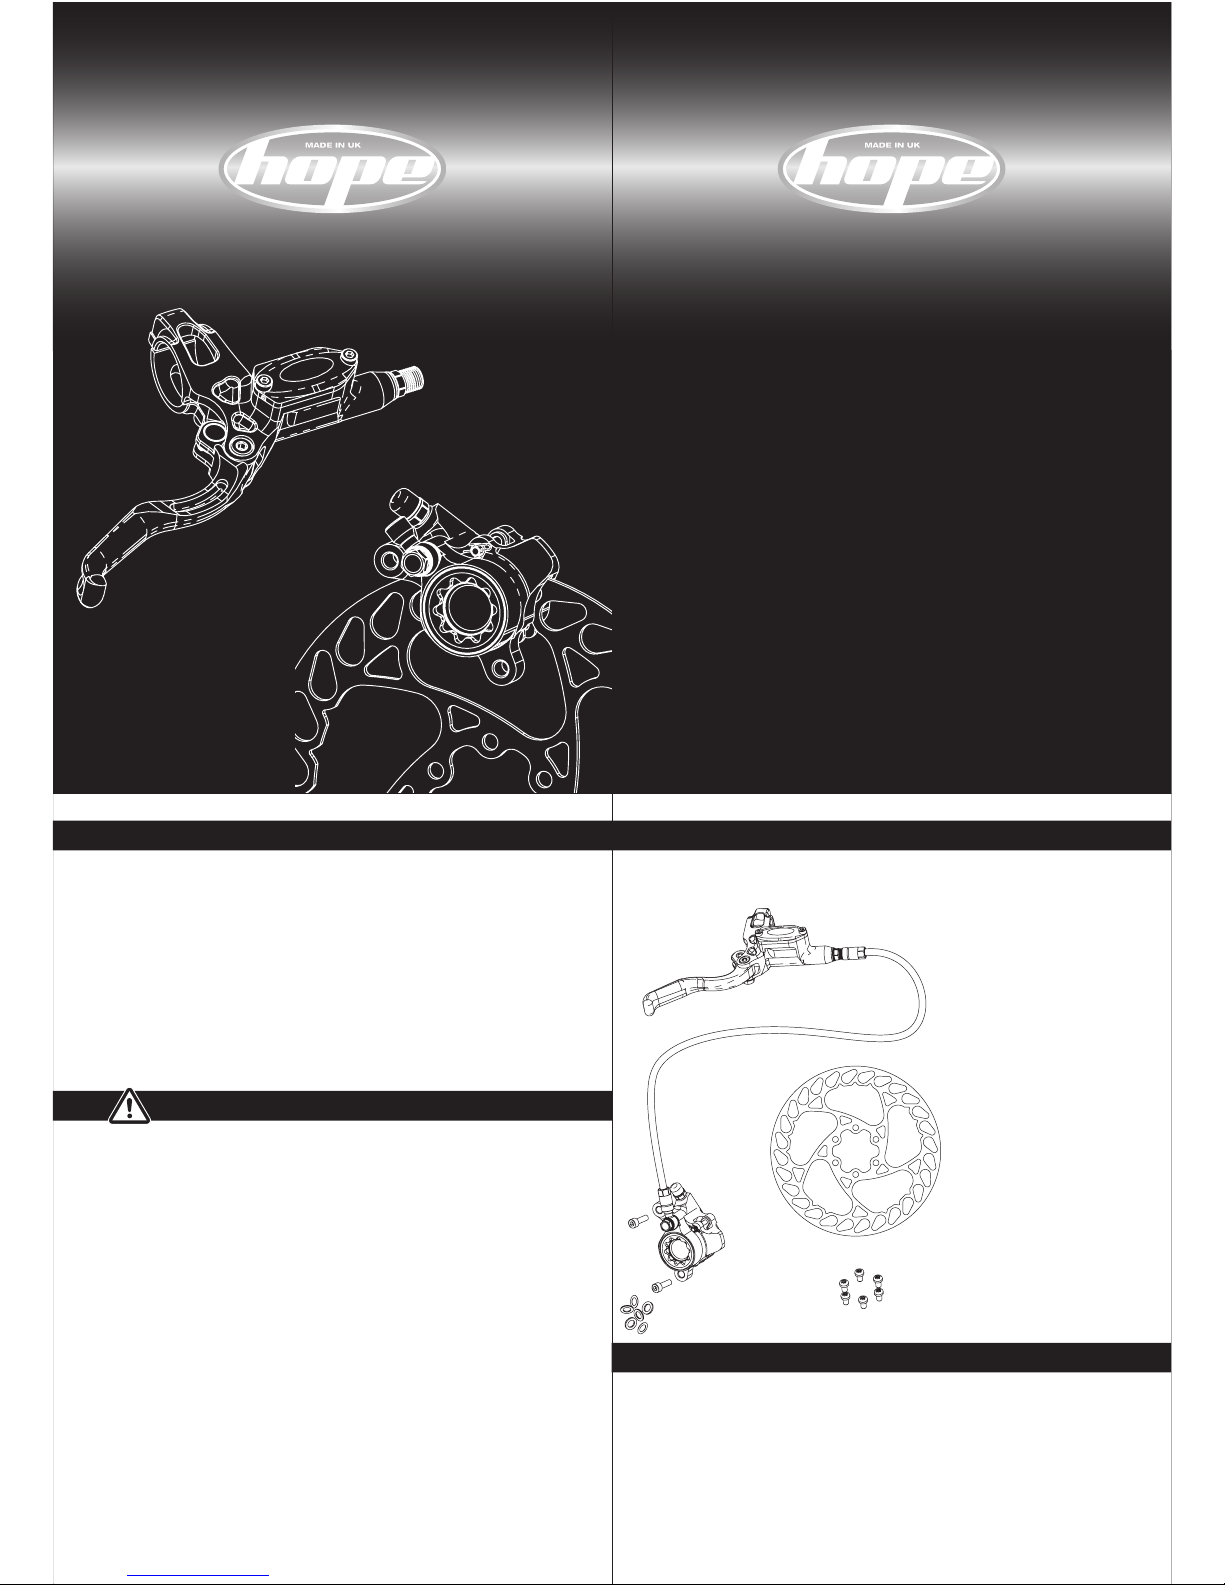
The MonoTrial caliper is only available in the International Standard (IS) type.
However there are two caliper size available, no5 and no3 to fit different size
rotors.
1. Attaching the disc rotor to the hub
INSTALLATION STEPS
a) Attach the disc rotor to the hub using the 6
Torx 25 bolts.
b) Make sure that the laser marked arrow on
the disc is pointing in the same direction as the
forward wheel rotation.
c) Using a Torx 25 driver, tighten the disc bolts
in a cross pattern. Recommended tightening
torque: 4 Nm.
Note: A mild engineering adhesive could be
used on disc bolts to prevent them unscrewing.
Do not use permanent adhesive.
Before riding check again the correct action of the brake and that braking
effort is applied as the lever is pulled.
To achieve the maximum braking performance, the new pads will need
bedding in. Please note that sintered pads take longer to bed in than organic
pads.
To bed in the pads, ride a short distance whilst alternatively gently applying
the brake on and off without attempting to stop. This procedure will achieve
good braking performance but will reach its full potential after a few rides.
HAPPY RIDING.
Be careful not to get your
fingers caught in the disc when
following these steps.
To ensure that the caliper is
properly aligned and to help avoid
squealing or bad lever feel - prior to
fitting the brake, it is important that
the tabs of your fork or frame are
clear of any paint or burrs.
We recommend that you
machine the tabs using a suitable
tool such as HOPE Spot Facing Tool.
==
==
a
INSERT
SHIM
b
-
+
+
-
Finger reach adjustment : The Mini
lever allows the adjustment of the lever
reach. This refers to the position of the
lever blade relative to the bars.
Use a 2mm Allen key, turn the adjuster
screw clockwise to increase the reach
and anti-clockwise to reduce it.
An IS type caliper (no5 or no3) will fit straight onto IS forks and frame brake
mounts using the correct size rotor.
a) Position the caliper onto the forks over the disc and slightly tighten the
two M6 bolts. Don’t tighten the bolts if the caliper body is touching the rotor or
this would bend it.
b) The aim is to position the caliper centrally over the disc (as showing on
Fig C below) using some of the supplied shim washers between the caliper and
brake mounts to achieve the central position. This is trial and error until the
correct position is achieved.
When the correct position of the caliper is achieved, tighten the two M6 cap
screws using a 5mm Allen key. Recommended tightening torque: 6Nm.
Fig C

Other Hope Bicycle Accessories manuals

Hope District Plus Vision User manual

Hope

Hope District Plus Vision User manual

Hope R8+ User manual

Hope

Hope R8+ User manual

Hope DIRECT MOUNT STEM User manual

Hope

Hope DIRECT MOUNT STEM User manual

Hope District+ User manual

Hope

Hope District+ User manual

Popular Bicycle Accessories manuals by other brands

Echowell a3 manual

Echowell

Echowell a3 manual

TFK velobaby operating manual

TFK

TFK velobaby operating manual

VDO Cyclecomputing M3 WR manual

VDO Cyclecomputing

VDO Cyclecomputing M3 WR manual

EBO KT-LCD3 user manual

EBO

EBO KT-LCD3 user manual

Ergon BioLeder GP1 installation instructions

Ergon

Ergon BioLeder GP1 installation instructions

Mio Cyclo 400 series user manual

Mio

Mio Cyclo 400 series user manual

Bosch KETTLER KB148-Z KC46 Series Translation of the original operating instructions

Bosch

Bosch KETTLER KB148-Z KC46 Series Translation of the original operating instructions

JING YI JY-8010 Series user manual

JING YI

JING YI JY-8010 Series user manual

Hamax HAM604809 user manual

Hamax

Hamax HAM604809 user manual

Scosche HANDLEIT BM01 manual

Scosche

Scosche HANDLEIT BM01 manual

Boogie Lockholder Install

Boogie

Boogie Lockholder Install

Shimano Nexus Inter-8 Dealer's manual

Shimano

Shimano Nexus Inter-8 Dealer's manual

Electric Bike Technologies E-BikeKit Owner's manual and installation guide

Electric Bike Technologies

Electric Bike Technologies E-BikeKit Owner's manual and installation guide

Vision Metron Front Hydration System installation instructions

Vision

Vision Metron Front Hydration System installation instructions

BAFANG E-SYSTEM manual

BAFANG

BAFANG E-SYSTEM manual

GHBIKE GH-523 manual

GHBIKE

GHBIKE GH-523 manual

RIESE & MULLER PowerPack 300 instruction manual

RIESE & MULLER

RIESE & MULLER PowerPack 300 instruction manual

EXT Racing Shox FERRO USD36 Quick manual

EXT Racing Shox

EXT Racing Shox FERRO USD36 Quick manual

manuals.online logo
manuals.online logoBrands
  • About & Mission
  • Contact us
  • Privacy Policy
  • Terms and Conditions

Copyright 2025 Manuals.Online. All Rights Reserved.