R4+.06.2017/ISS.2
Red
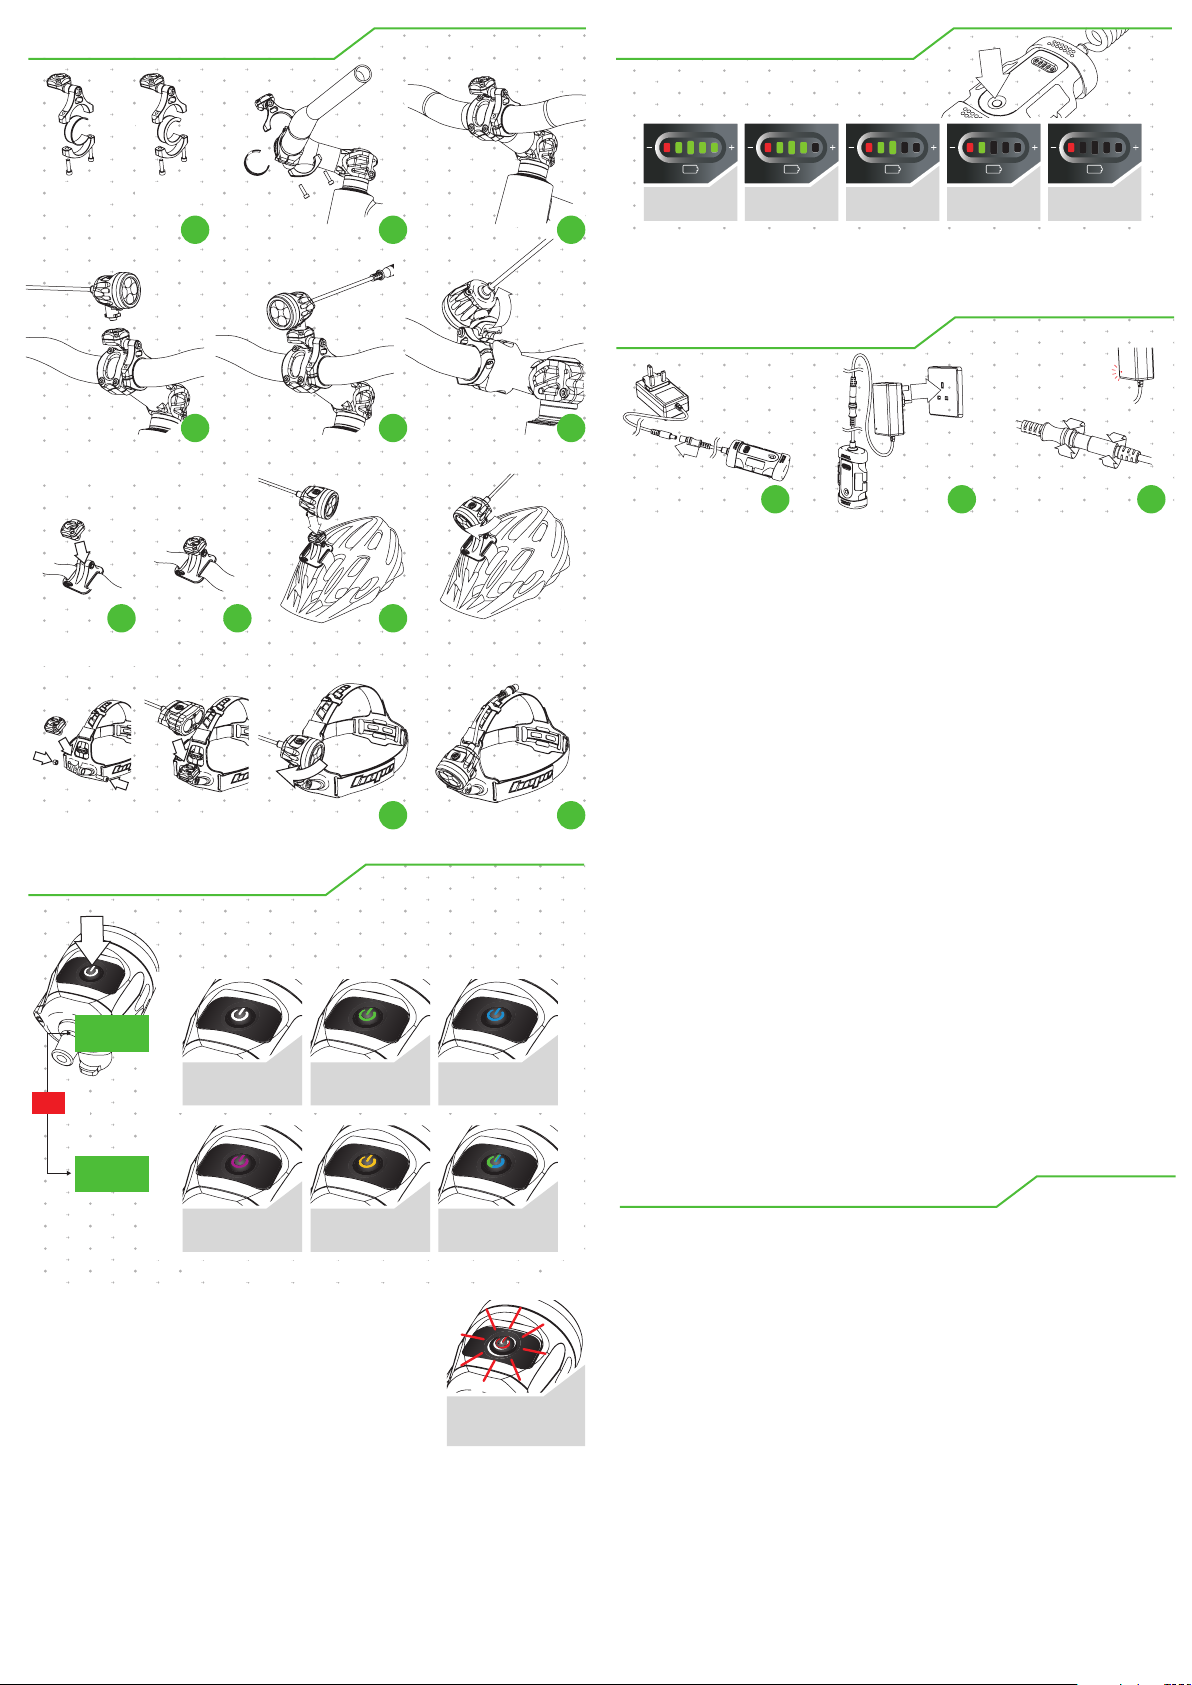
75% - 100% 50% - 75% 25% - 50% 5% - 25% Fully discharged.
Charge immediately
Low battery warning
DANGER: Use only the 7.4v Li-Ion battery pack supplied with the lighting system.
Any attempt to use or charge another battery pack may result in explosion and
serious injury.The battery charger is designed for indoor use only and should not
come into contact with water. The mains socket should be easily accessible.
In the event of any operational error the plug should be immediately removed
from the mains supply. The battery charger contains dangerous voltages and
the cover should not be removed. Any attempt to open the charger will
invalidate the warranty.
NOTE: The rechargeable battery pack is supplied with a small charge for testing
purposes only. Therefore, please ensure that the battery pack is fully charged
before first use. To correctly charge the battery pack, ensure these steps are
followed in order:
›› Disconnect the battery pack from the light unit by pulling apart the two
mating DC connectors. Always grip the connector heads when disconnecting,
not the cables.
›› Plug the charger into the battery pack before connecting it to the
mains supply (1).
›› Once the battery pack is connected to the charger it can then be plugged into
the mains power supply (2). The charger’s LED indicator will show as red during
the charging process. We recommend that the two mating connectors are rotated
at this point (3) to ensure that a good connection is made between the battery
pack and charger, and that the LED indicator turns red.
›› When charging is complete, the charger’s LED indicator will turn green.
Disconnect from the mains power supply before disconnecting the battery pack
from the charger.
NOTE: If you attempt to place the battery pack on charge after only a short period
of use (ie. with the remaining capacity at around 75% or higher, with four indicators
lit on the LED display), you may notice that the battery pack will not begin charging.
This is not a fault. It is simply due to the software communication between the
battery pack and charger. The charger is looking for a battery voltage of lower
than 8v before it will begin the charge process.
If this happens, simply connect the battery pack to the lamp unit and run
the lamp for a short while to further discharge the battery pack. It will then
charge successfully.
CHARGE TIMES: A fully discharged 2 cell battery should take approx 3.5 hours
to fully recharge. A 4 cell battery should take approx 7.5 hours.
NOTE: The R4+ lamp includes an ‘Energy Preserve’ feature
whereby the power will automatically drop down from mode
3 to mode 2 towards the end of the battery discharge cycle
(i.e. after approximately 2 hours 30 minutes in mode 3 with
the 4 cell battery, depending on conditions). The switch
illumination will change from blue to green at this point.
This is to prolong the remaining energy within the battery.
If you attempt to re-select mode 3 during the energy preserve
period the lamp will immediately fade back down to mode 2
and block theselection of mode 3 in order to maximise the
remaining battery life. Operation of the lamp then continues
with only modes 1 and 2 remaining active with each subsequent press of the power
button. Mode 3 is no longer selectable. This is a deliberate characteristic of the drive
circuit and should not be interpreted as a malfunction.
The R2 also features a low battery warning mode. When the battery is almost at
the end of it’s discharge cycle the lamp will drop down into low power mode, the
switch will illuminate red, and the lamp will flash twice every 30 seconds to warn
you that you are running low on battery life. Once the lamp unit has dropped into
low battery mode, no other modes are selectable. Pressing the power button will
only turn the lamp off or on.
OPERATION OF THE LAMP
*Although every effort is made to state accurate burn times, battery life is dependant on various
factors and environmental conditions. Therefore, actual burn times may vary from those shown.
The ES (Energy Status) battery pack features a 5 stage fuel gauge.
Press and hold the ‘TEST’ button to activate the LED display. This gives
a visual indication of the remaining capacity within the battery cells.
In order to prevent any malfunction within your Li-Ion battery pack and to
preserve the capacity as much as possible, there are a number of procedures
which must be considered when storing your battery pack for long periods while
not in use (ie. over the summer months).
STORAGE AND TRANSPORTATION: Never carry the lighting system by the cable.
This could result in damage to the electrical connections and will invalidate
your warranty.
Always disconnect the lamp unit from the battery pack when not in use.
When the lamp unit and battery pack are connected there is a small amount of
power constantly running through the circuit which could – over a period of time –
over discharge the battery pack resulting in loss of battery function and capacity.
This will also prevent the lamp unit accidentally switching on and potentially
overheating, which could cause permanent damage to the lamp and battery.
In extreme cases, overheating could cause fire and/or death.
STORAGE TEMPERATURE: The battery pack should be stored within the
temperature range of -20°C to 25°C in order to preserve cell capacity. Ideally in
a cool, dry room such as a cellar or garage.
OVER DISCHARGING: As with most battery cells, Li-Ion cells may discharge if
they are not used for a long time. In order to prevent over discharging fully charge
the battery pack before you store it. Also, charge the battery pack periodically
(ie. once every 3-4 weeks) to maintain the voltage between 6.8v to 7.6v. Over
discharging may cause loss of cell performance, or damage battery function.
If these few procedures are followed correctly, you can be sure that when the dark
nights creep back in your HOPE VISION battery pack will be fit and raring to go!
STORAGE AND TRANSPORTATION
BATTERY CHARGING
LI-ION E.S. BATTERY PACK
PRESS AND HOLD AT ANY TIME TO TURN OFF
QUICK PRESS:
ON
PRESS AND
HOLD: ON
OFF
Mode 2
300 Lumens
Mode 3
Flash mode
Mode 1
60 Lumens
Mode 2
1000 Lumens
Mode 3
1500 Lumens
Mode 1
550 Lumens
RACE SEQUENCETRAIL SEQUENCE
MOUNTING INSTRUCTIONS
Helmet mount
Head harness
35.0mm
(Item 4)
OR
31.8mm
(Item 3)
1 2 3
1 2 3
4 5 6
21 3 4
21 3 4


