HopeRF CMT2390F64-EB User manual

AN247
www.hoperf.cn
Copyright © By HOPERF
Rev 0.1 | Page 1/42
+
Overview
This document mainly introduces the operation of CMT2390F64-EB.The evaluation platform is designed
specifically for users to evaluate the performance of CMT2390F64. As the controller kernel of CMT2390F64
is a CM0 level single chip. This evaluation board can be regarded as its development board for various
functions of CMT2390F64 such as debugging, verification and testing.
The product models covered in this document are shown in the table below.
Table 1. Product Models Covered in This Document
Product Model Frequency
Range Modulation
Method Chip Function Configuration
Method Package
CMT2390F64 113 – 960 MHz
OOK
2(G)FSK
4(G)FSK
Integrated high-
performance RF
transceiver sigle chip
SoC QFN48
Remark:
1. Users are recommended to read the relavant document of CMT2300A in advance for the RF kernel of
CMT2390F64 is adopted from CMT2310A.
2. For more information about the function configuration of CMT2310A while using the evaluation board,
please refer to the relavant application documents:
a) AN235 CMT2310A FIFO and Packet Format Usage Guide;
b) AN236 CMT2310A Register Description;
c) AN237 CMT2310A Quick Start Guide;
d) AN238 CMT2310A RF Parameter Configuration Guide;
e) AN239 Using Guide for CMT2310A Auto-transceiver Function.
AN247
CMT2390F64-EB Evaluation Board User Guide

AN247
www.hoperf.cn
Copyright © By HOPERF
Rev 0.1 | Page 2/42
Table of Contents
1Hardware Platform....................................................................................................................................3
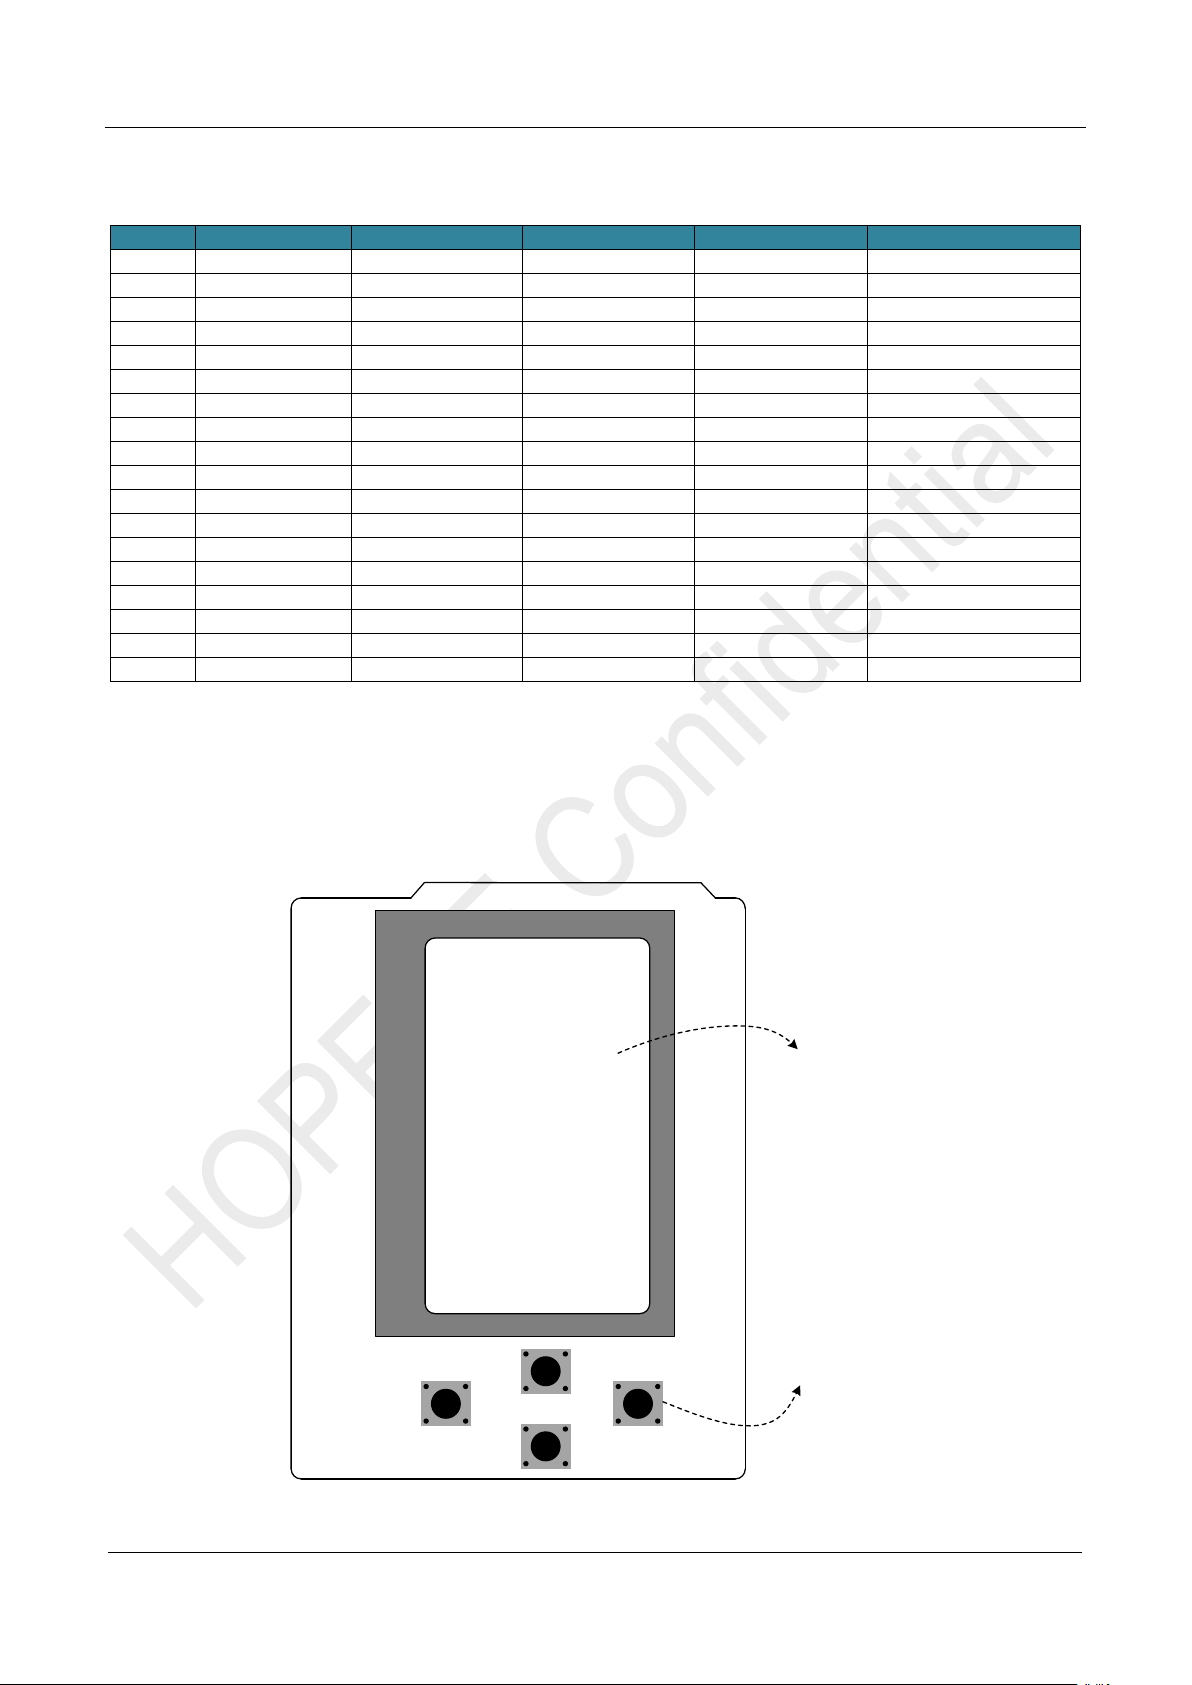
1.1 CMT2390F64-EB Introduction.......................................................................................................... 3
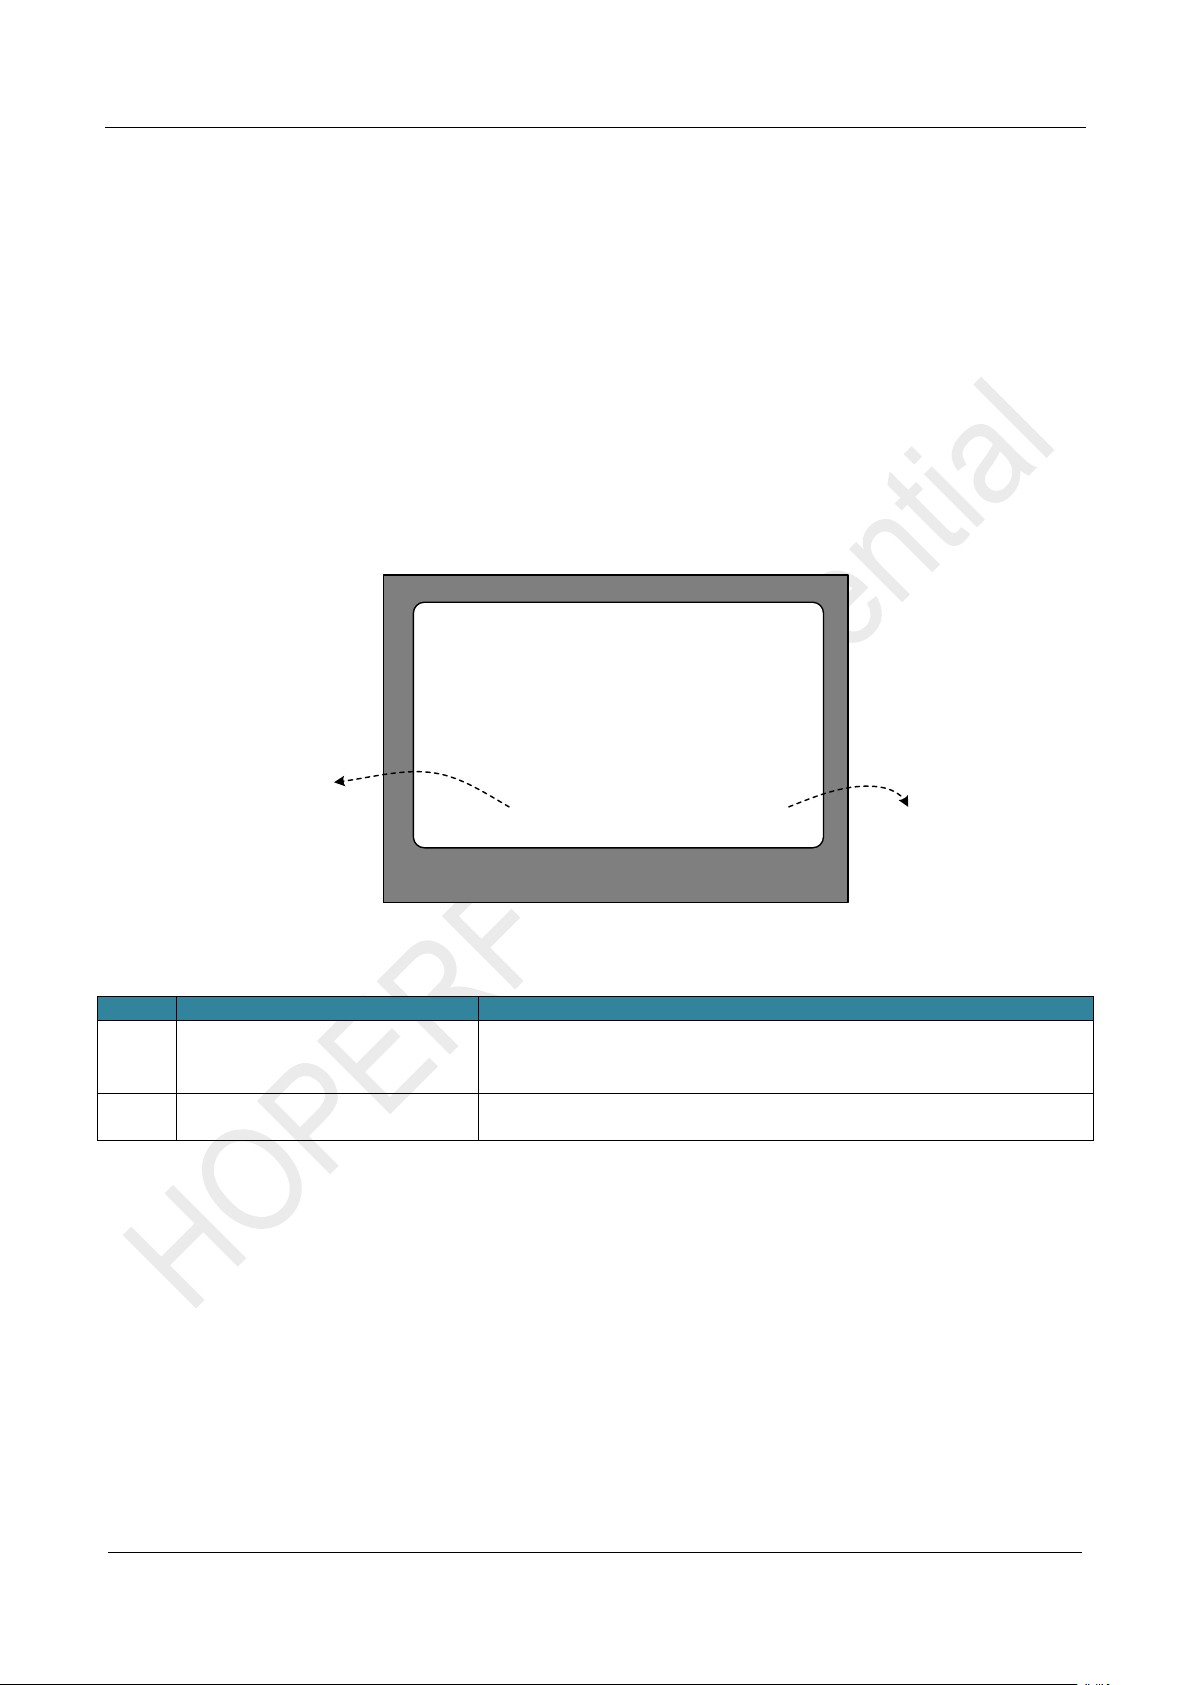
1.2 LCD Shiled Introduction.................................................................................................................... 5
2Introduction for Parameter Setting.........................................................................................................7
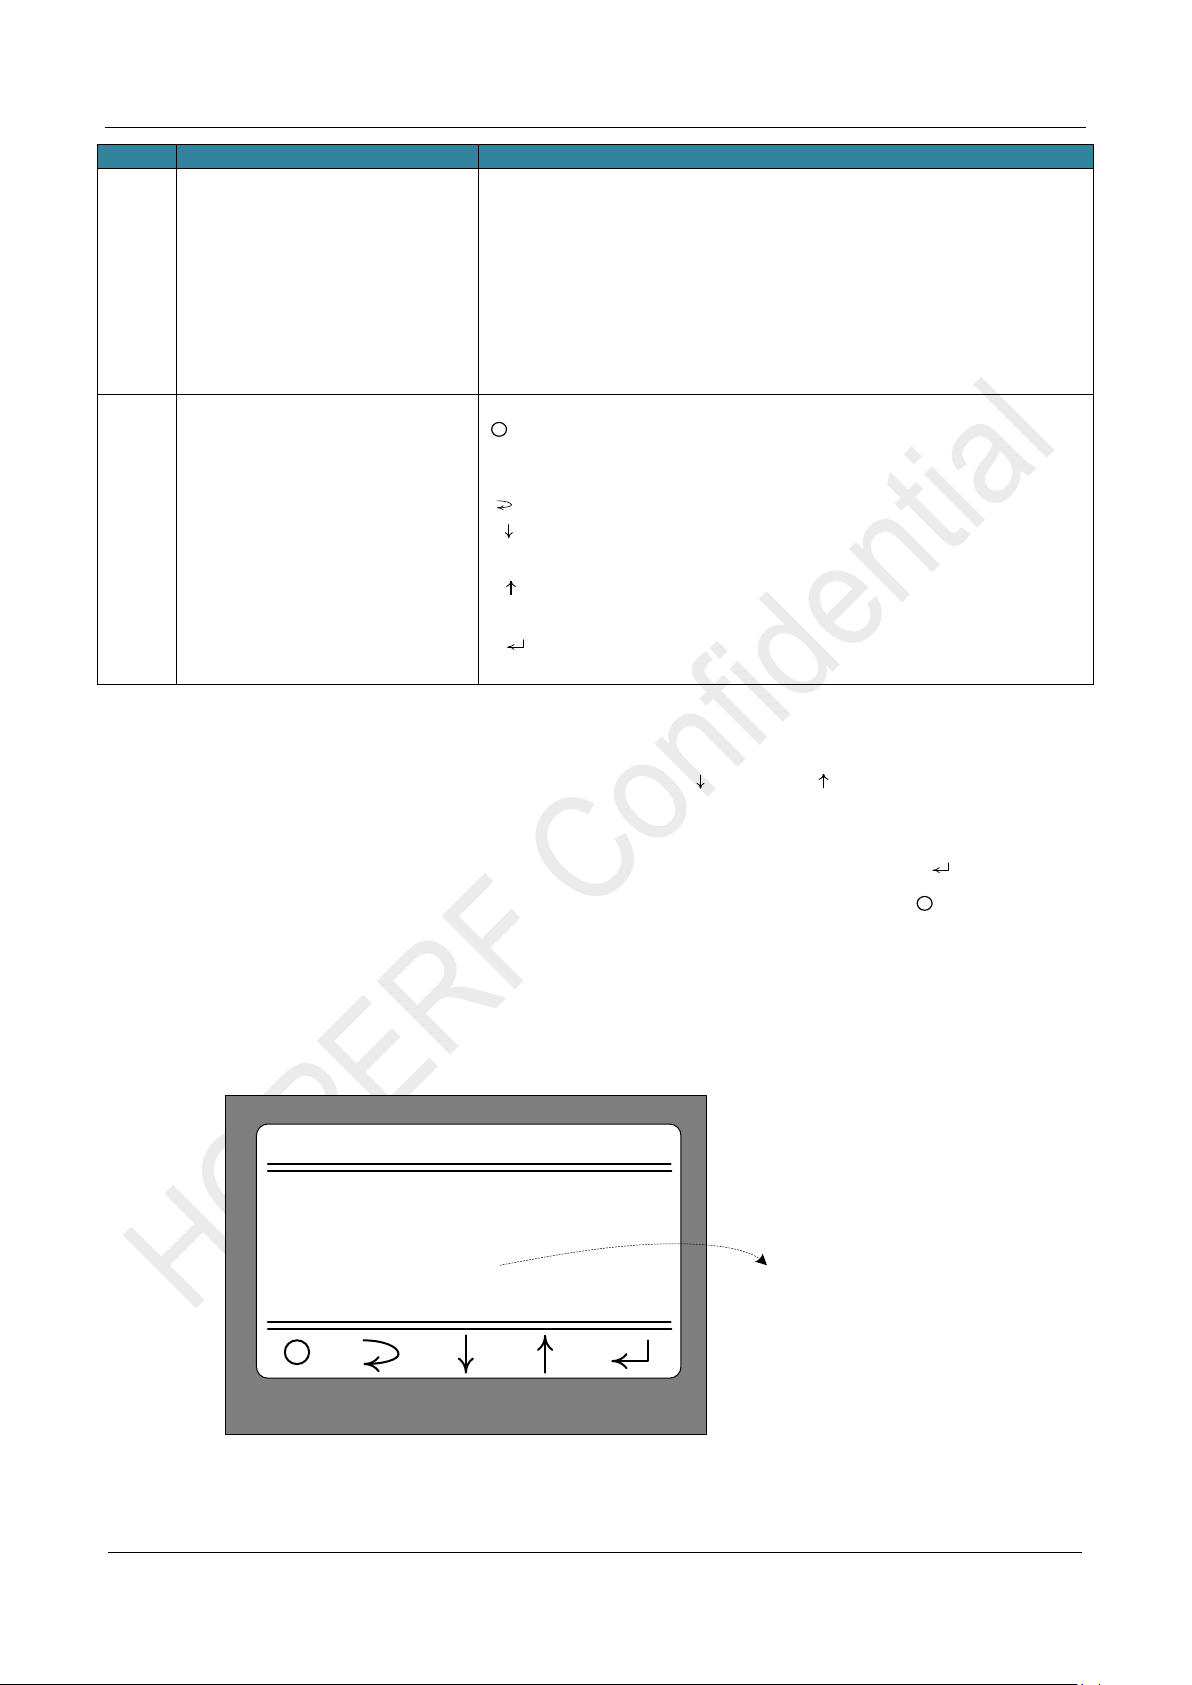
2.1 Startup Interface............................................................................................................................... 7
2.2 Main Menu Interface......................................................................................................................... 8
2.3 Modulation Submenu........................................................................................................................ 9
2.4 Work Mode Submenu..................................................................................................................... 10
2.5 Frequencry Band Submenu.............................................................................................................11
2.6 Data Rate Submenu........................................................................................................................11
2.7 Tx Output Power Submenu ............................................................................................................ 13
2.8 Preamble Length Submenu............................................................................................................ 14
2.9 Packet Length Submenu ................................................................................................................ 15
2.10 Coding Format Submenu ............................................................................................................... 15
2.11 CRC Select Submenu .................................................................................................................... 16
2.12 Packet Structure............................................................................................................................. 17
2.13 Frequencry Space and Frequencry Channel Submenu................................................................. 18
2.14 DC DC Select Submenu................................................................................................................. 20
2.15 Gaussian Select Submenu............................................................................................................. 20
2.16 Test Counter Submenu................................................................................................................... 21
2.17 Payload Content Submenu............................................................................................................. 22
2.18 AFC Select Submenu..................................................................................................................... 22
3Working Mode Description ................................................................................................................... 24
3.1 Sleep Mode..................................................................................................................................... 24
3.2 CW Tx Mode................................................................................................................................... 26
3.3 Direct Rx Mode............................................................................................................................... 28
3.4 Only Tx Mode ................................................................................................................................. 29
3.5 Only Rx Mode................................................................................................................................. 31
3.6 Tx and Rx Mode ............................................................................................................................. 32
4Supplymentary....................................................................................................................................... 36
4.1 Firmware Update Burning Operation.............................................................................................. 36
4.2 Corresponding Mode for Each Function/Indicator.......................................................................... 39
5Revise History........................................................................................................................................ 41
6Contacts.................................................................................................................................................. 42

AN247
www.hoperf.cn
Copyright © By HOPERF
Rev 0.1 | Page 3/42
1 Hardware Platform
The CMT2390F64 evaluation board is consist of CMT2390F64-EB and LCD Shield.
CMT2390F64-EB is used as the evaluation board,and CMT2390F64 is the development board for chip
controller. The evaluation board is with functionality and performance evaluation by default and it can be used
as the development board for getting to know CMT2390F64.
It provides two average frquency band:434MHz and 868MHz,with +20dBm Tx power in Direct Tie
matching mode;
CMT2390F64-EB can also provide two types of standard single antenna (default) and antenna diversity
(one PCB with different BOM, double Layout compatibility)
LCD Shiled is plugged into the CMT2390F64-EB. It is used as the man – machine interaction interface
for it provides LCD screen and buttons.
1.1CMT2390F64-EB Introduction
Top view and introduction of the CMT2390F64-EB is shown in the following figure.
3. CMT2390F64
10. J-Link Debug
Interface
1. SMA Connector
GND
SWCLK
SWDIO
VDD
9. CH340G
USBto UART
Interface
12. USB TypeB
Connector
14. DC +9V Input
6. Buzzer & Buzzer Jumper
PB04
PA08
PB15
PB14
PB13
PC13
GND
NC
PB03
PB12
PA10
PA13
PA14
PB07
PB06
PA09
PB05
NC
PA00
PA02
PA03
PA04
PA06
PA01
VIN
GND
+5V
+3V3
MCU_RST
GND
15. Reset Key
USB TypeB
7. RF GPIO5 Test Point
11. UART Jumper
16. Current Detect Jumper
2. RF_GPIO2
Test Point
4. RFDC-DC Jumper
5. MCU BOOT0 Jumper
8. RF GPIO4 Test Point
Power On/Off
13. Power Switch
17. RFnIRQ TestPoint
for TCXO Control
18. RF GPIO1 Test Point
19. RF GPIO0 Test Point
20. RF GPIO3 Test Point
CMT2390F64-EQR48-EB
Figure 1-1. CMT2390F64-EB Top View

AN247
www.hoperf.cn
Copyright © By HOPERF
Rev 0.1 | Page 4/42
Table 1-1. CMT2390F64-EB Description
Number Function Description
1 SMA Connector
CMT2390F64 connects to the antenna or test machine through the SMA
interface after matching complete.
2 RF GPIO2 Test Point
RF GPIO2 test point
Note:
1. RF GPIO2 do not connect to the controller GPIO port;
2. RF GPIO2 can also be output as a synchronous clock DCLK for data
streams in receive mode
;
3 CMT2390F64 CMT2390F64-EQR chip
4 RF DC-DC Select
The RF part of the CMT2390F64 is embedded with DC-DC module. The
DC-DC mode can either be enabled or disabled. It should be noted that
this jumper is a hardware selection and should be used together with the
control software. If the DC-DC module needs to be enabled, the software
also needs to configure the corresponding register BUCK_SEL to 1
(located in Page1, address 0x01, Bit4). Note: The DC-DC only applies to
the RF part, while not to power supply of controller part.
5 MCU BOOT0 Jumper Jumper of CMT2390F64 controller BOOT0
6
Buzzer & Buzzer
Jumper
Board buzzer and the control port jumper
7 RF GPIO5 Test Point
RF GPIO5 test point
Note
:
RF GPIO5 is connected to controller PB04 port.
8 RF GPIO4 Test Point
RF GPIO4 test point
Note
:
RF GPIO4 is connected to controller PC13 port.
9
CH340G
USB to UART
Interface
CH340G USB to the chip interface of UART
10 J-link Debug Interface J-link debug interface(SWD)
11 UART Jumper MCU serial port(PA09、PA10)is connected to CH340G jumper.
12 USB TypeB Connector USB interface,TypeB
13 Power Switch Power switch (Switch between battery power and DC power)
14 DC +9V Input Input interface of 9V direct current
15 Reset Key Reset key of evaluation board
16 Current Detect
The power consumption of each working state of CMT2390F64 can be
carried out by the current test jumper.
17 RF nIRQ Test Point
RF nIRQ test point
Note
:
1. RF nIRQ is not connected to the controller GPIO port
;
RF nIRQ can be used as the power control pin of TCXO, EB makes
common passive crystal and TCXO is treated as dual layout compatible
processing. EB is defaulted as common passive crystal.
18 RF GPIO1 Test Point
RF GPIO1 test point
1. RF GPIO1 is not connected to the MCU GPIO port
;
RF GPIO1 can also be used as a DOUT output for data streams in
receive mode;
19 RF GPIO0 Test Point
RF GPIO0 test point
1. RF GPIO0 is not connected to the MCU GPIO port
;
RF GPIO0 can also be used as a synchronous clock DCLK output for
data streams in receive mode;
20 RF GPIO3 Test Point
RF GPIO3 test point
1. RF GPIO3 is not connected to the MCU GPIO port
;
RF GPIO3 is one of the control terminal of antenna diversity
;

AN247
www.hoperf.cn
Copyright © By HOPERF
Rev 0.1 | Page 5/42
Table 1-2. CMT2390F64-EB Pin Function
Pin
QFN48-EB
LCD Shiled[1]
Pin
QFN48-EB
LCD Shiled
PA10
UART_RxD
PA00
PA00
LCD_SDIO
PA09
UART_TxD
PA01
PA01
LCD_RS
PA13
SWD_SLCK
LCD_LED
PA02
PA02
LCD_CS
PA14
SWD_SDIO
PA03
PA03
LCD_SCK
PB07
KEY1
S1
PA04
PA04
LCD_ROM_CS
PB06
KEY2
S2
PA06
PA06
LCD_ROM_SDIO
PB05
BUZZER
VIN
NC
NC
GND
PB04
RF_GPIO5
GND
PC13
RF_GPIO4
+5V
PA08
RF_CSB
+3V3
PB15
RF_MISO
MCU_RESET
PB14
RF_MOSI
NC
NC
PB13
RF_SCK
NC
NC
GND
PC14
32768Hz crystal
NC
NC
LCD_RESET
PC15
32768Hz crystal
PB03
PB03
S3
PB12
PB12
S4
Note: For more detail information, please refer to the CMT2390F64-EB schematic diagram.
1.2LCD Shiled Introduction
The following figure shows the top view and introduction of the LCD Shiled.
CMOSTEK
SW 20230203
LCDShiled
S1
S2 S3
S4
1. 128x64 LCD
2. S1~S4 Buttons
Figure 1-2. LCD Shiled Top View

AN247
www.hoperf.cn
Copyright © By HOPERF
Rev 0.1 | Page 6/42
Table 1-3. LCD Shiled Description
No.
Function
Description
1
128x64 LCD screen
2
S1~S4 button

AN247
www.hoperf.cn
Copyright © By HOPERF
Rev 0.1 | Page 7/42
2 Introduction for Parameter Setting
A firmware will be pre-burned around the chip before delivery for multiple functional test and evaluation (it
needs to be used together with LCD shield display) for CMT2390F64-EB or CMT2390F64-QFN48-EB. This
firmware will be updated from time to time as functional changes, it can be downloaded from the official
website of HOPE and it will be updated through J-Flash software from J-link debugger (the updated firmware
is described in detail in Chapter 4 of this article). In this chapter, parameter setting menu of the factory
firmware will be introduced in detail.
2.1Startup Interface
The startup interface is show in Fig. 2-1.
CMOSTEK
SW 20221126M FW C0
1. Software Version
2. RF-Core
Firmware Version
Figure 2-1. Startup Interface
No.
Function
Description
1 Software Version
Factory firmware
(
CMT2390F64 burning software
)
version
information, as shown in the above figure, it indicates that the
current operation version is: 20221126
2 RF-Core Firmware Version
RF core firmware version, as shown in the above figure, it
indicates the chip version is C0.

AN247
www.hoperf.cn
Copyright © By HOPERF
Rev 0.1 | Page 8/42
The startup interface of RF indentified failed is shown as Fig 2-2 (chip abnormal)
not found radio
Figure 2-2. Startup Interface when RF Identification Failed
2.2Main Menu Interface
The main menu interface will pop up 1 second after the startup interface, as shown in Figure 2-3.
CMT2390F64 EB GUI
1 Modulation
2 Work Mode
3 Frequencry Band
4 Data Rate
2. Rolling submenu
1. Title
3. Button for
functional selection
Figure 2-3. Main Menu Interface
No.
Function
Description
1
Title
CMT2390F64 EB GUI
2 Rolling submenu
15 submenu selections are shown in the area
:
1. Modulation(Modulation and demodulation mode selection)
2. Work Mode(Working mode selection)
3. Frequencry Band(Frequency band selection)
4. Data Rate(Rate/frequency offset parameter selection)
5. Tx Output Power(Transmission power selection)
6. Preamble Length(Preamble length selection)
7. Packet Length(Packet length selection)
8. Coding Format(Coding format selection)
9. CRC Select
(
CRC verification mode selection
)

AN247
www.hoperf.cn
Copyright © By HOPERF
Rev 0.1 | Page 9/42
No.
Function
Description
10. Freq Space
(
Frequency offset interval setting
)
11. Freq Channel(Frequency channel signal setting)
12. DC DC Select
13. Gaussian Select(Gaussian mode selection)
14. Test Counter(Test counter for packet TX)
15. Payload Content(Method for payload content)
16. AFC Select(Switch Selection for AFC)
17. XoCap Select (load capacitance selection of the internal
crystal)
3 Button for functional selection
The positions of S1 - S4 are corresponding to 5 signals.
:It is corresponding to S2(left button),indicating that the
firmware will enter into working state as parameters/modes set by
the above menus with short press;
:with no option;
:It is corresponding to S4(down button), indicating that the
firmware will enter the next selection with short press;
:It is corresponding to S1(up button), indicating that the
firmware will enter the above selection with short press;
:It is corresponding to S3(right button), indicating that the
firmware will enter the current selection with short press
;
Operation of the main menu interface:
1. Select the required modified submenu by short press the S4()and S1( ), the selected submenu
will flash accordingly.
2. Select the submenu respectively to set the corrsponding parameters by short press S3().
3. Enter into the corresponding working mode according to the setting by short press S2().
2.3Modulation Submenu
Select submenu“1 Modulation”and press S3 button will enter into the interface shown as followed.
CMT2390F64 EB GUI
1 Modulation
2FSK
1. Rolling option area
Figure 2-4. Modulation Submenu Interface

AN247
www.hoperf.cn
Copyright © By HOPERF
Rev 0.1 | Page 10/42
No.
Function
Description
1 Rolling option area
3 modulation and demodulation modes can be selected by short
pressing S1 or S4.
OOK
2FSK
4FSK
After selecting the corresponding modulation and demodulation
modes, press S2 or S3 to confirm the selection and return to the
upper menu (i.e. the main menu).
2.4Work Mode Submenu
Select submenu “2 Work Mode”and press S3 button will enter into the interface shown as followed.
CMT2390F64 EB GUI
2 Work Mode
Tx and Rx Mode
1. Rolling option area
Figure 2-5. Work Mode Submenu Interface
No.
Function
Description
1 Rolling option area
6 working modes can be selected by short pressing S1 or S4 ;
Sleep(only the RF part e
nters into sleep mode and the
controller still at working mode, supporting interface operation)
CW Tx(enter into CW Tx mode)
Direct Rx(enter into direct Rx mode)
Only Tx Mode (enter into only Tx mode, unidirectional
mode)
Only Rx Mode (
enter into only Rx mode, unidirectional
mode)
Tx and Rx Mode(enter into Tx and Rx mode – bidirectional
mode)
After selecting the corresponding modulation mode,short press
S2 or S5 to confirm the selection and return to the upper menu
(i.e. the main menu).
Note: In main menu state, the working mode is entered by short pressing S2 ( ) in accordance with the
selected modes in sub-menu.

AN247
www.hoperf.cn
Copyright © By HOPERF
Rev 0.1 | Page 11/42
2.5Frequencry Band Submenu
Select submenu “3 Frequencry Band”and press S3 button will enter into the interface shown as followed.
CMT2390F64 EB GUI
3 Frequencry Band
433000kHz
1. Rolling option area
Figure 2-6. Frequencry Band Submenu Interface
No.
Function
Description
1 Rolling option area
The following 6 freqency band can be selected by short pressing
S1 or S4:
169000kHz(i.e. the start frequency is 169MHz)
230000kHz (i.e. the start frequency is 230MHz)
314000kHz (i.e. the start frequency is 314MHz)
433000kHz (i.e. the start frequency is 433MHz)
470000kHz (i.e. the start frequency is 470MHz)
779000kHz (i.e. the start frequency is 779MHz)
863000kHz (i.e. the start frequency is 863MHz)
902000kHz (i.e. the start frequency is 902MHz)
After selecting the corresponding modulation mode, press S2 or
S3 to confirm the selection and return to the upper menu (i.e. the
main menu).
Note: The submenu is selected as the start frequency, because frequency offset can be achieved through ferq.
Space and freq. Channel. For more information, please see at the Freq.Space and Freq. Channel submenu
section.
2.6Data Rate Submenu
Select the 4 Data Rate and press S3 to enter the submenu, as shown in Figure 2-7.

AN247
www.hoperf.cn
Copyright © By HOPERF
Rev 0.1 | Page 12/42
CMT2390F64 EB GUI
4 Data Rate
20kbps 10kHz
1. Rolling option area
Figure 2-7. Data Rate Submenu Interface
No.
Function
Description
1 Rolling option area
Different data rate and frequency offset can combine differently
according to different modulation modes by short pressing S1 or
S4.
OOK mode:
-5kbps
-50kbps
-100kbps
-200kbps
-300kbps
2FSK mode:
-10kbps, 5kHz(i.e. data rate is 10kbps,offset is +/-5kHz)
-10kbps, 5kHz
-20kbps, 10kHz
-50kbps, 25kHz
-100kbps, 50kHz
-200kbps, 100kHz
-500kbps, 250kHz
-2400kbps, 1200Hz
4FSK mode:
-10kbps, 10kHz(i.e. data rate is 10kbps,
offset of the two
outermost terminal is +/-10kHz)
-100kbps, 100kHz
-200kbps, 150kHz
-400kbps, 200kHz
-800kbps, 250kHz
-1Mbps, 250kHz
-1Mbps, 350kHz
After selecting the corresponding modulation mode, short press S2
or S3 to confirm the selection and return to the upper menu (i.e.
the main menu).
Note
:
1. The combined parameters of rate/frequency offset provided in each modulation and demodulation mode
are basically corresponding to the test parameters in the CMT2390F64 data manual for the convenience of
retest and confirm by users.

AN247
www.hoperf.cn
Copyright © By HOPERF
Rev 0.1 | Page 13/42
2. For the rate/frequency offset combination parameters provided in each modulation and demodulation
mode, all the configuration parameters are derived from RFPDK, and the crystal deviation is set at 10ppm.
“
2400bps
,
1200Hz
”
is output from 2ppm configuration. Therefore, when setting the configuration, it is
necessary to ensure that the TCXO mode is used in a pair of CMT2390F64-EB, or the frequency deviation
between the two EB is very small, otherwise the communication effect will be affected and the performance
will be misjudged indirectly.
2.7Tx Output Power Submenu
Select the 5 Tx Output Power and press S3 to enter the submenu, as shown in Figure 2-8.
CMT2390F64 EB GUI
5 Tx Output Power
+20 dBm
1. Rolling option area
Figure 2-8. Tx Output Power Submenu Interface
No.
Function
Description
1 滚动选项区
In this area, different Tx power can be selected by short pressing
S1 or S4:
-10dBm
-7dBm
-3dBm
0dBm
+3dBm
+7dBm
+10dBm
+13dBm
+17dBm
+20dBm
After selecting the corresponding modulation mode, short press S2
or S3 to confirm the selection and return to the upper menu (i.e.
the main menu).
Note
:
1. The matching parameters of CMT2390F64-EB are different according to the frequency. For example,
CMT2390F64-EB -434MHz indicates that its optimal matching parameter patch component is at 434MHz
frequency band; CMT2390F64-EB-868MHz indicates that its optimal matching parameter patch component is

AN247
www.hoperf.cn
Copyright © By HOPERF
Rev 0.1 | Page 14/42
at 868MHz frequency band. Thus the accurate transmission power effect can be tested by selecting optimal
working frequency band in accordance with the EM.
2. The transmit power adjustment is applicable to the operating frequency band of 314MHz, 433MHz,
865MHz and 914MHz (click Frequencry Band on the menu). If the Tx power of 169MHz and 230MHz, donnot
optimized, the presentation effect will be offset.
2.8Preamble Length Submenu
Select the 6 Preamble Length and press S3 to enter the submenu, as shown in Figure 2-9.
CMT2390F64 EB GUI
6 Preamble Length
64 Bytes
1. Rolling option area
Figure 2-9. Preamble Length Submenu Interface
No.
Function
Description
1 Rolling option area
In this area different preamble length can be selected by short
pressing S1 or S4:
8 Bytes
16 Bytes
32 Bytes
64 Bytes
128 Bytes
256 Bytes
512 Bytes
1024 Bytes
After selecting the corresponding modulation mode, short press S2
or S3 to confirm the selection and return to the upper menu (i.e.
the main menu).

AN247
www.hoperf.cn
Copyright © By HOPERF
Rev 0.1 | Page 15/42
2.9Packet Length Submenu
Select the 7 Packet Length and press S3 to enter the submenu, as shown in Figure 2-10.
CMT2390F64 EB GUI
7 Packet Length
64 Bytes
1. Rolling option area
Figure 2-10. Packet Length Submenu Interface
No.
Function
Description
1 Rolling option area
In this area different Payload Length can be selected by short
pressing S1 or S4:
8 Bytes
16 Bytes
32 Bytes
64 Bytes
128 Bytes
256 Bytes
512 Bytes
1024 Bytes
After selecting the corresponding modulation mode, short press S2
or S3 to confirm the selection and return to the upper menu (i.e.
the main menu).
2.10 Coding Format Submenu
Select the 8 Coding Format and press S3 to enter the submenu, as shown in Figure 2-11.

AN247
www.hoperf.cn
Copyright © By HOPERF
Rev 0.1 | Page 16/42
CMT2390F64 EB GUI
8 Coding Format
NRZ
1. Rolling option area
Figure 2-11. Coding Format Submenu Interface
No.
Function
Description
1 Rolling option area
In this area, different coding format can be selected by short
pressing S1 or S4:
NRZ(Non-Return-Zero encoding)
Whitening(Whitening encoding)
Manchester(Manchester encoding)
FEC RSC
FEC NRNSC
After selecting the corresponding modulation mode, press S2 or
S3 to confirm the selection and return to the upper menu (i.e. the
main menu).
Note
:
1. The Whitening code is in the PN9-CCITT mode (according to the default option of RFPDK), and the
Whitening Seed value is set to 0x01FF
;
2. The Manchester encoding uses logic_1=2
’
b01
,
logic_0=2
’
b10, and SyncWord enables the
Manchester code
;
3. The FEC RSC and FECNRNSC are compatible to the specification defined by IEEE802.15.4g.
2.11 CRC Select Submenu
Select the 9 CRC Select and press S3 to enter the submenu, as shown in Figure 2-12.

AN247
www.hoperf.cn
Copyright © By HOPERF
Rev 0.1 | Page 17/42
CMT2390F64 EB GUI
9 CRC Select
CRC16 CCITT
1. Rolling option area
Figure 2-12. CRC Select Submenu Interface
No.
Function
Description
1 Rolling option area
In this area, different CRC verification format can be selected by
short pressing S1 or S4:
CRC16-CCITT
CRC16-IBM
CRC32 0x04C11DB7
After selecting the corresponding modulation mode, press S2 or
S3 to confirm the selection and return to the upper menu (i.e. the
main menu).
Note
:
1. No matter which kind of CRC verification mode is selected, the Seed value of CRC is 0.
;
2. If the Packet Length is relatively long, the CRC32 mode is recommended
;
2.12 Packet Structure
Chapters from 2.8 to 2.11 are related to the packet structure. Therefore, this section is mainly for describing
the packet structure mode of the firmware, as shown in Figure 2-13.
Preamble SyncWords Payload CRC
Coding Format
Figure 2-13. Packet Structure
1. The test Packet adopts fixed-length packet mode. The Payload Length is configured by the 7 Packet
Length submenu;
2. The Preamble transmission Length of packet is set from the 6 Preamble Length submenu with unit of 8
bits. The Preamble values are configured as followed:

AN247
www.hoperf.cn
Copyright © By HOPERF
Rev 0.1 | Page 18/42
Modulation/Demodulation
Mode
Preamble Value
OOK
0xAA
2FSK
0xAA
4FSK
0xCC
3. The SyncWords value of the test packet is set to 6 bytes and the value is 0x2DD42DD42DD4;
4. CRC mode is set by the "9 CRC Select" submenu;
5. The Payload content is filled randomly according the Packet length of the HC32L136 random module.
Each time the Tx content is not fixed.
6. The Coding Format (content set by the 6 Coding Format submenu) affects the packet range, as shown in
the figure above, which mainly applies to the Payload and CRC. Noted that when the encoding mode of the
packet in this firmware uses Manchester encoding, the SyncWords also uses Manchester encoding.
7. In 4-FSK mode, the relationship of data mapping is the default configuration8 'b11100100 of RFPDK,
which means:
Frequency
Deviation -DEV -DEV/3 +DEV/3 +DEV
Data
Mapping 2’b00 2’b01 2’b10 2’b11
2.13 Frequencry Space and Frequencry Channel Submenu
The 10 Freq Space and 11 Freq Channel submenus are associated with each other and they aims to the RF
Channel Settings. The 10 Freq Space sub-menu sets Frequencry Space, i.e. the channel interval value, with
setting range from 0 to 255 in kHz unit. The 11 Freq Channel submenu sets the Frequencry Channel, i.e. the
Channel signal, with setting range from 0 to 255. The transceiver frequency offset can be calculated through
the formula showned as followed:
Frequencry Offset =Frequencry_ ×_ℎ(kHz)
This Frequency Offset take the initial frequency set in the "3 Frequencry Band". Since the maximum value of
these two settings is 255, therefore the maximum Frequencry Offset can achieve in range from 0MHz to
65MHz with unit of kHz. For example, if the target frequency is 433.92MHz, then you can set the starting
frequency to 433000kHz in the "3 Frequencry Band", and Frequencry Space value to 92, Frequencry Channel
to 1.
Select the 10 Freq Space or 11 Freq Channel and press S3 to enter the submenu, as shown in Figure 2-14 or
Figure 2-15.

AN247
www.hoperf.cn
Copyright © By HOPERF
Rev 0.1 | Page 19/42
CMT2390F64 EB GUI
10 Freq Space
000
1
.
Rolling option area
Figure 2-14. Freq Space Submenu Interface
CMT2390F64 EB GUI
11 Freq Channel
000
1. Rolling option area
Figure 2-15. Freq Channel Submenu Interface
No.
Function
Description
1 Rolling option area
In this area, the value of Frequencry Space or Frequencry Channel
can be configured by pressing S4( )and S1( ):
Short press S4(), the value will decreased by 1 unit; If the
value reaches to 0, the frequency will turn 255 if it continuesly
decrease by 1.
Short press S1(), the value will increased by 1; If the
frequency turns to 255, it will overflow to 0.
Long press S4()(hold on for 1~2 seconds), the value will
automatically decrease by 1 until the frequency overflow to
255kHz, it will becomes 0 and then it will decrease by 1 unit once
again for cycles until loosing the S4 button.
Long press S1()(hold on for 1~2 seconds), the value will
automatically increase by 1 until the frequency reaches 255kHz, it
will becomes 0 and then it will increase by 1 once again for cycles
until loosing the S1 button.
After modifing, press S2 or S3 to confirm the current value and

AN247
www.hoperf.cn
Copyright © By HOPERF
Rev 0.1 | Page 20/42
No.
Function
Description
return to the upper menu (that is, the main menu).
2.14 DC DC Select Submenu
Select“12 DC DC Select”submenu and press S3 to enters into submenu, as shown in figure 2-16.
CMT2390F64 EB GUI
12 DC DC Select
Off
1.
Rolling option area
Figure 2-16. DC DC Select Submenu Interface
No.
Function
Description
1 Rolling option area
Options can be switched in this area by short pressing S1 or S4:
Off,disable the software configuration embedded DC DC
module;
On,e
nable the software configuration embedded DC DC
module;
After modifing, short press S2 or S3 to confirm the current value
and return to the upper menu (that is, the main menu).
Note: As mentioned above, the software configuration of DC-DC needs to be consistent with the hardware of
CMT2390F64-EB, that is, enable the software configuration, and the jumper selection of EB module needs to
be enabled by DC-DC. If the software is disabled, DC-DC of the EB module turns off.
2.15 Gaussian Select Submenu
Select 13 Gaussian Select and press S3 to enter the submenu, as shown in figure 2-17.
CMT2390F64 EB GUI
12 Gaussian Select
Off 1.
Rolling option area
Other manuals for CMT2390F64-EB
1
Table of contents
Other HopeRF Motherboard manuals
Popular Motherboard manuals by other brands

Skyworks
Skyworks Si5360 Reference manual

Apex Digital
Apex Digital Unismart Uni Epson III OEM Chip Reset operation instruction

Rohm
Rohm TO-247-4L Operation manual

Texas Instruments
Texas Instruments ADS1015EVM user guide

STMicroelectronics
STMicroelectronics STM32F4 Series quick start guide

Unicorn Computer
Unicorn Computer ENDAT-AJ01 user manual