Horizon Fitness Autometers Systems HT-100 User manual

HORIZON SYSTEM METER HT-100
Multi Function , Multi Tariff , MID Approved. Autometers Modbus V6.
Energy Monitoring and Invoicing

autometers.co.uk
Introduction...............................................................................................................
1. Unit Characteristics.............................................................................................
1.1 Unit Characteristics
1.2 Pulse Output
1.3 RS485 Serial Modbus RTU
1.4 Tariff Setting
2. Operation...............................................................................................................
2.1 LCD Display
2.2 Start-up Screens.............................................................................................
2.3 Scroll Display by Buttons
2.4 Set-up Mode...................................................................................................
2.4.1 Modbus Address...................................................................................
2.4.2 Baud Rate
2.4.3 Parity
2.4.4 Pulse Output 1
2.4.5 Pulse Output2 (Constant).....................................................................
2.4.6 Pulse Duration
2.4.7 Demand Integration Time
2.4.8 Scroll Time Interval
2.4.9 Password Set-up...................................................................................
2.4.10 Date
2.4.11 Time Set-up
3. Specification...........................................................................................................
3.1 Accuracy
3.2 General Specifications
3.3 Environment
3.4 Pulse Output Diagram
3.5 RS485 Output for Modbus RTU.....................................................................
4. Dimensions
5. Maintenance
6. Installation
6.1 Safety................................................................................................................
7. Electrician
8. EMC Installation Requirements
9. Wiring Diagram
10. The Horizon Energy Monitoring System with the new HT-100 Series.....
11. Metal Enclosures for the HT-100 Series.........................................................
1
2
3
4
6
7
8
9
10
11
12
13
14

Declaration of Conformity
We, Autometers Systems Ltd
4B Albany Road, Manchester, M21 0AW, UK
Ensure and declare that apparatus:
Energy Meter: HT-100 With the measurement range
230V / 0, 25~5(100) A 50Hz Are in conformity with the
type as described in the
EU-type examination certificate 0120/SGS0186
With Serial number in format of XXXXXXXX, Batch
format: xxxxxx
The fulfilment of the essential requirements set out in
Annex I and in the relevant instrument specific Annexes
has been demonstrated.
The electricity meter types described above are in
conformity with the relevant union harmonization
legislation and satisfy the appropriate requirements of
the Directive 2014/32/EU with the following standards:
autometers.co.uk 1
Introduction
This document provides operating, maintenance and
installation instructions for the HT-100 series 1 phase 2 wire
din rail mounted kWh meters.
The Bi-directional measurements make the meter suitable
for active and reactive energy for all power monitoring
applications including the new Solar PV requirements for
measuring Energy. The HT-100 has the facility for being able
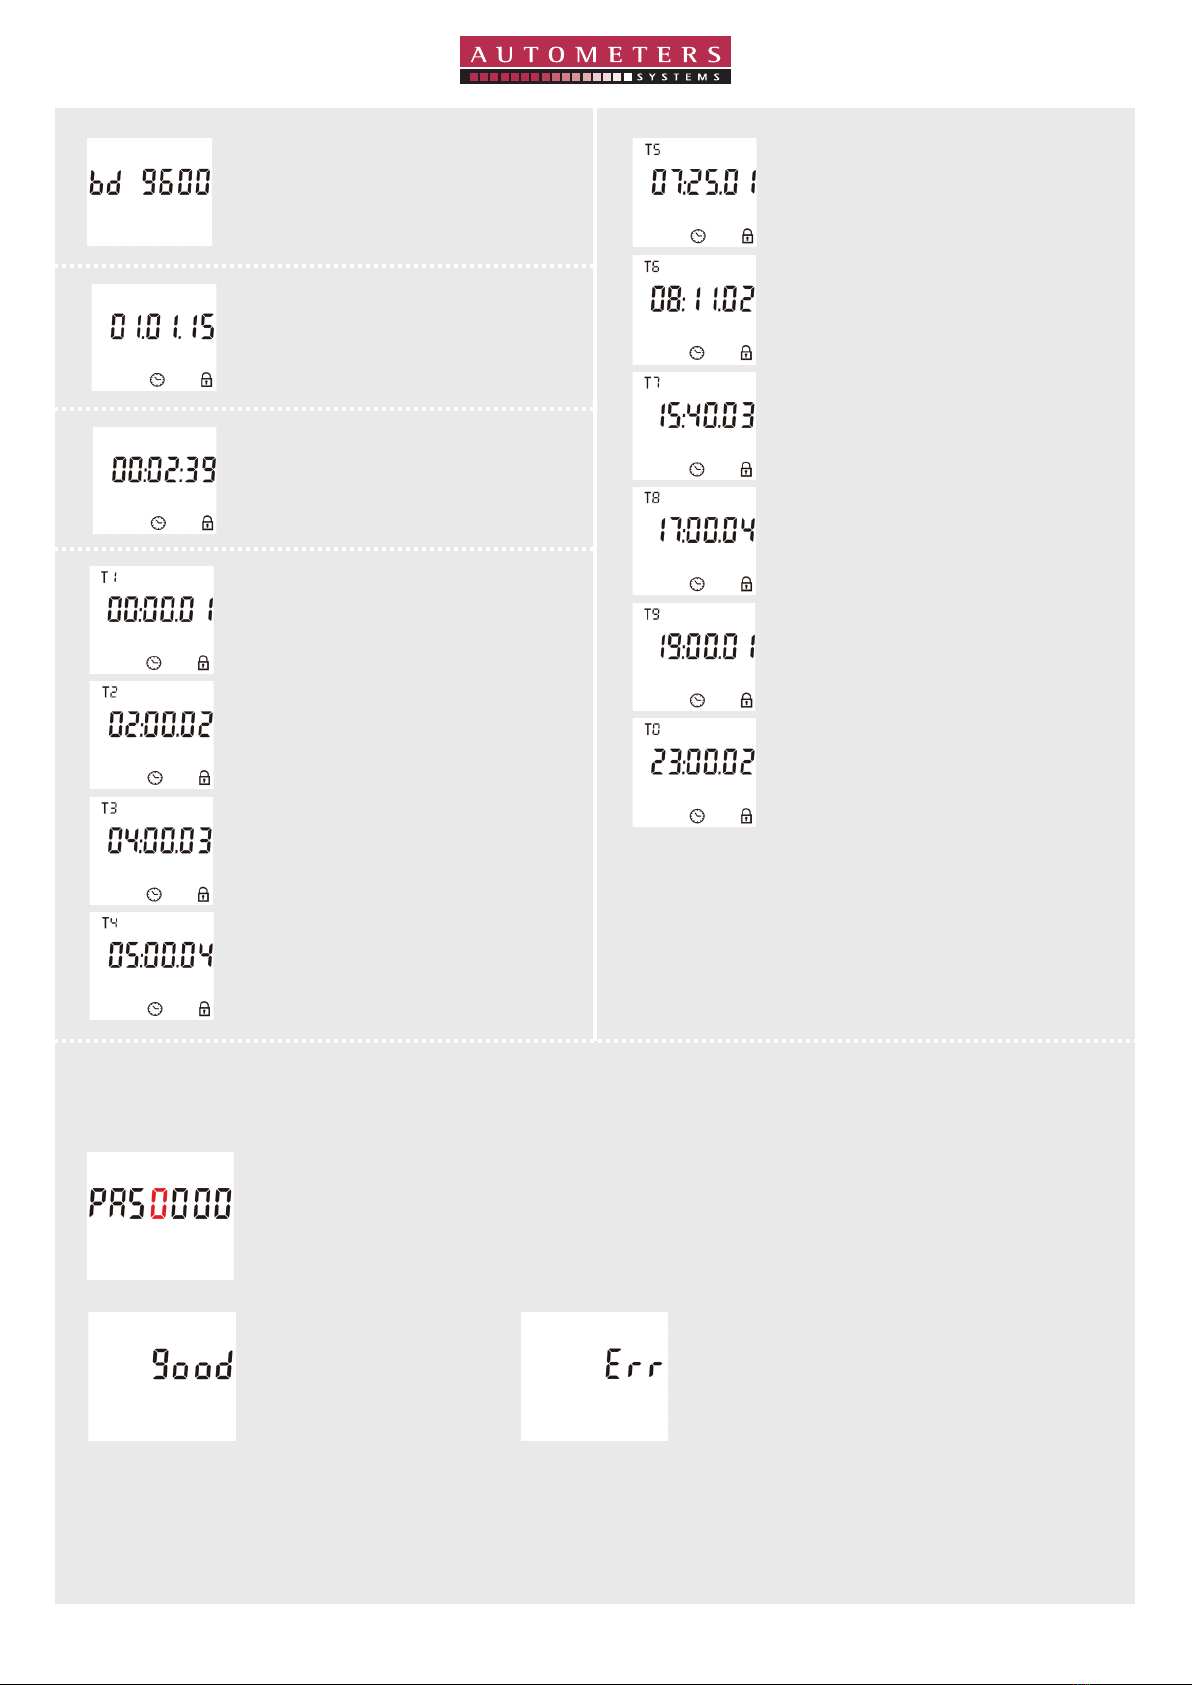
to program four tariffs with its built-in timer switch for
monitoring energy in different periods.
Model
HT-100
Measurements
U, I, P, Q, PF, Hz,
Dmd, kWh, kVarh,
Import, Export
Communication
RS 485 Modbus
Pulse Outputs
1: Configurable
2: 1000 Imp/kWh
Multi-Tariffs
4 Tariffs (RTC)
230V 0,25-5(100)A 50Hz
EN50470-1/3 Cl.B 3K6
2 1
0120/SGS0186
HT-100
M
kWh
EN 50470-1: 2006, Electricity metering
equipment (AC) Part 1: General requirements,
tests and test conditions. Metering equipment
(class indexes A, B and C)
EN 50470-3: 2006, Electricity metering
equipment (AC) Part 3: Particular requirements -
Static meters for active energy (class indexes A,
B and C)

1. Unit Characteristics
1.1 Unit Characteristics
MID Approved B & D
Multifunction KWh, Amps and Volts etc.
100Amp direct connected
Multi tariff
RS 485 Modbus output ( Autometers V.6 )
Two Pulse outputs (1 Programmable)
Large display with back-light
Password protected
Two modules wide
1.2 Pulse output
The meter provides two pulse outputs. Both pulse outputs are passive type.
Pulse output 1 can be set to generate pulses to represent total / import / export kWh or kVarh.
The pulse constant can be set to generate 1 pulse per:0.001 (default)/0.01/0.1/1kWh/kVarh.
Pulse width:200/100/60ms
Pulse output 2 is non-configurable. It is fixed up with active kWh (Imp). The constant is
1000Imp/kWh.
1.3 RS485 Serial-Modbus RTU
RS485 serial port with Modbus RTU protocol (Autometers V.6 protocol) to provide a means of
remotely monitoring and controlling the unit.
1.4 Tariff Setting
The tariff settings are normally done in the factory by means of the RS 485 Modbus. Four tariffs
and ten time segments can be set with the natural day.
autometers.co.uk
2

230V 0,25-5(100)A 50Hz
EN50470-1/3 Cl.B 3K6
2 1
0120/SGS0186
HT-100
2. Operation
2.1 LCD Display
autometers.co.uk 3
7 digits used to
display measured
values or RTC
Total value
Tariff
information
Max. Demand for
Power or Current
Pulse output 1&2
Measurement
units
Power Factor
Frequency
Bar display
of power
Communication
indicator Time
information Low battery
warning
Lock active
Import/Export
information
Pulse output lights
Scroll button
Enter button

2.2 Start-up Screens
autometers.co.uk
4
All display
segments light
up
Software version Modbus ID or
Mbus primary
address
Baud rate Total kWh
2.3 Scroll Display by Buttons
After initiation and self-checking program, the meter displays the measured values. The default
page is total kWh. To view other information press the scroll button onthe front panel.
The HT-100 can display the following:
Total kWh - import kWh - Export kWh - T1kWh - T2kWh - T3kWh - T4kWh - Total kVarh - Import
kVarh - Export kVarh - T1kVarh - T2kVarh - T3kVarh - T4kVarh - Max. power demand - T1Max.
power demand - T2Max. power demand - T3Max. power demand - T4 Max. power demand -
Voltage - Current - W - Var - VA - Power factor - Frequency - Pulse constant - Modbus ID - Baud
rate - Date - Time - Time segment 1 - Time segment 2 - Time segment 3 - Time segment 4 - Time
segment 5 - Time segment 6 - Time segment 7 - Time segment 8 - Time segment 9 - Time
segment 10
Display no: 1~41
Total active energy
(import and export energy)
eg. 70.00 kWh
Import active energy
eg. 50.00 kWh
Export active energy
eg. 20.00 kWh
T1 active energy
eg. 10.00kWh
T2 active energy
eg. 10.00 kWh
T3 active energy
eg. 30.00 kWh
T4 active energy
eg. 20.00 kWh

autometers.co.uk 5
Total reactive energy
eg. 10.00 kVArh
Import reactive energy
eg. 5.00 kVArh
Export reactive energy
eg. 5.00 kVArh
T1 reactive energy
eg. 2.00 kVArh
T2 reactive energy
eg. 2.00 kVArh
T3 reactive energy
eg. 2.00 kVArh
T4 reactive energy
eg. 4.00 kVArh
Max. power demand
eg. 6938W
T1 Max. power demand
eg. 0W
T2 Max. power demand
eg. 0W
T3 Max power demand
eg. 0W
T4 Max. power demand
eg. 0W
Voltage
eg. 229.8V
Current
eg. 30.156A
Active power
eg. 4700W
Reactive power
eg. 1030VAr
Apparent power
eg. 4811VA
Power factor
eg. 1.000
Frequency
eg. 49.99Hz
Pulse 2 Constant
eg. 1000
Modbus address
eg. 001

autometers.co.uk
6
Baud rate
eg. 9600
Date
Format: Day.Month.Year
eg. 1st Jan 2015
Time
Format: Hour:Minute:Second
eg. 00:02:39
Time segment 1
Format: Hour:Minute.Tariff
eg. 00:00 Tariff 1
Time segment 2
Format: Hour:Minute.Tariff
eg. 02:00 Tariff 2
Time segment 3
Format: Hour:Minute.Tariff
eg. 04:00 Tariff 3
Time segment 4
Format: Hour:Minute.Tariff
eg. 05:00 Tariff 4
Time segment 5
Format: Hour:Minute.Tariff
eg. 07:25 Tariff 1
Time segment 6
Format: Hour:Minute.Tariff
eg. 08:11 Tariff 2
Time segment 7
Format: Hour:Minute.Tariff
eg. 15:40 Tariff 3
Time segment 8
Format: Hour:Minute.Tariff
eg. 17:00 Tariff 4
Time segment 9
Format: Hour:Minute.Tariff
eg. 19:00 Tariff 1
Time segment 10
Format: Hour:Minute.Tariff
eg. 23:00 Tariff 2
2.4 Set-up Mode
To enter set-up mode, press the “enter” button for 3 seconds.
The setting has been done correctly. The information entered is incorrect. Please try again.
To access set-up mode the password must be entered.
Default password: 1000

Press the Enter button, the red digits will flash.
Press the scroll button to change the value. Once the new value has been
selected, press the Enter button to confirm the setting.
autometers.co.uk 7
2.4.1 Modbus Address
2.4.2 Baud Rate
Default ID is 001
Range:001-247
Default value 9600bps
Range: 1200, 2400, 4800, 9600bps
Press the Enter button, the first digit will flash.
Press the scroll button to change the value. Once the new value has been
selected, press the Enter button to confirm the setting.
Press Enter to confirm. The value shown in red will flash. Press the scroll
button to change the option. After choosing the new value, press the Enter
button to confirm.
2.4.3 Parity
2.4.4 Pulse Output 1
Press the Enter button, the red digits will flash.
Press the scroll button to change the value. Once the new value has been
selected, press the Enter button to confirm the setting.
Press the Enter button, the red digits will flash.
Press the scroll button to change the option. Once the new pulse output
option has been selected, press the Enter button to confirm the setting.
Default: Even
Options: None / Odd / Even
Default: 100Imp/kWh
Options: kWh / kVArh / Imp. kWh / Exp. kWh / Imp. kVArh / Exp. kVArh

2.4.5 Pulse Output 2 (Constant)
Press the Enter button, the red digits will flash.
Press the scroll button to change the option. Once the new pulse duration
option has been selected, press the Enter button to confirm the setting.
Default: 100ms
Options: 200 / 100 / 60ms
Press the Enter button, the red digits will flash.
Press the scroll button to change the option. Once the new DIT option has
been selected, press the Enter button to confirm the setting.
Default: 15 minutes
Options: off (0) / 5 / 10 / 15 / 30 / 60 minutes
Press the Enter button, the red digits will flash.
Press the scroll button to change the option. Once the new scroll time
interval has been selected, press the Enter button to confirm the setting.
Default: 0 seconds
Options: 0 - 30 seconds
2.4.6 Pulse Duration
2.4.7 Demand Integration Time
2.4.8 Scroll Time Interval
autometers.co.uk
8
Press the Enter button, the red digits will flash.
Press the scroll button to change the option. Once the new pulse constant
option has been selected, press the Enter button to confirm the setting.
Default: 1000
Options: 1000 / 100 / 10 / 1

Press the Enter button, the first digit will flash.
Press the scroll button to change the option. Once the new password has
been selected, press the Enter button to confirm the setting.
Default: 1000
2.4.9 Password Set-up
autometers.co.uk 9
Time format: Hour:Minute:Second
Press the Enter button, the red digits will flash.
Press the scroll button to change the option. Once the new time has been
selected, press the Enter button to confirm the setting.
Press the Enter button to enter the time set-up page
2.4.11 Time Set-up
Date format: Day.Month.Year
Press the scroll button to change the value. Once the value has been
selected, press the Enter button to confirm the setting.
Press Enter to access date set-up mode.
2.4.10 Date

3.5 RS485 Output for Modbus RTU
The meter provides a RS485 Modbus output for remote monitoring. The default is Autometers
V.6. For other protocols it can be configured via the display using the password.
Baud rate:
Parity:
Stop bit:
Modbus address:
3.6 Mechanics
DIN rail dimensions:
Mounting:
Sealing:
Material:
4. Dimensions
3. Specification
3.1 Accuracy
Voltage
Current
Frequency
Active power
Reactive power
Apparent power
Active energy
Reactive energy
3.2 General Specifications
Voltage AC (Un)
Voltage range
Base current (Ib/Iref)
Max. current (Imax)
Min. current (Imin)
Starting current
Power consumption
Frequency
AC voltage withstand
Impulse voltage withstand
Over current withstand
Pulse 1 output rate
Pulse 2 output rate
Display
Max. reading
3.3 Environment
Operating temperature
Storage/transportation temperature
Reference temperature
Relative humidity
Installation category
Mechanical environment
Electromagnetic environment
Degree of pollution
*Maximum operating and storage temperatures are int he context of typical daily and seasonal
variation.
3.4 Pulse Output Diagram
Uimp
R
OUTPUT
+-
Pulse output circuit diagram
0.5% of range maximum
0.5% of nominal
0.2% of mid-frequency
1% of range maximum
1% of range maximum
1% of range maximum
Class 1 IEC62053-21
Class B EN50470-3
1% of range maximum
-25°c to +55°c
-40°c to 70°c
23°c ±2°c
0 to 95%
non-condensing
CAT II
M1
E2
2
230V
176~276 AC
5A
100A
0.25A
0.4% of Ib/Iref
<2W/10VA
50Hz (for MID version)
50/60Hz ±2% (for non MID version)
4kV for 1 minute
6kV-1.2uS wavform
30 Imax for 0.01s
configurable, default, 1000i/kWh
non-configurable, 1000i/kWh
LCD backlit
99999.99kWh
ATTENTION: Pulse output must be fed as shown in the adjacent wiring diagram.
Scrupulously respect polarities and the connection mode. Opto-coupler with
potential-free SPST-NO Contact.
Contact range: 5~27V DC
Max. current input: 27mA DC
6.1 Safety
The unit is designed in accordance with IEC 61010-1:2010 – Permanently connected use, Normal
condition. Installation category III, pollution degree 2, basic insulation for rated voltage.
7. Electrician.
The HT-100 DIN rail meter should only be installed by a fully qualified electrician who has
knowledge of electricity meters connected with current transformers.
It is the installer who is fully responsible for the safe installation of this meter. It must be installed
to meet the current electrical regulations concerning installation of electricity meters.
8. EMC Installation Requirements
Whilst this unit complies with all relevant EU EMC (electro-magnetic compatibility) regulations, any
additional precautions necessary to provide proper operation of this and adjacent equipment will
be installation dependent and so the following can only be general guidance: Avoid routing wiring
to this unit alongside cables and products that are, or could be, a source of interference.
The auxiliary supply to the unit should not be subject to excessive interference. In some cases, a
supply line filter may be required.
To protect the product against incorrect operation or permanent damage, surge transients must
be controlled. It is good EMC practice to suppress transients and surges at the source. The unit
has been designed to automatically recover from typical transients; however in extreme
circumstances it may be necessary to temporarily disconnect the auxiliary supply for a period of
greater than 10 seconds to restore correct operation.
Screened communication leads are recommended and may be required. These and other
connecting leads may require the fitting of RF suppression components, such as ferrite absorbers,
line filters etc., if RF fields cause problems.
It is good practice to install sensitive electronic instruments that are performing critical functions
in EMC enclosures that protect against electrical interference causing a disturbance in function.
9. Wiring Diagram
autometers.co.uk
10
5. Maintenance
In normal use, little maintenance is needed. As appropriate for service conditions, isolate electrical
power, inspect the unit and remove any dust or other foreign material present. Periodically check
all connections for freedom from corrosion and screw tightness, particularly if vibration is present.
The front of the case should be wiped with a dry cloth only. Use minimal pressure, especially over
the viewing window area. If necessary wipe the rear case with a dry cloth. If a cleaning agent is
necessary, isopropyl alcohol is the only recommended agent and should be used sparingly. Water
should not be used. If the rear case exterior or terminals should be contaminated accidentally
with water, the unit must be returned to Autometers Systems Ltd for inspection and testing.
6. Installation
The meter is designed to be fitted on a DIN rail in a suitable enclosure. The unit is intended for use
in a reasonably stable ambient temperature within the range -25°C to +55°C. Do not fit the meter
where there is excessive vibration or in excessive direct sunlight.
Please note terminal covers should be fitted and sealed.
See connection diagrams page 16.

3.5 RS485 Output for Modbus RTU
The meter provides a RS485 Modbus output for remote monitoring. The default is Autometers
V.6. For other protocols it can be configured via the display using the password.
Baud rate:
Parity:
Stop bit:
Modbus address:
3.6 Mechanics
DIN rail dimensions:
Mounting:
Sealing:
Material:
4. Dimensions
3. Specification
3.1 Accuracy
Voltage
Current
Frequency
Active power
Reactive power
Apparent power
Active energy
Reactive energy
3.2 General Specifications
Voltage AC (Un)
Voltage range
Base current (Ib/Iref)
Max. current (Imax)
Min. current (Imin)
Starting current
Power consumption
Frequency
AC voltage withstand
Impulse voltage withstand
Over current withstand
Pulse 1 output rate
Pulse 2 output rate
Display
Max. reading
3.3 Environment
Operating temperature
Storage/transportation temperature
Reference temperature
Relative humidity
Installation category
Mechanical environment
Electromagnetic environment
Degree of pollution
*Maximum operating and storage temperatures are int he context of typical daily and seasonal
variation.
3.4 Pulse Output Diagram
autometers.co.uk
11
35x92x65 (WxHxD)
Per DIN 43880
DIN rail 35mmn
IP51 (indoor)
self-extinguishing UL94V-1
1200, 2400, 4800, 9600
none / odd / even
1 or 2
001 to 247
6.1 Safety
The unit is designed in accordance with IEC 61010-1:2010 – Permanently connected use, Normal
condition. Installation category III, pollution degree 2, basic insulation for rated voltage.
7. Electrician.
The HT-100 DIN rail meter should only be installed by a fully qualified electrician who has
knowledge of electricity meters connected with current transformers.
It is the installer who is fully responsible for the safe installation of this meter. It must be installed
to meet the current electrical regulations concerning installation of electricity meters.
8. EMC Installation Requirements
Whilst this unit complies with all relevant EU EMC (electro-magnetic compatibility) regulations, any
additional precautions necessary to provide proper operation of this and adjacent equipment will
be installation dependent and so the following can only be general guidance: Avoid routing wiring
to this unit alongside cables and products that are, or could be, a source of interference.
The auxiliary supply to the unit should not be subject to excessive interference. In some cases, a
supply line filter may be required.
To protect the product against incorrect operation or permanent damage, surge transients must
be controlled. It is good EMC practice to suppress transients and surges at the source. The unit
has been designed to automatically recover from typical transients; however in extreme
circumstances it may be necessary to temporarily disconnect the auxiliary supply for a period of
greater than 10 seconds to restore correct operation.
Screened communication leads are recommended and may be required. These and other
connecting leads may require the fitting of RF suppression components, such as ferrite absorbers,
line filters etc., if RF fields cause problems.
It is good practice to install sensitive electronic instruments that are performing critical functions
in EMC enclosures that protect against electrical interference causing a disturbance in function.
9. Wiring Diagram
WARNING
Important Safety Information is
contained in sections 5-6. Familiarize
yourself with this information before
attempting installation or other
procedures. Symbols used in this
document:
Risk of Danger: These instructions
contain important safety information.
Read them before starting installation or
servicing of the equipment.
Caution: Risk of Electric Shock
5. Maintenance
In normal use, little maintenance is needed. As appropriate for service conditions, isolate electrical
power, inspect the unit and remove any dust or other foreign material present. Periodically check
all connections for freedom from corrosion and screw tightness, particularly if vibration is present.
The front of the case should be wiped with a dry cloth only. Use minimal pressure, especially over
the viewing window area. If necessary wipe the rear case with a dry cloth. If a cleaning agent is
necessary, isopropyl alcohol is the only recommended agent and should be used sparingly. Water
should not be used. If the rear case exterior or terminals should be contaminated accidentally
with water, the unit must be returned to Autometers Systems Ltd for inspection and testing.
6. Installation
The meter is designed to be fitted on a DIN rail in a suitable enclosure. The unit is intended for use
in a reasonably stable ambient temperature within the range -25°C to +55°C. Do not fit the meter
where there is excessive vibration or in excessive direct sunlight.
Please note terminal covers should be fitted and sealed.
See connection diagrams page 16.

3.5 RS485 Output for Modbus RTU
The meter provides a RS485 Modbus output for remote monitoring. The default is Autometers
V.6. For other protocols it can be configured via the display using the password.
Baud rate:
Parity:
Stop bit:
Modbus address:
3.6 Mechanics
DIN rail dimensions:
Mounting:
Sealing:
Material:
4. Dimensions
3. Specification
3.1 Accuracy
Voltage
Current
Frequency
Active power
Reactive power
Apparent power
Active energy
Reactive energy
3.2 General Specifications
Voltage AC (Un)
Voltage range
Base current (Ib/Iref)
Max. current (Imax)
Min. current (Imin)
Starting current
Power consumption
Frequency
AC voltage withstand
Impulse voltage withstand
Over current withstand
Pulse 1 output rate
Pulse 2 output rate
Display
Max. reading
3.3 Environment
Operating temperature
Storage/transportation temperature
Reference temperature
Relative humidity
Installation category
Mechanical environment
Electromagnetic environment
Degree of pollution
*Maximum operating and storage temperatures are int he context of typical daily and seasonal
variation.
3.4 Pulse Output Diagram
autometers.co.uk 12
6.1 Safety
The unit is designed in accordance with IEC 61010-1:2010 – Permanently connected use, Normal
condition. Installation category III, pollution degree 2, basic insulation for rated voltage.
7. Electrician.
The HT-100 DIN rail meter should only be installed by a fully qualified electrician who has
knowledge of electricity meters connected with current transformers.
It is the installer who is fully responsible for the safe installation of this meter. It must be installed
to meet the current electrical regulations concerning installation of electricity meters.
8. EMC Installation Requirements
Whilst this unit complies with all relevant EU EMC (electro-magnetic compatibility) regulations, any
additional precautions necessary to provide proper operation of this and adjacent equipment will
be installation dependent and so the following can only be general guidance: Avoid routing wiring
to this unit alongside cables and products that are, or could be, a source of interference.
The auxiliary supply to the unit should not be subject to excessive interference. In some cases, a
supply line filter may be required.
To protect the product against incorrect operation or permanent damage, surge transients must
be controlled. It is good EMC practice to suppress transients and surges at the source. The unit
has been designed to automatically recover from typical transients; however in extreme
circumstances it may be necessary to temporarily disconnect the auxiliary supply for a period of
greater than 10 seconds to restore correct operation.
Screened communication leads are recommended and may be required. These and other
connecting leads may require the fitting of RF suppression components, such as ferrite absorbers,
line filters etc., if RF fields cause problems.
It is good practice to install sensitive electronic instruments that are performing critical functions
in EMC enclosures that protect against electrical interference causing a disturbance in function.
9. Wiring Diagram
5. Maintenance
In normal use, little maintenance is needed. As appropriate for service conditions, isolate electrical
power, inspect the unit and remove any dust or other foreign material present. Periodically check
all connections for freedom from corrosion and screw tightness, particularly if vibration is present.
The front of the case should be wiped with a dry cloth only. Use minimal pressure, especially over
the viewing window area. If necessary wipe the rear case with a dry cloth. If a cleaning agent is
necessary, isopropyl alcohol is the only recommended agent and should be used sparingly. Water
should not be used. If the rear case exterior or terminals should be contaminated accidentally
with water, the unit must be returned to Autometers Systems Ltd for inspection and testing.
6. Installation
The meter is designed to be fitted on a DIN rail in a suitable enclosure. The unit is intended for use
in a reasonably stable ambient temperature within the range -25°C to +55°C. Do not fit the meter
where there is excessive vibration or in excessive direct sunlight.
Please note terminal covers should be fitted and sealed.
See connection diagrams page 16.
12 Shield TX+TX-
+ - +
1 2 3
4 5 6 7 8 9
PULSE OUTPUT RS485 PORT
100A
MAINS
LOAD
L
N
25mm
When connecting the mains
cables into the meter it is good
practice to have approx 25mm in
a stright line entering the
terminal.
Try to ensure that the cable is
formed in such a way that the
cable wants to go into the
terminal.
UNDER NO CIRCUMSTANCES
ALLOW A SHARP BEND ON THE
CABLE ENTERING THE TERMINAL.

230V 0,25-5(100)A 50Hz
EN50470-1/3 Cl.B 3K6
2 1
0120/SGS0186
HT-100
M
kWh
456789
RS485
230V 0,25-5(100)A 50Hz
EN50470-1/3 Cl.B 3K6
2 1
0120/SGS0186
HT-100
M
kWh
456789
RS485
10. The Horizon Energy Monitoring System
With the New HT-100 Series
RS 485 Modbus
Communication
to enable full data
retrieval of kWh
for Graphic
analysis and Billing
autometers.co.uk
Communications shield continuous
Belden 9841 or Equal Cable Screened
Twisted pair with full Coax shielding
for RS 485 Modbus connection.
Red..…TX+ , Black…TX- , Green…Shield
to the next meter
Danger 415 Volts
Isolate electricity supply
before opening cover
The HC2-P is a surface mounted GPRS enabled data collection device capable of
storing information from up to 350 meters via 3 separate Lans
2 x Modbus – up to 127 meters on 1000 metres of Belden 9841 cable.
1 x M-bus – up to 100 devices on 1000 metres of Belcom 410P1824 cable.
HC2-P is powered from either the HS-PS7 or HS-PS13
autometers.co.uk
13

Autometers Systems Ltd.
4B Albany Road, Chorlton-cum-Hardy
Manchester M21 0AW
Email: [email protected]
Phone: 00(44) 0161 861 9056
Fax: 0161 881 3745
autometers.co.uk
Ref. HT-100.10.2019
Product development is continuous and Autometers
Systems Limited reserves the right to make alterations and
manufacture without notice. Products as delivered may
therefor differ from the descriptions and illustrations in this
publication
autometers.co.uk
Danger 415 Volts
Isolate electricity supply
before opening cover
230V 0,25-5(100)A 50Hz
EN50470-1/3 Cl.B 3K6
2 1
0120/SGS0186
HT-100
M
kWh
230V 0,25-5(100)A 50Hz
EN50470-1/3 Cl.B 3K6
2 1
0120/SGS0186
HT-100
M
kWh
11. Metal Enclosures for the HT-100 Series
UE-1
UE-32
Autometers manufacture a number of metal enclosures
compatible with the full range of meters it supplies.
The new UE-1 is the latest design for the range of electricity
meters.
The enclosure consists of a fuse and shorting terminal
arrangement, pre-wired to the meter inside the enclosure.
The UE-32 is a metal enclosure
allowing 32 single phase meters one
module wide, 16 single phase meters
two modules wide, or 8 three phase
meters 4 modules wide, or a mixture
of meters as per the diagram opposite.
230V 0,25-5(100)A 50Hz
EN50470-1/3 Cl.B 3K6
2 1
0120/SGS0186
HT-100
M
kWh
230V 0,25-5(100)A 50Hz
EN50470-1/3 Cl.B 3K6
2 1
0120/SGS0186
HT-100
M
kWh
230V 0,25-5(100)A 50Hz
EN50470-1/3 Cl.B 3K6
2 1
0120/SGS0186
HT-100
M
kWh
230V 0,25-5(100)A 50Hz
EN50470-1/3 Cl.B 3K6
2 1
0120/SGS0186
HT-100
M
kWh
Table of contents
Other Horizon Fitness Measuring Instrument manuals