Hoselink US3025 User manual

AUTO REWIND HOSE REEL
USER MANUAL
Models: US3025
IMPORTANT:
READ BEFORE USE AND
KEEP FOR FUTURE REFERENCE

January 2016
Welcome to trouble-free watering at its best!
The Hoselink Auto Rewind Hose Reel is manufactured from a range of quality materials, including a powerful spring
mechanism that is designed to retract the hose automatically and a high-quality hose, which has been rigorously
pressure tested by Hoselink.
The reel features an easy to use lock anywheresystem to ensure the hose remains in place as you water and a
bracket that allows for a full 180 degree range of motion. When installed and used correctly, this product will
provide years of good service.
**WARNING**
DO NOT ALLOW THE HOSE TO RETRACT UNASSISTED!!! THIS MAY DAMAGE THE HOSE REEL AND SPRAY
GUN.
Always walk the hose back to the hose reel at a steady pace.
DO NOT OPEN THE HOSE REEL CASING.
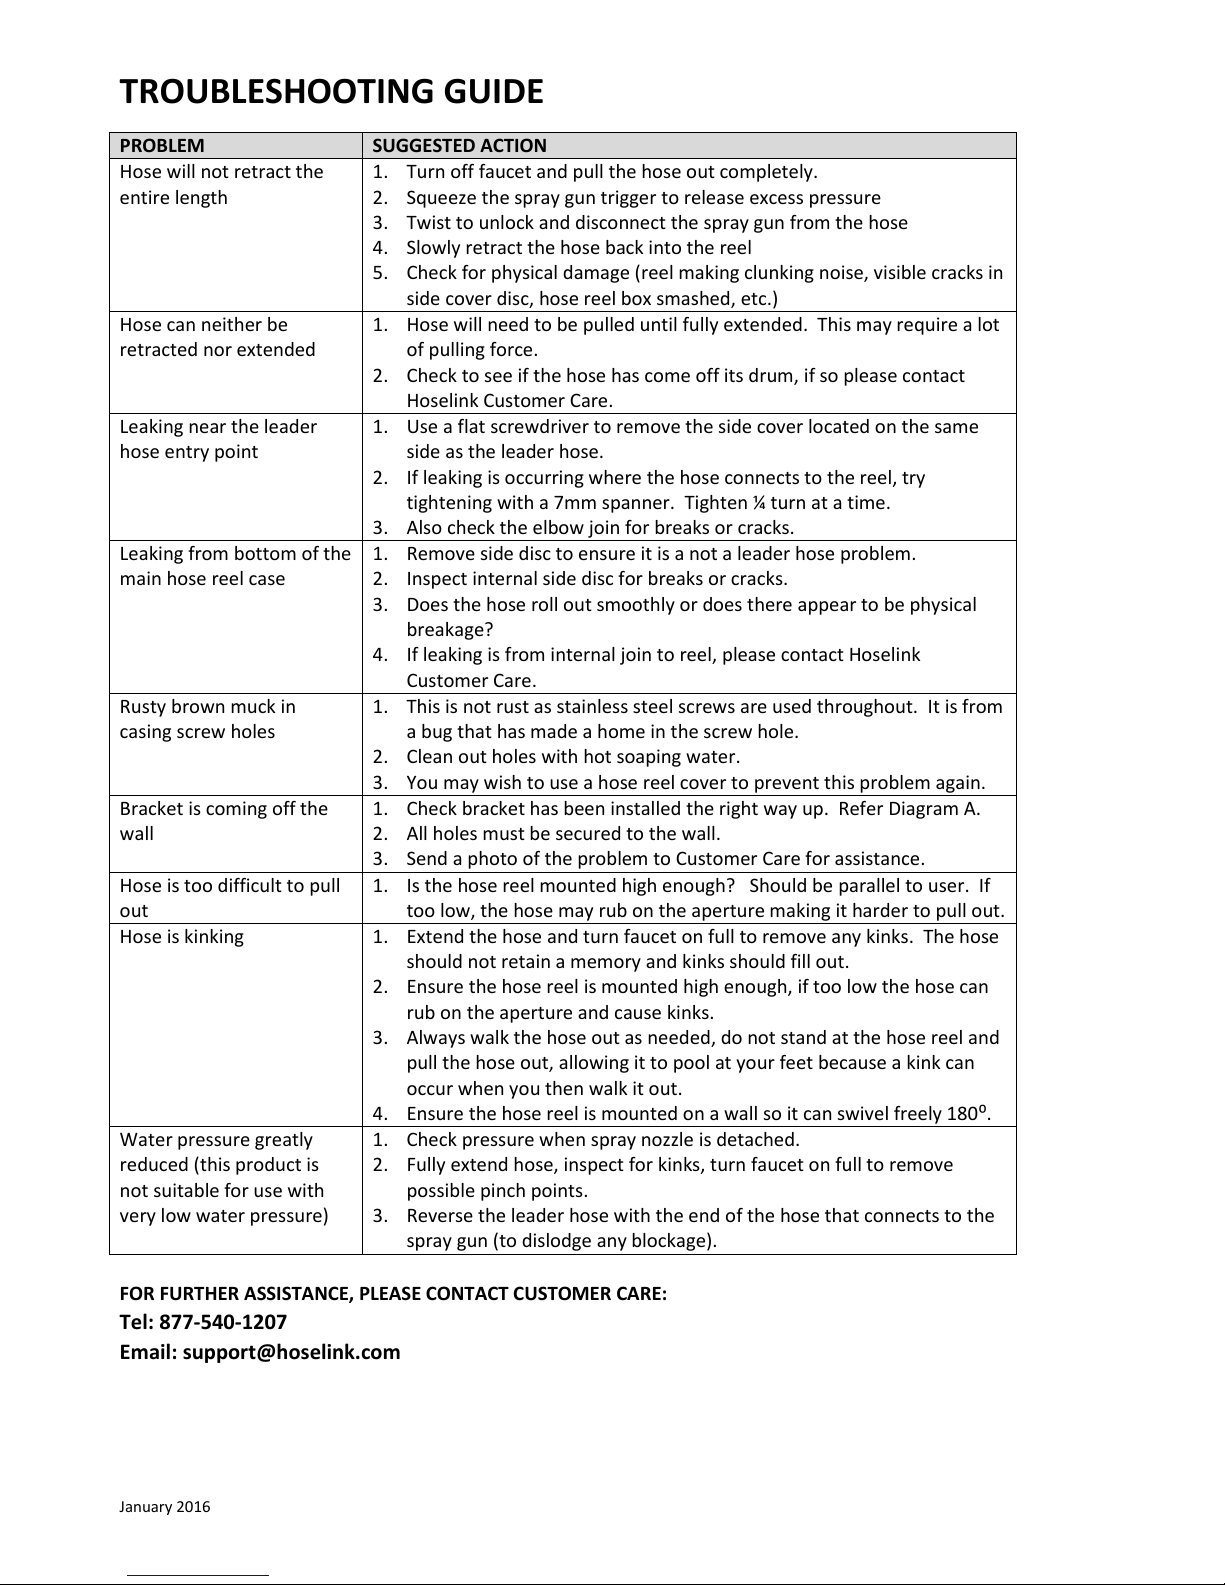
Unscrewing the case could cause injury and also will void the warranty. If leaking or retraction problems occur,
please contact Hoselik’s Custoer Care team for advice and assistance –see details on last page.
USING THE HOSE REEL
USING THE HOSE REEL
How to lock the hose off
To lock the hose off at the desired length, simply release tension and it will lock.
To extend the hose further, simply start pulling and release tension again at the new length.
Retracting the hose
To unlock the hose, give the hose a small 1tug to start retraction. If you pull the hose too far, it will lock
again rather than start to retract.
To shorten the hose, start retraction then once at the desired point, stop and walk back out a little to lock it
at the new length.
Do not let the hose retract unassisted as you may damage the hose reel unit and spray gun. When walked
back at a steady pace, the hose self-layering mechanism neatly layers the hose into the reel, ensuring it
remains kink and tangle free.
Recommended usage
Before retracting the hose, turn off the faucet and squeeze the trigger to release extra pressure.
Always retract hose after use.

January 2016
CARE AND MAINTENANCE
Cleaning the hose
Keep the hose clean by wiping with a damp cloth. Stand at the reel with a damp cloth over the hose and
retract the hose through the cloth. This will prevent dirt and sand from being pulled into the reel,
potentially damaging the locking and retraction mechanisms. Alternatively, spray the hose as it retracts.
Avoid contact with chemicals
Do NOT use any chemicals or substances with this hose such as acetone, white spirits, lactic acid, etc. to
clean the unit. Use of these chemicals will void the warranty.
Do not submerge
Do not submerge the hose reel into water to clean it. Simply wipe the case with a damp cloth.
Prolonging the life of your hose reel
The hose reel casing has been UV stabilised and will last a long time. When not in use for long periods of
time, we recommend storing the hose reel indoors for an even longer life!
BOX CONTENTS
1 x Spring-loaded Auto Rewind Hose Reel unit with 2m Leader Hose attached
1 x Premium Ned Kelly Starter Kit, includes:
2 x Hose Connectors pre-fitted to the hoses
1 x Faucet Connector
1 x Accessory Connector
1 x Metal Spray Gun
1 x Mounting Bracket plus Screw Kit, that includes:
4 x Stainless Steel Screws
4 x Masonry Plugs
4 x Washers
1 x User Manual

January 2016
INSTALLATION
Choosing a location
The bracket must be mounted on to a strong surface, due to the weight
of the reel when full of water and the pulling action during use. Brick or
timber post surfaces are suitable.
Where possible, we recommend mounting the base of the bracket 3ft
above ground level and up to 5ft away from the faucet.
Installing the bracket
Brick Installation
Timber Installation
Tools: Electric Drill (hammer or rotary), 5/16 inch
masonry drill bit, hammer, socket set (3/8 inch
socket)
Tools: Electric Drill, 3/16 inch drill bit, socket set
(3/8 inch socket)
1. Use the bracket to mark the 1st hole
position.
2. Drill the hole with 5/16 inch masonry drill
bit, minimum 1 ½ Inches deep. (Tip: depth
is important, use sticky tape around the
drill bit to mark just over 1 ½ inch depth)
3. Tap the yellow plug into the first hole.
4. Now use the bracket to mark the 2nd hole
position, then drill hole as above and tap
the plug into the hole.
5. Repeat process 1-3 to drill the remaining
2 holes.
6. Set bracket in place, add the supplied
washer then screw and use the 3/8
socket to tighten.
7. Repeat on all holes.
1. Use the bracket to mark 4 hole positions.
2. Drill 4 holes with 3/16 inch drill bit, 2
inches deep.
3. Set bracket in place, add washer then
screw and use socket set to tighten.
4. Repeat on all holes.
TIP
Ideally, mount
the reel so the
opening is at the
user’s waist
height.

January 2016
INSTALLATION Continued…
Setting up the hose reel
Once the bracket is installed, lift the reel and place in the bracket hole.
Attach the Faucet Connector to the faucet.
To connect the hose to the faucet, line up the white lugs and use a point and twist action to connect.
Screw the Accessory Connector into the base of the Metal Spray Gun. Now attach to the hose end, with a
point and twist.
Your hose reel is now set up and ready for use.

January 2016
TROUBLESHOOTING GUIDE
PROBLEM
SUGGESTED ACTION
Hose will not retract the
entire length
1. Turn off faucet and pull the hose out completely.
2. Squeeze the spray gun trigger to release excess pressure
3. Twist to unlock and disconnect the spray gun from the hose
4. Slowly retract the hose back into the reel
5. Check for physical damage (reel making clunking noise, visible cracks in
side cover disc, hose reel box smashed, etc.)
Hose can neither be
retracted nor extended
1. Hose will need to be pulled until fully extended. This may require a lot
of pulling force.
2. Check to see if the hose has come off its drum, if so please contact
Hoselink Customer Care.
Leaking near the leader
hose entry point
1. Use a flat screwdriver to remove the side cover located on the same
side as the leader hose.
2. If leaking is occurring where the hose connects to the reel, try
tightening with a 7mm spanner. Tighten ¼ turn at a time.
3. Also check the elbow join for breaks or cracks.
Leaking from bottom of the
main hose reel case
1. Remove side disc to ensure it is a not a leader hose problem.
2. Inspect internal side disc for breaks or cracks.
3. Does the hose roll out smoothly or does there appear to be physical
breakage?
4. If leaking is from internal join to reel, please contact Hoselink
Customer Care.
Rusty brown muck in
casing screw holes
1. This is not rust as stainless steel screws are used throughout. It is from
a bug that has made a home in the screw hole.
2. Clean out holes with hot soaping water.
3. You may wish to use a hose reel cover to prevent this problem again.
Bracket is coming off the
wall
1. Check bracket has been installed the right way up. Refer Diagram A.
2. All holes must be secured to the wall.
3. Send a photo of the problem to Customer Care for assistance.
Hose is too difficult to pull
out
1. Is the hose reel mounted high enough? Should be parallel to user. If
too low, the hose may rub on the aperture making it harder to pull out.
Hose is kinking
1. Extend the hose and turn faucet on full to remove any kinks. The hose
should not retain a memory and kinks should fill out.
2. Ensure the hose reel is mounted high enough, if too low the hose can
rub on the aperture and cause kinks.
3. Always walk the hose out as needed, do not stand at the hose reel and
pull the hose out, allowing it to pool at your feet because a kink can
occur when you then walk it out.
4. Ensure the hose reel is mounted on a wall so it can swivel freely 180⁰.
Water pressure greatly
reduced (this product is
not suitable for use with
very low water pressure)
1. Check pressure when spray nozzle is detached.
2. Fully extend hose, inspect for kinks, turn faucet on full to remove
possible pinch points.
3. Reverse the leader hose with the end of the hose that connects to the
spray gun (to dislodge any blockage).
FOR FURTHER ASSISTANCE, PLEASE CONTACT CUSTOMER CARE:
Tel: 877-540-1207
Email: support@hoselink.com

January 2016
WARRANTY
Hoselik’s mission is to offer excellent products and exception after sales support. Your hose reel carries a 24 month
warranty from the date of purchase. Should you require trouble-shooting advice or after sales care, please contact
us via telephone or email (see contact details below) and our Customer Care team will assist you.
Our goods come with guarantees that cannot be excluded under US Consumer Law. You are entitled to a
replacement or refund for a major failure. You are also entitled to have the goods repaired or replaced if the goods
fail to be of acceptable quality and the failure does not amount to a major failure.
If a Product has a minor defect, we will provide a repair or offer you a replacement or a refund. If you think that a
Product is defective you should contact our Customer Care team within 14 days and a Customer Care representative
will assist you. A photo may be requested to assist with the assessment of your claim.
Where a Product is defective and needs to be replaced or repaired, return shipping will be arranged at the expense
of Hoselink. This must be arranged with Customer Care prior to the item being returned. If a Product is replaced,
your replacement Product becomes your property and the returned Product becomes our property. When a refund
is given, the returned Product becomes our property.
Should you ever require any assistance with your Hoselink product, please do not hesitate to contact us for a speedy
resolution.
FOR ALL WARRANTY CLAIMS and enquires, PLEASE CONTACT CUSTOMER CARE:
Tel: 877-540-1207
Email: support@hoselink.com
SPECIFICATIONS
Model SKU
Hose Length
Weight
(Without water)
Hose
Material
Max Working
Pressure
Hose Inner
Diameter
US3025
82ft Internal
Hose + 6ft
Leader Hose
35lb
PVC
150psi
5/8(14mm)
Table of contents
Other Hoselink Lawn And Garden Equipment manuals
Popular Lawn And Garden Equipment manuals by other brands

Rain Bird
Rain Bird Root Watering System installation instructions

KE
KE Gennius A1 Use and maintenance manual

Holman
Holman RGB1505 instruction manual

Ego Power+
Ego Power+ PH1400 Operator's manual

Efco
Efco TR 1540 Operators instruction book

FLORABEST
FLORABEST FLV 1200 B1 translation of original operation manual

Toro
Toro MULTI PRO 5600 Service manual

Pioneer Athletics
Pioneer Athletics BRITE STRIPER 1600PS Instruction manual and parts listing and parts listing

Southland
Southland SRTT212 Operator's manual

EarthQuake
EarthQuake MC25 Operator's manual

Gronomics
Gronomics SAC 24-45 Assembly instruction

Dewenwils
Dewenwils HDWT04B instruction manual