manuals.online logo
Brands
  1. Home
  2. •
  3. Brands
  4. •
  5. HOTOWELL
  6. •
  7. Thermostat
  8. •
  9. HOTOWELL HTW-HT03 Series User manual

HOTOWELL HTW-HT03 Series User manual

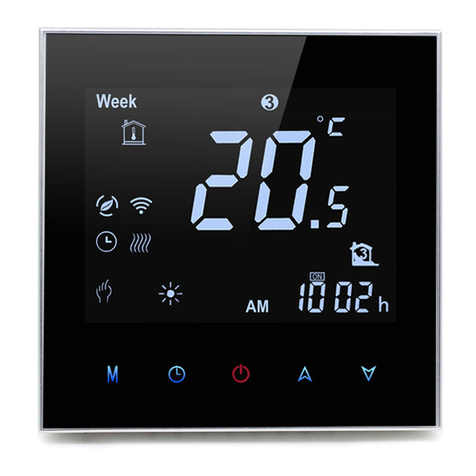
Smart Wifi Thermostat
Reference No.:HTW-HT03 Series
- 1 -
Version 2018-1.0
HTW-HT03 series Wifi thermostat is widely used in these environment like Homes, Residential buildings,
Schools, Hotels, Hos itals, Offices and etc. to main an ideal room tem erature ur ose. It can be used in
Electric Underfloor Heating, Water Heating or Water/Gas Boiler systems.
 17 Mainstreaming Languages synchronize in APP(
English, Spanish, R ssian, H ngarian, T rkey, Hebrew, German,
Italian, Japanese, French, Poland, simplified Chinese, traditional Chinese, Holland, Port g ese, Vietnamese, Arabic, Korean
)
 Sna -In Easy Installation
 Fit for EU & Standard Junction Electric Box
 Easily Work with Amazon Alexa, Google Assistant, IFTTT
 Grou Control in 1 A
Consise Design
Ordering Information
HTW-HT03- **
Smart Wifi Thermostat
Code A lication
-3A Water Heating, 3A, NC+NO+Com out ut terminals
-16A Electric Underfloor Heating, 16A, L+N line voltage out ut terminals
-NV Water/Gas Boiler, 3A, 1 air of Non-Voltage out ut terminals
e.g. HTW-HT03-3A refers to application:Water Heating, 3A, NC+NO+Com output terminals
General
Features
Ordering Guide
-3A -16A -NV
Ty e A: Full Black
Ty e C: Half Black Ty e D: Full White
Ty e B: Half White
Smart Wifi Thermostat
Reference No.:HTW-HT03 Series
- 2 -
Version 2018-1.0
Power Su ly 95~240Vac, 50/60Hz Sensor NTC3950, 10K
Current Load 3A(-3A, -NV a lication) Tem erature Accuracy ±0.5°C or ±1℉
16A(-16A a lication) Set-Point Range 5~35°C
Storage Tem . -5 ~ 45 °C Dis lay Tem . Range 5 ~ 99°C
Power Consum tion < 1.5W Timing Error < 1%
Housing Material PC +ABS ( Fire roof) Installation Box EU or Standard Electric Box
Wires on Terminals Wire 2 x 1.5 mm
2
or 1 x 2.5 mm
2
Protection Class IP20 O erating Buttons Ca acitive Touch Buttons
 Make sure the ower is OFF! Try turning ON your heating/cooling system by changing the tem erature. If
you can’t get the system to turn ON in 5 minutes, you’ll know the ower is OFF.
 Take off the installation face late by gras ing and gently ulling, then connect voltage su ly/load
out ut/external sensor(if with) wires res ectively to a ro riate terminals.
 Fix the installation late onto the electric junction box with screws acked in the box.
 Fasten the thermostat dis lay art and the installation face late through the groove.(Installation rocess
com leted)
WARNING: RISK OF ELECTRICAL SHOCK. Disconnect ower su ly before making electrical connection. Contact
with com onents carrying hazardous voltage can cause electrical shock and may result in severe ersonal injury or
death.
Dimensions and Dis lay
S ecification
Installation
Smart Wifi Thermostat
Reference No.:HTW-HT03 Series
- 3 -
Version 2018-1.0
Buttons/Functions
O eration
Switch thermostat ower On or Off
︽︾ Increase or decrease set- oint or arameters
Set the time and weekday:
Touch this icon to set Minute/Hour and Weekday (1 = Monday, 2 = Tuesday etc.)
Increase or decrease arameters by using the arrow ︽︾ icons.
Press once more to confirm and switch to next relevant arameter setting.
Lock/Unlock Press these 2 buttons ︽︾ simultaneously and hold for 5 seconds to lock/unlock
thermostat.
Notes: In parameter 3 of ISU process, F ll/Half lock config rable.
Switch between Manual and Programmable mode
In manual mode, this icon a ears in the button left dis lay
In rogrammable mode, the eriod icon a ears in the right side.
Notes: In programmable mode, the Temperat re and Time can not be adj sted
Programmable
Schedule
Configuration
(5+2 weekly)
1.Press button switch working mode to Programmable mode.
2.Set the time and weekday:
Touch this icon to set Minute>Hour> Weekday (1 = Monday, 2 = Tuesday etc.)
Increase or decrease arameters by using these icons .
Press once more to confirm and switch to next relevant arameter setting.
3. Touch the icon again to set the weekday schedule [settings a ear (1 2 3 4 5)
will show along the to of the screen].
Likewise, use ︽︾ and becomingly to adjust the time/tem erature for the
1-6 eriod er day.
Re eat the above rocess to set the weekend schedule. Press once more to
confirm and exit.
E -factory Default Settings
Time display WEEKDAY (MON. – FRI.) WEEKEND (SAT. – SUN.)
TIME TEMP. TIME TEMP.
Period 1 (Comfort) 06.00 waken 20°C 06.00 waken 20°C
Period 2 (Economy) 0 .00 leave 15°C 0 .00 leave 20°C
Period 3 (Comfort) 11.30 home 15°C 11.30 home 20°C
Period 4 (Economy) 13.30 leave 15°C 13.30 leave 20°C
Period 5 (Comfort)(1+2) 17.00 home 22°C 17.00 home 15°C
Period 6 (Economy)(3+4)
22.00 bed 15°C 22.00 bed 15°C
Floor Tem erature
Dis lay Press and hold the ︾ for 5 sec. to dis lay the tem . of floor sensor(if connected).
Notes: D ring the thermostat in wifi connected stat s, it r ns the programmable sched le process made from APP prior to that of
thermostat. i.e. The programmable sched le only can be carried o t if there is no Wifi connection between thermostat and
smartphone/tablet PC.
O eration
Smart Wifi Thermostat
Reference No.:HTW-HT03 Series
- 4 -
Version 2018-1.0
The installation ersonnel with non- rofessional training shall not erform this o eration!
During thermostat ower off, Press these 2 buttons & simultaneously and hold for 5 seconds to enter
ISU rocess. Press ︽︾ to adjust the configurable arameter value, and ress to switch to next
arameters. The ISU rocess will automatically exit and be confirmed after 5 seconds with no o eration.
Parameter
Function Configurable Value Default
1 Tem erature calibration -7°C to +9°C (internal sensor) -1
2 Dead Zone 1°C to 5°C (Switching differential) 1
3 Key ad Lock ty e 00: = All buttons will lock exce t the Power button
01: = All buttons will lock
01
4 Sensor selection
In = Internal sensor(to control or limit the tem erature)
OU= External sensor(to control or limit the tem erature)
Al = internal sensor to control tem erature, and external sensor
to limit the floor tem erature.
Notes: Please make s re config re the right sensor. The thermostat
display Err. If wrongly config red.
In for model:
-3A
-NV
Al for model:
-16A
5 Min. set- oint limit 5°C - 15°C 05
6 Max. set- oint limit 15°C - 45°C 35
7 Tem erature Dis lay 00
:
dis lay both set- oint and room tem .
01
:
dis lay set- oint only
00
8 Low Tem erature
Protection
0°C - 10°C 00
9 High Tem erature
Protection
25°C - 70°C 45
A Economy Mode 0
:
Normal mode
1
:
Energy Saving mode
0
B Economy Tem erature 0°C - 30°C 20
 Products are warranted for 2 full year (checking and re airing
services) from the date of urchase which roducts are not
being damaged by any man-made factors.
 Service outwith the warranty eriod may incur an extra charge.
 More details lease contact with Hotowell directly.
Installer Set-UP Process (ISU)
Warranty
Smart Wifi Thermostat
Reference No.:HTW-HT03 Series
- 5 -
Version 2018-1.0
Use your smart hone or tablet PC to scan the QR code below or Search “SMART LIFE” in the a store
/Google lay to download and install APP .
 O en “SMART LIFE” a lication, click “Allow” on the o u notification dialog(fig 2.1)
 Press “register” button on the register age(fig2.2)
 Select your region and ty e in your hone No. or email (fig 2.3) then you may get a verification code.
Ty e in your assword and confirm (fig 2.4) to com lete your registration.
 If you already have an account, lease just log in.
On t e t ermostat
During ower off status, ress and hold the arrow icon ︾ for 8 sec until the connecting icon a ears on
Wifi Connection
Ste 1-
Download and Install APP
Ste 2-
Register your account
For ios system For Android system
fig 2.1 fig 2.2 fig 2.3 fig 2.4
Ste 3-
Connect A with Thermostat
App Icon
Smart Wifi Thermostat
Reference No.:HTW-HT03 Series
- 6 -
Version 2018-1.0
the thermostat screen and flashes once a sec.
On t e App
 Press the “+” on the u er right corner of the age (see Fig 3.1) or “Add Device” to add “Thermostat”.
 Click “Confirm indicator ra idly blink” (Fig 3.2) then select your network and back to your A to enter the
assword of your wireless router(Fig.3.3) and confirm.
 The A will connect with the thermostat successfully. The connecting rocess takes 5~90 sec, the
thermostat name can be editable once connected.(Fig.4.4)
***If the thermostat has already been connected under above ste s, lease ignore this rocess.***
This SMART LIFE A is only su orted on 2.4GHz Wi-Fi channels.
If the router does not be su orted, or the wi-fi signal is weak or thermostat can not be connected as above
ste s, lease try this AP mode connection rocess.
On t e t ermostat
 During ower off status, ress and hold the arrow icon ︾ for 8 sec until the connecting
icon
a ears on the thermostat screen and flashes once a sec.
 ress and hold the arrow icon ︾ for 8 sec again, the icon will flash once er 3 sec.(fig 4.1)
indicates connecting from normal router mode.
Indicates connecting from AP mode.
On t e App
 Click “Confirm indicator slowly blink” (fig 4.1) then select your network and back to your a to enter the
assword of your wireless router (fig 4.2) and confirm. The a will go into the age(fig 4.3)
 Press “Connect now” to select the wifi signal Smart life-XXXX from the thermostat(fig 4.3).
 This AP mode connection rocess may ty ically take a rox. 5~90 seconds to com lete.
fig 3.1 fig 3.2 fig 3.3 fig 3.4
Alternative AP mode Connection
Smart Wifi Thermostat
Reference No.:HTW-HT03 Series
- 7 -
Version 2018-1.0
 The thermostat name can be edited after connection (fig 4.4).
A Icons Functions
Switch thermostat ower On or Off
Lock/Unlock Icon. Locked=Green, Unlocked=Grey
Economy mode. The thermostat runs with the set- oint configured as Parameter B in ISU
Economy set- oint=20°C in default.
Thermostat runs in Manual Mode
Thermostat runs in Programmable Mode
When thermostat runs in rogrammable mode, click the “schedule setting”(fig 5.1) to switch to the schedule
age(fig 5.2), where you can sim ly configure the weekly rogrammable 5+2 schedule u to 6 eriod each day.
(Workdays=Monday~Friday, Weekend=Saturday and Sunday)
Click “Com lete” to save the configuration.(fig 5.3)
fig 4.1 fig 4.2 fig 4.3 fig 4.4
O eration Icons on APP
Programmable Schedule Setting
f
ig
5
.1
fig
5
.2
fig
5
.3
Smart Wifi Thermostat
Reference No.:HTW-HT03 Series
- -
Version 2018-1.0
 Press the menu button as fig 6.1, then click “Create Grou ”. Select all the rooms you want and confirm.(fig
6.2 and fig 6.3), edit the grou name or ungrou as fig 6.3 and fig 6.4
 Grou Control allows to control all thermostats(+∞ units) configuration in the grou at the same time.
 Method 1: Click “Share with Familay” as fig 4.4.
 Method 2: Click “Profile”>”Sent”>”Add”>Switch on the device>”Share with New Member”>Ty e in the
tele hone number you would like to share with.
 Method 3:Home age of the device>Menu(as fig 6.1)>”Device Sharing”>”Add”>>Ty e in the tele hone
number you would like to share with.
Click “Profile”>”Integration”>Select amazon echo/Google Home/IFTTT>”Use Now”
Details as below fig 7.1 and 7.2.
Grou Control and Info. Modify
fig 6.1 fig 6.2 fig 6.3 fig 6.4
Share Thermostat with Others
fig 7.1
Work with 3rd arty Echo Control
fig 7.2
Smart Wifi Thermostat
Reference No.:HTW-HT03 Series
- 9 -
Version 2018-1.0
 This rocess is to customize your own ersonal scenes to suit your needs, for exam le, set your home
tem erature automatically when you come back home.
 There are 4 scenes in default setting, and can be added/deleted at will.
 Here set an exam le of a s ecific scene: “leave home for holiday” and turn on the thermostat when
tem erature lower than 5°C
 Scenes(fig 8.1)>+>Enter a name for the scene(fig 8.2)>Add a condition(Below 5°C as fig 8.3)>Add a Task(fig
8.4)>Save
No.
If…
Then…
1 Power is on but without dis lay.  Check if the terminals between LCD anel and
Relay/Power Module is loosen.
2 Without out ut but dis lay works.  Use a new LCD anel or new Relay/Power
Module for Re lacement
3 Room Tem . on dis lay is not correct  Do tem erature calibration in arameter in ISU
4 Heating system does not res ond
 Set the mode to heating by ress-ing the M
button.
 Make sure the tem erature is set above the
room tem erature.
 Make sure “heat on” icon shows on the dis lay.
 Wait 5 minutes for the system to res ond.
5 The M or Increase/Decrease button
doesn’t work
 Make sure key ad is unlocked.

Check that thermostat is on.
Notice: Hotowell reserves all t e rig t for t e final explanation. T e manual is subject to c ange wit out furt er notice.
Customize Scene
fig 8.1 fig 8.2 fig 8.3 fig 8.4
Trouble Shooting

Other manuals for HTW-HT03 Series

1

Other HOTOWELL Thermostat manuals

HOTOWELL HTW-IZ12-24V-0-10V User manual

HOTOWELL

HOTOWELL HTW-IZ12-24V-0-10V User manual

HOTOWELL HTW-HT03 Series User manual

HOTOWELL

HOTOWELL HTW-HT03 Series User manual

HOTOWELL HTW-61-HT Series User manual

HOTOWELL

HOTOWELL HTW-61-HT Series User manual

HOTOWELL HTW-WF01-FC Series User manual

HOTOWELL

HOTOWELL HTW-WF01-FC Series User manual

HOTOWELL HTW-21RT User manual

HOTOWELL

HOTOWELL HTW-21RT User manual

HOTOWELL HTW-31-KT13 User manual

HOTOWELL

HOTOWELL HTW-31-KT13 User manual

HOTOWELL HTW-MT06 Series User manual

HOTOWELL

HOTOWELL HTW-MT06 Series User manual

HOTOWELL HTW-91-WT416-X8 User manual

HOTOWELL

HOTOWELL HTW-91-WT416-X8 User manual

HOTOWELL HTW-WF06-FC Series User manual

HOTOWELL

HOTOWELL HTW-WF06-FC Series User manual

HOTOWELL HTW-ST01-B User manual

HOTOWELL

HOTOWELL HTW-ST01-B User manual

HOTOWELL HTW-31-KT19T Series User manual

HOTOWELL

HOTOWELL HTW-31-KT19T Series User manual

HOTOWELL HTW-31RT User manual

HOTOWELL

HOTOWELL HTW-31RT User manual

HOTOWELL HTW-WF06 Series User manual

HOTOWELL

HOTOWELL HTW-WF06 Series User manual

HOTOWELL HTW-ST01-A User manual

HOTOWELL

HOTOWELL HTW-ST01-A User manual

HOTOWELL HTW-ECB6 Series User manual

HOTOWELL

HOTOWELL HTW-ECB6 Series User manual

HOTOWELL HTW-WF02 Series User manual

HOTOWELL

HOTOWELL HTW-WF02 Series User manual

HOTOWELL HTW-91-WT416 User manual

HOTOWELL

HOTOWELL HTW-91-WT416 User manual

HOTOWELL HTW-31-H12 User manual

HOTOWELL

HOTOWELL HTW-31-H12 User manual

HOTOWELL HTW-31-WKT13-WF User manual

HOTOWELL

HOTOWELL HTW-31-WKT13-WF User manual

HOTOWELL HTW-81-FN7WF Series User manual

HOTOWELL

HOTOWELL HTW-81-FN7WF Series User manual

HOTOWELL HTW-IZ19 Series User manual

HOTOWELL

HOTOWELL HTW-IZ19 Series User manual

HOTOWELL HTW-MT08 Series User manual

HOTOWELL

HOTOWELL HTW-MT08 Series User manual

HOTOWELL HTW-91-WT410-X8 User manual

HOTOWELL

HOTOWELL HTW-91-WT410-X8 User manual

HOTOWELL HTW-11-U20-WF Series User manual
HOTOWELL

HOTOWELL HTW-11-U20-WF Series User manual

Popular Thermostat manuals by other brands

Lux Products PSD011Wa Installation and operating instructions

Lux Products

Lux Products PSD011Wa Installation and operating instructions

Myson MPRT MS installation instructions

Myson

Myson MPRT MS installation instructions

Secure SEC_SRT321 Quick start manual

Secure

Secure SEC_SRT321 Quick start manual

Robertshaw 9405 Specifications

Robertshaw

Robertshaw 9405 Specifications

Trane Z WAVE TZEMT400AB32MAA installation instructions

Trane

Trane Z WAVE TZEMT400AB32MAA installation instructions

Robertshaw 300-203 operating instructions

Robertshaw

Robertshaw 300-203 operating instructions

CODEMAKER Comfortzone installation guide

CODEMAKER

CODEMAKER Comfortzone installation guide

Honeywell CM900 installation guide

Honeywell

Honeywell CM900 installation guide

GV S603R-3A user manual

GV

GV S603R-3A user manual

Sangamo CHOICE RSTAT5 Installation and user instructions

Sangamo

Sangamo CHOICE RSTAT5 Installation and user instructions

Honeywell Home T6 Pro Z-Wave Professional install guide

Honeywell Home

Honeywell Home T6 Pro Z-Wave Professional install guide

Aprilaire 8710 Safety & installation instructions

Aprilaire

Aprilaire 8710 Safety & installation instructions

ThermSave LCD-RF-3 instruction manual

ThermSave

ThermSave LCD-RF-3 instruction manual

Carrier O3TS-TA32 Guide Homeowner's guide

Carrier

Carrier O3TS-TA32 Guide Homeowner's guide

LockStateConnect LS-90 Operation guide

LockStateConnect

LockStateConnect LS-90 Operation guide

AMX ENV-VST-C installation guide

AMX

AMX ENV-VST-C installation guide

Genebre 3917 quick start guide

Genebre

Genebre 3917 quick start guide

Honeywell RTH2510 Series operating manual

Honeywell

Honeywell RTH2510 Series operating manual

manuals.online logo
manuals.online logoBrands
  • About & Mission
  • Contact us
  • Privacy Policy
  • Terms and Conditions

Copyright 2025 Manuals.Online. All Rights Reserved.