Hotpoint Ariston HRD 5030 B User manual

USER MANUAL MANUAL DO UTILIZADOR
MANUEL DE L’UTILISATEUR MANUAL DE UTILIZARE
BUILTIN COOKTOP
Electric PLACA DE ENCASTRAR
Elétrica
TABLE DE CUISSON INTÉGRÉE
Électrique
PLITĂ ÎNCORPORABILĂ
Electrică
Electric

2
Contents
Important warnings.............................................................................................................3
Installation of cooktop........................................................................................................9
Counter cutting sizes.........................................................................................................10
Electrical connection .........................................................................................................11
Product description ...........................................................................................................12
Technical features...............................................................................................................12
Control panel........................................................................................................................13
Electronic board manual..................................................................................................14
Usage of your cooktop......................................................................................................21
Maintenance and cleaning ............................................................................................. 22
Error codes ........................................................................................................................... 23
Troubleshooting................................................................................................................. 23
After-sales service...............................................................................................................24

3
IMPORTANT WARNINGS
Before using the appliance, read these safety instructions.
Keep them nearby for future reference. These instructions
and the appliance itself provide important safety warnings
to be observed at all times. The manufacturer declines any
liability for failure to observe these safety instructions, for
inappropriate use of the appliance or incorrect setting of
controls.
WARNING: If the hob surface is cracked, do not use the
appliance - risk of electric shock.
WARNING: Danger of re: Do not store items on the
cooking surfaces.
CAUTION: The cooking process has to be supervised.
A short cooking process has to be supervised continuously.
WARNING: Unattended cooking on a hob with fat or oil
can be dangerous - risk of re. NEVER try to extinguish a
re with water: instead, switch o the appliance and then
cover ame e.g. with a lid or a re blanket.
Do not use the hob as a work surface or support.
Keep clothes or other ammable materials away from the
appliance, until all the components have cooled down
completely - risk of re.
Very young children (0-3 years) should be kept away from
the appliance. Young children (3-8 years) should be kept
away from the appliance unless continuously supervised.
Children from 8 years old and above and persons with

4
reduced physical, sensory or mental capabilities or lack
of experience and knowledge can use this appliance only
if they are supervised or have been given instructions on
safe use and understand the hazards involved. Children
must not play with the appliance. Cleaning and user
maintenance must not be carried out by children without
supervision.
WARNING:Theapplianceanditsaccessiblepartsbecome
hot during use. Care should be taken to avoid touching
heating elements. Children less than 8 years of age shall
be kept away unless continuously supervised.
PERMITTED USE
CAUTION: the appliance is not intended to be operated
by means of an external switching device, such as a timer,
or separate remote controlled system.
This appliance is intended to be used in household and
similar applications such as: sta kitchen areas in shops,
oces and other working environments; farm houses;
by clients in hotels, motels, bed & breakfast and other
residential environments.
No other use is permitted (e.g. heating rooms).
This appliance is not for professional use. Do not use the
appliance outdoors.
INSTALLATION
The appliance must be handled and installed by two
or more persons - risk of injury. Use protective gloves to

5
unpack and install - risk of cuts.
Installation, including water supply (if any), electrical
connections and repairs must be carried out by a qualied
technician.Donotrepairorreplaceanypartoftheappliance
unless specically stated in the user manual. Keep children
away from the installation site. After unpacking the
appliance, make sure that it has not been damaged during
transport. In the event of problems, contact the dealer or
your nearest After-sales Service. Once installed, packaging
waste (plastic, styrofoam parts etc.) must be stored out
of reach of children - risk of suocation. The appliance
must be disconnected from the power supply before
any installation operation - risk of electric shock. During
installation, make sure the appliance does not damage the
power cable - risk of re or electric shock. Only activate
the appliance when the installation has been completed.
Carry out all cabinet cutting operations before tting
the appliance and remove all wood chips and sawdust.
Iftheapplianceisnot installedabove anoven,aseparator
panel (not included) must be installed in the compartment
under the appliance.
ELECTRICAL WARNINGS
It must be possible to disconnect the appliance from
the power supply by unplugging it if plug is accessible, or
by a multi-pole switch installed upstream of the socket in
accordance with the wiring rules and the appliance must

6
be earthed in conformity with national electrical safety
standards.
Do not use extension leads, multiple sockets or adapters.
The electrical components must not be accessible to the
user after installation. Do not use the appliance when you
are wet or barefoot. Do not operate this appliance if it has a
damaged power cable or plug, if it is not working properly,
or if it has been damaged or dropped.
If the supply cord is damaged, it must be replaced with
an identical one by the manufacturer, its service agent or
similarly qualied persons in order to avoid a hazard - risk
of electric shock.
Installationusingapowercableplugisnotallowedunless
the product is already equipped with the one provided by
the Manufacturer.
CLEANING AND MAINTENANCE
WARNING: Ensure that the appliance is switched o and
disconnected from the power supply before performing
any maintenance operation. To avoid risk of personal
injury use protective gloves (risk of laceration) and safety
shoes (risk of contusion); be sure to handle by two persons
(reduce load); never use steam cleaning equipment (risk of
electric shock). Non-professional repairs not authorised by
the manufacturer could result in a risk to health and safety,
for which the manufacturer cannot be held liable. Any
defect or damage caused from non-professional repairs

7
or maintenance will not be covered by the guarantee, the
terms of which are outlined in the document delivered
with the unit.
Do not use abrasive or corrosive products, chlorine-
based cleaners or pan scourers.
DISPOSAL OF PACKAGING MATERIALS
The packaging material is 100% recyclable and is marked
with the recycle symbol . The various parts of the
packaging must therefore be disposed of responsibly
and in full compliance with local authority regulations
governing waste disposal.
DISPOSAL OF HOUSEHOLD APPLIANCES
This appliance is manufactured with recyclable or reusable
materials. Dispose of it in accordance with local waste
disposal regulations. For further information on the
treatment, recovery and recycling of household electrical
appliances, contact your local authority, the collection
service for household waste or the store where you
purchased the appliance. This appliance is marked in
compliance with European Directive 2012/19/EU, Waste
Electrical and Electronic Equipment (WEEE) and with the
Waste Electrical and Electronic Equipment regulations
2013 (as amended). By ensuring this product is disposed of
correctly, you will help prevent negative consequences for
the environment and human health.

8
The symbol on the product or on the accompanying
documentation indicates that it should not be treated
as domestic waste but must be taken to an appropriate
collection center for the recycling of electrical and
electronic equipment.
DECLARATION OF CONFORMITY
This appliance meets Ecodesign requirements of European
Regulation 66/2014 and The Ecodesign for Energy-Related
Products and Energy Information (Amendment) (EU Exit)
Regulations2019incompliancewiththeEuropeanstandard
EN 60350-2.

9
INSTALLATION
• The cooktop must be set into a
worktop between 20 mm and
50 mm deep.
• Install a separator panel under
the hob.
• The lower part of the product
must not be accesible after
installation.
• Do not t the separator panel if an undertop oven is installed.
• There must be nothing between the cooktop and the oven (cross rails,
brackets, etc.).
• The distance between the lower face of the glass ceramic hob and the
cupboard or separating panel must be at least 20 mm.
• If the cooktop is to be installed next to a column unit, leave a distance of at
least 100 mm from the edge of the cooktop to the side of the column unit.
• For built-in dimensions and installation see the picture in this paragraph.
• A minimum distance must be maintained between the hob and the hood
above it. Please refer to the user manual of the hood for more informations.
• Apply the supplied gasket to the cooktop (unless it has already been tted),
after having cleaned its surface.
• Do not install the cooktop near a dishwasher or washing machine, so that
the electronic circuits do not come into contact with steam or moisture,
which could damage them.
• If an oven is installed beneath the cooktop, make sure that it is equipped
with a cooling system. If the temperature of the electronic circuits
exceeds the maximum permitted temperature, the cooktop will switch
o automatically; in this case, wait for a few minutes until the internal
temperature of the electronic circuits reaches a tolerable level, at which
point it will be possible to switch the hob on again.
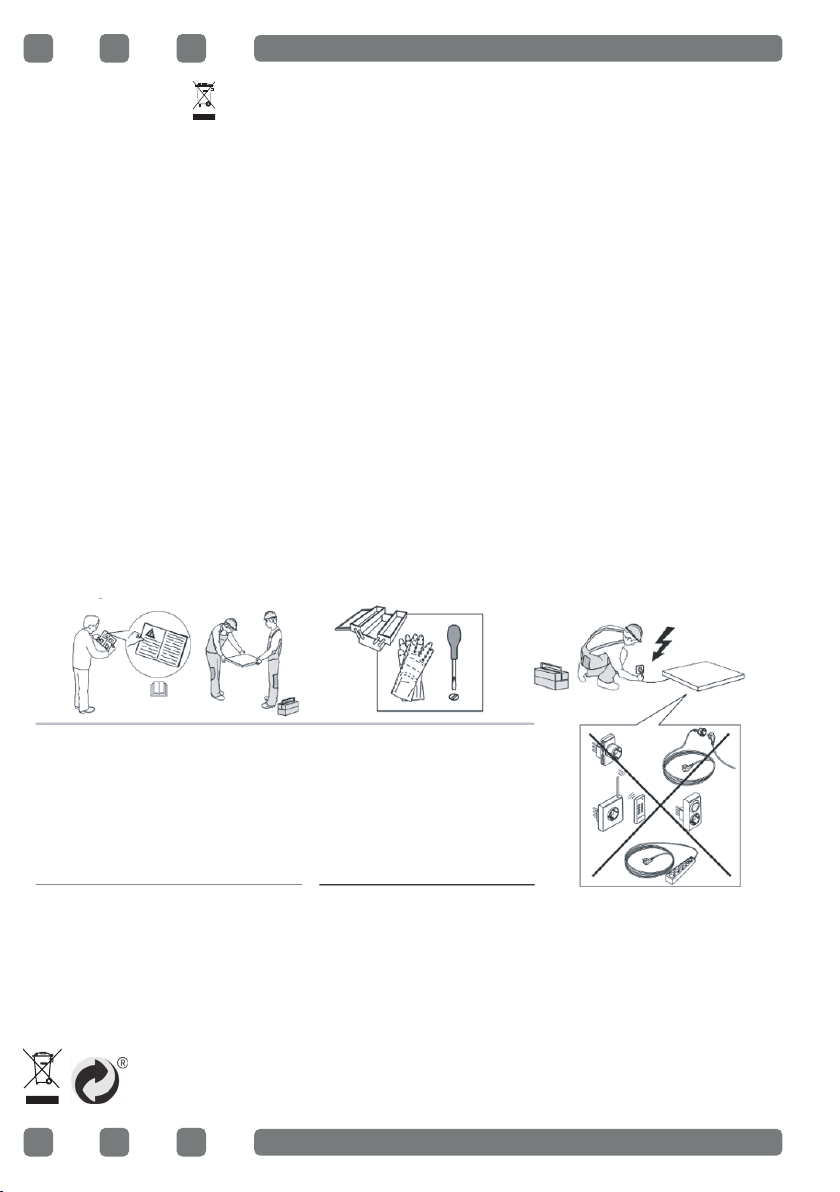
Placing the hob
1. Turn the cooktop down and place on smooth ground.
min. 20 mm
min. 20 mm

10
2. In order to prevent entrance of foreign substances and liquids between
cooktop and counter, apply the paste given in package to the sides of
lower guard of counter. For corners, curl paste and increase curls till lling
corner gaps.
3. Turn cooktop again and align with and place on counter.
4. Fasten up your cooktop on counter by using the clamp and screws supplied.
Installation diagram
Dimensions and distances to be
maintained Counter cut-o dimensions
L
i
Min.10 cm
Min.40 cm
Min. 5 cm
520 mm
490 mm
300 mm
270 mm
min.60 mm
min.60 mm
min.60 mm
Cooktop of 30 cm
Wick

11
Electrical connection
• Electrical connection must be made before connecting the appliance to
the electricity supply.
• Installation must be carried out by qualied personnel who know the
current safety and installation regulations. Specically, installation must
be carried out in compliance with the regulations of the local electricity
supply company.
• Make sure the voltage specied on the data plate located on the bottom
of the appliance is the same as that of the home.
• Regulations require that the appliance be earthed: use conductors
(including the earth conductor) of the appropriate size only
Connection to the therminal block:
For the electrical connection, use an H05 VV-F3G 4mm²
220-240V~50/60Hz
H05 VV-F 3G 4 mm²
Live
phase
Neutral
Neutre
Earth
Terre
Erdung
ATTENTION: the power supply cable must be long enough to allow the
cooktop to be removed from the worktop and must be positioned to avoid
damage or overheating caused by contact with the base.

12
PRODUCT DESCRIPTION
1
2
4
3
IMPORTANT: The picture above is only for illustration purposes.
1. Double Ceramic Heater Heater (120 mm / 180 mm)
2. Ceramic heater (140 mm)
3. Control switches
4. Glass Surface
TECHNICAL FEATURES
Specications Cooktop Power
140 mm ceramic heater 1200 W
120 / 180 mm ceramic
heater 1800 W
Supply Voltage 220-240 VAC / 50-60 Hz

13
CONTROL PANEL
Cooking Zone Controls and Corresponding display
Multiple Zone
Activaction / Deactivation
Power Adjustment
Buttons
On / O
IMPORTANT : The control panel above is only for illustration purposes.
Consider the control panel on your device.
Warnings About Using The Touchmatic Control
1. The controls react to touching, so you do not need to apply any pressure
to the controls.
2. Use the bottom, not the tip of your nger while using the device.
Correct Wrong
3. Make sure that the touch controls are always clean and dry. Even a thin
layer of water may make it dicult for touch controls to work.

14
DAILY USE
30 CM BUILT-IN STOVE OVAL - DOUBLE VITROCERAMIC ELECTRONIC BOARD MANUAL
Upper cooking area selection key
Lower cooking area selection key
Special function selection key
Plus key
Minus key
On / o key
Temperature display icon

15
Turning the Stove on
Note: Unit becomes operational within 1 second after it is plugged to the mains. All LEDs
and displays illuminate for 1 second.
Unit is turned on by pressing the key. The
symbol is displayed on all displays. (See Fig. 1)
Figure 1
If the temperature of the glass over the hobs is
above + 60°C, and icons are displayed on
the display of the relevant successively. ( = 0.5
seconds, = 0.5 seconds) (see Fig. 2)
Figure 2
Turning the Stove o
Unit is turned o by pressing the key. (see Fig.
3) You may turn o the unit by pressing the key
even if the child lock is active.
Figure 3
WARNING: Electronic components remain active for 20 seconds. If there is no cooking
level within this period, unit switches to ‘‘o mode’’ automatically with a signalling sound.
Residual Heat Display
If the icon on the display of the stove is
illuminated, this means that the relevant hob is still
hot. It may be used for heating a small amount of
food. (See Fig. 4).
WARNING: Residual heat display is not illuminated,
and thus it does not warn the user against heat in
case of a power outage.
Figure 4
WARNING: Residual heat display of each cooking area remains active until the measured
glass temperature is below + 60 °C.

16
Turning the Stove Cooking Areas On
1. Turn the stove on by pressing the button. (See
Fig. 5)
Figure 5
2. Press the relevant hob selection key. The icon
shall be displayed in the relevant hob when you
touch for the rst time. (See Fig. 6)
Figure 6
3. Power level of the relevant hob may be set from
1 to 9 using the and the keys or from to 9 as
per the option of the stove. (See Fig. 7)
Figure 7
WARNING: If the hob selected is hot , icon shall be displayed instead of icon after the
selection is made.
Keep Warm Function (Optional)
Keep warm function keeps the cooked food placed on a cooking area warm. The selected
hob is operated with a lower power in this function. Keep warm function is also a cooking
level.
To activate the keep warm function;
1. Turn the stove on by pressing the button. (See
Fig. 8)
Figure 8

17
2. Press the relevant hob selection key once. The
icon is displayed when you touch for the rst
time. (See Fig. 9)
Figure 9
3. Then, press the key once. The icon
shall be displayed in the relevant hob with this
touch. (see Fig. 10) Thus, the keep warm shall be
activated.
Figure 10
Turning the Stove Cooking Areas O:
1. You may turn the stove o by pressing the
button. (See Fig. 11)
Figure 11
2. Using the and keys, bring the
temperature on all hobs to . (see Fig. 12) Stove
shall be turned o by itself after 20 seconds
Figure 12
3. If any hob is still hot after 20 seconds,
symbol is displayed until the temperature of the
relevant hob becomes lower than +60 °C. (see
Fig. 13) No icon is displayed after the stove is
turned o if the relevant hob is not hot.
Figure 13

18
Child Lock Function (Optional)
To activate the child lock;
1. Press upper hob selection key ( ) and minus key
() simultaneously, you shall hear a short warning
signal at this time. (see Fig. 14) Then, remove your
ngers from the stove control panel.
Figure 14
2. Press the upper hob selection key ( ) again.
(See Fig. 15)
Figure 15
3. The child lock is activated at this time and the
icon is displayed on all hobs to indicate this
condition. (see Fig. 16) The and icons are
displayed alternatively if any hob is hot.
Figure 16
To deactivate the child lock until the stove is turned o;
1. The icon is displayed on all displays when the
stove is on and the child lock is active. (see Fig. 17)
The and icons are displayed alternatively if any
hob is hot. You may turn the stove on or o with the
key only.
Figure 17
2. Press upper hob selection key ( ) and minus key
( ) simultaneously. (see Fig. 18) You shall hear a
short warning signal at this time. Then, remove your
ngers from the stove control panel.
Figure 18

19
3. The icon is displayed on all displays. (see Fig. 19)
The and icons are displayed alternatively if any
hob is hot.
Figure 19
WARNING: Child lock is deactivated until the stove is turned o only with the steps
performed in this section. In other words, child lock shall be activated again if the unit
is turned o and on again. Thus, the child lock shall be activated whenever the stove is
turned o and on.
To activate the child lock completely;
1. The icon is displayed on all displays when the
stove is on and the child lock is active. (see Fig. 20)
The and icons are displayed alternatively if any
hob is hot. You may turn the stove on or o with the
key only.
Figure 20
2. Press upper hob selection key ( ) and minus key
( ) simultaneously. (see Fig. 21) You shall hear a
short warning signal at this time. Then, remove your
ngers from the stove control panel.
Figure 21
3. Press the key again. (see Fig. 22) This shall be
performed right after the 2nd step. Child lock is
deactivated permanently. In other words, child lock
shall continue to be deactivated even if the unit is
turned o and on again.
Figure 22
4. Unit switches to stand-by mode after these
procedures. However, the icon shall be displayed
in case of a hot hob even if the unit switches to
stand-by mode. (See Fig. 23)
Figure 23

20
WARNING: Child lock shall be deactivated in case of a power outage.
Special Function Selection Key
Special function selection key controls the double heater. When the double heater is
selected for cooking, both hobs of this heater are activated. You may select one cooking
area of the double heater by pressing the special function selection key. Touch the special
function selection key again to activate both cooking areas of the heater.
A point ( ) icon is displayed beside the cooking
level of the relevant hob when both hobs of the
double heater are active. (See Fig. 24)
Figure 24
Cooking level is displayed by itself without a point
() icon when a single hob of the double heater is
activated by touching the special function selection
key. (See Fig. 25)
Figure 25
Table of contents
Languages:
Other Hotpoint Ariston Cooktop manuals
Popular Cooktop manuals by other brands

GE
GE Digital Radiant Cooktop Use and care guide

Frigidaire
Frigidaire FGC30S4DBA installation instructions

Smeg
Smeg GCO90XG Instructions for installation and use

Electrolux
Electrolux EW36CC55GB - 36 Inch Hybrid Induction... Use and care guide

Frigidaire
Frigidaire PLEF489CCB Circuit diagrams

AEG
AEG 6050 K Operating and installation instructions