manuals.online logo
Brands
  1. Home
  2. •
  3. Brands
  4. •
  5. Hotron
  6. •
  7. Security Sensor
  8. •
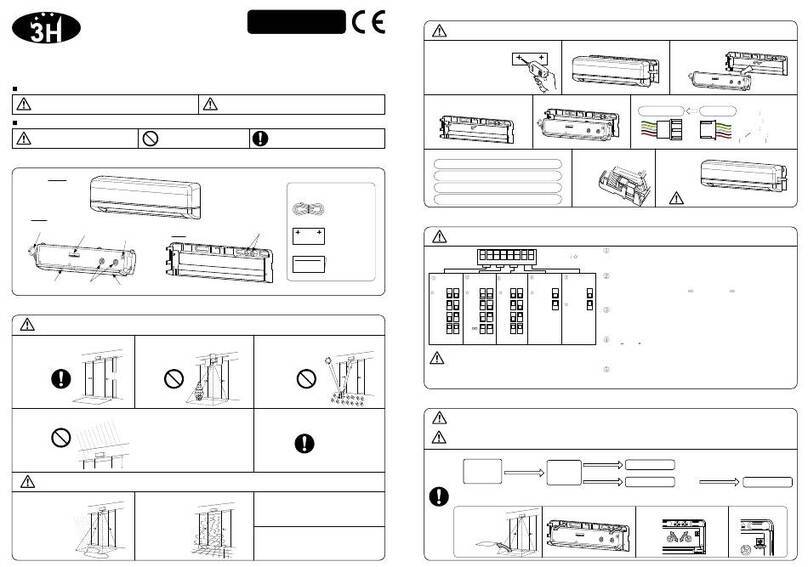
  9. Hotron 3H-IR14 User manual

Hotron 3H-IR14 User manual

CAUTION
CAUTION
WARNING
CAUTION
■The symbols below indicate what should be obeyed.
Disregarding this symbol may result in injury
or damage to equipment
Disregarding this symbol may result in
serious injury or death
This symbol refers to an
instructions which is prohibited
This symbol refer to an Instruction which must
be followed
This symbol refers to a Caution
WARNING CAUTION
■The symbols below indicate an extremely dangerous situation.
2. Remove Cover
User Manual
3H-IR14
Motion and Presence Sensor
We would like to extend our thanks to you for purchasing this product.
Before using this product, please read the following instructions carefully.
Please retain this manual for reference in case it needs to be referred to during the lifetime of this product.
2. MOUNTING PRECAUTIONS
To prevent leakage, malfunction or damage, please follow instructions below.
1. Mount lower than 3m (9.8ft) 2. Ensure no moving objects in the
detection area
4. Mount where rain or snow will not fall directly on unit.
1. Accumulation of
snow or water on the
floor.
3. Ensure the minimum of reflected
sunlight from the floor
2. Environment is
humid or steamy.
5. Please install in a place where no vibration
Cover
1. DESCRIPTION
User
Manual
Accessories
Mounting
Template
Cable
(2.5m)
Body
Potentiometer
(Sensitivity Volume)
Connector
LED Indicator Area Mask Detection Window
Dip Switch Base
3.0m
9. Place Cover on sensor and clean the sensor.
Do not move Body when
attaching Cover.
8. House Connectors in the
space provided.
1. Determine the mounting
position of the device and
attach Mounting Template.
Drill mounting and wiring
holes.
3. MOUNTING & WIRING INFORMATION
Drilling may cause electric shock.
Be careful of hidden wires inside the door engine cover.
7. Set the following parameters
4. DIP SWITCH SETTINGS
6. Wiring to the door controller.
4. Install Base with Mounting
Screws.
6. ADJUSTING DETECTION PATTERN
5. Attach Body to Base.
3. Remove Mounting Screws and Body
from Base .
4. DIP SWITCH SETTINGS
5. APPLYING POWER
8. VERIFICATION OF OPERATION
Mounting Screws
(2 pcs.)
If the sensor is exposed to
excessive rain or snow install
with a Hotron weather cover
In the following cases, the sensor may detect without the presence of a person
3. Objects placed in the detection area.
4. Pets / Animals enter the detection area.
②Presence Timer
The sensor will detect a stationary object only for the time set by the
Presence Timer. When it is set to ∞, the period is ∞in case of the 1st
and 2nd row, 2 s in case of the 3rd and 4th row.
④Monitor Mode
Set to “Snow”in instances where false door activations can result from
blowing snow, leaves or rubbish close to the door detection area. It should
be noted that sensitivity to detecting pedestrians may also be reduced.
①Quantity of Detection Rows
The number of rows of detection can be set to 4, 3, 2,1 depending on
detection area requirements.
③Frequency
When more than two sensors are used in close proximity to each other,
select different frequency setting for each sensors to prevent interference.
( A + B + C + D = Maximum 4 sensors )
If you change the setting of the Dip switch when
the power is on, the sensor will be reset in
approx 6 s.
If you carry out the followings, please turn off the power.
If you carry out the followings when the power is turned on, the sensor will detect for the presence timer setting that you have set
Before turning on the power, please wire the door controller to the sensor.
No moving object
Power-
on/Reset
Presence detection
If there is a moving object in detection area after power-up / reset, the sensor will be in motion detection mode.
If there is no moving object in detection area after power-up / reset, the sensor will be in presence detection mode.
Moving object
Motion detection
7 s
No moving object
7 s
Remove
moving
object
Presence detection
Motion
Detection
2 s
7. ADJUSTING SENSITIVITY
The reset is the same as the Power-On.
Please set in a manner suitable for operation.
⑤Self-Monitoring
When the sensor has malfunctioned, the Green/Red LED blinks alternately
and the relay output is relayed to the sensor.
Cable   Green:N.C.
  Yellow:N.O.
  White:COM
Red/Black:Power
(Non Pole)
Connector
Place or remove the
mat on the detection
area.
Adjust the angle of Body. Adjust the width of the detection area. Adjust the sensitivity.
Default Setting
:☆
☆☆ ☆
②Presence
Timer
2s
30s
60s
∞
3 4
③Frequency
A
B
C
D
5 6
①
Quantity of
Detection Rows
R4
R3
R2
R1
1 2
☆
④Monitor
Mode
Normal
7
1 2 3 4 5 6 7 8
Snow ☆
⑤Self-
Monitoring
OFF
8
ON
MP-10137-C '22.08
CAUTION
Adjust the detection pattern either 0°or +5°by
moving the angle of Body. 
7. ADJUSTING SENSITIVITY
2. If the sensor does not detect
even if a person enters the
detection area, please increase
the sensitivity.
After rechecking, if there is still a problem, please contact us or your dealer.
Adjust the detection pattern. Remove moving object.
Problem Possible Cause Solution
Door opens and closes
for no apparent reason
(Ghosting)
The sensor detects door movement Adjust detection depth away from the door.
Door does not
operate
Door operates
intermittently
Door operate by itself
Tighten or reconnect the connector.
Apply proper voltage to the sensor. (AC/DC 12-24V)
Dust, frost or water droplet on the sensor lens Wipe Detection Window clean and install a weather cover if necessary
   (Chemicals such as thinner, alcohol use is prohibited to use.)
Sensitivity too low
Inappropriate detection area
Turn up sensitivity
Adjust the detection pattern.
There is a moving object in the detection range.
Detection pattern too far from the door,
detecting people passing by.
Sensitivity too high Turn down the sensitivity.
Another sensor is too close by. Change the frequency to each sensor.
The condition of detection area is varing.
・Dust / Dirty
・Spread out / Remove a mat
・Snow
Change the presence timer settings to shorter
Connector not connected correctly
Incorrect power supply voltage
Adjust the detection pattern.
10. TROUBLESHOOTING
11. TECHNICAL SPECIFICATIONS
Please note that specifications are changed without notice.
0°/ +5°
R4~R1
Normal / Snow
4 Frequencies
2s / 30s / 60s / ∞
Wide / Narrow
Installation Height
Sensitivity adjustment
3.0m
Available
Presence Timer
Depth adjustment Angle
Row
Width adjustment
Monitor mode
Frequency
Model Name 3H-IR14
AC12V:1.3VAMax / AC24V:1.5VAMax
DC12V:65mAMax / DC24V:35mAMax
Supply Voltage
Power
Consumption
Output
AC/DC12~24V±10% 50/60Hz
S : Silver , BL : Black
Output Holding
Time
LED Indicator
Operating
Temperature
Weight
Color
Approx 180g
-20℃~+60℃
Relay Contact1c
DC50V 0.1A(Resistance load)
Fail safe
Approx 0.5s
12. EXTERNAL DIMENSIONS
[mm]
< Disclaimer >
The manufacturer cannot be held responsible for
below.
1. Misinterpretation of the installation instructions,
miss connection, negligence, sensor modification and
inappropriate installation.
2. Damage caused by inappropriate transportation.
3. Accidents or damages caused by fire, pollution,
abnormal voltage, earthquake, thunderstorm, wind,
floods and other acts of providence.
4. Losses of business profits, business interruptions,
business information losses and other financial losses
caused by using the sensor or malfunction of the
sensor.
5. Amount of compensation beyond selling price in all
cases.
Adjust the monitoring modeMounting portion is distorted
Adjust the monitoring mode(footprints being left in fresh snow)
Active Infrared ReflectionDetection Method
3. If the sensor detects even
though no one is in the
detection area, please
decrease the sensitivity.
1. Please set the sensitivity suitable for the mounting height. 
Sensitivity
L
M
H
Please adjust the sensitivity that is appropriate to the operation.
Area mask
3. Width adjustment
6. ADJUSTING DETECTION PATTERN
You can adjust the detection width by turning Area Mask with a screwdriver.
2. Depth adjustment
1. Angle adjustment
The detection range will vary depending on installation environment, object detected and settings etc (clothes and floor material and
sensitivity adjustment)
                 
Delete or add rows of detection
4. DIP SWITCH SETTINGS
Ensure that the inner row of detection does not detect door movement
[m]
0
1.0
2.0
3.0
0.5
1.5
2.5
1.0 0.5
1.52.0 00.5 1.0 1.5 2.0
Wide
[m]
0
1.0
2.0
3.0
0.5
1.5
2.5
1.0 0.5
1.52.0 00.5 1.0 1.5 2.0
Narrow
Narrow
0
0.5
1.0
1.5
2.0
2.5
3.0
00.51.01.52.02.5 [m]
[+5°]
Door
Door
After installation and adjusting various settings, please check whether the detection range and sensitivity is suitable for
operation. If it is difficult to detect or false activations occur, please re-adjust the detection range and sensitivity settings.
8. VERIFICATION OF OPERATION
00.51.01.52.02.5 [m]
0
0.5
1.0
1.5
2.0
2.5
3.0
[0°]
The table below is an estimation.
H L H L
Wide
If Self-Monitoring determines that the sensor has malfunctioned, the relay
output will cause the door to open, and the Green/Red LED flashes .
In this case, please replace the sensor immediately. OFF / ON of Self-
Monitoring can be set with DIP switch.
Relay output waveform(in case of not normal)
Make
Break
12 s 12 s
60 s
1 cycle
LED Indicator Flashing red and green
9. SELF-MONITORING
OFF / ONSelf-Monitoring
4 Rows ON 3 Rows ON 2 Rows ON 1 Rows ON
26 Dublin Street (2nd Floor), Carlow, Ireland
URL: http://www.hotron.com
Fax: +353-(0)59-9140543
Phone: +353-(0)59-9140345
1-11-26 Hyakunin-Cho, Shinjuku-Ku, Tokyo, Japan
URL: http://www.hotron.com
Fax: +81-(0)3-5330-9222
Phone: +81-(0)3-5330-9221
Manufacturer
HOTRON CO.,LTD.
SALES Europe
Hotron Ireland Ltd.
28.5
59
15
75
(Standard Mounting Pitch)
35 10
210
CAUTION
2.0 ~2.5
2.5 ~3.0
L ~M
M ~H
Estimated
sensitivity
Height
[m]
Standby (Green)
R3, R4 Detecting (Red), R2 Detecting (Slow flashing Red), R1 Detecting (Fast flashing Red)
Door movement is detected (Orange)  Waiting for reset (Fast flashing Orange)
Reflection Diagnostics (Flashing Red and Green)
MP-10137-C '22.08

This manual suits for next models

1

Other Hotron Security Sensor manuals

Hotron SSR-3 User manual

Hotron

Hotron SSR-3 User manual

Hotron KABUTO User manual

Hotron

Hotron KABUTO User manual

Hotron HR50 User manual

Hotron

Hotron HR50 User manual

Hotron 3H-IR14 User manual

Hotron

Hotron 3H-IR14 User manual

Popular Security Sensor manuals by other brands

Vaisala MD30 Updating Software

Vaisala

Vaisala MD30 Updating Software

Neopost Studiojet 110H owner's manual

Neopost

Neopost Studiojet 110H owner's manual

BEMKO SES12WH instructions

BEMKO

BEMKO SES12WH instructions

Genesis LG2 WP-3020 Installation handbook

Genesis

Genesis LG2 WP-3020 Installation handbook

PCB Piezotronics IMI SENSORS 640B61/015BZ Installation and operating manual

PCB Piezotronics

PCB Piezotronics IMI SENSORS 640B61/015BZ Installation and operating manual

Eaton NexiTech Series manual

Eaton

Eaton NexiTech Series manual

Bartec ETC 500 operating manual

Bartec

Bartec ETC 500 operating manual

KAM Simple Presision OOD Series user manual

KAM

KAM Simple Presision OOD Series user manual

Pelsue LG5 Series product manual

Pelsue

Pelsue LG5 Series product manual

Aritech EV1000 Series installation instructions

Aritech

Aritech EV1000 Series installation instructions

Crowcon Flamgard-Plus Installation, operation and maintenance instructions

Crowcon

Crowcon Flamgard-Plus Installation, operation and maintenance instructions

SKYLOTEC CONREST Instructions for use

SKYLOTEC

SKYLOTEC CONREST Instructions for use

Baumer URCK 09G8914 quick start guide

Baumer

Baumer URCK 09G8914 quick start guide

AJAX GlassProtect Fibra user manual

AJAX

AJAX GlassProtect Fibra user manual

LEGRAND CP Electronics EBDSPIR-DALI2 installation guide

LEGRAND

LEGRAND CP Electronics EBDSPIR-DALI2 installation guide

MSA Ultra Elite-H operating manual

MSA

MSA Ultra Elite-H operating manual

Etlin-Daniels SENPIR-CM-02 installation manual

Etlin-Daniels

Etlin-Daniels SENPIR-CM-02 installation manual

quiko QK-RADAR manual

quiko

quiko QK-RADAR manual

manuals.online logo
manuals.online logoBrands
  • About & Mission
  • Contact us
  • Privacy Policy
  • Terms and Conditions

Copyright 2025 Manuals.Online. All Rights Reserved.