Hoval TopTronic E Manual

Subject to modication | EN
Technical information
Installation instructions
4 214 514 / 02 - 10/15
TopTronic®E Gateway module Modbus TCP/RS485
Hoval TopTronic®E Modbus TCP/RTU interface
Hoval products may only be installed and com-
missioned by appropriately qualied experts.
These instructions are intended exclusively for the
specialist. Electrical installations may only be carried
out by a qualied electrician.
These instructions are applicable to the fol-
lowing types:
1-TopTronic®E GW-Modbus TCP/RS485

2
1. Important notes
1.1 Intended use ........................................................................................................................................................................3
1.2 Explanation of the symbols ................................................................................................................................................3
1.2.1 Warnings ..........................................................................................................................................................................3
1.2.2 Symbols............................................................................................................................................................................3
2. Technical information
2.1 Installation location in the wall housing/control panel......................................................................................................4
2.1.1 Modbus TCP dimensional drawing ....................................................................................................................................4
2.1.2 Modbus RS485 dimensional drawing.................................................................................................................................4
2.2 Connections of the gateway................................................................................................................................................4
2.2.1 Back .................................................................................................................................................................................4
2.3 Technical data for the TopTronic®E Modbus interface......................................................................................................5
2.3.1 Connections on the underside...........................................................................................................................................5
2.3.2 CAN pin assignment on RJ45............................................................................................................................................5
3. Installing and connecting the gateway
3.1 Installing the gateway in the wall housing or control panel..............................................................................................6
3.2 Installing the gateway in the heat generator......................................................................................................................6
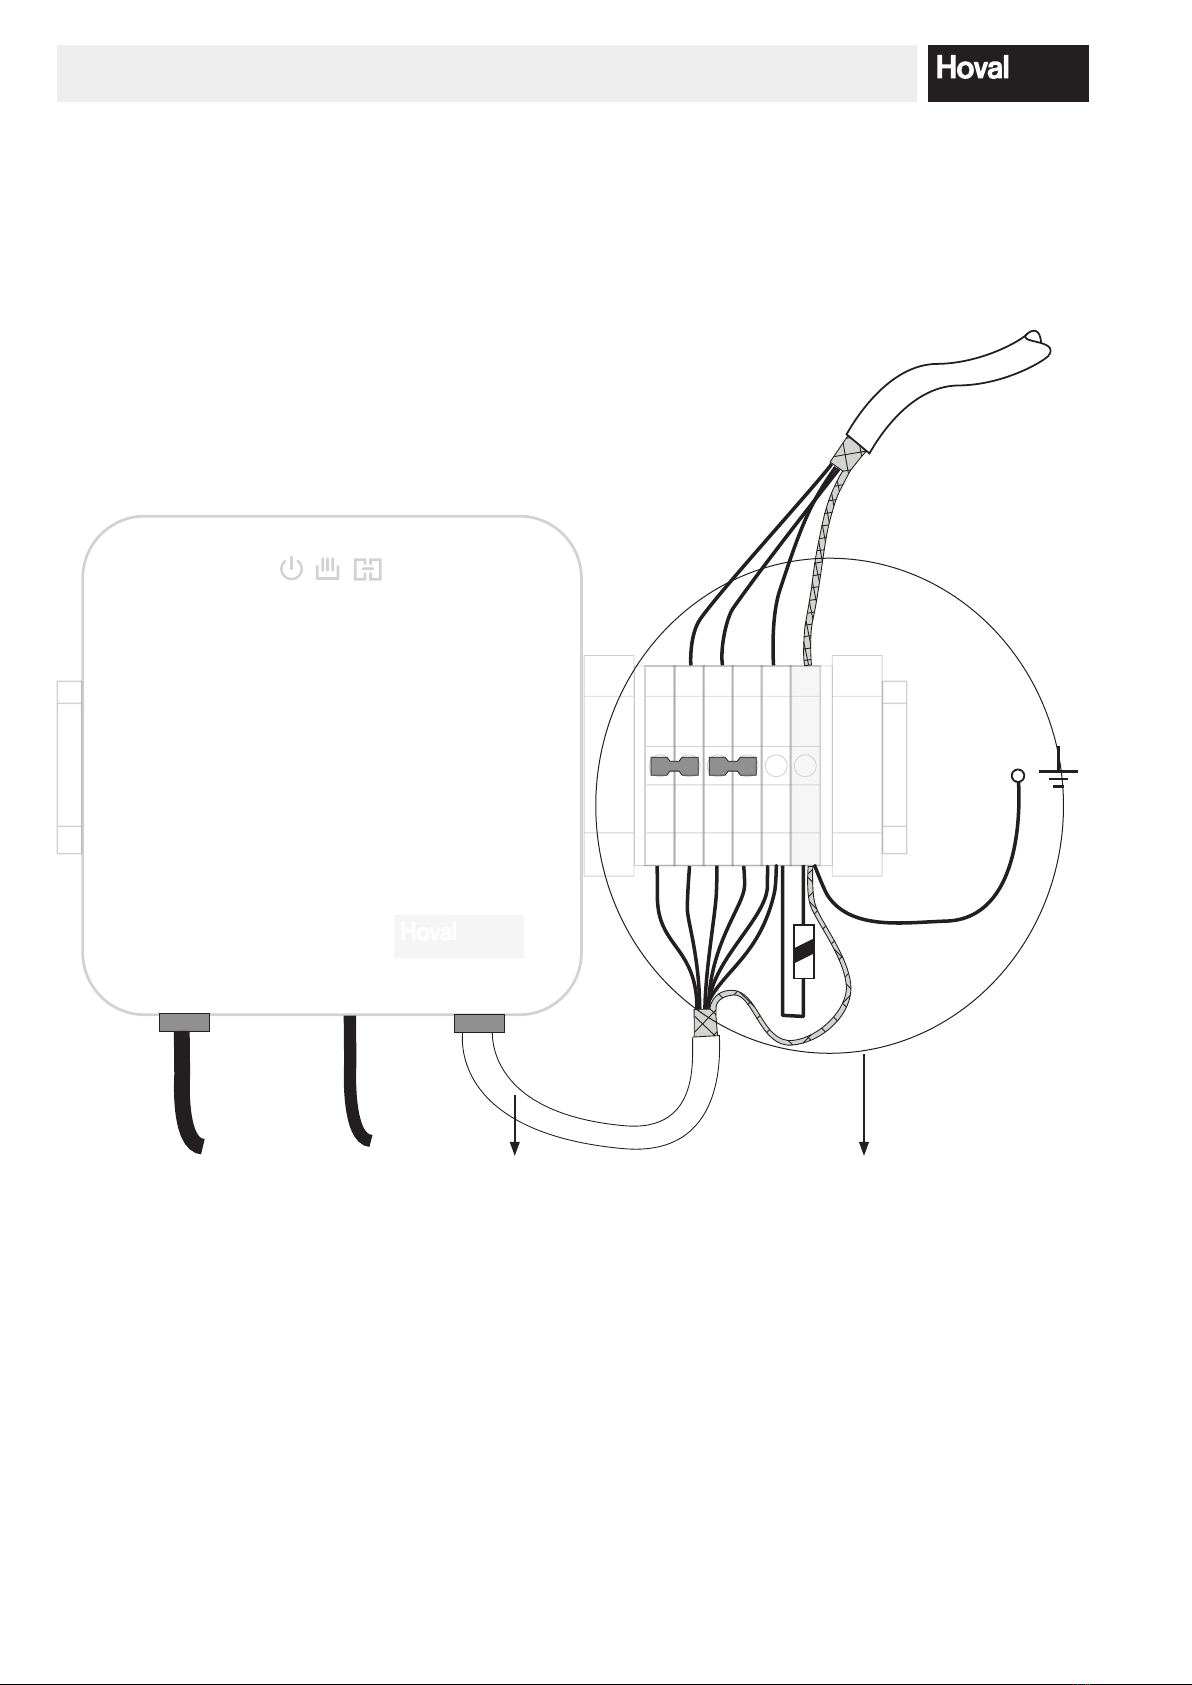
3.3 Connection for the heat generator (WEZ / CAN bus) .........................................................................................................7
3.4 Connection for the Modbus TCP.........................................................................................................................................8
3.5 Connection for the Modbus RS485 .....................................................................................................................................9
3.6 LED lights on the gateway ................................................................................................................................................10
4. Commissioning the TopTronic®E Gateway module Modbus
4.1 Connecting the Modbus TCP/RS485 (RTU) to the gateway ............................................................................................11
5. General Modbus information
6. Data point list
6.1 Important columns ............................................................................................................................................................13
6.2 Module addresses .............................................................................................................................................................14
6.3 Special data points............................................................................................................................................................14
6.3.1 Four-byte data points ......................................................................................................................................................14
6.3.2 Active errors ...................................................................................................................................................................15
6.3.3 LIST data types...............................................................................................................................................................15
6.4 Essential data points.........................................................................................................................................................16
6.4.1 The following lists contain a selection of important data points. TTE-WEZ.......................................................................16
6.4.2 TTE-HK/WW ...................................................................................................................................................................18
6.4.3 TTE-PS...........................................................................................................................................................................20
6.4.4 SOL ................................................................................................................................................................................20
6.4.5 TTE-FW..........................................................................................................................................................................21
6.4.6 TTE-MWA .......................................................................................................................................................................22
4 214 514 / 02
TABLE OF CONTENTS

3
1. Important notes
1.1 Intended use
The gateway is the connection point between the Ho-
val CAN bus and a Modbus interface via TCP or RS485
(RTU).
The gateway enables users to access and operate their
Hoval heating system via Modbus.
These instructions describe how to connect, install and
commission the interface.
1.2 Explanation of the symbols
1.2.1 Warnings
NOTICE
... indicates a situation of possible danger
which can lead to damage to property if not
avoided.
«Warning: dangerous electrical voltage» as a
warning for accident prevention.
Ensures that people do not come into contact
with electrical voltage. The danger sign with
the black lighting symbol warns against the
danger of electrical voltage.
1.2.2 Symbols
Information:
Provides important information.
4 214 514 / 02
IMPORTANT NOTES

4
2.2 Connections of the gateway
1 2 3 4 5 6
Modbus RS485
or
Modbus TCP
To the heat generator
CAN bus
g. 03
2.2.1 Back
On the back, the CAN bus can be connected to the ter-
minal.
g. 04
CAN bus The terminals permit direct wiring to the
Hoval CAN bus
CAN+ CAN bus data line
CAN- CAN bus data line
12VDC 12V power supply via CAN bus
GND Earth CAN bus
NOTICE
The earth must always be connected to all
CAN bus subscribers.
This also applies when a mains adapter is
used.
NOTICE
When using a mains adapter, 12 V DC must
not be connected.
2. Technical information
2.1 Installation location in the wall housing/
control panel
Delivery:
TopTronic®E Gateway module Modbus on top-hat rail
The TopTronic®E Gateway module Modbus can be
installed in the wall housing, in the control panel or in the
heat exchanger
2.1.1 Modbus TCP dimensional drawing
(all dimensions in mm)
100
100
g. 01
Dimensions:
W = 100
H = 100
D = 27 (including top-hat rail: 42)
2.1.2 Modbus RS485 dimensional drawing
(all dimensions in mm)
1 2 3 4 5 6
155
100
g. 02
Dimensions:
W = 155
H = 100
D = 47 (terminal block including top-hat rail: 55)
4 214 514 / 02
TECHNICAL INFORMATION

5
2.3 Technical data for the TopTronic®E Modbus
interface
2.3.1 Connections on the underside
g. 05
Power Connection for the external power supply
(only use the supplied mains adapter)
LAN Modbus TCP interface
USB Not used
CAN Connection for Hoval CAN bus, pluggable
connection RJ45
RS 485 Modbus RS485 interface
NOTICE
Do not confuse CAN bus with LAN. Ethernet
hardware can be damaged by the 12 V volta-
ge of the CAN bus!
2.3.2 CAN pin assignment on RJ45
RJ45 pin
Signals
1
CAN_H
2
CAN_L
3
CAN_GND
8
CAN_12VDC++
Electrical safety
• Protection class (according to EN 60529): IP 20
• Complies with EN 50491-3
• Safety extra-low voltage SELV 24 V DC
EMC requirements
• Complies with EN 61000-6-2, EN 61000-6-3, EN
50491-5-1, EN 50491-5-2 and EN 50491-5-3
• According to EMC Directive (residential and functional
building)
Environmental conditions
• Ambient temp. during operation: 0 to +45°C
• Storage temperature: -20 to +60°C
• Rel. humidity (not condens.): 20% to 80%
Mechanical data
• Housing: plastic
• Weight: approx. 500 g
Ethernet
• 10BaseT (10 Mbit/s)
• Supported protocols: UDP/IP, TCP/IP, DHCP and static
IP
Power supply
• External supply: 12 V DC
• Power consumption: < 800 mW
Connections
• RJ45 LAN connector
• RS 485
• CAN bus
4 214 514 / 02
TECHNICAL INFORMATION

6
3. Installing and connecting the gateway
3.1 Installing the gateway in the wall housing or
control panel
• Install the gateway in the wall housing or control panel.
• It may be necessary to remove the gateway and the
connector base from the top-hat rail prior to this.
g. 06
3.2 Installing the gateway in the heat generator
If, after installing all modules and extensions, there is still
space in the heat exchanger, this can be used for the
gateway.
- See also “Technical Information Installation Instruc-
tions” in the “Electrical connection” chapter.
g. 07
Installation example: UltraGas with
Modbus RS485 gateway
4 214 514 / 02
INSTALLATION

7
3.3 Connection for the heat generator (WEZ /
CAN bus)
There is a danger of electric shock.
The heat generator can only be de-energised
by disconnecting it from the mains (fuse).
NOTICE
The gateway can be connected to the CAN
bus at any point on the bus system.
•
In doing so, ensure that the CAN bus is
correctly terminated.
1. Plug the CAN bus into the gateway
or establish the CAN connection via the terminals on
the back of the gateway.
CAN bus
Pluggable connection
CAN bus
Terminal connection
g. 08
If installing the gateway in the heat exchanger, cont-
inue to point 3:
2. Expose a basic or controller module in the heat gene-
rator, wall housing or control panel according to the
“Technical Information Installation Instructions” in the
“Electrical connection” chapter.
3. Connect the Hoval CAN bus to a basic or controller
module (g. 08) according to chapter 2.3.2
NOTICE
When using an external mains adapter, the
12 V line (CAN_V+) of the CAN bus must
NOT be connected.
4. Route the cable according to the "Technical Informa-
tion Installation Instructions" in the "Electrical connec-
tion" chapter.
NOTICE
The CAN bus cable must have strain relief
applied.
4 214 514 / 02
INSTALLATION

8
3.4 Connection for the Modbus TCP
(If using Modbus RS485, proceed to point 3.3)
1 2 3 4 5 6
Modbus
TCP
LAN CAN bus
Disconnect This section is not necessary in Modbus
TCP. The parts can be removed.
g. 09
4 214 514 / 02
INSTALLATION

9
3.5 Connection for the Modbus RS485
The RS485 interface and the terminal strip supplied are
assigned as follows:
• Connect Modbus RS485
• Install earth cable
CAN bus
Earth cable
1 2 3 4 5 6
12 3
4
4
5
g. 10
Modbus RS485 connection
1. RXTX+
2. RXTX-
3. GND
4. Supply line shielding on PE
5. Bridges for bus terminating resistors
NOTICE
Remove the bridges to deactivate the bus
terminating resistors.
(Factory setting: terminated)
4 214 514 / 02
INSTALLATION

10
3.6 LED lights on the gateway
For commissioning it is important to know what status
the gateway is currently in. The LEDs indicate the current
status for this purpose.
The LED electrical power supply is green, all other LEDs
are dark.
• Gateway is in boot status, i.e. the operating system is
starting up – can take up to 60 seconds
12 3
g. 11
1Left LED, “Power supply”:
Power supply via CAN bus or external supply
Green
2Middle LED, “CAN bus”:
• Connecting to the CAN bus
• Connection to the CAN bus established
• No connection to the CAN bus
Flashing blue
Blue
Red
3Right LED, “Network”
• No connection to the server
- Occurs whilst establishing connection to
the LAN network
- Occurs during initialisation in the WLAN
(green LED on
- WLAN aerial ashes) – can take up to 60
seconds
- Otherwise, check the settings on the
gateway
• Connection setup to the server - can take up
to 30 seconds
• Connection to the server established
• Data logging on USB active
• No physical network connection
• No connection to the server
Not
used
4 214 514 / 02
INSTALLATION

11
4. Commissioning the TopTronic®E
Gateway module Modbus
The settings described below can be perfor
-
med on the control module of the system.
4.1 Connecting the Modbus TCP/RS485 (RTU)
to the gateway
1. Launch the TopTronic®E control module and select
- Main menu > Service.
g. 12
Only required for Modbus TCP:
Service > TTE-GW > General > Gateway general > All
data points > Internet access
2. Select network (=cable connection) and conrm with
“OK”.
> Network is set as standard.
3. DHCP (router gives the address)
- DHCP > Yes is set as standard.
- Open and select DHCP > Yes > Apply IP changes >
Apply and conrm with “OK”.
- This automatically searches for and sets the correct
IP address. The TopTronic® E gateway is installed.
For Modbus TCP, DHCP should be set to “No”
and a static IP address should be given as the
IP address cannot be changed as a result.
Only required for Modbus TCP:
4. Set a xed IP address, this setting can be carried out
by a specialist.
- Set DHCP > No.
- Open > IP address, enter the required IP address
and conrm with “OK”.
- Open > Subnet mask, enter the required subnet
mask and conrm with “OK”.
- Open > Default gateway, enter the required IP
address and conrm with “OK”.
- Open and select > Apply IP changes > Apply and
conrm with “OK”.
- The TopTronic® E gateway is installed.
A reliable IP mask must be entered in the sub
-
net even if the system does not have a default
gateway.
5. When the connection has been established, the ga-
teway is restarted; the control module continues to
operate. The gateway must be restarted manually if it
does not restart automatically.
Service > TTE-GW > General > Settings > All data
points > Restart
The restart can take a few minutes.
6. The Modbus is congured via TTE-GW > Modbus >
Settings.
- Active: Activates or deactivates the Modbus service
- UnitID: Modbus address of the gateway for Modbus
RTU
- Mode: Modbus RTU (via RS485) or Modbus TCP
- Parity: Even, uneven or none. This setting must be
the same on all units in the RS485 bus system.
- Baud rate: This setting must be the same on all
units in the RS485 bus system.
4 214 514 / 02
COMMISSIONING

12
5. General Modbus information
On the gateway, Modbus RTU is implemented via
RS485 and Modbus TCP via Ethernet. Either Modbus
RTU or Modbus TCP can be used. The two protocols
cannot be used at the same time.
The following Modbus function codes are implemented:
• Function 03 (03hex) Read Holding Registers
• Function 04 (04hex) Read Input Registers
• Function 06 (06hex) Write Single Register
However, no more than 10 to 15 data points should be
read at the same time as this can cause the time for ge-
nerating the response to increase signicantly.
Modbus uses the terms “register” and
“address”. Whilst the registers begin with the
number 1, the addresses start with 0. The data
point list uses Modbus addresses to address
the data points.
4 214 514 / 02
COMMISSIONING

13
6. Data point list
The complete data point list can be downloaded from
www.hoval.com/misc/TTE/TTE-GW-Modbus-datapoints.xlsx
6.1 Important columns
Modbus address UnitName UnitId
Address by which the data point on
the Hoval CAN bus via Modbus can
be addressed
Name of the TopTronic®E module Hoval CAN bus module address
(Explanation further below)
DatapointName TypeName Decimal
Name of the data point
in the Hoval CAN bus
Indicates whether a data point is unsi-
gned (U) or signed (S).
The length in bit of the data point is
also given.
(e.g. U8, S16, S32)
The number of decimal places that
the value has.
(e.g. if the value 263 (decimal) is
transmitted and “Decimal” is 1, the
value is represented as 26.3.)
FunctionGroup name Function name Steps
Indicates the Hoval CAN bus data
point function group where the value
can be found (e.g. heating circuits)
Indicates the Hoval CAN bus data
point function where the value can be
found (e.g. heating circuits 1)
Indicates the number of valid steps
when adjusting values.
(e.g. 5 -> value may only take on 0,
5, 10, etc.)
Min. value Max. value Writable Commentary
Smallest possible
value
Largest possible value “Yes” if the value is writable. Comments
Text 0 to text 31
If a selection is possible on control module, this column indicates
the value that represents the selection.
(e.g. text 0 is “Standby”, text 1 is “Week 1” -> Value 0 of the Modbus
data point represents “Standby”, value 1 represents “Week 1”)
4 214 514 / 02
DATA POINT LIST

14
6.2 Module addresses
The “UnitId” column indicates the Hoval CAN bus address
of the module that is to be addressed. If, for example, an
MWA is congured with number “1” via the control modu-
le, this corresponds to the “UnitId” “385” in the Modbus
data point list.
Name of the Hoval
TopTronic®E
module
Start address End address
SOL 65 80
WEZ 1 16
HC/DHW 257 272
DH 193 203
MWA 385 400
GW 1153 1160
PS 129 144
BCT 449 464
6.3 Special data points
6.3.1 Four-byte data points
If a data point of the Hoval CAN bus is longer than 2 by-
tes, the data point is distributed to 2 Modbus data points.
This is sufxed with “high” for high bytes and “low” for low
bytes.
Example:
Modbus
address Unit name Data point
Id
Data point
name Steps Min. value Max. value Writable
3 SOL 2034 Total yield
collector_high 1 0 0 No
4 SOL 2034 Total yield
collector_low 1 0 0 No
4 214 514 / 02
DATA POINT LIST

15
6.3.2 Active errors
Active errors are complied of 9 Modbus addresses. The-
re is only an error if the “Active error X_error_type” data
point has a different value to 0xFF.
Active error 1_appearance_time Time of the appearance in minutes since midnight
Active error 1_appearance_date Date of the appearance in days since 1.1.1900
Active error 1_disappear_time Time of the disappearance in minutes since midnight
Active error 1_disappear_date Date of the disappearance in days since 1.1.1900
Active error 1_source Hoval CAN bus address of the module in which the error occurred.
Active error 1_function_group Hoval CAN bus data point function group where the error occurred
Active error 1_function_number Hoval CAN bus data point function where the error occurred
Active error 1_error_type Error type
Active error 1_error_code Error code
The meanings of “error type” and “error code” can be ta-
ken from the respective manuals of the modules.
6.3.3 LIST data types
If a text selection can be made for a data point on the
control module (e.g. “Standby”, “Week 1”, “Week 2”, etc.),
the LIST data type manages the text that is represented
by a number. Fields “Text 0” to “Text 31” of the data point
list indicate which number means what and which text it
represents. If, for example, the value of a LIST data point
is “2”, the setting, which is entered in the “Text 2” column
in the data point list, is active.
The value in the “Min. value” column regulates which
selection is permissible. This value represents a bit pat-
tern, which is laid over the 32 text columns and masks the
texts that can be selected.
4 214 514 / 02
DATA POINT LIST

16
Modbus address
Unit name
UnitId
DatapointName
Type name
Decimal
FunctionGroup
name
Function name
Steps
Min. value
Max. value
Writable
Commentary
1477 WEZ 1 AF1 - outdoor sensor
1
S16 1 General General 1 0 0 No Outdoor sensor 1
(AF1, local HW input)
1513 WEZ 1 Supply actual S16 1 Heating
circuit
Heating
circuit 1
1 0 0 No
1514 WEZ 1 Supply actual S16 1 Heating
circuit
Heating
circuit 2
1 0 0 No
1515 WEZ 1 Supply actual S16 1 Heating
circuit
Heating
circuit 3
1 0 0 No
1500 WEZ 1 Hot water actual SF S16 1 Hot water Hot water
1
1 0 0 No
1539 WEZ 1 WEZ status U8 0 Auto unit FA
General
1 0 0 No Burner status
1531 WEZ 1 WEZ set value S16 1 Auto unit FA general 1 0 0 No WEZ set value
1525 WEZ 1 WEZ temperature S16 1 Auto unit FA general 1 0 0 No WEZ temperature
1536 WEZ 1 WEZ output U8 0 Auto unit FA
General
1 0 0 No WEZ output
1528 WEZ 1 Burner ame U8 0 Auto unit FA
General
1 0 0 No Burner ame
1487 WEZ 1 Set temperature
Manual operating
mode
S16 1 Heating
circuit
Heating
circuit 1
5 100 900 Yes In manual operation, the ow
temperature is controlled at the
reference value set here.
1488 WEZ 1 Manual mode set
temperature
S16 1 Heating
circuit
Heating
circuit 2
5 100 900 Yes In manual operation, the ow
temperature is controlled at the
reference value set here.
1489 WEZ 1 Manual mode set
temperature
S16 1 Heating
circuit
Heating
circuit 3
5 100 900 Yes In manual operation, the ow
temperature is controlled at the
reference value set here.
1481 WEZ 1 Normal room temp.
heating oper.
S16 1 Heating
circuit
Heating
circuit 1
5 100 300 Yes The parameter selects the
required setpoint for the room
temperature during normal hea-
ting operation.
1483 WEZ 1 Normal room temp.
heating oper.
S16 1 Heating
circuit
Heating
circuit 2
5 100 300 Yes The parameter selects the
required setpoint for the room
temperature during normal hea-
ting operation.
1485 WEZ 1 Normal room temp.
heating oper.
S16 1 Heating
circuit
Heating
circuit 3
5 100 300 Yes The parameter selects the
required setpoint for the room
temperature during normal hea-
ting operation.
6.4 Essential data points
6.4.1 The following lists contain a selection of im-
portant data points. TTE-WEZ
This list applies to the rst heat generator module; the
data point list must be consulted for all other modules.
4 214 514 / 02
DATA POINT LIST

17
1478 WEZ 1 Heating operation
choice
LIST 0 Heating
circuit
Heating
circuit 1
10x01D3 0Yes The setting determines the ope-
ration choice of the heating circuit:
#0 = Standby mode
#1 = Automatic mode
#4 = Constant normal mode
#5 = Constant energy-saving mode
#6 = Summer mode
#7 = Manual operating mode heating
#8 = Manual operating mode
cooling
1479 WEZ 1 Heating operation
choice
LIST 0 Heating
circuit
Heating
circuit 2
10x01D3 0Yes The setting determines the ope-
ration choice of the heating circuit:
#0 = Standby mode
#1 = Automatic mode
#4 = Constant normal mode
#5 = Constant energy-saving mode
#6 = Summer mode
#7 = Manual operating mode heating
#8 = Manual operating mode cooling
1480 WEZ 1 Heating operation
choice
LIST 0 Heating
circuit
Heating
circuit 3
10x01D3 0Yes The setting determines the ope-
ration choice of the heating circuit:
#0 = Standby mode
#1 = Automatic mode
#4 = Constant normal mode
#5 = Constant energy-saving mode
#6 = Summer mode
#7 = Manual operating mode heating
#8 = Manual operating mode cooling
1563 WEZ 1 Emissions test output
limitation
U8 0 Heat gen. Heat gen. 1 1 100 Yes Can be requested for each
H-Gen, can be changed conti-
nuously as parameter, initialise
emissions at start
1564 WEZ 1 Activate emissions
test
U8 0 Heat gen. Heat gen. 1 0 1 Yes Activate emissions test
#0=OFF,
#1=ON
1561 WEZ 1 Operation choice
Heat generator
LIST 0 Heat gen. Heat gen. 10x00000013 0Yes The following operating modes
can be selected:
#0 = Heat generator off
#1 = Automatic mode
#4 = Manual heating
#5 = Manual cooling
1562 WEZ 1 Set temperature
Manual operating
mode
S16 1 Heat gen. Heat gen. 10 0 900 Yes Set value for the heat generator
ow temperature in manual ope-
rating mode.
Comment:
• Room set temperature for heating circuit: Set “He-
ating operation choice” to constant and set required
temperature below “Normal room temp. heating oper.”.
Cascade management in TTE
• Flow set temperature for heating circuit: “Heating
operation choice” to manual. Set “Manual mode set
temperature” to required temperature. Cascade ma-
nagement in TTE
• Output set temperature at heat exchanger: Set “Acti-
vate emissions test” to “0” and immediately to “1” every
59 minutes and set “Emissions test output limitation”
to required modulation. The cascade management is
external.
• Set temperature to heat generator: Set “Heat gene-
rator operation choice” to manual and enter required
temperature below “Manual mode set temperature”.
The cascade management is external.
4 214 514 / 02
DATA POINT LIST

18
6.4.2 TTE-HK/WW
This list applies to the rst heating circuit/domestic hot
water module; the data point list must be consulted for all
other modules.
Modbus address
Unit name
UnitId
DatapointName
Type name
Decimal
FunctionGroup
name
Function name
Steps
Min. value
Max. value
Writable
Commentary
3705 HK/WW 257 AF1 - outdoor sensor
1
S16 1 General General 1 0 0 No Outdoor sensor 1 (AF1, local
HW input)
3738 HK/WW 257 Supply actual S16 1 Heating
circuit
Heating
circuit 1
1 0 0 No
3739 HK/WW 257 Supply actual S16 1 Heating
circuit
Heating
circuit 2
1 0 0 No
3740 HK/WW 257 Supply actual S16 1 Heating
circuit
Heating
circuit 3
1 0 0 No
3735 HK/WW 257 Room actual S16 1 Heating
circuit
Heating
circuit 1
1 0 0 No
3736 HK/WW 257 Room actual S16 1 Heating
circuit
Heating
circuit 2
1 0 0 No
3737 HK/WW 257 Room actual S16 1 Heating
circuit
Heating
circuit 3
1 0 0 No
3728 HK/WW 257 Hot water actual SF S16 1 Hot water Hot water
1
1 0 0 No
3727 HK/WW 257 Hot water setpoint S16 1 Hot water Hot water
1
1 0 0 No Calc. ref. value for the hot
water temp.
3729 HK/WW 257 SLP hot water char-
ging pump
U8 0 Hot water Hot water
1
1 0 1 No
3718 HK/WW 257 Manual mode set
temperature
S16 1 Heating
circuit
Heating
circuit 1
5 100 900 Yes In manual operation, the ow
temperature is controlled at the
reference value set here.
3719 HK/WW 257 Manual mode set
temperature
S16 1 Heating
circuit
Heating
circuit 2
5 100 900 Yes In manual operation, the ow
temperature is controlled at the
reference value set here.
3720 HK/WW 257 Manual mode set
temperature
S16 1 Heating
circuit
Heating
circuit 3
5 100 900 Yes In manual operation, the ow
temperature is controlled at the
reference value set here.
3709 HK/WW 257 Normal room temp.
heating oper.
S16 1 Heating
circuit
Heating
circuit 1
5 100 300 Yes The parameter selects the
required setpoint for the room
temperature during normal
heating operation.
3711 HK/WW 257 Normal room temp.
heating oper.
S16 1 Heating
circuit
Heating
circuit 2
5 100 300 Yes The parameter selects the
required setpoint for the room
temperature during normal
heating operation.
3713 HK/WW 257 Normal room temp.
heating oper.
S16 1 Heating
circuit
Heating
circuit 3
5 100 300 Yes The parameter selects the
required setpoint for the room
temperature during normal
heating operation.
4 214 514 / 02
DATA POINT LIST

19
3706 HK/WW 257 Heating operation
choice
LIST 0 Heating
circuit
Heating
circuit 1
10x01D3 0Yes The setting determines the operati-
on choice of the heating circuit:
#0 = Standby mode
#1 = Automatic mode
#4 = Constant normal mode
#5 = Constant energy-saving mode
#6 = Summer mode
#7 = Manual operating mode heating
#8 = Manual operating mode cooling
3707 HK/WW 257 Heating operation
choice
LIST 0 Heating
circuit
Heating
circuit 2
10x01D3 0Yes The setting determines the operati-
on choice of the heating circuit:
#0 = Standby mode
#1 = Automatic mode
#4 = Constant normal mode
#5 = Constant energy-saving mode
#6 = Summer mode
#7 = Manual operating mode heating
#8 = Manual operating mode cooling
3708 HK/WW 257 Heating operation
choice
LIST 0 Heating
circuit
Heating
circuit 3
10x01D3 0Yes The setting determines the operati-
on choice of the heating circuit:
#0 = Standby mode
#1 = Automatic mode
#4 = Constant normal mode
#5 = Constant energy-saving mode
#6 = Summer mode
#7 = Manual operating mode heating
#8 = Manual operating mode cooling
Comment:
• Room set temperature for heating circuit: Set “Heating
operation choice” to constant and set required tempe-
rature below “Normal room temp. heating oper.”.
• Flow set temperature for heating circuit: “Heating ope-
ration choice” to manual. Set “Manual mode set tempe-
rature” to required temperature.
4 214 514 / 02
DATA POINT LIST

20
6.4.3 TTE-PS
This list applies to the rst solar pump module; the data
point list must be consulted for all other modules.
Modbus address
Unit name
UnitId
DatapointName
Type name
Decimal
FunctionGroup
name
Function name
Steps
Min. value
Max. value
Writable
Commentary
16516 PS 129 Status buffer U8 0 Buffer Buffer 0 0 0 No Buffer function operating state:
Charging control:
#0 = No requirement, OFF
#1 = Requirement, low temp., PLP off
(discharge protection)
#2 = Requirement, charging running
#3 = Requirement, setpoint achieved, follow-on active
#4 = Requirement, setpoint achieved
#6 = Forced energy
#7= Skimming function
Discharge control:
#0 = No requirement (WEZ release)
#2 = Requirement, setpoint not achieved, UPE in
direction of WEZ or YPEL regulates constantly to PEF
#3 = Requirement, UPE changeover delay, UPE/YPEL
in direction of WEZ
#4 = Requirement, setpoint achieved, UPE/YPEL in
direction of buffer
#6 = Forced energy
#8 = Preferential operation SmartGrid
#9 = Forced acceptance SmartGrid
16517 PS 129 Buffer setpoint S16 1 Buffer Buffer 1 0 0 No Buffer setpoint
16518 PS 129 Buffer PF/KPF2
actual
S16 1 Buffer Buffer 1 0 0 No Buffer PF/KPF2 actual
16519 PS 129 Buffer PF2/KPF
actual
S16 1 Buffer Buffer 1 0 0 No Buffer PF2/KPF actual
6.4.4 SOL
This list applies to the rst SOL module; the data point list
must be consulted for all other modules.
Modbus address
Unit name
UnitId
DatapointName
Type name
Decimal
FunctionGroup
name
Function name
Steps
Min. value
Max. value
Writable
Commentary
1 SOL 65 TKO1 collector
temperature
S16 1 Collector Collector 1 1 -300 3000 No TKO1 collector temperature
81 SOL 65 TKR collector return
temp.
S16 1 Collector Collector 1 1 0 1000 No TKR collector return tempe-
rature
86 SOL 65 PS curr. speed solar
pump
U8 0 Collector Collector 2 1 0 100 No PS curr. speed solar pump
8 SOL 65 Total yield collector_high
S32 0 Collector Collector 1 1 0 0 No Total yield collector
9 SOL 65 Total yield collector_low
S32 0 Collector Collector 1 1 0 0 No Total yield collector
79 SOL 65 Vset volume ow solar
circuit
S16 2 Collector Collector 1 1 0 0 No Vset volume ow solar circuit
6 SOL 65 Operating hours PS
solar pump
U16 0 Collector Collector 1 1 0 65535 No Below 81 reset of operating
hours (only change to "0"
possible)
10 SOL 65 Current collector output S16 1 Collector Collector 1 1 0 32767 No Current collector output
69 SOL 65 Solar controller status U8 0 Collector Collector 1 1 0 3 No Solar functions status
#0 = Switched off
#1= Charging active
#2= Fault
#3= Warning / info
71 SOL 65 TU storage tank bottom
temp.
S16 1 Solar
storage
tank
Solar stora-
ge tank 1
1 0 1000 No Current temperature in the
solar storage tank bottom.
4 214 514 / 02
DATA POINT LIST
Other manuals for TopTronic E
5
Table of contents