hp-TECHNIK UHE-WH3 Series User manual

Installation, Maintenance and
Operation Instruction
Internal Gear Pump Series UHE-WH3
hp
-
TECHNIK GmbH Industriepumpen
-
Förderaggregate und Anlagenbau
Gablonzer Straße 21 D-76185 Karlsruhe Germany Tel.: 0721/ 9 56 18 – 0
Postfach 21 10 10 D-76160 Karlsruhe Germany FAX: 0721/ 9 56 18 – 28
home: http://www.hptechnik.com
:
info@hptechnik.com

Contents
1. General Safety Notes.......................................................................................................................3
1.1 Intended Use .................................................................................................................................3
2. General Information........................................................................................................................3
2.1 Operational Limits.........................................................................................................................4
2.2 Materials used ...............................................................................................................................4
2.3 Mechanical Seal.............................................................................................................................5
3. Installation......................................................................................................................................5
3.1 The Following must be Observed for Installation and before Commissioning: ............................5
4. Commissioning ................................................................................................................................7
4.1 Accessories ....................................................................................................................................7
5. Operation.........................................................................................................................................7
5.1 Inspection and Maintenance .........................................................................................................7
5.2 Preservation ..................................................................................................................................8
5.3 Troubleshooting.............................................................................................................................8
6. Environment ....................................................................................................................................9
7. General Information........................................................................................................................9
7.1 Application Risk.............................................................................................................................9
7.2 Usable fuel.....................................................................................................................................9
7.3 Painting .........................................................................................................................................9
7.4 Directives.......................................................................................................................................9
7.5 Documentation..............................................................................................................................9
8. Dimensional drawing UHE-WH3....................................................................................................10
9. Flow characteristics for hp-pumps series UHE-WH3.....................................................................10

----
3 – 06/2015
1. General Safety Notes
Indicates a potentially dangerous situation. If this is not avoided,
small or light injury may result.
Indicates general information on a danger of property damage.
Indicates general information on a danger of personal injury.
The notes for installation and maintenance are intended for a
specialist!
Pursuant to DIN EN 12514-1 section 4.3.3., the operator of the
complete system must provide a pressure controller, e.g. a pressure
control device.
The operator shall be responsible for complying with the general
accident prevention, safety and operating provisions.
1.1 Intended Use
In spite of careful safety optimization being performed for the UHE series pumps, there is still some residual
danger from operating the pump. The safety notes explained above and in the following must be observed
under any case to prevent personal injury and / or damage to the pump. By complying with the instructions at
all times, you will increase your pump's service life and retain full warranty claims towards the manufacturer in
the case of damage.
Any pumps are subjected to a performance test after manufacture and are equipped with a test card.
2. General Information
The UHE series pumps are internal gear pumps. They have an integrated overflow valve as well as an integrated
bypass connection. The flow rate for normal fuel oil at 20 °C (6 cSt) and motor speed of 2800 min -1 is 600 l/h at
30 bar. The pump works in the adjustable pressure range between 7 – 40 bar. The delivered pump is intended
for two-pipe system ex works. Two drilled holes in the adapter of the pump with pipe thread G 1/8" are for the
specific leakage removal provided, which can be used selectively (see Fig. 4 – page 10).
An internal geared rotor drives an excentric mounted outer geared pinion. The pumping medium will conveyed
between the tooth gaps of the two gears. For this purpose the conveyor rooms are sealed by a cap with an
integrated crescent.
The UHE series pumps are intended for transporting heating oils (see chapter 7.2 – page 9). Where other media
has to be transported, this must be verified by the manufacturer. Otherwise, the pump's service life may be
decreased.
For use with pre-heated media - which have a higher viscosity when cooled - the manufacturer recommends the
use of an electrical standby and companion heating system H2 without thermostat (see Fig. 3 – page 7). It is
available as an accessory.
The following information is engraved into the pump body:
• Exact description of the pump type
• manufacturing date – MM/YY
• Rotational direction arrow (corresponding to order)
• Manufacturer's pump number
• The side for suction connection will be marked with „A“
• The side for delivery connection will be marked with „S“.

----
4 – 06/2015
Fig. 1
2.1 Operational Limits
Capacity
60
0
l/h
at 30 bar
Max.
pressure
(
adjustable on the integrated overflow valve)
up to
40
bar
Min.
inlet pressure
-
0,
4
bar
Max
.
inlet pressure
5,0 bar
Max.
valid rotation speed of the pump
2800 min
-
1
at
50 Hz
Initial pump breakaway torqu
e
1,6 Nm
Temperatur
e
up to
150 °C
Allowable test pressure for certification
m
ax.
60
bar
with removed mech.
s
eal
(Sealing area closed by jack)
2.2 Materials used
Pump
housing
Hydrauli
c casting
EN
-
GJS
-
400
Rotor
EGT 80
Pinion gear
16MnCr5
Lower bearin
g
Continuous casting
GG25
Mechanical seal
Carbon
/ SiC
-
Viton
–
CrNiMo
-
steel
V
alve parts
Spring wire steel,
11SMnPb30+C, 16MnCrS5

----
5 – 06/2015
2.3 Mechanical Seal
Fig. 2
All hp pumps are equipped with axial
face seals. They are temperature-
resistant up to 150°C.
These axial face seals are relieved at the
pump's suction side.
Maximum pressure load on the GLRD,
i.e. suction side, against temperature
(see adjacent figure).
For a new pump a max. leakage of
1 cm3/day is regular.
0
5
10
15
20
25
25 50 75 100 125 150
Temperatur °C
max. Druck (bar)
3. Installation
3.1 The Following must be Observed for Installation and before Commissioning:
·Installation must be performed so that the pump shaft and drive shaft are perfectly aligned in axial
direction and so that there is no radial pressure. Furthermore, a coupling appropriate for the pump shaft
in size and weight and not transferring any imbalances to the pump must be used.
·The axial play between the coupling halves should be 1 to 1.5 mm. Rotation coupling parts must not
touch any fixed pump or engine parts axially!
·Before connecting the lines, all plastic caps must be removed.
·All connections and lines must be installed free of tension and tight. We recommend only using sealing
rings made of copper, aluminium or plastics. Never use hemp or similar materials. The pipes must be
cleaned from any dirt and metal particles before the pump is connected.
·In two-pipe-system, the return flow line must be led back to the tank and must never be closed off.
Otherwise, the pump's overpressure protection will no longer work.
·The suction connection (see figure 1) of the pump is filled with oil. Then the suction line is connected to
thread connection „A“.
·The pressure/delivery line is connect to thread connection „S“ and the bypass line connect to thread
connection „R“. (see figure.1)
·Remove the screw plug for connecting the manometer (fig. 1). The pressure gauge connected to port „A“
it shows the suction pressure and the pressure gauge connected to port „S“ it shows the delivery
pressure. Observe using manometers with the right pressure range (according to the pump's pressure
range).
1.
Pump
housing
2. Union nut
3a. O-Ring
3. Tapet
4a. O-Ring
4. Counter ring
5. Spring
X Installation size*
* - In case of replacement can be found in the
documents accompanying the valid installation
dimension
Article-number: 0190015
M
ax.
pressure (bar)

----
6 – 06/2015
·Before switching on the pump, check that all locking valves in the pipes and check whether the pump has
sufficient medium is available.
·Ensure that the pump is operated in the intended rotational direction (engraved arrow). Connect the
motor according to the information on the type place and switch it on. Preventively provide a motor
protection switch with overload function!
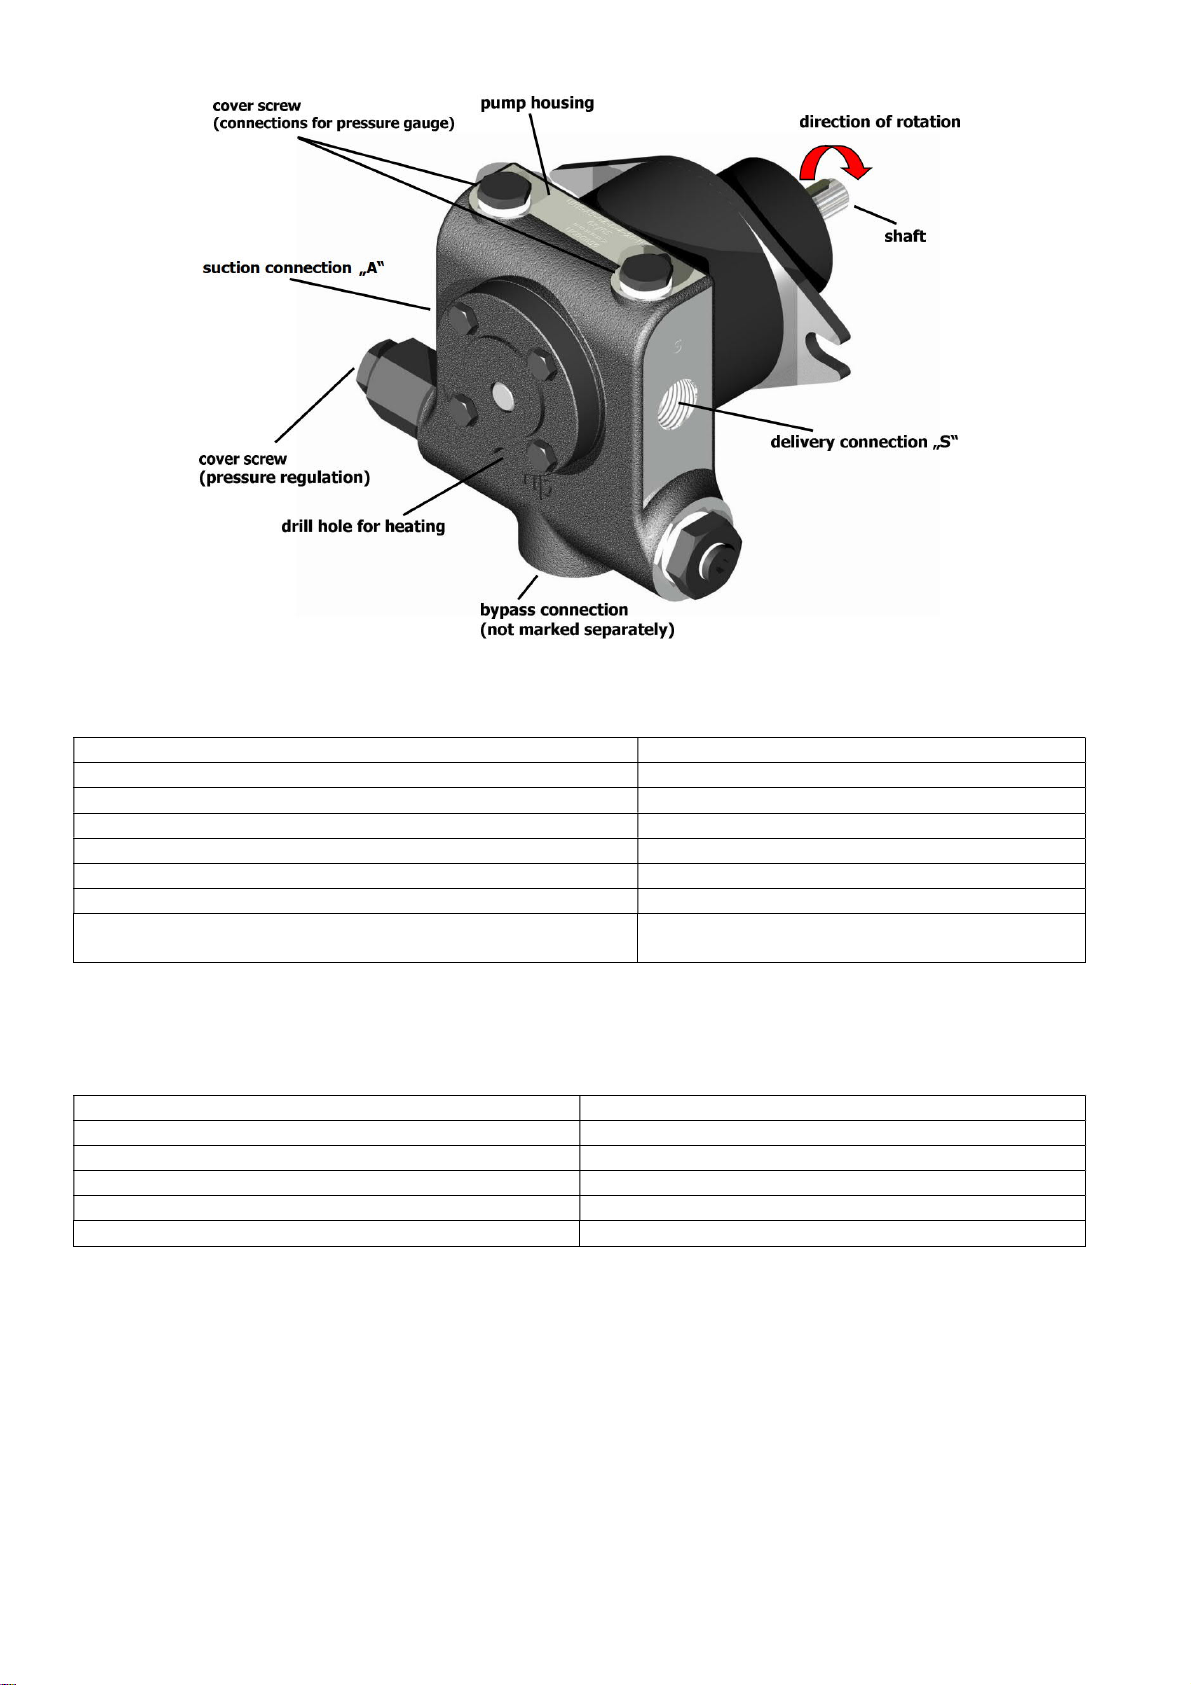
·The presetting of the pump pressure occurs a closed pressure line.
·For pressure regulation, the plug screw (see figure 1) must be removed.
·After removing the cover screw, the pressure regulating screw with hexagon socket (6mm size) is visible.
Use a hexagon wrench to:
- turn it to the right to increase pressure
- turn it to the left to decrease pressure
·When adjusting the desired operational pressure, observe that it may only be set within the permissible
pressure range.
Pressure range
Factory settings
from
7
-
40
bar
30
bar
Attention! Setting an operational pressure exceeding the pressure range will cause the spring
to lock and lead to pressure surges and thus to pump outage after a short time.
·When the pressure is set, the pressure adjustment cover screw and its sealing must be replaced oil-tight.
·The pump shaft is sealed to the outside with a mechanical seal made of the materials carbon / SiC and
Viton elastomer.
·The free shaft end has a diameter of 12 mm and is equipped with a groove and spring pursuant to DIN
6885-A-4x4x20.
Non
-
compliance with the max. pressure range may cause spring
blockage. These in turn causes pressure surges and thus pump
outage after a short time.
If the medium rotates within the pump for too long, this may cause
damage to the valve, overheating and, as a result, mechanical
damage.
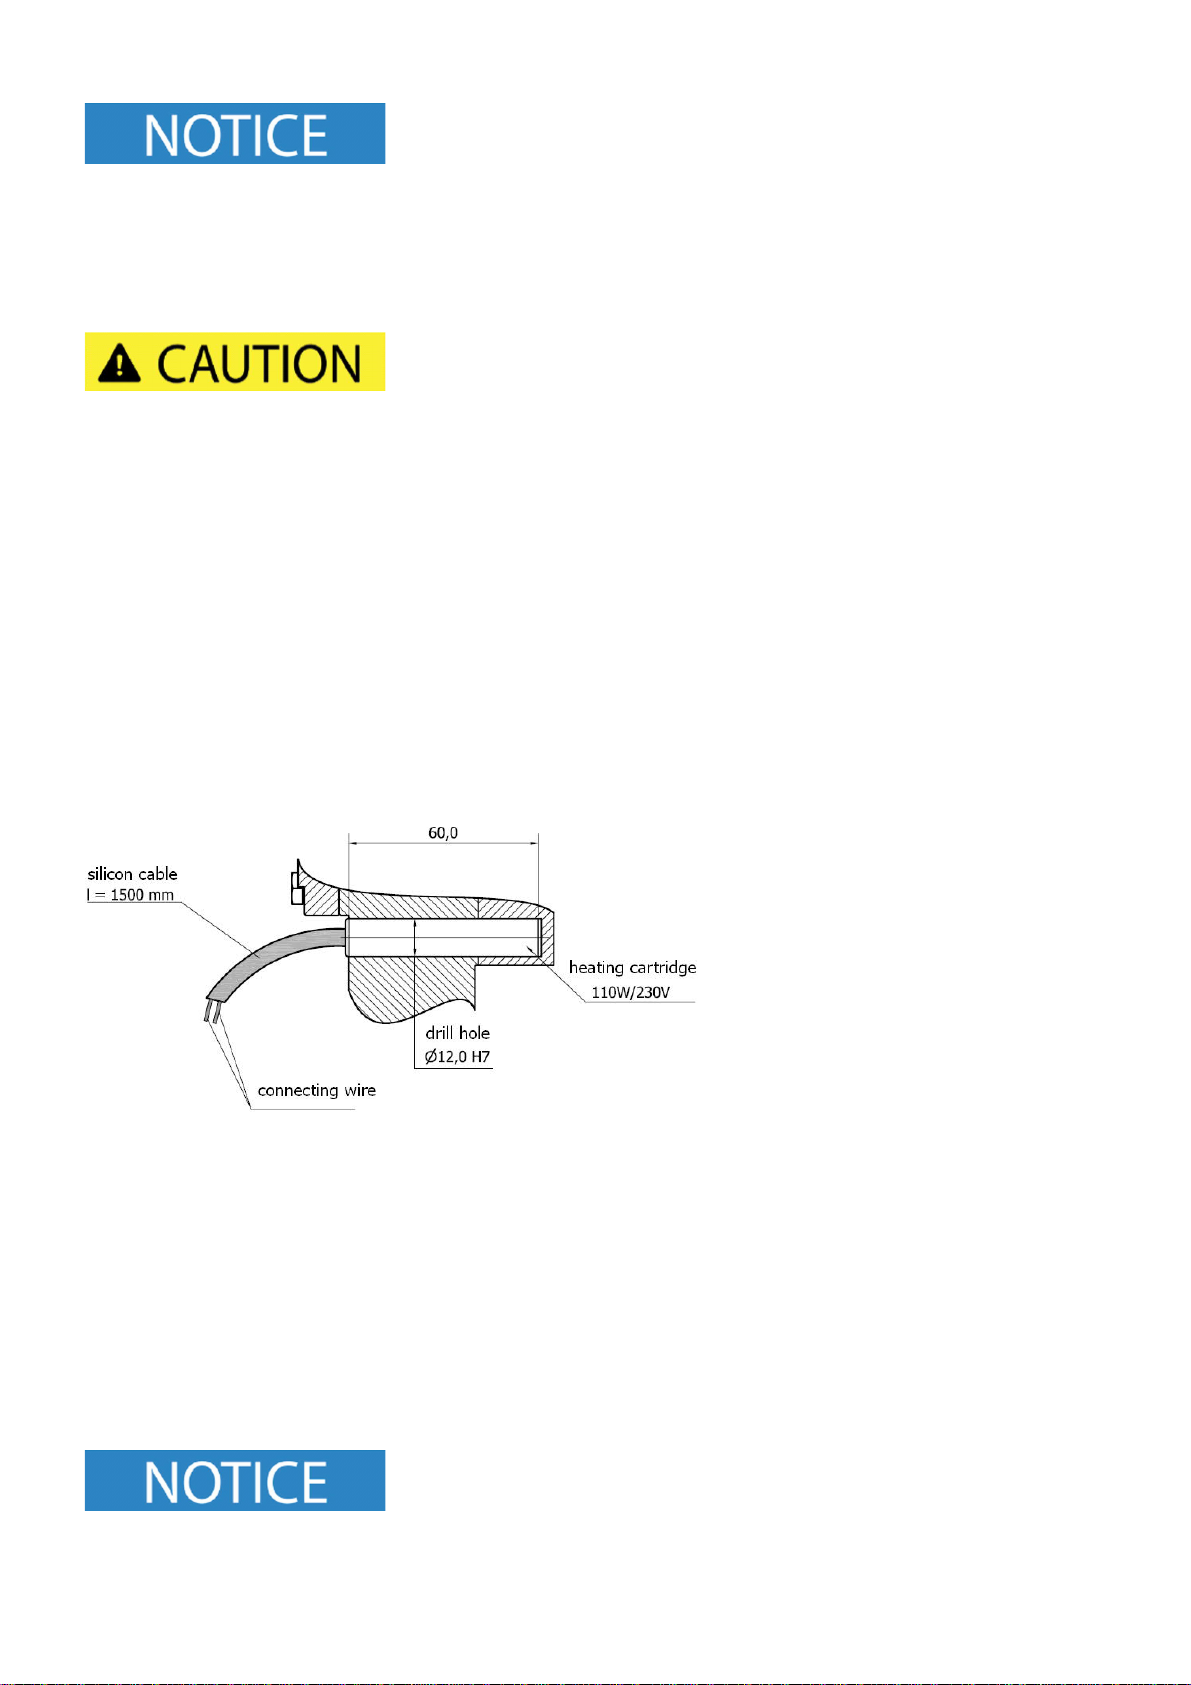
For highly viscous media, a pump heating is prerequisite. To avoid
cavitations and damage to the shaft sealings, the heating times must
be observed under any circumstances.
Because of heat expansion, all valves must be open when heating.
Pumps must never be used as a fix point for the connected pipes. Any forces and moments appearing, e.g.
·Tensions
·Expansion of pipe lines due to temperature influence or reaction forces must be avoided.
·To prevent possible heat expansion of pipe lines, we recommend installing compensators.
·The suction line must be designed so that the flow speed is between 0.5 und max. 1.0 m/sec.
·The pressure line must only reach a maximum of 2 – 2.5 m/sec.
·The suction line must be vacuum-tight and placed in a rising fashion.
·Ensure that the pump and pipe system is not contaminated, e.g. by purging.
·When testing the pipe system for tightness, the max. permissible shaft sealing supply pressure must not
be exceeded.

----
7 – 06/2015
Never use water as purging liquid!
Danger of corrosion!
4. Commissioning
Ensure that the pump does not start up dry. It must be filled with oil.
Mechanically abrasive and chemically aggressive components in the
medium reduce the pump service life.
Clear your pipe lines from any dirt or metal particles
before connecting it to the pump.
Ensure correct rotational direction (see engraved arrow).
Only perform the basic settings or adjustment of the
pump pressure when the pressure line is closed.
Before installation, ensure that the pump and drive shafts correspond
exactly in axial direction. There must not be any radial pressure.
Use a coupling suitable for the pump shaft in respect of size
and weight. This way, you can avoid transferring imbalances onto the
pump shaft.
4.1 Accessories
Fig. 3
hp
-
electrical standby and companion
heater
All UHE type hp pumps can be equipped with
an H2 heating cartridge as electrical standby
and companion heating system without
thermostat. A strain-relief for the wire of the
heating cartridge is assembled on the cover
of the pump (see Fig. 4 – page 10).
Article-no.: 0720525
Using this option is strictly recommend
for using the pumps with HFO!
5. Operation
5.1 Inspection and Maintenance
The pump is provided with a suction filter integrated in the suction line. The filter must be checked for dirt
regularly and replaced if required. The mesh width of the filter element depends on the viscosity of the
transported medium. Transported media with a high viscosity (heavy heating oil) require a filter element with
a mesh width of 500 µm and alternative for media with a low viscosity a filter element with mesh width 100
µm is recommend. The pump supply must be within a pressure range of -0.4 to 5 bar.
Filter elements must be disposed of under environmental
considerations.

----
8 – 06/2015
5.2 Preservation
After the test run, testing oil remains in the pump to preserve it. The parts not treated ex works must be re-
treated by the operator according to the local conditions.
If the pump is inactive for an extended period or stored, it must be preserved with acid-free non-resinous oil
and stored dryly.
5.3 Troubleshooting
Errors appearing
Possible cause
The pump does not prime
1, 2, 3, 4, 5, 12
The pump does not work at full capacity
3,
4, 5, 8, 9, 10, 11, 17, 18
The pump is operating noisily
3, 4, 5, 6, 7, 10, 11, 13, 17
The motor heats up
9, 10, 13
Uneven transport
3, 5, 8, 10, 11
Shaft seal is not tight
7, 10, 14, 15, 16
No.
Possible cause
Removal
1.
No medium in the pump
Fill p
ump with medium
2.
Pump has the wrong rotational direction
Set rotational direction according to the engraved
arrow
3.
Filter element, valve or lines are clogged
Check and clean parts
4.
Suction line or shaft seal are leaking
Check suction line, connect
ion points and valves or
shaft face seal
5.
Suction head too large
-
Decrease height difference
- Shorten line
- Increase line diameter
- Decrease medium viscosity by
heating
6.
Axis error
Pump, coupling and motor:
- Align shaft end precisely
- Balance coupling
7.
Vibrations and pulsations in the system
-
Use elastic bearings for the aggregate
- Use hoses for connections
8.
The overflow valve is jammed or set too
low
Check or adjust valve
9.
Wrong speed
-
Check motor speed and power
consumption
- Compare voltage and frequency to the
type plate
10.
Medium too viscous
-
Increase medium temperature
- Lower speed
11.
Air inclusions or gas formation in the
medium
-
Remove leakages
- Decrease suction height
- Increase feed pressure
12.
Pump
does not vent
Vent pressure line at the highest point
13.
Motor bearing damaged
Renew motor bearings
14.
Shaft seal damaged
Replace shaft seal
15.
Feed pressure too high or too low
-
Decrease feed pressure in the system
- Insert check valve on the pressure side
16.
Cold start when transporting heavy oil
Install pump heating and observe pre
-
heating time
17.
Overflow valve fluttering
Set opening pressure higher by turning the setting
screw clockwise.
18.
Overflow valve leaking
Clean overflow valve
For economic reasons, we recommend providing a reserve pump right
at the burner.

----
9 – 06/2015
6. Environment
Of course, hp-TECHNIK focuses on Environmental protection for its development work! To ensure that the
environment does not take damage from our products - caused, e.g. by environmentally harmful media escaping
unnoticed - we will even increase our efforts for the further development of our hp- Program.
We are continuously working to decrease effects on the environment as well as energy and resource
consumption - far exceeding the measure required for compliance with environmental protection laws and
regulations.
Environmentally compatible actions are not only a task for each and every employee, but must also be
supported continuously by the management. We ensure that our environmental policy is effectively
implemented. The technical and organizational procedures required for this are inspected regularly and
continuously developed.
We support our customers in the environmentally compatible use of our products.
7. General Information
7.1 Application Risk
In case of failure or leakage may occur hazards to humans and the environment.
7.2 Usable fuel
Liquid fuels, mainly fuel oils derived from crude oil distillation, qualities according to DIN 51603 Part 1 – 5
FAME – mix with fuel oil according to DIN 51603 Part 6 (FAME = Fatty Acid Methyl Ester)
FAME 100% DIN EN 14214 respectively EN 14213
Marine fuel ISO 8217 (HFO, MDF Kategorie ISO-F-DMX, DMA, DMB)
Cold-pressed bio fuel according to DIN V 51605
Characteristics for different fuels (reference value)
Fuel
Density
(at 20 °C)
Kin. viscosity
(at 40°C)
Max. temperature
at spraying viscosity *)
Unit
[kg/m
3
]
[mm
2
/s]
[°C]
Fuel oil (DIN 51603
-
1)
max. 856
max. 3,6
15
HFO (DIN 51603
-
3)
max. 1150
160
Re
–
raffinate (
DIN 51603
-
4)
<45
90
Fuel oil (DIN 51603
-
6)
max. 860
max. 3,6
15
Marine Fuels (ISO 8217)
890 (15°C)
min: 1,4; max. 11
80
RME (DIN EN 14213)
856,6
-
896,6
3,5
–
5,0
28
Rape oil (DIN V 51605)
896,6
-
926,6
max. 36,0
85
*) temperature values are approximate
Chemical resistance of all parts for specified types of fuel. Non-standard fuels are excluded from the
warranty.
7.3 Painting
black, matt RAL 9005.
temperature resistant to 150 °C
7.4 Directives
PED 97/23/EG
MD 2006/42/EG
EMC 2004/108/EG (89/336/EWG)
LVD 2006/95/EG (73/23/EWG)
ROHS 2000/53/EG
EU MEPS
WEEE 2002/95/EC
Observe the relevant national regulations.
7.5 Documentation
Test report on leak and functional testing
Installation, maintenance and operating instructions with dimensional drawing and flow characteristics

----
10 – 06/2015
8. Dimensional drawing UHE-WH3
Fig. 4
9. Flow characteristics for hp-pumps series UHE-WH3
Flow characteristics
UHE
-
WH
3
Characteristics
hp-Pump Series UHE-WH3
at 2800 min^-1
400
500
600
700
800
900
0 10 20 30 40
Pressure (bar)
Capacity (l/h)
Characteristics
hp-Pump Series UHE-WH3
at 3600 min^-1
400
500
600
700
800
900
0 10 20 30 40
Pressure (bar)
Capacity (l/h)
300
500
700
900
1100
1300
1500
1700
1900
0 10 20 30 40
Pressure (bar)
Power (W)
300
500
700
900
1100
1300
1500
1700
1900
0 10 20 30 40
Pressure (bar)
Power (W)
Table of contents
Other hp-TECHNIK Water Pump manuals
Popular Water Pump manuals by other brands

Sears
Sears Craftsman 390.304051 owner's manual

Pfeiffer Vacuum
Pfeiffer Vacuum HIPACE 800 H operating instructions

Grundfos
Grundfos CRN MAGdrive Installation and operating instructions

SFA
SFA SANICOM 2 Installation instruction

Mouvex
Mouvex SLS24 i Installation operation & maintenance

Elpumps
Elpumps BT 4876 K user manual