HPH Glasflugel 304 eS User manual

T
TE
EC
CH
HN
NI
IC
CA
AL
L
D
DE
ES
SC
CR
RI
IP
PT
TI
IO
ON
N,
,
O
OP
PE
ER
RA
AT
TI
IN
NG
G,
,
M
MA
AI
IN
NT
TE
EN
NA
AN
NC
CE
E
A
AN
ND
D
R
RE
EP
PA
AI
IR
R
M
MA
AN
NU
UA
AL
L
S
SU
UP
PL
LE
EM
ME
EN
NT
T
F
FO
OR
R
T
TH
HE
E
S
SA
AI
IL
LP
PL
LA
AN
NE
E
Č
Čá
ás
sl
la
av
vs
sk
ká
á
2
23
34
4
2
28
84
4
0
01
1
K
Ku
ut
tn
ná
á
H
Ho
or
ra
a
C
CZ
ZE
EC
CH
H
R
RE
EP
PU
UB
BL
LI
IC
C
t
te
el
l.
.:
:
+
+4
42
20
0
3
32
27
7
5
51
12
26
63
33
3
f
fa
ax
x:
:
+
+4
42
20
0
3
32
27
7
5
51
13
34
44
41
1
i
in
nf
fo
o@
@h
hp
ph
h.
.c
cz
z
HPHLtd.

i
T
TE
EC
CH
HN
NI
IC
CA
AL
L
D
DE
ES
SC
CR
RI
IP
PT
TI
IO
ON
N,
,
O
OP
PE
ER
RA
AT
TI
IN
NG
G,
,
M
MA
AI
IN
NT
TE
EN
NA
AN
NC
CE
E
A
AN
ND
D
R
RE
EP
PA
AI
IR
R
M
MA
AN
NU
UA
AL
L
S
SU
UP
PP
PL
LE
EM
ME
EN
NT
T
F
FO
OR
R
T
TH
HE
E
S
SA
AI
IL
LP
PL
LA
AN
NE
E
M
Mo
od
de
el
l:
:
Glasflügel 304 eS
S
Se
er
ri
ia
al
l
N
No
o.
.:
:
R
Re
eg
gi
is
st
tr
ra
at
ti
io
on
n:
:
Document No.: 304eS/MMSupp
Date of Issue: 11/17
Č
Čá
ás
sl
la
av
vs
sk
ká
á
2
23
34
4
2
28
84
4
0
01
1
K
Ku
ut
tn
ná
á
H
Ho
or
ra
a
C
CZ
ZE
EC
CH
H
R
RE
EP
PU
UB
BL
LI
IC
C
t
te
el
l.
.:
:
+
+4
42
20
0
3
32
27
7
5
51
12
26
63
33
3
f
fa
ax
x:
:
+
+4
42
20
0
3
32
27
7
5
51
13
34
44
41
1
i
in
nf
fo
o@
@h
hp
ph
h.
.c
cz
z
HPHLtd.

T
Te
ec
ch
hn
ni
ic
ca
al
l
D
De
es
sc
cr
ri
ip
pt
ti
io
on
n,
,
O
Op
pe
er
ra
at
ti
in
ng
g,
,
M
Ma
ai
in
nt
te
en
na
an
nc
ce
e
a
an
nd
d
R
Re
ep
pa
ai
ir
r
M
Ma
an
nu
ua
al
l
S
Su
up
pp
pl
le
em
me
en
nt
t
Document No.: 304eS/MMSupp
Date of Issue: 11/17
ii
HPHLtd.
Table of contents Page
0.1 LIST OF EFFECTIVE PAGES ................................................................................ IV
0.2 RECORD OF REVISIONS ......................................................................................V
1. BASIC TECHNICAL DATA ............................................................................1-0
1.1 BASIC TECHNICAL DATA ..................................................................................1-1
1.2 TECHNICAL DESCRIPTION................................................................................1-1
1.2.1 Fuselage ...................................................................................................1-1
1.2.2 Wing..........................................................................................................1-1
1.2.3 Horizontal Tail Unit....................................................................................1-2
1.2.4 Vertical Tail Unit........................................................................................1-2
1.2.5 Water ballast system.................................................................................1-2
1.2.6 Power-plant...............................................................................................1-2
1.3 SAILPLANE SYSTEMS.....................................................................................1-10
1.3.1 Control systems in the fuselage ..............................................................1-10
1.3.2 Control systems in the wing ....................................................................1-10
1.3.3 Rudder control system ............................................................................1-10
1.3.4 Main landing gear system .......................................................................1-10
1.3.5 Control surface deflections and dimensions............................................1-10
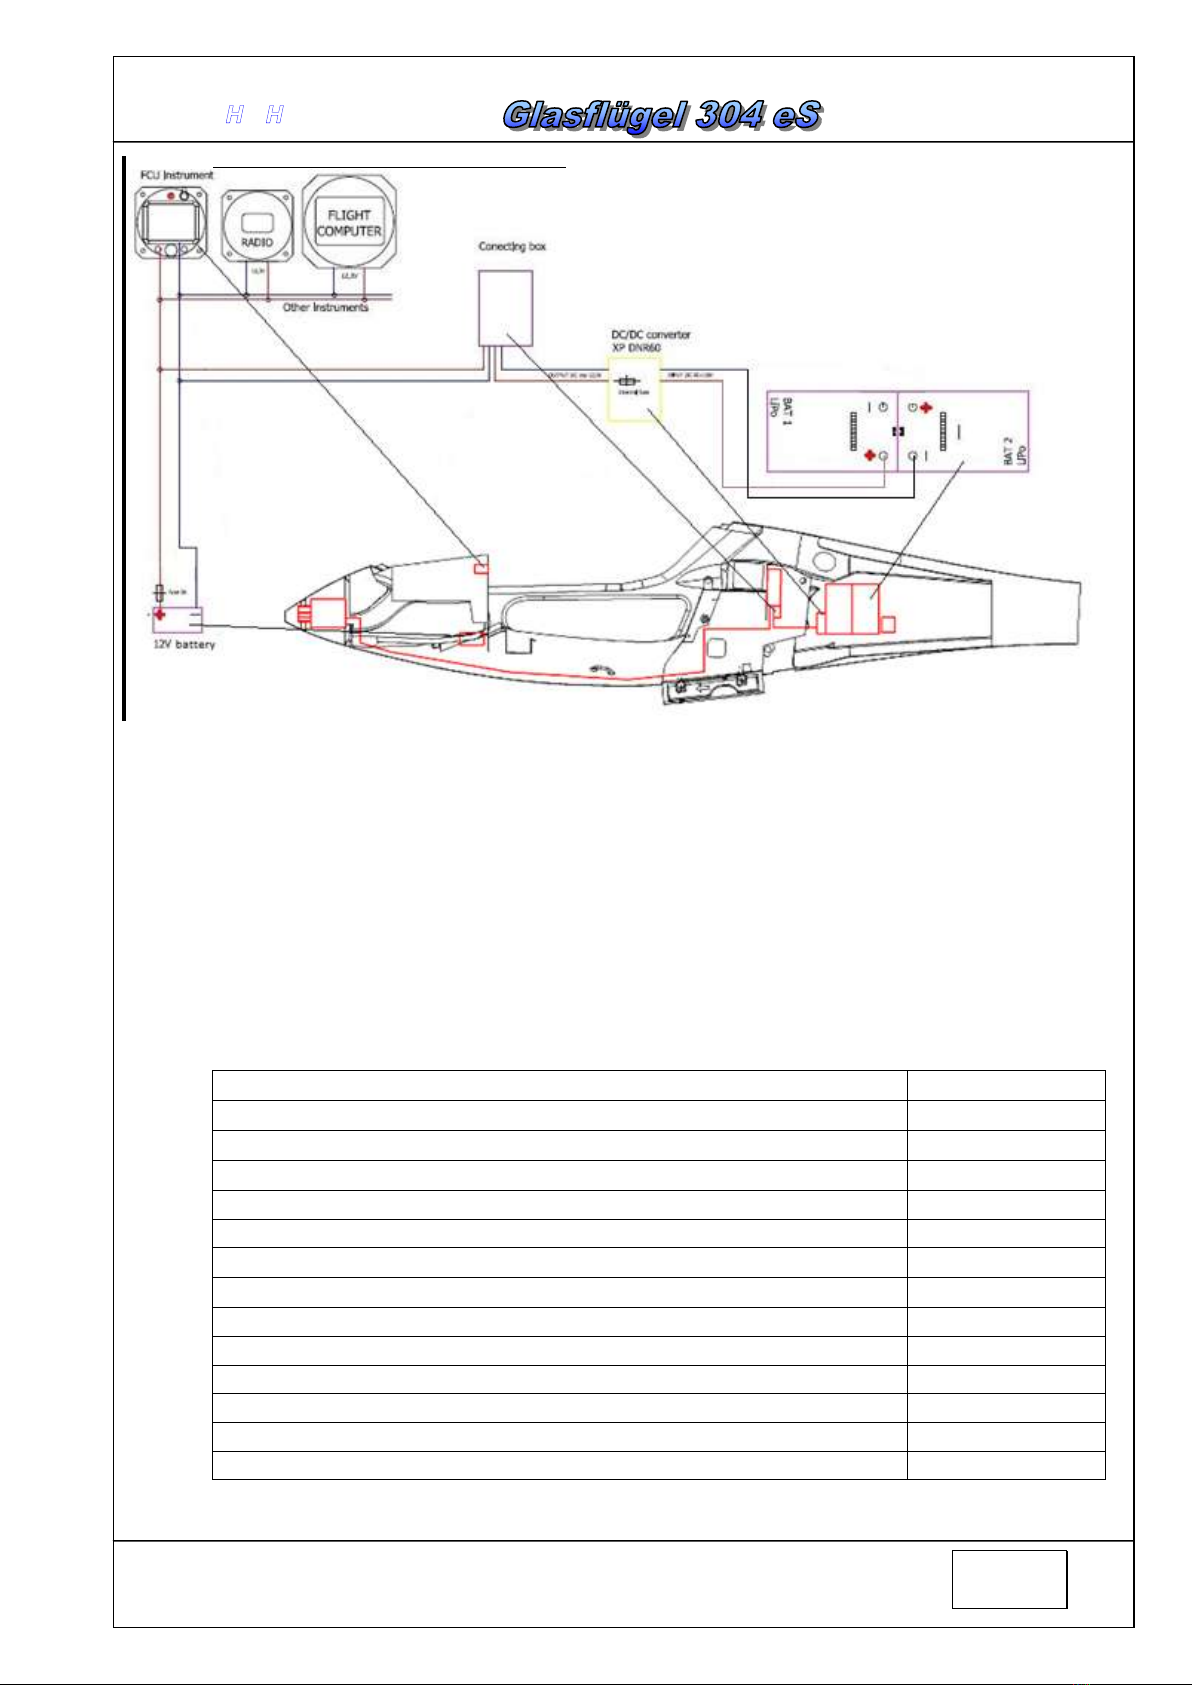
1.3.6 Electric system........................................................................................1-10
2. HANGARING, TRANSPORT, RIGGING ........................................................2-0
2.1.1 Hangaring, Parking, and Ground Handling ...............................................2-1
2.2 RIGGING ........................................................................................................2-2
2.3 DE-RIGGING ...................................................................................................2-3
3. MAINTENANCE .............................................................................................3-0
3.1 MANDATORY MAINTENANCE ............................................................................3-1
3.1.1 Inspections periods ...................................................................................3-1
3.1.2 Inspection after every 100 flight hours ......................................................3-1
3.1.3 Propeller....................................................................................................3-1
3.1.4 Motor –Propeller ......................................................................................3-2
3.2 REGULAR MAINTENANCE.................................................................................3-2
3.2.1
Annual inspection
......................................................................................3-2
3.2.2 Inspection at the end of flight season........................................................3-2
3.2.3 Adjustments ..............................................................................................3-2
3.2.4 Motor maintenance ...................................................................................3-3
3.2.5 Propeller maintenance ..............................................................................3-4
3.2.6 Battery packs maintenance.......................................................................3-4
3.3 SPECIAL INSPECTION PROCEDURE...................................................................3-6
3.3.1 After hard landing, ground loops and battery pack impact ........................3-6
3.4 FREE PLAY IN THE CONTROL CIRCUITS ............................................................3-7
3.5 FREE PLAY IN WING AND TAIL PLANE ATTACHMENTS .........................................3-7
3.6 PRIMARY AND SECONDARY STRUCTURES ..........................................................3-7
3.7 DAMAGE ........................................................................................................3-7
3.8 REPAIRS ........................................................................................................3-7
3.9 REMOVAL AND RE-INSTALLATION OF RELEASES ................................................3-8
3.10 CONTROL SURFACE MOMENTS ........................................................................3-8
3.11 PLACARDS AND MARKINGS IN THE COCKPIT.......................................................3-8
3.12 CLEANING AND CARE ......................................................................................3-8

T
Te
ec
ch
hn
ni
ic
ca
al
l
D
De
es
sc
cr
ri
ip
pt
ti
io
on
n,
,
O
Op
pe
er
ra
at
ti
in
ng
g,
,
M
Ma
ai
in
nt
te
en
na
an
nc
ce
e
a
an
nd
d
R
Re
ep
pa
ai
ir
r
M
Ma
an
nu
ua
al
l
S
Su
up
pp
pl
le
em
me
en
nt
t
Document No.: 304eS/MMSupp
Date of Issue: 11/17
iii
HPHLtd.
3.13 LUBRICATION SCHEME.....................................................................................3-9
3.14 TIGHTENING TORQUE MOMENTS TABLE............................................................3-9
3.15 SAFETY HARNESS ..........................................................................................3-9
3.16 PITOT AND STATIC LINES AND INSTRUMENT CONNECTIONS ................................3-9
3.17 LIST OF INSTRUMENTS.....................................................................................3-9
3.17.1 Airspeed Indicators ...................................................................................3-9
3.17.2 Altimeters ..................................................................................................3-9
3.17.3 Variometers...............................................................................................3-9
3.17.4 Magnetic Compasses ...............................................................................3-9
3.17.5 Turn and Bank Indicators..........................................................................3-9
3.17.6 COMM.....................................................................................................3-10
3.17.7 Transponders..........................................................................................3-10
3.17.8 FCU Instrument.......................................................................................3-10
3.18 OXYGEN SYSTEM..........................................................................................3-10
3.19 SERVICE INSTRUCTIONS ................................................................................3-10
3.20 LIST OF SPECIAL TOOLS.................................................................................3-10
3.21 MOTOR REMOVING AND INSTALLATION ............................................................3-11
3.22 INSTALLATION OF PROPELLER ........................................................................3-12
3.23 BALANCING OF ROTATING PARTS....................................................................3-12
3.24 CONTROLLER ALARM CODES..........................................................................3-13
4. AIRWORTHINESS LIMITATIONS..................................................................4-0
4.1 GENERAL.......................................................................................................4-1
4.2 SERVICE TIME ................................................................................................4-1
4.3 INSPECTION ...................................................................................................4-1
4.4 CHECK OUT PROGRAM ....................................................................................4-1
4.5 INSPECTION RESULTS......................................................................................4-1
4.6 OBLIGATORY INSPECTIONS ..............................................................................4-1
4.7 LIFE LIMITED COMPONENT SECTION.................................................................4-1
5. CENTER OF GRAVITY ..................................................................................5-0
5.1 CENTER OF GRAVITY POSITION ........................................................................5-1
5.2 PAYLOAD RANGE............................................................................................5-1
6. INSTRUCTIONS FOR REPAIRS....................................................................6-0
6.1 CHECKLIST.................................................................................................6-1
6.1.1 General .....................................................................................................6-1
6.1.2 Wing..........................................................................................................6-1
6.1.3 Fuselage ...................................................................................................6-1
6.1.4 Propeller....................................................................................................6-1
6.1.5 Motor.........................................................................................................6-1
6.1.6 Batteries....................................................................................................6-1
6.1.7 List of potential problems ..........................................................................6-2
6.2 STRUCTURE OF COMPONENTS.........................................................................6-3
6.3 MATERIALS ....................................................................................................6-3
6.3.1 List of FES spare parts..............................................................................6-3
6.4 TYPE OF WAVES .............................................................................................6-3
6.5 BASIC TECHNIQUES AND TOOLS.......................................................................6-3
6.5.1 Soldering...................................................................................................6-3

T
Te
ec
ch
hn
ni
ic
ca
al
l
D
De
es
sc
cr
ri
ip
pt
ti
io
on
n,
,
O
Op
pe
er
ra
at
ti
in
ng
g,
,
M
Ma
ai
in
nt
te
en
na
an
nc
ce
e
a
an
nd
d
R
Re
ep
pa
ai
ir
r
M
Ma
an
nu
ua
al
l
S
Su
up
pp
pl
le
em
me
en
nt
t
Document No.: 304eS/MMSupp
Date of Issue: 11/17
iv
HPHLtd.
0.1 List of Effective Pages
Section
Page
Date
Section
Page
Date
Section
Page
Date
Cover page
3-11
11/17
3-12
11/17
i
11/17
3-13
11/17
ii
11/17
3-14
11/17
iii
11/17
iv
11/17
v
11/17
4
4-0
09/16
4-1
09/16
1
1-0
09/16
1-1
11/17
1-2
11/17
5
5-0
09/16
1-3
11/17
5-1
09/16
1-4
09/16
1-5
09/16
1-6
09/16
1-7
09/16
6
6-0
09/16
1-8
11/17
6-1
09/16
1-9
09/16
6-2
09/16
1-10
11/17
6-3
09/16
1-11
11/17
1-12
09/16
1-13
10/17
2
2-0
09/16
2-1
09/16
2-2
09/16
2-3
09/16
3
3-0
09/16
3-1
09/16
3-2
09/16
3-3
09/16
3-4
11/17
3-5
11/17
3-6
11/17
3-7
11/17
3-8
11/17
3-9
11/17
3-10
11/17

T
Te
ec
ch
hn
ni
ic
ca
al
l
D
De
es
sc
cr
ri
ip
pt
ti
io
on
n,
,
O
Op
pe
er
ra
at
ti
in
ng
g,
,
M
Ma
ai
in
nt
te
en
na
an
nc
ce
e
a
an
nd
d
R
Re
ep
pa
ai
ir
r
M
Ma
an
nu
ua
al
l
S
Su
up
pp
pl
le
em
me
en
nt
t
Document No.: 304eS/MMSupp
Date of Issue: 11/17
v
HPHLtd.
0.2 Record of revisions
Any revision of this Manual must be recorded in the following table and in case
of approved Sections endorsed by the responsible airworthiness authority.
The new or amended text in the revised page will be indicated by a black
vertical line in the left hand margin, and the Revision No. and the date will be
shown on the bottom left hand of the page.
Rev.
No.:
Affected
Section
Affected
Page
Date of
Issue
Approval
Date of
approval
Date
Inserted
Signature
R00
all
all
09/16
R01
1,
3
1-1, 1-2,
1-3, 1-8,
1-10, 1-11
1-13,
3-4, 3-5,
3-6, 3-7,
3-8, 3-9,
3-10, 3-11,
3-12, 3-13,
3-14
11/17

T
Te
ec
ch
hn
ni
ic
ca
al
l
D
De
es
sc
cr
ri
ip
pt
ti
io
on
n,
,
O
Op
pe
er
ra
at
ti
in
ng
g,
,
M
Ma
ai
in
nt
te
en
na
an
nc
ce
e
a
an
nd
d
R
Re
ep
pa
ai
ir
r
M
Ma
an
nu
ua
al
l
S
Su
up
pp
pl
le
em
me
en
nt
t
Document No.: 304eS/MMSupp
Date of Issue: 09/16
1-0
HPHLtd.
1
1.
.
B
BA
AS
SI
IC
C
T
TE
EC
CH
HN
NI
IC
CA
AL
L
D
DA
AT
TA
A

T
Te
ec
ch
hn
ni
ic
ca
al
l
D
De
es
sc
cr
ri
ip
pt
ti
io
on
n,
,
O
Op
pe
er
ra
at
ti
in
ng
g,
,
M
Ma
ai
in
nt
te
en
na
an
nc
ce
e
a
an
nd
d
R
Re
ep
pa
ai
ir
r
M
Ma
an
nu
ua
al
l
S
Su
up
pp
pl
le
em
me
en
nt
t
Document No.: 304eS/MMSupp R01
Date of Issue: 11/17
1-1
HPHLtd.
1.1 Basic Technical data
Power-plant
Sailplane is equipped with a high-tech powerful FES front electric propulsion system
developed for high performance sailplanes. Main parts of the FES system are:
Brushless electric motor
Controller for motor
Foldable propeller
Battery packs (FES-BP-14S) with internal BMS (Battery Management System)
Charger (1200W or 600W)
FCU (FES control unit) instrument
LXUI box with Shunt (for current and voltage measurements)
FCC box (FES connecting circuit)
Power switch
DC/DC converter (converts high voltage to 12V)
1.2 Technical Description
The GLASFLÜGEL 304 eS is single seat 18m flapped sailplane of 18m FAI class,
constructed from fiber-reinforced plastics (FRP), featuring camber-changing flaps
and a T-tail (with fixed horizontal stabilizer and elevator). The sailplane is equipped
with FES (front electric propulsion system) which enables self-sustaining flight.
1.2.1 Fuselage
Front part of the fuselage is equipped with electric permanent magnet motor. The
motor is directly connected with spinner and foldable propeller. The system enables
restarting of the motor in flight and precise positioning of the spinner after motor turn
off to achieve good aerodynamic qualities of the fuselage.
Motor controller and other electronic devices there are located in the central part of
the fuselage in place of original baggage compartment.
Battery packs there are located aft the wing in battery compartment accessible
through a covered opening in the upper side of the fuselage.
1.2.1.1 Battery compartment cover and venting valve
Battery compartment cover is equipped with venting valve. The valve consist of hole
with diameter 40mm covered by special foil. The foil is hold in place by circular ring
made of adhesive tape (inner diameter 30mm, outer diameter 50mm). The valve
must be attached only the way described above. Other attachment options are
prohibited.
1.2.2 Wing
Not affected.

T
Te
ec
ch
hn
ni
ic
ca
al
l
D
De
es
sc
cr
ri
ip
pt
ti
io
on
n,
,
O
Op
pe
er
ra
at
ti
in
ng
g,
,
M
Ma
ai
in
nt
te
en
na
an
nc
ce
e
a
an
nd
d
R
Re
ep
pa
ai
ir
r
M
Ma
an
nu
ua
al
l
S
Su
up
pp
pl
le
em
me
en
nt
t
Document No.: 304eS/MMSupp R01
Date of Issue: 11/17
1-2
HPHLtd.
1.2.3 Horizontal Tail Unit
Not affected.
1.2.4 Vertical Tail Unit
Not affected.
1.2.5 Water ballast system
Not affected.
1.2.6 Power-plant
We spent a lot of effort to develop FES system to be simple and reliable, but
also that it would need as little as possible of maintenance. However some minimal
maintenance is still required. In order to be able to perform maintenance it is first
required to know locations of installed FES components and to understand how it
works.

T
Te
ec
ch
hn
ni
ic
ca
al
l
D
De
es
sc
cr
ri
ip
pt
ti
io
on
n,
,
O
Op
pe
er
ra
at
ti
in
ng
g,
,
M
Ma
ai
in
nt
te
en
na
an
nc
ce
e
a
an
nd
d
R
Re
ep
pa
ai
ir
r
M
Ma
an
nu
ua
al
l
S
Su
up
pp
pl
le
em
me
en
nt
t
Document No.: 304eS/MMSupp R01
Date of Issue: 11/17
1-3
HPHLtd.
Genera layout of the FES system
1.2.6.1 Electric motor
Motor construction is out-runner brushless synchronous permanent magnet motor
with electronically controlled commutation system 3 phase. Rotor position is
determined by 3 hall sensors and additional 4th hall sensor for automatic propeller
positioning.
This motor can work only in combination with suitable electronic motor Controller
which transform DC current from Battery packs to 3 phase current which supply
motor.
Electrical motor power ratings (type FES-HPH-M100) at 116V on motor controller
and loaded with propeller (type FES-HPH-P1-102):
Maximum torque
75 Nm
Maximum current
200A
Maximum Voltage
180V
Rpm non loaded
45 rpm/V
Rpm non loaded (at 116V DC on Controller)
5300 rpm
Non loaded motor current (at 5300 rpm)
16-18 A
Rpm loaded with FES-HPH-P1-102 propeller
4500 rpm
Battery current loaded (4500 rpm, 116V) with FES-HPH-P1-102
up to 200 A
Rotor rink diameter
177mm
Motor length
100mm
Motor weight cca.
7,3 kg
Motor efficiency
82-95 %
Maximum allowed temperature
90 °C
Minimum allowed starting temperature
-20 °C
More detailed description of motor is provided in FES Motor manual.

T
Te
ec
ch
hn
ni
ic
ca
al
l
D
De
es
sc
cr
ri
ip
pt
ti
io
on
n,
,
O
Op
pe
er
ra
at
ti
in
ng
g,
,
M
Ma
ai
in
nt
te
en
na
an
nc
ce
e
a
an
nd
d
R
Re
ep
pa
ai
ir
r
M
Ma
an
nu
ua
al
l
S
Su
up
pp
pl
le
em
me
en
nt
t
Document No.: 304eS/MMSupp
Date of Issue: 09/16
1-4
HPHLtd.
1.2.6.2 Propeller
The foldable fixed pitch carbon fibre composite propeller is high quality product.
Technical data and limitations of the propeller:
Number of propeller blades: 2
Maximum power on a propeller shaft: 23 kW;
Maximum rotational speed: 4500 RPM;
Propeller blade mass excluding attaching bolts: approximately 245 g each
blade;
+20
Diameter of the propeller: d = 1000 -0 mm;
Service time between main overhauls: 50 hours;
Total service time: 200 hours;
Type of propeller: tractor;
Sense of rotation: clockwise looking at direction of
flight.
Operating conditions: the propeller can be operated in any normal environment
conditions except hail, sand storm or similar
FES propellers as described herein is designed and tested according to JAR 22
Subpart J. It is made of GFC and CFC from accurate metal moulds, which were
manufactured using modern CNC technology. This made it possible to have very
accurate propeller geometry. Inside is solid and not hollow.
Quality acrylic white paint is used to protect the composite body against moisture
and erosion. Each blade pair is sanded and polished so that mass difference
tolerance is only 0,2g. Paint is resistant against fuel, oil and other chemical
products. This type of paint has also an excellent flexibility.
More detailed propeller description is provided at FES Propeller manual.

T
Te
ec
ch
hn
ni
ic
ca
al
l
D
De
es
sc
cr
ri
ip
pt
ti
io
on
n,
,
O
Op
pe
er
ra
at
ti
in
ng
g,
,
M
Ma
ai
in
nt
te
en
na
an
nc
ce
e
a
an
nd
d
R
Re
ep
pa
ai
ir
r
M
Ma
an
nu
ua
al
l
S
Su
up
pp
pl
le
em
me
en
nt
t
Document No.: 304eS/MMSupp
Date of Issue: 09/16
1-5
HPHLtd.
1.2.6.3 FCU instrument
FCU instrument was developed for LZ design’s FES system by LXNAV company,
who is otherwise well known in gliding community by their excellent flight computers
(LX8000, LX9000) - electronic variometers.
LXNAV produce FCU instruments exclusively for FES system of LZ design.
Technical specification:
• 1* RPM input
• 2* LED INPUT
• 1* digital output for BRAKE
• 1* analogue output for POWER (adjustable with rotary knob)
• 4* temperature (Controller/Motor/ 2* battery)
• Audio signal
• 1* analogue input for measuring current
• 1* analogue input for measuring voltage
• 1* rs232 input for firmware update
• 1* input for canopy open switch
• 1* CAN bus
• 1* rotary and push button
• ON/OFF switch
Functions not supported by software, but supported in HW.
• 1* rs485
• 1* additional analogue input
Sunlight readable QVGA LCD (320*240).
Consumption cca 100mA.
More detailed description is provided at FES FCU instrument manual.

T
Te
ec
ch
hn
ni
ic
ca
al
l
D
De
es
sc
cr
ri
ip
pt
ti
io
on
n,
,
O
Op
pe
er
ra
at
ti
in
ng
g,
,
M
Ma
ai
in
nt
te
en
na
an
nc
ce
e
a
an
nd
d
R
Re
ep
pa
ai
ir
r
M
Ma
an
nu
ua
al
l
S
Su
up
pp
pl
le
em
me
en
nt
t
Document No.: 304eS/MMSupp
Date of Issue: 09/16
1-6
HPHLtd.
1.2.6.4 Battery packs and its chargers
Standard FES battery pack contains 14 cells which are all wired in serial. For FES
application you need two of them. They are marked with serial number and a letter
first as A pack and second as B pack!
We are using one of the best high power SLPB (Superiol Lithium Polymer Battery)
cells available on the market produced by world renowned manufacturer Kokam.
You can find detailed technical data about these cells in Technical Specifications.
“Battery pack GEN2” are equipped with internal BMS (Battery Management
System) which is fixed above the cells, and is equipped with 16 LEDs to monitor its
operation.
For + and - terminals (GEN2 packs only) we chose to use Amphenol Radsok
hyperbolic high power contact technology. High current female contacts are hidden
inside of the pack.
To avoid possible wrong connections there is 8mm contact for –pole and 10mm
contact for +pole.
Technical data
Battery pack type
FES-BP-14S GEN2
Weight
16 kg
Box dimensions (WxLxH), without terminals and ventilators
154x220x257 mm
Cells producer
Kokam, South Korea
Cells type
SLPB100216216H
Average capacity of each cell
43 Ah
Number of cells
14
Energy storage capacity
2,1 kWh
Maximum allowed total voltage
58,3 V
Minimum allowed total voltage
42 V
Maximum allowed current
250A
Max balancing current per cell
1A
Internal BMS type
FES-BMS-9R
Standard big charger
KOP1001 BMS
Standard small charger
KOP602 BMS
More detailed description of suitable battery packs are provided in:
FES Battery pack GEN2 manual

T
Te
ec
ch
hn
ni
ic
ca
al
l
D
De
es
sc
cr
ri
ip
pt
ti
io
on
n,
,
O
Op
pe
er
ra
at
ti
in
ng
g,
,
M
Ma
ai
in
nt
te
en
na
an
nc
ce
e
a
an
nd
d
R
Re
ep
pa
ai
ir
r
M
Ma
an
nu
ua
al
l
S
Su
up
pp
pl
le
em
me
en
nt
t
Document No.: 304eS/MMSupp
Date of Issue: 09/16
1-7
HPHLtd.
Battery packs care
Charging:
Only approved charger can be used. For chargers description see FES BATTERY
PACK GEN2 manual.
Charging procedure:
Place Charger on a safe, secure position. Keep away from dust, direct sunlight, fire,
smoke, children and any unatendent person!
.
1. Connect RED + and BLACK , cables from charger to first battery pack.
2. Connect charger and Battery pack with BMS, Charger signal cable.
3. Plug in Charger to (220V AC, 50,60hz only) outlet.
4. Turn on BMS switch on top of Battery pack cover
5. Immediately after BMS switching ON, the BMS starts test procedure. Red »Error
LED« turns ON to signal the system's test procedure.
6. If the test procedure is OK then »Error LED« turns OFF and BMS starts working
in normal mode. BMS sends signal to the CHARGER to start charging and
»Orange LED« on CHARGER indicates the start of charging. It is also possible to
hear the contactor "click" inside of the CHARGER. Charging current rises slowly
to the final value of 18 A, and cooling fans in CHARGER start working.
7. In normal mode green »Power LED« of BMS is flashing. This means that the
BMS is turned ON, but not necessary balancing. Normally balancing starts when
one cell reaches pre, set value, usually 4,1V (could be changed by BMS Control
Software). If any of 14 Green LED cell balancing indicators are ON, it means that
those cells have slightly higher voltage compared to the lowest one. If there is
more than 30mV (preset value) difference between highest and lowest cell than
balancing start even before one cells reach 4,1V.
Possible scenarios:
If one or more cells have higher voltage levels that the others, it will discharge
them, the temperature rise of BMS will be minimum.
If only one cell has lower voltage level than all the others, all higher cells need to
be balanced. This leads to higher BMS temperature, even if voltage difference is
only 0.010 V (10mV).
If BMS gets hot despite of working ventilators (more than 55 °C) during
charging, this means that it has a lot of work with balancing (scenario 2). In
such case CHARGER will switch off automatically until temperature of BMS
will drop for about 10 degrees.

T
Te
ec
ch
hn
ni
ic
ca
al
l
D
De
es
sc
cr
ri
ip
pt
ti
io
on
n,
,
O
Op
pe
er
ra
at
ti
in
ng
g,
,
M
Ma
ai
in
nt
te
en
na
an
nc
ce
e
a
an
nd
d
R
Re
ep
pa
ai
ir
r
M
Ma
an
nu
ua
al
l
S
Su
up
pp
pl
le
em
me
en
nt
t
Document No.: 304eS/MMSupp R01
Date of Issue: 11/17
1-8
HPHLtd.
8. Red »Error LED« is ON only during the initial test procedure. After the test is
completed it turns OFF. Some system errors are also indicated with red »Error
LED« by the number of ON blinks, followed by a longer OFF state. Number of
blinks identifies the error:
Number of ON blinks Error
1 Single or multiple cell voltage is too high (4.2 V)*.
2 Single or multiple cell voltage is too low (3.24 V)*.
3 Cell voltages differs more than 20 mV (0.02 V).
4 Cells temperature is too high (>55 C)*.
5 BMS temperature is too high (>50°C)*.
6 Number of cells is not set properly.
7 Too low temperature for charging <-1°C.
8 BMS do not recognize temperature sensor.
9. Communication error.
10 Measurement of cell below 0,1V or above 4,8V.
13 Wrong chemistry set by BMS control software.
*Initial settings may be changed with BMS Control Software.
9. When first cell reaches 4.160V, charging current is reduced. If there is a big
difference between cells (more than 50mV) than it can take quite long until they
all reach 4,16V, as charging current is only 1A.
10.When finally all cells reach 4.160V (+/, 2mV) then BMS send a signal to
CHARGER to stop charging. Green “Power LED” stop flashing and is turned ON.
When this happened charging and balancing is properly completed!
11.Switch OFF BMS on top of Battery pack. Unplug charger from outlet. Remove
charging cables and signal cable from Battery pack.
12.Charge second Battery pack!
Both battery packs must have approximately the same cell voltage levels
(close to 4.16 V per cell), before usage. Using two packs with too much
difference in voltage levels is not allowed! Maximum 1V difference between
total voltages of both pack is acceptable.
Higher difference is not acceptable!
For instance Pack 1: 58,24V (4.160 per cell), Pack 2: 57,82V (4,130V per cell),
this is acceptable!

T
Te
ec
ch
hn
ni
ic
ca
al
l
D
De
es
sc
cr
ri
ip
pt
ti
io
on
n,
,
O
Op
pe
er
ra
at
ti
in
ng
g,
,
M
Ma
ai
in
nt
te
en
na
an
nc
ce
e
a
an
nd
d
R
Re
ep
pa
ai
ir
r
M
Ma
an
nu
ua
al
l
S
Su
up
pp
pl
le
em
me
en
nt
t
Document No.: 304eS/MMSupp
Date of Issue: 09/16
1-9
HPHLtd.
Storage:
When you will stop flying before the winter (or any other longer period of no flying) it
is advisable to discharge Battery packs to middle voltage which is 3,7V per cell.
(This is about 52V per pack, or 104V on FCU instrument). Store packs at room
temperature of 20 degrees or lower. (At the basement where is usually colder), at
normal humidity conditions.
Always try to avoid to have packs exposed to high temperature, and this is
decreasing life of cells significantly.
Car transport:
When transporting your packs with your car, make sure that packs cannot move
during car acceleration and braking. If surface in your car is very slippery than we
advise you to use special transport box, which you can order as part of optional
equipment. Its construction effectively prevent sliding and moving of packs in your
car. Do not leave packs for longer time in hot car under sun.

T
Te
ec
ch
hn
ni
ic
ca
al
l
D
De
es
sc
cr
ri
ip
pt
ti
io
on
n,
,
O
Op
pe
er
ra
at
ti
in
ng
g,
,
M
Ma
ai
in
nt
te
en
na
an
nc
ce
e
a
an
nd
d
R
Re
ep
pa
ai
ir
r
M
Ma
an
nu
ua
al
l
S
Su
up
pp
pl
le
em
me
en
nt
t
Document No.: 304eS/MMSupp R01
Date of Issue: 11/17
1-10
HPHLtd.
1.3 Sailplane systems
1.3.1 Control systems in the fuselage
Not affected.
1.3.2 Control systems in the wing
Not affected.
1.3.3 Rudder control system
Not affected.
1.3.4 Main landing gear system
Not affected.
1.3.5 Control surface deflections and dimensions
Not affected.
1.3.6 Electric system
FES wiring consists of power, signal and 12V wires, and different types of
connectors.
For power cables we use high quality Betatherm 155 wires with cross section of
35 mm2. For signal wires we use high quality tinned and shielded wires. For all 12V
circuits we use aviation grade Spec 55 wires.
On the end of power wires are pressed and soldered suitable cable shoes
and Radsok power connectors. Signal wires, are soldered to multipole DB9 or DB15
connectors, and on other side directly to FCC box electronic circuit board. 12V
circuits are equipped with cables shoes.
-DC/DC converter is used to convert high voltage from FES battery packs, to
12V which is used to supply instruments, and main contactor. It also charge 12V
battery if installed.
-Main contactor is used to connect and disconnect traction batteries (FES
battery packs) to motor controller. There is installed also precharge resistor.
-Motor controller is used to convert high voltage DC to three phase AC
voltage which goes to motor. It also send RPM and controller temperature by CAN
bus to FCU instrument.
-Ventilators are used to cool down motor controller.
-Power switch (double pole) is used to give 12V power to main contactor,
supply to electronic circuit board in motor controller.
-BMS inside of battery packs is used to balance and to control charging. It
can be connected to PC with a special cable in order to monitor charging process
with BMS Control software. During flight BMS is sending data to FCU instrument,
about temperature of the pack and voltage levels of each cell.
-Shunt is used to measure current from Battery packs.
-LXUI box convert analog measurement of current and voltage to digital
signal which is sent by CAN bus to FCU instrument.
-FCC box have electronic circuit board, where all signal and 12V wires came
together and are spitted to right directions. It consist also a microprocessor for

T
Te
ec
ch
hn
ni
ic
ca
al
l
D
De
es
sc
cr
ri
ip
pt
ti
io
on
n,
,
O
Op
pe
er
ra
at
ti
in
ng
g,
,
M
Ma
ai
in
nt
te
en
na
an
nc
ce
e
a
an
nd
d
R
Re
ep
pa
ai
ir
r
M
Ma
an
nu
ua
al
l
S
Su
up
pp
pl
le
em
me
en
nt
t
Document No.: 304eS/MMSupp R01
Date of Issue: 11/17
1-11
HPHLtd.
automatic propeller positioning. There is located also 2A fuse, potentiometer for
adjusting of electronic braking and DB9 female connector for FCU update.
-12V battery is not really required for operation of FES system, but is there
mainly to be able to set other instruments if main battery packs are still charging.
Battery should be equipped with 3A fuse.
-325A power fuse protect the whole system in case of a high power short-
circuit.
-Battery packs provide power to the whole FES system
-one 1,kW or optionally two 600W external chargers are used for charging of
Battery packs, one by one or simultaneously in case of two chargers.
-FCU instrument gives information to the pilot about important parameters.
There is also located throttle knob, and 3 bright LEDs in red and green color.
1.3.6.1 Fire and smoke alarm
Fire and smoke alarm sensor JABLOTRON SD-283ST is installed in battery
compartment. The alarm works only when the sensor is supplied by 12V. Therefore
main switch must be switched on and at least 12V battery installed for proper
function of the alarm. Fire and smoke alarm is based on smoke detection and
detection of temperature (higher then 60°C). The sensor is connected with fire
signalization on instrument panel (red LED and buzzer) according scheme in this
manual section. Beeping sound of buzzer can be switched off using "FIRE ALARM"
switch on instrument panel.
High amount of dust particles inside battery compartment may lead to incorrect
sensor function. Therefore keep battery compartment clean.
Test procedure - during preflight inspection
The test must be provided with 12V battery installed and Main electric switch turned
on.
To test the detector press the detector against the base and wait until a LED
indicator switches on. The LED flashing signals switchover to the testing mode. The
LED is flashes for the whole duration of the test. When the test is complete, the LED
switches off. The detector then signals the result. If the detector beeps once, the
test has been done successfully. If a failure is discovered, the LED flashes and
beeps three times. If the battery is low, there is no acoustic signalling but just one
flash when the test is completed. When the testing is completed the ALARM
terminal is activated for a short time. Than red LED warning and buzzer on
instrument panel is engaged. Once the alarm terminal in not activated the red LED
warning and buzzer on instrument panel is deactivated.
Annual check
During annual check the above test must be performed. The complete functioning of
the detector can be tested with a testing spray (e.g. SD-TESTER). The heat sensor
can be tested with heated air (e.g. with a hair dryer). Warning: never test the
detector with fire.
If the fault is recognized the alarm must be repaired by manufacturer or replaced
with a new one.

T
Te
ec
ch
hn
ni
ic
ca
al
l
D
De
es
sc
cr
ri
ip
pt
ti
io
on
n,
,
O
Op
pe
er
ra
at
ti
in
ng
g,
,
M
Ma
ai
in
nt
te
en
na
an
nc
ce
e
a
an
nd
d
R
Re
ep
pa
ai
ir
r
M
Ma
an
nu
ua
al
l
S
Su
up
pp
pl
le
em
me
en
nt
t
Document No.: 304eS/MMSupp
Date of Issue: 09/16
1-12
HPHLtd.

T
Te
ec
ch
hn
ni
ic
ca
al
l
D
De
es
sc
cr
ri
ip
pt
ti
io
on
n,
,
O
Op
pe
er
ra
at
ti
in
ng
g,
,
M
Ma
ai
in
nt
te
en
na
an
nc
ce
e
a
an
nd
d
R
Re
ep
pa
ai
ir
r
M
Ma
an
nu
ua
al
l
S
Su
up
pp
pl
le
em
me
en
nt
t
Document No.: 304eS/MMSupp R01
Date of Issue: 11/17
1-13
HPHLtd.
Fire and smoke alarm wiring scheme
Other manuals for Glasflugel 304 eS
1
Table of contents
Other HPH Aircraft manuals