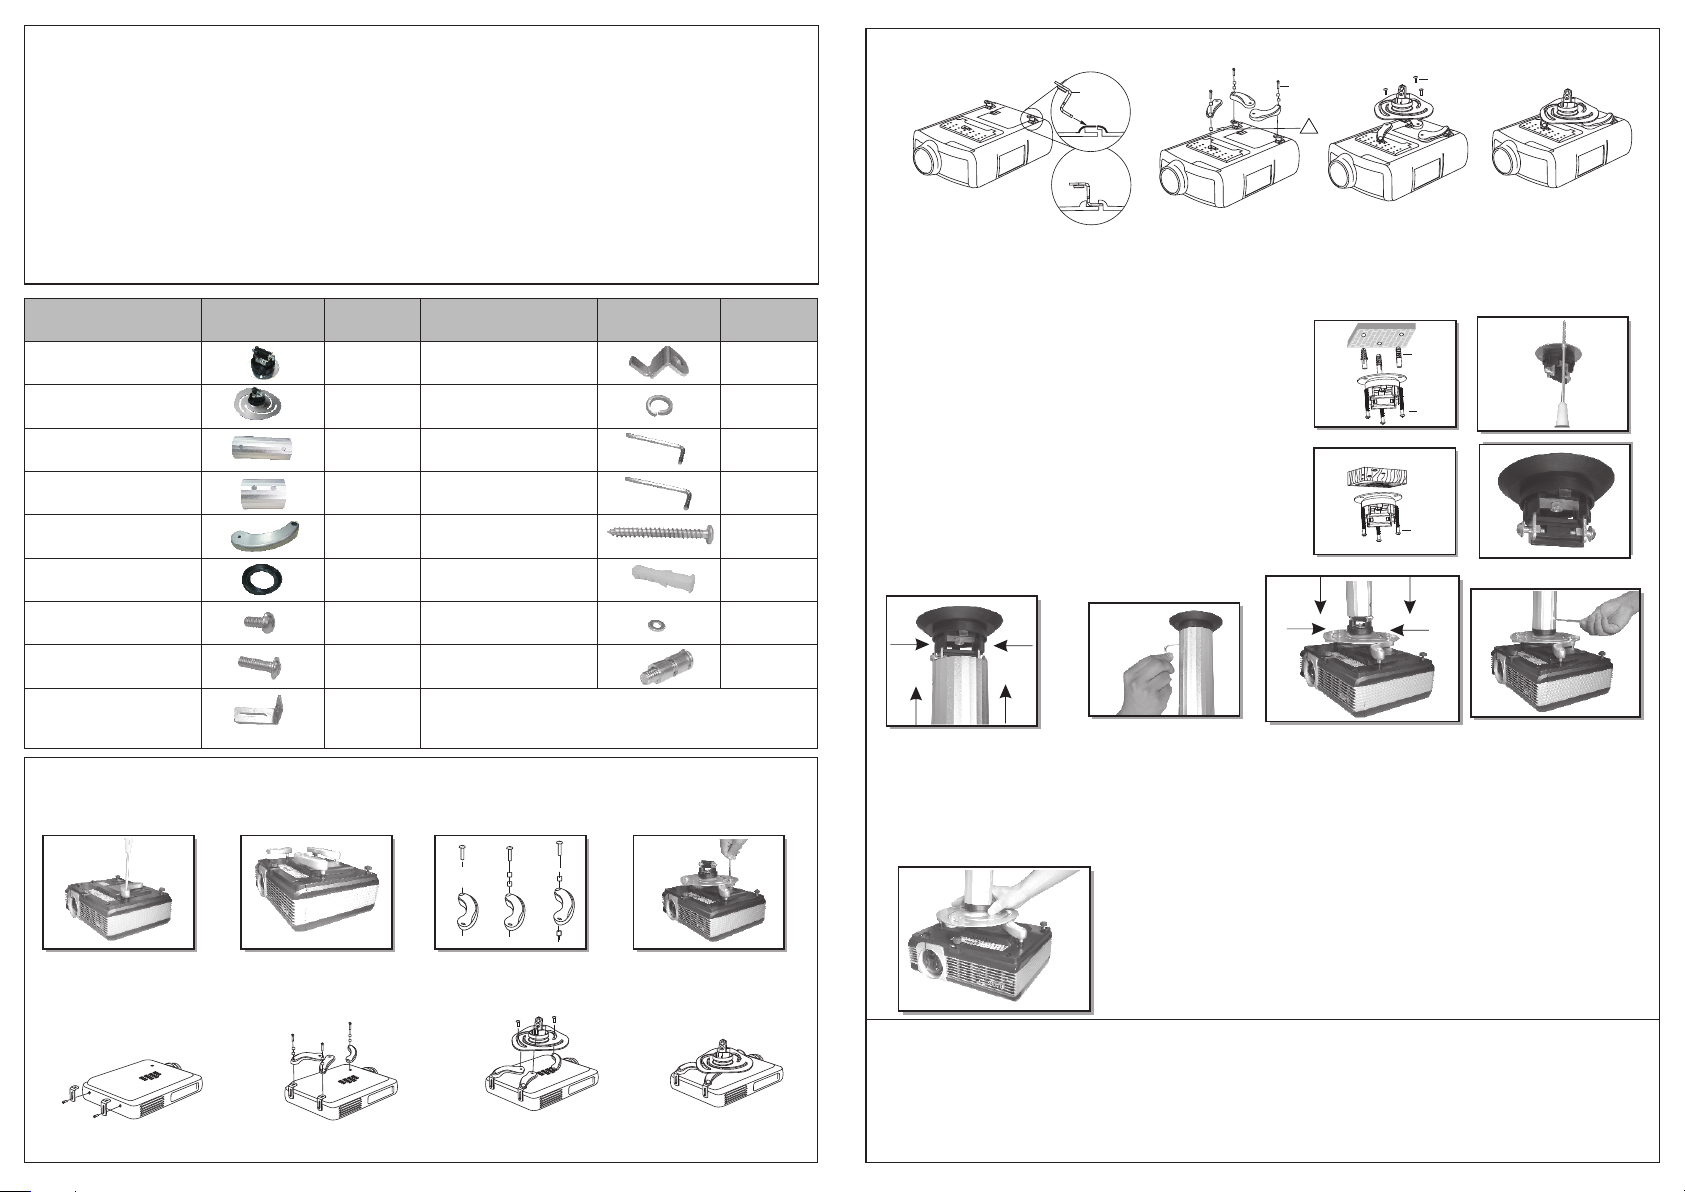
FIT VIDEO. PROJECTOR
①
FIX TO CEILING
②
This product is designed to mount video projector weighing up to 10kg to ceiling.
Safety Warning: Be careful to make sure there are no missing or defective parts. Never use defective parts.
Improper installation may cause damage or serious injury.
Note: The included hardware is for mounting on solid brick, concrete or hard wood ceiling . If mounting on wood, do
not use any concrete anchor. If you are uncertain about the nature of your ceiling, consult an expert. Please consult
your hardware or installation professional for proper mounting to other types or ceiling. The supplied hardware is not
for steel.
Forbidden Instruction: Do not mount onto plasterboard or panelled ceiling.
ASSEMBLY INSTRUCTIONS
FOR VIDEO PROJECTOR
JOINT
③
(a) COMMON MOUNTING
·Fix the projector arm (5)
using screw (17).
·Adjust the proj ctor arms
at the same height
e·You can choose mode Ⅰor
Ⅱ or Ⅲ to adjust the projector
arm at the same height condition
on the surface of video projector.
(B)SPECIAL MOUNTING
b1. For Toshiba projectors
1234
1234
b2.For phieips projectors
(a) SOLID BRICK AND CONCRETE BLOCK CEILING
MOUNTING:
Use the ceiling plate (1) as a template to mark 3 holes
locations on the ceiling. Pre-Drill these holes with a 8mm
masonry bit to at least 50mm in depth. Insert a Concrete
Anchor (15) into each of these holes, Attach the ceiling Plate
(1) to the ceiling using 3 Lag bolts (14) and washer (16).
(b) HARD WOOD CEILING MOUNTING:
Use the ceiling plate (1) as a template to mark 3 holes
locations on the ceiling. Attach the ceiling Plate (1) to the
ceiling using for the 3 Lag Bolts (14)and washer (16).
Note: Do not use any concrete anchor when you mount
the brateck onto hard wood ceiling.
·Join the plate
to the ceiling support and push
the two bolts at the same time
which extension pipes you choose
condition on the height of ceiling
extension pipe ·Turn the bolts outside for
the maximum safety use
the allen key (13)
·Join the projector plate to the
extension pipe pushing the
two bolts at the same time
·Turn the bolts outside for the
maximum safety use the allen
key (13)
·Tilt the bracket as desired by working on
the central part of the assembly swivel.
ADJUST
④
Please check whether screws are fixed well each two months.
IF YOU HAVE ANY DOUBTS REGARDING INSTALLATION CONSULT OUR SPECIAL
FRANCHISER.
·Attach the adjust ble part (9) to
video projector using M4(8)
a·Fix the projector arm (5)
using screw(17)
·Fix the screws
·Insert adjustable part(10)
Into video projector
·Fix the screws
ⅠⅡⅢ
·Converge the arms to centre
and fix the arms to bottom
of the projector plate by using
the screw M6(7), washer(11)
and washer (16)
·Converge the arms to centre
and fix the arms to bottom of the
projector plate by using the screw
M6(7) washer(11) and washer(16)
·Fix the projector leg (5)
using (17)
·Converge the arms to centre
and fix the arms to bottom of the
projector plate by using the
screw M6(7) washer (11) and
washer(16)
TENDING INSTRUCTION
!!
(17)
(10)
(7)
(15)
(14)
(14)
Parts
1.Ceiling plate
2.Projector plate
3.15cm Extension pipes
4.8cm Extension pipes
5.Projector arm
6.Rubber gasket
7.M6 Screw
8.M4 Screw
Standard
package
x1
x1
x1
x1
x3
x1
x4
Picture Parts
9.Adjustable part
10.Adjustable part
11.M6 Washer
12.5mm Allen key
13.4mm Allen key
14.6mm Lag Bolt
15.Concrete Anchor
16.M6 Washer
Standard
package
x2
x3
x3
x1
x1
x3
x6
Picture
x4
x3
SUPPLIED PARTS: Supplied joint parts are exclusive for using
in this product. Other joint parts are forbidden to use on this
product. If any parts are missing or faulty, telephone the special
franchiser for a placement.
17.Screw with Washer
x3


