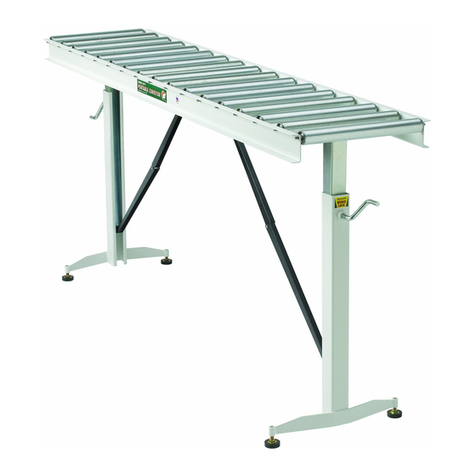
HTC HTT-31 User manual

OPERATORS MANUAL
!SSEMBLYs/PERATIONs0ARTS,ISTs7ARNINGSs7ARRANTY
#AUTION2EADALLINSTRUCTIONSCAREFULLY
3!6%4(%3%).3425#4)/.32EFERTOTHEMOFTENANDUSETHEMTOINSTRUCTOTHERS
MANUEL DE L’UTILISATEUR
!SSEMBLAGEs&ONCTIONNEMENTs,ISTEDEPIÒCESs!VERTISSEMENTSs'ARANTIE
-ISEENGARDE,IREATTENTIVEMENTLENSEMBLEDESINSTRUCTIONS
#/.3%26%2#%3).3425#4)/.3,ESCONSULTERSOUVENTETLESUTILISERPOURÏDUQUERLESAUTRES
MANUAL DEL OPERADOR
%NSAMBLEs/PERACIØNs,ISTADE0ARTESs!DVERTENCIASs'ARANTÓA
0RECAUCIØN,EACUIDADOSAMENTETODASLASINSTRUCCIONES
'5!2$%%34!3).3425##)/.%32EFIÏRASEALASINSTRUCCIONESYÞSELASPARAENSE×ARLEAOTRASPERSONAS
HTT-31
TOOL TABLE
ÉTABLI POUR OUTIL
MESA PARA HERRAMIENTAS

2
Description Part No. Qty
Machine Screw - 'M6' x 10mm 3049P 24
Nut 'M6' 3050 24
Washer - 'M6' 3051 12
Wood Screw - 'M6' D908 10
Leveling Pad G223 1
Slotted Rubber Feet G222 4
Legs 3113 4
Long Center Frame Support 3116 2
Short Center Frame Support 3117 2
Long Top Support 3114 2
Short Top Support 3115 2
Center Shelf Board 3112 2
Table Top Left 3111L 1
Table Top Right 3111R 1
Leveling Bolt 3052 1
Leveling Nut 3053 2
Congratulations
You have just purchased a shop accessory that will help you work safer, quicker,
and easier than ever before. Designed for a lifetime of use, HTC Products will help
you do your best alone!
Warning:
Read Owners Manual carefully and be completely familiar with the correct and
safe operation of each power tool before use. Failure to follow these rules may
result in serious personal injury.
Parts
M8 Washer 3054 1

3
Safety Rules
Using power tools of any kind can be dangerous if safe operating procedures are
not followed. Recognizing the hazards of each tool and using them with respect and
caution will considerably limit the possibility of personal injury. However, if safety
precautions are ignored, personal injury will likely result. Always use common sense
– your personal safety-is your responsibility.
.QRZ\RXUSRZHUWRRO5HDGDQGXQGHUVWDQGWKH2ZQHU·V0DQXDODQGREVHUYH
the warnings and instruction labels affixed to the tool.
2. Properly ground all tools.
3. Keep guards in place.
4. Remove adjusting keys and wrenches.
5. Keep work area clean and dry.
6. Keep children away.
7. Never leave running machines/tools unattended.
8. Disconnect tools from service.
9. Regularly maintain tools.
10. Use correct tools for the job.
11. Never force a tool.
12. Wear safety apparel.
13. Wear safety glasses/goggles.
14. Never stand or sit on tools.
15. Replace damaged components immediately.
16. Think Safety. Safety is a combination of operator awareness, common sense and
alertness at all times.

!All attachments, besides the table top, are done with
the following hardware: Machine Screw ,
a washer , and a Nut .
1Insert rubber feet onto ends of legs .
Notice: the correct end has two rectangular holes.
2Attach the Long Center Frame
Support to the legs .
Repeat again with remaining
parts and .
3Attach the two Short Center
Frame Supports to one of the
assembled sides from Step 2.
4Attach the remaining assembled side from
Step 2 to the parts assembled in Step 3
4
An adjustment nut/bolt goes through the center of
the foot and can adjust the stand on uneven floors

5Using both holes predrilled at the top of
each leg, attach the Long Top Support .
Repeat on other side.
6Using both holes predrilled at the top of each
leg, attach the Short Top Support .
Repeat on other side.
7Using the (8) supplied Wood Screws
and the (8) washers attach the table top.
• Line up predrilled holes in the bottom of
the table tops and with the slots
in the Short Top Supports .
• Be sure the measurements printed on
the table top match up before attaching.
•
longer sides before tightening*
*
8
5
If attaching a machine larger than the
table top in closed position, adjust the slats
appropriately before tightening.
Insert the Center Shelf Boards as shown.

©2019 Affinity Tool Works, LLC
Customer Service Department
1-800-624-2027
www.affinitytool.com
Affinity Tool Works, LLC
1161 Rankin
Troy, Michigan 48083 USA
www.affinitytool.com
One Year Limited Warranty
Warrantor warrants to the original purchaser that the HTT-31 will be free from
defects in materials and workmanship under normal use and service for a period
of one (1) year from the date of original purchase.
The obligation of this Warranty is limited to repair or replacement, at our option,
of components which prove defective under normal use.
Any product or component claimed to be defective should be sent during Warranty
period, postage prepaid to Affinity Tool , 1161 Rankin, Troy, Michigan 48083,
Attn: Warranty Department, together with a copy of your original dated sales
receipt. Call for authorization number before sending.
This warranty is in lieu of all other express warranties, obligations or liabilities. ANY
IMPLIED WARRANTIES, OBLIGATIONS OR LIABILITIES, SHALL BE LIMITED
IN DURATION TO THE ONE YEAR PERIOD OF THIS LIMITED WARRANTY.
NO AGENT, REPRESENTATIVE, DEALER, OR EMPLOYEE OF THE COMPANY
HAS THE AUTHORITY TO INCREASE OR ALTER THE OBLIGATIONS OF THIS
WARRANTY.
This Warranty shall not apply to any product or component which in the opinion
of the Warrantor has been modified or altered in any way, damaged as a result of
an accident, misuse or abuse, or loss of parts. In no case shall the Warrantor be
liable for any special or consequential damages, or any other costs or warranty,
expressed or implied, whatsoever.
This Warranty gives you specific legal rights, and you may also have other rights
which vary from state to state.

7
Description Pièce NoQuantité
Vis mécanique - 'M6' x 10mm 3049P 24
Écrou avec - 'M6' 3050 24
Rondelle plate - 'M6' 3051 12
Vis à bois - 'M6' D908 10
Patin de nivellement G223 1
Pieds en caoutchouc avec fentes G222 4
Pattes 3113 4
Long support de cadre central 3116 2
Petit support de cadre central 3117 2
Long support supérieur 3114 2
Petit support supérieur 3115 2
Panneau d’étagère central 3112 2
Plateau d’établi - gauche 3111L 1
Plateau d’établi - droit 3111R 1
Boulon de nivellement 3052 1
Écrou de nivellement 3053 2
M8 Rondelle plate 3054 1
Félicitations
Vous venez de faire l’achat d’un accessoire d’atelier qui vous aidera à travailler plus
rapidement, plus facilement et de manière plus sécuritaire que jamais. Conçus pour
une utilisation à vie, les produits HTC vous aiderons à être plus efficace lorsque
vous travaillez seul!
Avertissement:
Lire consciencieusement le manuel d’utilisation et s’assurer d’être
complètement familiarisé avec le fonctionnement approprié et sécuritaire de
chaque outil avant de les utiliser. Le fait de négliger de suivre ces directives
peut entraîner des blessures graves.
Liste des
pièces:

Instructions de sécurité
/·XWLOLVDWLRQG·RXWLOVpOHFWULTXHVGHTXHOTXHW\SHTXHFHVRLWSHXWrWUHGDQJHUHXVHVL
OHVSURFpGXUHVG·XWLOLVDWLRQGHO·RXWLOQHVRQWSDVUHVSHFWpHV/HIDLWGHUHFRQQDvWUH
HWG·LGHQWLILHUOHVGDQJHUVGHFKDTXHRXWLOHWGHOHVXWLOLVHUDYHFUHVSHFWHWSUXGHQFH
UpGXLUDFRQVLGpUDEOHPHQWOHVULVTXHVG·DFFLGHQWV&HSHQGDQWVLOHVSUpFDXWLRQVGH
VpFXULWpVRQWLJQRUpHVLOSOXVTXHSUREDEOHTX·XQDFFLGHQWVXUYLHQQH7RXMRXUVIDLUH
preuve de bon sens – votre sécurité personnelle est votre responsabilité.
&RQQDvWUHVRQRXWLOpOHFWULTXH/LUHHWFRPSUHQGUHOHPDQXHOGXSURSULpWDLUH
HWUHVSHFWHUOHFRQWHQXGHVpWLTXHWWHVG·DYHUWLVVHPHQWHWGHVLQVWUXFWLRQV
SUpVHQWHVVXUO·RXWLO
5HOLHUFRUUHFWHPHQWWRXVOHVRXWLOVjODWHUUH
0DLQWHQLUOHVJDUGHVGHSURWHFWLRQHQSODFH
(QOHYHUOHVFOpVGHUpJODJHHWOHVFOpV
0DLQWHQLUO·HVSDFHGHWUDYDLOSURSUHHWVHF
*DUGHUOHVHQIDQWVjGLVWDQFH
7. Ne jamais laisser une machine/un outil qui fonctionne sans surveillance.
'pEUDQFKHUOHVRXWLOVDYDQWO·HQWUHWLHQ
(QWUHWHQLUOHVRXWLOVUpJXOLqUHPHQW
8WLOLVHUO·RXWLOTXLFRQYLHQWjODWkFKH
11. Ne jamais forcer un outil.
12. Porter des équipements de protection.
13. Porter des lunettes de protection.
1HMDPDLVVHWHQLUGHERXWRXV·DVVHRLUVXUXQRXWLO
15. Remplacer immédiatement les pièces endommagées.
3HQVHUVpFXULWp/DVpFXULWpFRQVLVWHjIDLUHSUHXYHG·DWWHQWLRQGHERQVHQVHW
GHYLJLODQFHjWRXWPRPHQW
8

!Tout l’assemblage, sauf celui du plateau de l’établi,
est effectué avec la visserie suivante : une vis
mécanique cruciforme , une rondelle de blocage
et un écrou avec .
1Insérer les pieds en caoutchouc à l’extrémité des
pattes .
Avis : le pied se loge à l’extrémité dont les deux
trous sont rectangulaires.
2Fixer le long support de cadre
central sur les pattes .
Répéter l’opération pour les
pièces restantes et .
3Fixer les deux petits supports de
cadre centraux à un côté déjà
assemblé à l’étape 2.
4Fixer le côté assemblé à l’étape 2 aux
pièces assemblées à l’étape 3 (avec les
pieds en caoutchouc déposés sur le sol).
9
Un écrou/boulon de réglage traverse le centre du pied
et permet de régler le pied sur des sols inégaux.

10
5Fixer le long support supérieur aux deux
trous prépercés en haut de chaque patte.
Répéter l’opération de l’autre côté.
6Fixer le petit support supérieur aux deux
trous prépercés en haut de chaque patte.
Répéter l’opération de l’autre côté.
7Fixer le plateau de l’établi à l’aide des huit
vis à bois cruciformes fournies et des
huit rondelles restantes.
• Aligner les trous prépercés à la base des
plateaux et de l’établi avec les fentes
des petits supports supérieurs .
• S’assurer que les règles imprimées sur le dessus
• S’assurer que le dessus du plateau est
à égalité avec les côtés les plus longs
avant de serrer*.
*
8
Ajuster les fentes avant de serrer lorsqu’un
outil plus large que le plateau en position
Insérer les panneaux d’étagère centraux,
comme il est illustré.

©2019 Affinity Tool Works, LLC
Service à la clientèle
1-800-624-2027
www.AffinityTool.com
Affinity Tool Works, LLC
1161 Rankin
Troy, Michigan 48083 USA
www.affinitytool.com
Garantie limitée de un an
Le garant garantit à l’acheteur d’origine que le HTT-31 sera exempt de défaut
de matériaux et de fabrication dans des conditions d’usage et d’entretien normal
pendant une période de un (1) an à partir de la date de l’achat d’origine.
Les obligations de cette garantie sont limitées à la réparation ou au remplacement,
à notre discrétion, des composants dont il a été déterminé qu’ils sont défectueux
suite à une utilisation normale.
Tout produit ou composant considéré défectueux doit être envoyé pendant la
période de garantie, dans un colis affranchi à Affinity Tool, 1161 Rankin, Troy,
Michigan 48083, Attn: Warranty Department, avec une copie du reçu orignal
de vente daté. Appeler pour obtenir un numéro d’autorisation avant d’envoyer.
Cette garantie remplace toute autre garantie expresse, obligation ou responsabilité.
TOUTE GARANTIE IMPLICITE, OBLIGATION OU RESPONSABILITÉ EST
LIMITÉE À LA PÉRIODE DE UN AN DE CETTE GARANTIE LIMITÉE. AUCUN
AGENT, REPRÉSENTANT, DÉTAILLANT OU EMPLOYÉ DE L’ENTREPRISE
N’EST AUTORISÉ À AUGMENTER OU MODIFIER LES OBLIGATIONS DE
CETTE GARANTIE.
Cette garantie ne peut s’appliquer à aucun autre produit ou composant qui, selon
l’opinion du garant, a été modifié ou altéré en quelque manière, endommagé suite
à un accident, mal utilisé ou abusé, ou encore perdu. En aucun cas le garant ne
peut être responsable de dommages spéciaux ou consécutifs ou de tout autre
coût ou garantie, explicite ou implicite.
Cette garantie donne à l’acheteur des droits juridiques spécifiques ainsi que
certains autres droits qui peuvent varier d’une juridiction à l’autre.

12
Descripción Parte # Cantidad
Tornillo de máquina - 'M6' x 10mm 3049P 24
Tuerca - 'M6' 3050 24
Arandela plana - 'M6' 3051 12
Tornillo de madera - 'M6' D908 10
Almohadilla de nivelación G223 1
Pie de caucho ranurado G222 4
Patas 3113 4
Soporte de armazón central largo 3116 2
Soporte de armazón central corto 3117 2
Soporte superior largo 3114 2
Soporte superior corto 3115 2
Tabla de estante central 3112 2
Superficie izquierda de mesa 3111L 1
Superficie derecha de mesa 3111R 1
Perno de nivelación 3052 1
Tuerca de nivelación 3053 2
Arandela plana M8 3054 1
Felicitaciones
Usted acaba de comprar un accesorio para el taller que lo ayudará a trabajar con
mayor seguridad, y más fácil y rápidamente que antes. Diseñados para ser usados
de por vida, ¡los Productos HTC lo ayudarán a realizar sus mejores tareas y sólo!
Advertencia:
Por favor lea cuidadosamente el Manual del Propietario para familiarizarse
completamente con la correcta y segura operación de cada herramienta
eléctrica antes de usarla. El no seguir estas instrucciones podrá resultar en
lesiones personales graves.
Lista de
Partes:

13
Reglas de Seguridad
(OXVRGHFXDOTXLHUWLSRGHKHUUDPLHQWDHOpFWULFDSXHGHVHUSHOLJURGHQR
VHJXLUVHSURFHGLPLHQWRVVHJXURVGHRSHUDFLyQ(OUHFRQRFHUORVSHOLJURVGHFDGD
herramienta y el usarlas con respeto y precaución, limitará de forma considerable
la posibilidad de lesiones personales. No obstante, es probable que el ignorar
las precauciones de seguridad resulte en lesiones personales. Use siempre buen
sentido común – su seguridad personal es su responsabilidad.
&RQR]FDODKHUUDPLHQWDHOpFWULFD/HD\FRPSUHQGDHO0DQXDOGHO3URSLHWDULR\
observe las advertencias y etiquetas de instrucciones fijadas en la herramienta.
2. Conecte a tierra correctamente todas las herramientas.
0DQWHQJDODVGHIHQVDVHQVXOXJDU
4. Quite las llaves de ajuste y las llaves de tuerca.
0DQWHQJDHOOXJDUGHWUDEDMROLPSLR\VHFR
0DQWHQJDDORVQLxRVDOHMDGRV
7. No deje nunca las máquina en funcionamiento ni las herramientas
desatendidas.
8. Desconecte totalmente las herramientas.
9. Preste servicio a las herramientas con regularidad.
10. Use las herramientas correctas para cada tarea.
11. Nunca use fuerza en una herramienta.
12. Use vestimenta de seguridad.
13. Use lentes/ gafas de seguridad.
14. No se pare nunca en las herramientas ni se siente en ellas.
15. Reemplace de inmediato los componentes dañados.
3LHQVHHQOD6HJXULGDG/DVHJXULGDGHVXQDFRPELQDFLyQGHFRQRFLPLHQWR
sentido común y de alerta en todo momento por parte del operador.

14
!
mesa, se llevan a cabo con la siguiente ferretería:
un tornillo de máquina , una arandela de
seguridad y una tuerca .
1Inserte el pie de caucho en los extremos
de los pies .
rectangulares.
2Fije el soporte de armazón cen-
tral largo a los pies .
Repita nuevamente con las
partes restantes y .
3Fije los dos soportes de armazón
central cortos a uno de los lados
armados del paso 2.
4Fije el lado armado restante del paso 2 a
las partes armadas en el paso 3 (pie de
caucho en el piso).
Una tuerca / perno de ajuste atraviesa el centro del
pie y puede ajustar el soporte en pisos irregulares.

15
5
soporte superior largo .
Repita lo mismo del otro lado.
6
superior corto .
Repita lo mismo del otro lado.
7
*
8
cerrada, ajuste correctamente las tablillas
antes de apretarla.
Inserte las tablas del estante central tal
como se muestra.
Utilizando los tornillos Phillips de madera
•
y con
las ranuras en los soportes superiores cortos .
• Esté seguro de que las mediciones impresas
•
encuentre nivelada con los lados más largos
antes de apretarlos*.

Table of contents
Languages:
Other HTC Indoor Furnishing manuals
Popular Indoor Furnishing manuals by other brands

Broyhill
Broyhill CALVACANTE 7022 Assembly instructions

HOPPER STUDIO
HOPPER STUDIO 7165BRO88EUV64 Assembly instructions

Kettler
Kettler Palma 0193315-2100 Assembly instructions

Happy Babies
Happy Babies HAPPY B04 Assembly instructions

Royal Catering
Royal Catering RC-WFWH12045 user manual

TUHOME Furniture
TUHOME Furniture OSLO Assembly instructions