HTW KAIROS HTW-GBCRT-B-RFKA User manual

KAIRÓS
HTW-GBCRT-B-RFKA
ES
EN
FR
PT
IT
MANUAL DE USUARIO
OWNER’S MANUAL
MANUEL DE L’UTILISATEUR
MANUAL DO UTILIZADOR
MANUALE UTENTE
Por favor lea atentamente este manual antes de usar este producto.
Please, read carefully this manual before using the product.
Avant d’utiliser l’équipement, lisez attentivement les instructions.
Por favor leia atentamente este manual antes de usar o equipamento.
Per favore leggere attentamente questo manuale prima di utilizzare questo prodotto.
Gracias | Thank you | Merci | Obrigado | Grazie
CRONOTERMOSTATO CON RADIOFRECUENCIA PARA CALDERAS
CHRONOTHERMOSTAT WITH RADIO FREQUENCY FOR BOILERS
CHRONOTHERMOSTAT À RADIOFRÉQUENCE POUR CHAUDIÈRES
CRONOTERMÓSTATO DE RADIOFREQUÊNCIA PARA CALDEIRAS
CRONOTERMOSTATO A RADIOFREQUENZA PER CALDAIE


MANUAL DE USUARIO
ESPAÑOL
KAIRÓS
HTW-GBCRT-B-RFKA
CRONOTERMOSTATO CON
RADIOFRECUENCIA PARA CALDERAS

1.Introducción del producto:
El teclado incluye: Encendido/apagado ), ajuste,programable (PRG) y dos botones de ajuste ( y ).
2.Características clave
Termostato de calefacción
Fuente de alimentación de batería 2xAAA
Estilo moderno y atractivo
Montaje de superficie
Aprobado por la CE, ROHS
3.Datos técnicos
4.Pantallas y botones
Fuente de alimentación - 2*Batería AAA Luz de fondo - Blanca
Contacto de retransmisión del receptor - Max 0.5A
Sensor - NTC 10K
Rango de punto de ajuste- 5~30ºC Precisión - ± 0.5ºC (control de pasos de +0.5ºC)
Ambiente- 0~50℃Clase de protección - IP30
Humedad relativa - 85%
Carcasa - ABS a plástico retardante del fuego UL94-5
Ajuste de temperatura y parámetros
Temp. habitación
Botón de ajuste
Botón de encendido/apagado
Ajuste de temperatura y parámetros
Botón PRG
Día de la semana
Período actual
Función de los botones:
Botón de encendido/apagado: Presione este botón para encender o apagar.
Botón de ajuste: Ajuste del reloj y la temperatura
Botón +: para aumentar la temperatura y el ajuste de parámetros
Reloj
HTW-GBCRT-B-RFKA
El termostato digital HTW-GBCRT-B-RFKA usa el chip más avanzado del mundo con el sensor NTC interno
de alta precisión del termostato para detectar y comparar la temperatura. El equipo de calefacción se
enciende/apaga automáticamente para mantener la temperatura interior deseada en la habitación. La
característica opcional ocupado/desocupado permite ahorrar energía. HTW-GBCRT-B-RFKA cuenta con
una gran pantalla LCD y muestra el estado del modo de funcionamiento (refrigeración / calefacción /
ventilación), temperatura interior y temperatura establecida, etc.
2

Botón - : para dismunuir la temperatura y el ajuste de parámetros
Botón PRG: selección de modo y configuración programable.
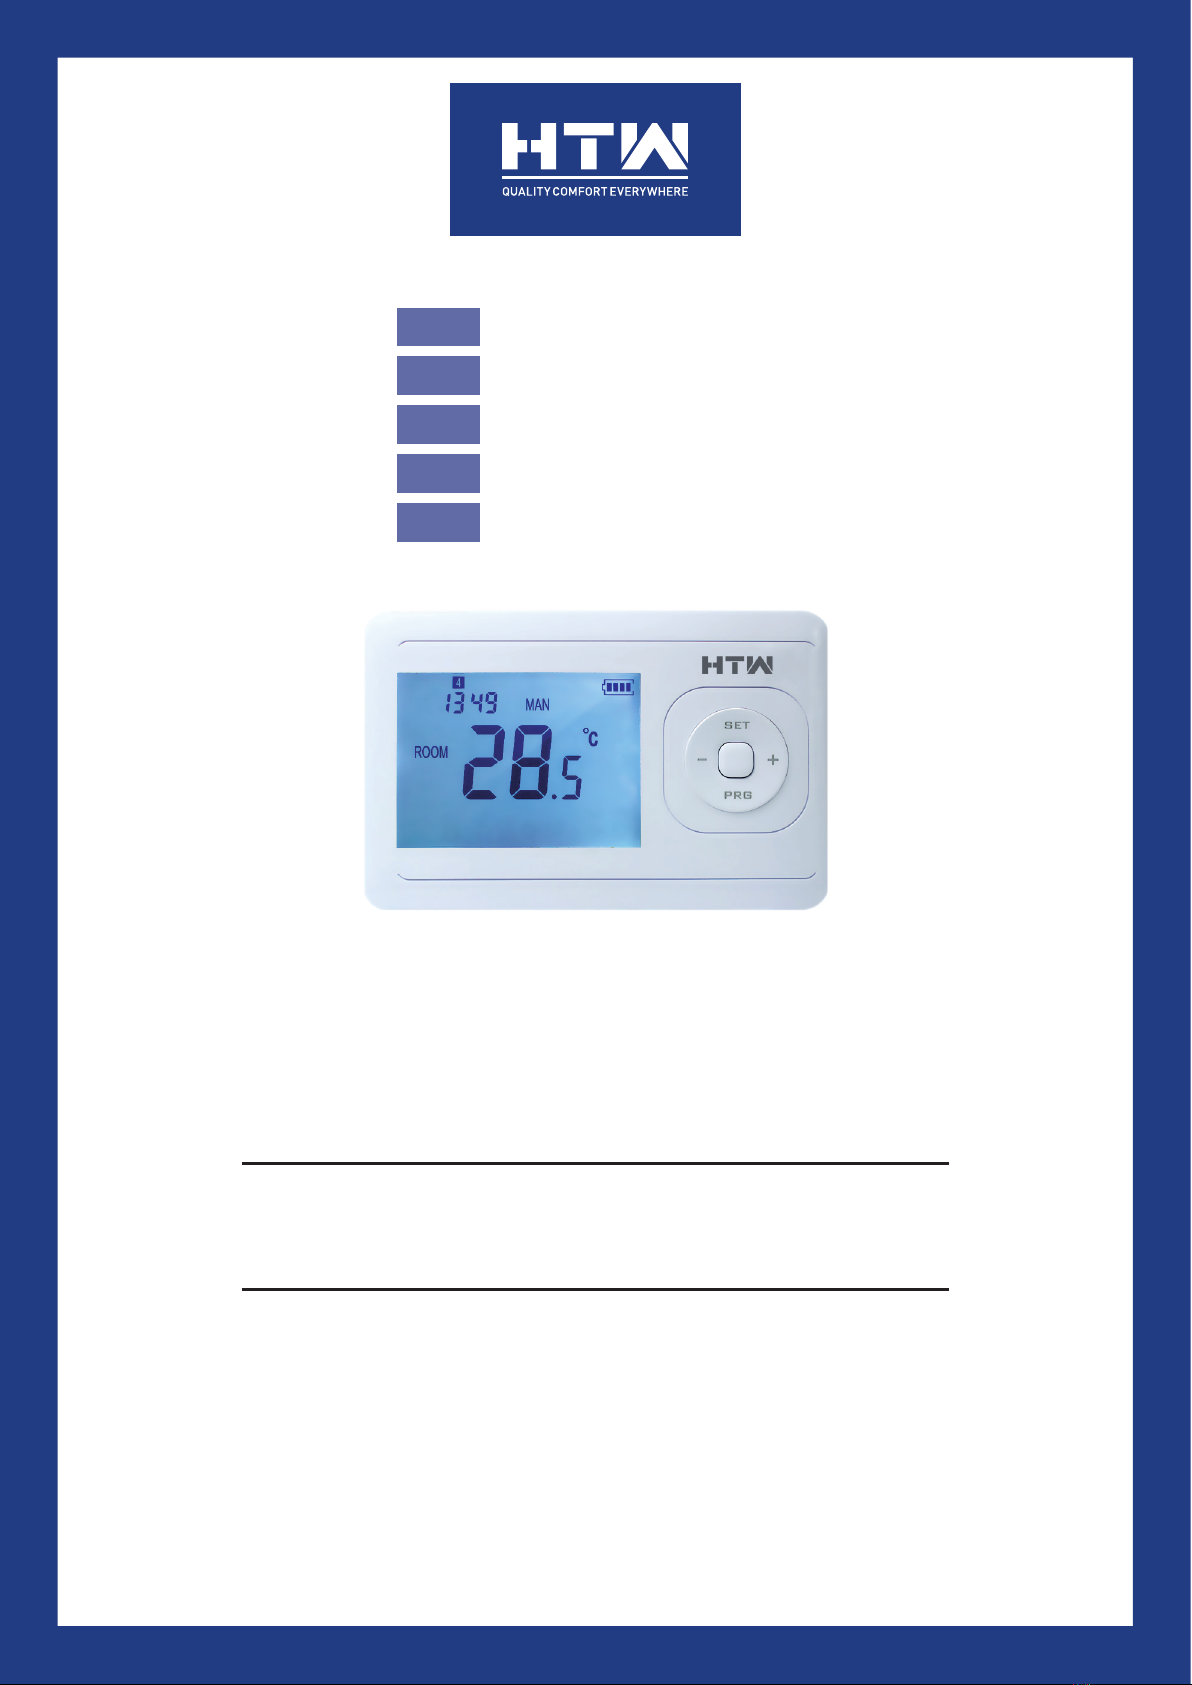
Instrucciones de operación:
5.Ajuste de reloj y temperatura
Mantenga presionado el botón SET durante 5 s, configure el reloj (Min-Hora-Día de la semana) presionando
los botones + y -, cada presión del botón SET conducirá a la configuración del siguiente elemento.
6. Configuración avanzada
1) Calibración de temperatura
Apague el emisor, mantenga presionado el botón "SET" hasta que la pantalla se encienda, presione el botón "+" o
"-" para establecer la temperatura de calibración. Rango: -8 °C ~ 8 °C
Presione el botón “PRG” para ingresar al siguiente paso.
2) Ajuste del diferencial de conmutación
Presione el botón “+” o “-” para cambiar la configuración del diferencial del interruptor. Rango: 0,5 ~ 5 °C
Presione el botón “PRG” para ingresar al siguiente paso.
3) Temperatura límite del suelo (solo para la versión con calefacción eléctrica)
Presione el botón “+” o “-” para cambiar la temperatura límite del suelo. Rango: 25 ~ 60 °C
Presione el botón “PRG” para ingresar al siguiente paso.
4) Selección del modo de programación
Presione el botón "+" o "-" hasta "00" para programación 5 + 1 + 1 o "01" para la programación de 7 días
individuales.
Presione el botón “PRG” para ingresar al siguiente paso.
5) Función anticongelante
Presione el botón “+” o “-” para encender/ apagar esta función o cambiar la temperatura de ajuste. Rango: 3 ~ 10 °C.
Presione el botón “PRG” para ingresar al siguiente paso.
6) Función de detección de ventana abierta (función OWD)
Presione el botón "+" o "-" hasta "00" para cerrar esta función y "01" para abrir esta función.
Presione el botón “PRG” para ingresar al siguiente paso.
7) Tiempo de detección de OWD
Presione el botón “+” o “-” para cambiar el tiempo de detección de OWD. Rango: 2-30 min
Presione el botón “PRG” para ingresar al siguiente paso.
8) Selección de lacaída de temperatura de OWD.(dentro del tiempo de detección)
Presione el botón “+” o “-” para cambiar la selección de latemperatura de caída de OWD. Rango: 2-4 ℃
Presione el botón “PRG” para ingresar al siguiente paso.
9) Selección de tiempo de retraso de OWD (volver al estado de funcionamiento anterior)
Presione el botón “+” o “-” para cambiar la selección del tiempo de retraso de OWD. Rango: 10-60 min
Presione el botón “PRG” para ingresar al siguiente paso.
10) Emparejar emisor a receptor (solo para versión inalámbrica RF)
Consulte la parte 14. Presione el botón “PRG” para ingresar al siguiente paso.
11)Restablecer la configuración de fábrica
Presione el botón "+" o "-" hasta "01", y luego presione el botón "SET" durante 5 segundos, espere hasta que el
termostato se reinicie.
Menú Descripción
01 Ajuste del reloj: minuto
02 Ajuste del reloj: hora
03 Ajuste de día de la semana
HTW-GBCRT-B-RFKA
3

Presione el botón "-" hasta "--" para apagar la función anticongelación. Presione el botón "+" para encender la
función anticongelación y cambiar la temperatura establecida, cuando la temperatura ambiente alcanza esta
temperatura, el termostato enciende a la fuerza la calefacción. Cuando la temperatura ambiente es superior a esta
temperatura en 2 °C, el termostato apaga automáticamente la calefacción.
9.Función de detección de ventana abierta (función OWD)
Cuando el modo de ventana abierta está habilitado en la configuración de parámetros, el sistema dejará de calentar
automáticamente cuando detecte una caída repentina de la temperatura ambiente (2 °C en 5 minutos por defecto).
Esto se produce normalmente cuando se abre una ventana o puerta sin apagar el dispositivo de calefacción. El
dispositivo volverá al modo de funcionamiento anterior después de 30 minutos, luego OP desaparecerá. Presione
cualquier botón para salir de la función OWD durante el período de apagado de calefacción.
10. Recordatorio de fallos del sensor de temperatura del suelo (Sólo para la versión de calefacción eléctrica)
Cuando el termostato detecte que el sensor de límite de temperatura del suelo está defectuoso, la calefacción se
detendrá a la fuerza y el semáforo de "encendido" parpadeará alternativamente para recordar al usuario que
revise el sensor. Cuando se elimina el fallo, el termostato regresará al estado normal.
11. Bloqueo para niños
Presione el botón ON / OFF durante 3 segundos para activar / desactivar la función de bloqueo de teclas. La
función de bloqueo de teclas muestra " "
12. Selección de modo
Presione el botón “PRG” para seleccionar el modo manual (MAN) y el modo programable (PRG). Modo manual: en el
modo manual, para controlar la unidad en ON /OFF manualmente. Modo programable: la unidad puede ser operada
automáticamente por el tiempo y temperatura establecidos. El modo programable cuenta con 4 períodos de tiempo y
4 temperaturas relacionadas, su función se muestra a continuación:
13.Configuración programable de 5+1+1 o 7 días individuales
1) Mantenga presionado el botón PRG durante un tiempo para ingresar en la configuración del programa.
2) Configure el horario (Día de la semana-Período-Hora de inicio-Temp.) Presionando los botones + y -, cada
presión del botón PRG irá a la configuración del siguiente elemento.
Ejemplo:
De lunes a viernes Sábado Domingo
Período 1 2 3 4 1 2 3 4 1 2 3 4
Hora 6:30 8:00 18:00 22:30 8:00 10:00 18:00 23:00 9:00 12:00 19:00 0:00
Te m p. 21°C 18°C 21°C 16°C 21°C 21°C 21°C 16°C 23°C 21°C 16°C 21°C
7. Temperatura límite del suelo (Sólo para la versión de calefacción eléctrica)
Cuando la temperatura del suelo alcanza el valor establecido, el termostato deja de calentar a la fuerza y la luz
roja "Calefacción encendida" del receptor parpadea para recordar al cliente que la función de límite de temperatura
del suelo está activada. Cuando la temperatura del suelo es más baja que el valor establecido, y la luz verde
"Power" deja de parpadear. El termostato vuelve al estado normal.
8. Función antihielo
4

14. Emparejamiento de códigos
1) Presione largamente el botón de emparejamiento de códigos en el receptor hasta que el LED 1
parpadee rápidamente.
2) Apague el emisor, y presione largo tiempo el botón "SET" hasta que la pantalla se ilumine, luego
presione el botón "PRG" nuevamente nueve veces, luego presione el botón "SET" y espere.
3) Espere un rato, el LED 1 deja de parpadear. Emparejamiento de códigos hecho.
15. Diagrama de cableado
Botón de emparejamiento de códigos
Indicador de calefacción "encendido" (LED 1)
Indicador de alimentación (LED 2)
Botón de encendido /
apagado
5

16. Instalación
Remitente
Instalación en la pared Poner en el escritorio
Receptor
6

17. Dimensión
7


OWNER’S MANUAL
ENGLISH
KAIRÓS
HTW-GBCRT-B-RFKA
CHRONOTHERMOSTAT WITH RADIO
FREQUENCY FOR BOILERS

1.Product Introduction:
The HTW-GBCRT-B-RFKA digital thermostat adoptsthe most advanced chip in the world. with the high
precision internal NTC sensor of the thermostat to detect and compared the temperature. The heating
equipment is
automatically turned on/off to maintain the indoor desired room temperature. The optional Occupied/Unoccupied
eature saves energy.HTW-GBCRT-B-RFKA features with large LCD screen display, and displays the status
of work mode(cooling/heating/vent) indoor temperature and set temperature etc...
Keypad includes: Power on/off ( ), set , programmable(PRG) and two adjustment buttons( &).
2.Key Features
Heating thermostat
2xAAA battery power supply
Attractive modern styling
Surface mounting.
CE, ROHS approved
3.Technical Data
4.Displays & Buttons
Buttons Function:
on/off button: Press this button for power on/off.
Set button: Clock & Temperature Setting
+ button: for Temp. & Parameters setting increase
Power Supply - 2*AAA battery Backlight - White
Receiver relay contact - Max 0.5A Sensor - NTC 10K
Set Point Range - 5~30℃Accuracy - ± 0.5℃(step control by +0.5℃)
Ambient - 0~50℃Protection Class -IP30
Relative Humidity - 85% Housing - ABS to UL94-5 fire retardant plastic
Temp. & Parameters setting
Set button
Room Temp. on/off button
PRG button
Weekday
Current period
Clock
HTW-GBCRT-B-RFKA
10

-button: for Temp. & Parameters setting decrease
PRG button: Mode select & programmable setting
Operating Instructions:
5.Clock & Temperature Setting
Press and hold SET button for 5s, set the clock (Min-Hour-Weekday) by pressing + and - button, each press of
SET button will go to next item setting.
6,Advanced setting
1) Temperature calibration
Turn off the sender, long press “SET” button until the screen is lit , press “+” or “-” button to set calibration
temperature. Range: -8 °C~8°C
Press “PRG” button to enter to next step.
2) Switch differential setting
Press “+” or “-” button to change switch differential setting. Range: 0.5~5 °C
Press “PRG” button to enter to next step.
3) Floor limiting temperature (For electric heating version only)
Press “+” or “-” button to change the floor limiting temperature. Range: 25~60 °C
Press “PRG” button to enter to next step.
4) Programming mode selection
Press “+” or “-” button to ‘00’ for 5+1+1 programming or ‘01’ 7 individual days programming.
Press “PRG” button to enter to next step.
5) Anti-frozen function
Press “+” or “-” button to turn on/off this function or change setting temperature. Range: 3~10 °C
Press “PRG” button to enter to next step.
6) Open window detect function (OWD function)
Press “+” or “-” button to ‘00’ for close this function and ‘01’ for open this function.
Press “PRG” button to enter to next step.
7) OWD Detect Time
Press “+” or “-” button to change OWD Detect Time. Range:2-30 min
Press “PRG” button to enter to next step.
8) OWD Drop temp. select(within detect time)
Press “+” or “-” button to change OWD Drop temp. select . Range:2-4 ℃
Press “PRG” button to enter to next step.
9) OWD Delay time select (Return to previous working status)
Press “+” or “-” button to change OWD Delay time select. Range:10-60 min
Press “PRG” button to enter to next step.
10) Pair for sender to receiver (For RF wireless version only)
Please refer to the part 14 .
Press “PRG” button to enter to next step.
11) Reset to factory setting
Press “+” or “-” button to ‘01’, and then press “SET” button for 5s, wait until thermostat restart
Menu Description
01 Clock setting- Minute
02 Clock setting- Hour
03 Weekday setting
HTW-GBCRT-B-RFKA
11

7, Floor limiting temperature(For electric heating version only)
When the floor temperature reaches the set value, the thermostat forcibly stops heating and the receiver's “Heating
on” red light flashes to remind the customer that the floor temperature limit function is activated, When the floor
temperature is lower than the set value, and the “Power” green light stops flashing. The thermostat returns to normal
state.
8, Anti-frozen function
Press “-” button to " -- " for turn off Anti-frozen function, Press “ + ” button to turn on the Anti-frozen function and
change the set temperature, When the room temperature reaches this temperature, the thermostat forcibly turns on
the heating. When the room temperature is higher than this temperature by 2 °C, the thermostat automatically turns
off the heating.
9,Open window detect function(OWD function)
When the Open Window mode is enabled in the parameter setting, the system will automatically stop heating when it
detects a sudden drop of room temperature (2°C in 5 minutes as default). This is normally caused when a window or
door isopened without turning off the heating device.
The device will return to the previous mode of operation after 30mins, then OP disappear. Press any button will exit
OWD function during the heating off period.
10, Floor temperature sensor fault reminder(For electric heating version only)
When the thermostat detects that the floor temperature limit sensor is faulty,the heating will be forcibly stopped and
the “power” traffic light flashes alternately to remind the user to check the sensor. When the fault is eliminated, the
thermostat returns to the normal state.
11, Child lock
Press ON/OFF button for 3 seconds to engage/disengage key-lock function key-lock shows “ ”
12, Mode select
Press “PRG” button to select Manual mode (MAN) and Programmable mode (PRG).
Manual mode: With under the manual mode, to control the unit to ON/OFF manually.
Programmable mode: The unit can be operated by the setted time & temperature automatically, the programmable
mode with 4 period times &4 related temperatures, its function show as below:
13, 5+1+1 OR 7 individual days programmable setting
1) Press and hold PRG button for a while to enter program setting.
2) Set the schedule (Weekday-Period-Start time-Temp.) by pressing + and - button, each press of PRG button will go
to next item setting.
Example:
Monday to Friday Saturday Sunday
Period 1 2 3 4 1 2 3 4 1 2 3 4
Time 6:30 8:00 18:00 22:30 8:00 10:00 18:00 23:00 9:00 12:00 19:00 0:00
Te m p. 21°C 18°C 21°C 16°C 21°C 21°C 21°C 16°C 23°C 21°C 16°C 21°C
12

14.Code Pairing
1) Long press the code pairing button on the receiver until LED 1 is flickering quickly.
2) Turn off sender, and long press “SET” button until the screen is lit, then press “PRG” button again nine
times ,Then press “SET” button and waiting.
3) Wait for a while, LED 1 stop flickering. Code pairing done.
15. Wiring diagram
Code pairing button
Heating on indicator (LED 1)
Power supply indicator (LED 2)
On/off button
13

16.Installation
Sender
Wall installation put on desk
Receiver
14

17.Dimension
15


MANUEL DE L’UTILISATEUR
FRANÇAIS
KAIRÓS
HTW-GBCRT-B-RFKA
CHRONOTHERMOSTAT À
RADIOFRÉQUENCE POUR CHAUDIÈRES

1.Introduction du produit:
Le thermostat numérique HTW-GBCRT-B-RFKA adopte la puce la plus avancée au monde. avec le
capteur NTC interne de haute précision du thermostat pour détecter et comparer la température.
L'équipement de chauffage est automatiquement mis en marche/arrêt pour maintenir la température
intérieure souhaitée de la pièce. L'option Occupé/non-occupé permet d'économiser de l'énergie. Le HTW-
GBCRT-B-RFKA est doté d'un grand écran LCD, et affiche l'état du mode de travail (refroidissement/
chauffage/évacuation) de la température intérieure et de la température de consigne, etc.
Le clavier comprend : Mise en marche/arrêt ( ), set , programmable(PRG) et deux boutons de réglage
( et ).
2. Caractéristiques principales
Thermostat de chauffage
2xAAA alimentation par piles
Style moderne et attrayant
Montage en surface
CE, approuvé ROHS
3.Données techniques
4.Affichages et boutons
Function de les boutons:
Bouton marche/arrêt: Appuyez sur ce bouton pour allumer/éteindre.
Bouton "Set" : Réglage de l'horloge et de la température
Bouton + : pour l'augmentation de la température et du paramétrage.
Alimentation électrique - batterie 2*AAA Rétro-éclairage - Blanc
Contact relais récepteur - Max 0,5A Capteur - NTC 10K
Gamme de points de consigne - 5~30ºC Précision - ± 0.5ºC (contrôle des étapes par + 0.5ºC)
Ambiance - 0~50ºC Classe de protection - IP30
Relative Humidity - 85% Boîtier - ABS selon UL94-5, plastique ignifuge
Réglage de la température
et des paramètres
Temp. de
chambre
Bouton de réglage
Bouton marche/arrêt
Réglage de la température
et des paramètres
Bouton PRG
Jour de la semaine
Période en cours
Horloge
HTW-GBCRT-B-RFKA
18
This manual suits for next models
2
Table of contents
Languages: