BECA BHT-1000GBLW User manual
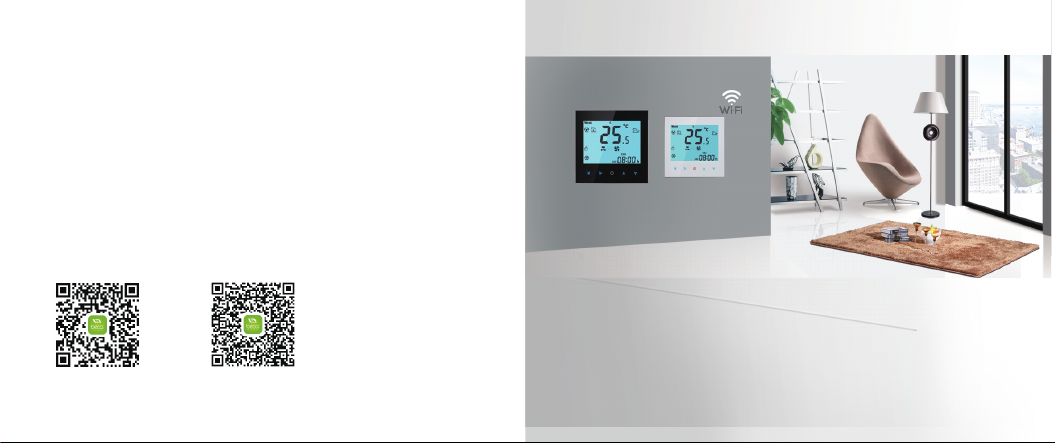
BUILDING ENERGY SAVING
WIFI HEATING THERMOSTAT
IOS Android

Take your modern life.
Clear, Concise, Convenient operation.
C
O
M
F
O
R
T
FEATURES
A
B
L
E
Option of piano black or diamond white
casings.
Fashionable, contemporary design to suit any
Outstanding performance, outstanding quality
Remote control via the APP on your
smartphone or tablet
Touch panel display – no awkward buttons
Accuracy of 0.5°C maintains your pre-set
temperature
Backlit display
Lowers energy bills
Easy to use - Easy to programme
décor
Manage your heating 24/7 from anywhere

Welcome
Thermostat
Screws
Installation/programming manual
Wall plate
1pc
2pc
1pc
1pc
Contents
* Your Wi-Fi thermostat supports DHCP protocol only.
Please ensure your router is DHCP enabled prior to
the connection process.
12
Thank you for your purchase.
Your new thermostat will provide uniform
and comfortable temperature control
throughout every room in your property. We
bring together technology, craftsmanship and
the highest quality materials to provide you
with a safe, reliable product combined with
sleek, contemporary design. Please read this
installation/programming manual for compre-
hensive instructions on installing and operating
your thermostat. Please ensure a suitably
qualified person installs your thermostat
and complies with all local regulations.
2.5m external (floor) sensor (optional) 1pc
* Your thermostat Wi-Fi module frequency is 2.4Ghz.
* Your Wi-Fi thermostat supports WPA & WPA2 only.
It does NOT support WEP.
YOUR THERMOSTATS
The BHT-1000 Wi-Fi range has been developed
to control electric underfloor, water heating or
boiler systems using your smartphone or tablet via
the thermostat’s App. These units are
designed for use in commercial, industrial,
civil and domestic properties.
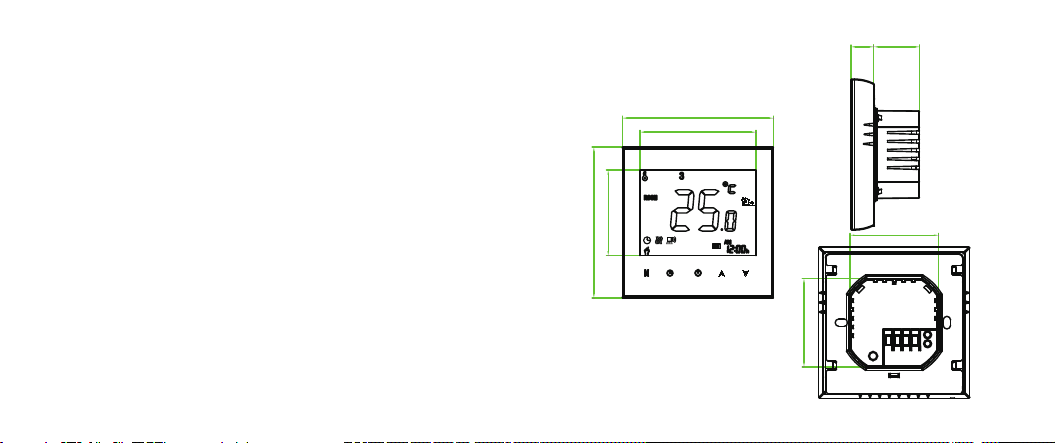
DIMENSION
Unit: mm
3 4
86.0
86.0
65.9
48.6
13.0 26.0
50.3
50.3
Your thermostat carries an 18 month warranty
from date of purchase. Service outwith the
warranty period may incur a charge.
Warranty
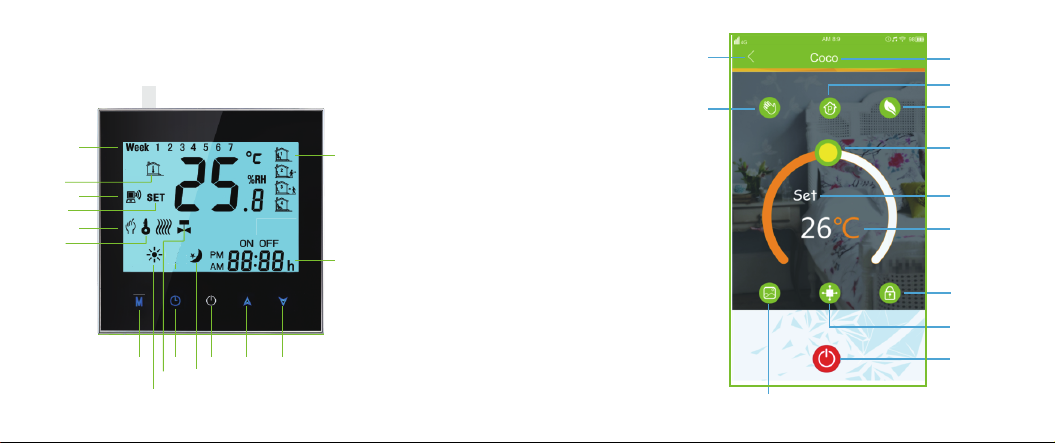
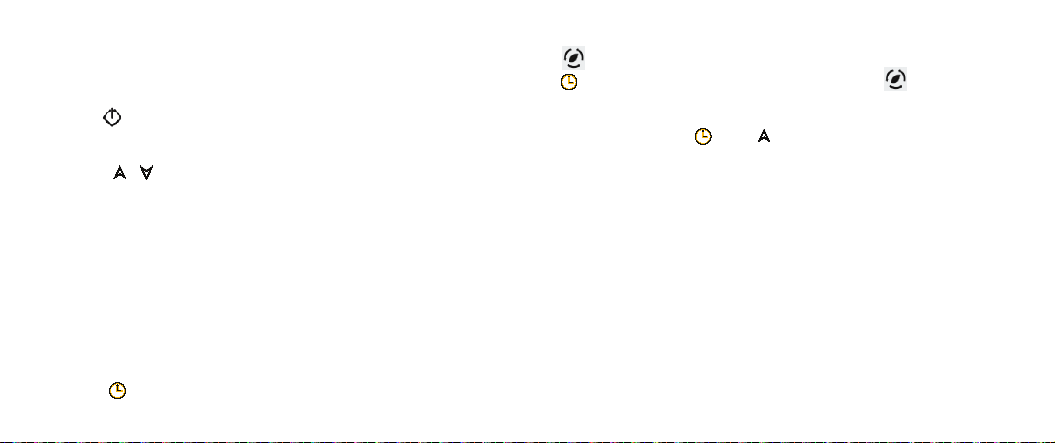
HOME SCREEN QUICK REFERENCE
56
1. Power
2. Temperature Up
3. Temperature Down
4. Time
5. Periods
6. Week
7. Room Temperature
8. Wi-Fi
9. Set Temperature
10. Manual
11. Lock
1
4
5
6
7
8
9
10
11
12 2 3
13
14
15 16
12. Mode
13. Heating On
14. Valve On
15. Clock
16. Sleep
17. Back to Home Page
18. Manual
19. Programmable
20. Set Programmable
1
21. External Sensor
22. Room’s name
23. Choose or take photo
2/3
11
23
21
9
7
24. Economy Mode
24
19
22
18
17

TECHNICAL DATA
Sensor:NTC
Accuracy:±1℃
Set Te mp. Range:5-35℃
Room Temp. Range:5-99℃
Power Consumption:< 1.5W
Timing Error:<1%
Power Supply:AC95 ~ 240V, 50 ~60Hz
Current Load:3A(water heating),
16A(electric heating)
Shell material:PC+ABS (flame retardant)
Dimension:86x86x13.3mm
Ambient Temp.:0-45℃,5-95%RH
(Non-condensing)
Storage Temp.:-5-55℃
Installation Hole distance: 60mm
WIRING
78
AC 95~240V
IP20
NL
1 2 3 4
M
5
6
NTC
GA
L1 N1
LOAD
IP20
NL
12 3 4
NTC
5
6
GB
Note:
GA is for water heating;
GB is for electric heating;
GC is for boiler.
AC 95~240V
Notice: Do not over-tighten the
terminals in your thermostat as
damage may occur.
AC 95~240V
IP20
NL
1234
5
6
NTC
GC
Dry Contact
Close
Open
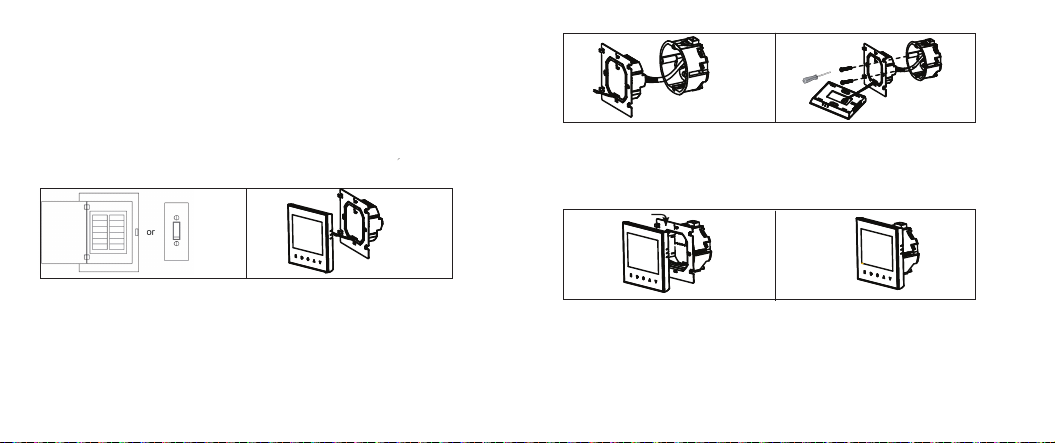
INSTALLING YOUR THERMOSTAT
Your thermostat is suitable for installation within a
standard 86mm pattress box or European 60mm round
pattress box.
9 10
Step 1. Keep power off. See Fig 1.
Step 2. Remove the mounting Plate. See Fig 2.
Fig 1 Fig 2
Step 3. Connect power supply, load and external (floor) sensor
into the appropriate terminals if there is external sensor.
(see “Wiring your thermostat” for details and Fig 3).
Step 4. Fix the mounting plate into the wall with screws in
the box. See Fig 4
Fig 3
Fig 4
Step 5. Fasten body of thermostat and the mounting plate
through the groove. See Fig 5.
Fig 5 Fig 6
Step 6. Installation complete. See Fig 6.
RISK OF ELECTRICAL SHOCK. Disconnect/isolate
power supply prior to making electrical connections.
Contact with high voltage components can cause electrical
shock, severe injury or death.
OPERATION/PROGRAMMING
1. Power on/off
Press to turn on/off.
2. Adjusting/setting the temperature
3. Setting the clock
4. Checking the floor temperature
11
Press to set the desired temperature
Press to display the floor temperature. The
will show on the screen of your thermostat. Press
6. Adjusting/setting the program schedules
When Wi-Fi connection is made, your thermostat will
automatically accept the program schedule made via
the APP on your device (see page 27/28 for detailed
instructions) To set the program schedules through
your thermostat (NOT via your smartphone/tablet)
simply follow the instructions on pages 13/14.
to revert back to room temperature. will disappear.
5. Locking your thermostat
Press and hold and at the same time for 5 sec,.
to lock/unlock your thermostat.
12
Note: If your thermostat is in program mode
this temperature adjustment will revert to
pre-set temperatures at the next scheduled time.
Your thermostat will automatically update and
reflect the time of your smartphone/tablet once
a Wi-Fi connection is made.
Please note: Setting the programme schedule through your
thermostat can only be carried out if there is no Wi-Fi connection
between your thermostat and smartphone/tablet.

13 14
Touch M(mode) to change between manual mode
and programme mode. In manual mode, will
show in the bottom left of the screen. In programme
mode, touch and hold the icon Muntil the weekday
schedule settings appear (1 2 3 4 5 will show along
the top of the screen).
Use the and arrows to adjust the on time
Press the icon Mand use the and arrows to
set the off time (2nd period).
Repeat this process for periods 3 and 4.
Press the icon Monce more to enter the
weekend schedule settings (6 & 7 will show along
the top of the screen).
Repeat the above process to set the weekend
schedule. Press Monce more to confirm and exit.
Default settings for program schedule
A separate schedule may be set for weekdays
(Mon – Fri) and for weekends (Sat – Sun).
(1st period.)
Press the icon Mand use the and arrows to
set the temperature.
Time display
WEEKDAY (MONDAY – FRIDAY)
(1 2 3 4 5 shows on screen)
WEEKEND (SATURDAY – SUNDAY)
(6 7 shows on screen)
TIME
TEMPERATURE
TIME
TEMPERATURE
Period 1 (On time)
08:00
25°C
08:00
25°C
Period 2 (Off time)
12:00
25°C
12:00
25°C
Period 3 (On time)
13:30
25°C
13:30
25°C
Period 4 (Off time)
18:00
25°C
18:00
25°C

16
15
8. System function settings
With power off, press and hold both M and for 5
seconds to enter the System Functions. Press M to
scroll through the available functions, and use the
and arrows to change the available options.
Your thermostat will automatically exit the System
Functions settings after approximately 15 - 20
seconds of inactivity. All settings are automatically
confirmed when power is switched on.
Please note:
1.“Err” on your thermostat indicates a fault with the external (floor)
sensor. Your thermostat will be inoperative until the error is rectified.
Code Function Setting & options Default
1Air temperature
calibration Range is -9°Cto +9°C for internal sensor -2
2Switching
differential
Range is 1°C to 5°C
The number of degrees above/below set temperature before
switching on/off
When default is set to 1°C the thermostat will switch on 0.5°C
below the set temperature and will switch off 0.5°C above the
set temperature.
1
3Button locking 0: = All buttons locked except the Power button
1: = All buttons are locked 1
4Sensor selection
0 = control temperature using the internal sensor
1 = control temperature using the external (floor) sensor
2 = control temperature using internal sensor to control
temperature, and external sensor to limit the floor temperature
0 for GA/GC
2 for GB
5Minimum
temperature setting
Range is 5°C - 15°C. 5
6Maximum
temperature setting
Range is 25°C - 35°C. 35
712/24 hour clock 12h: = 12 Hour clock
24h: = 24 hour clock 1
8Display Mode 0:display set temp. only
1:display both set temp. and room temp. 1
9
Maximum floor
temperature
protection setting
Range is 10°C - 70°C.
When chosen floor temperature is reached, the system will
automatically switch off. This facility is used to protect delicate
floor coverings.
45
0:
1:
2.When sensor selection is “2” (option 4 above) the room temperature
will be displayed on your thermostat by default. The floor temperature
can be temporarily displayed by pressing the button. Your thermostat
will revert to display the room temperature by pressing the button
once more.

WI-FI CONNECTION
Before using your Wi-Fi thermostat for the first time,
you must configure the Wi-Fi signal and settings
through your smartphone or tablet. This will allow
communication between your connected devices.
Step 1 Download your APP (Fig 1-1)
Fig 1-1
Step 2 Connect your Wi-Fi signal
On your thermostat
With power on, press and hold the and arrows
simultaneously for eight (8) seconds. The icon
will flash.
Then, on your smartphone/tablet
Open the Wi-Fi networks (usually found in
“Settings”) and connect to SSID USR-WIFI232-S
signal being broadcast by your thermostat (see Fig 2)
17 18
in Google Play and download. Alternatively, scan the
relevant QR code here (See Fig 1-3).
For IOS devices, search for BECA ENERGY
in Apple Store and download. Alternatively, scan the
relevant QR code here (See Fig 1-2).
Fig 1-2 IOS Fig 1-3 Android
For ANDROID devices, search for BECA ENERGY

(Fig 2)
Open the App (Fig 3) and you will be taken to
the first settings page (Fig 4-1 & 4-2)
19 20
(Fig 3)
(Fig 4-1) (Fig 4-2)
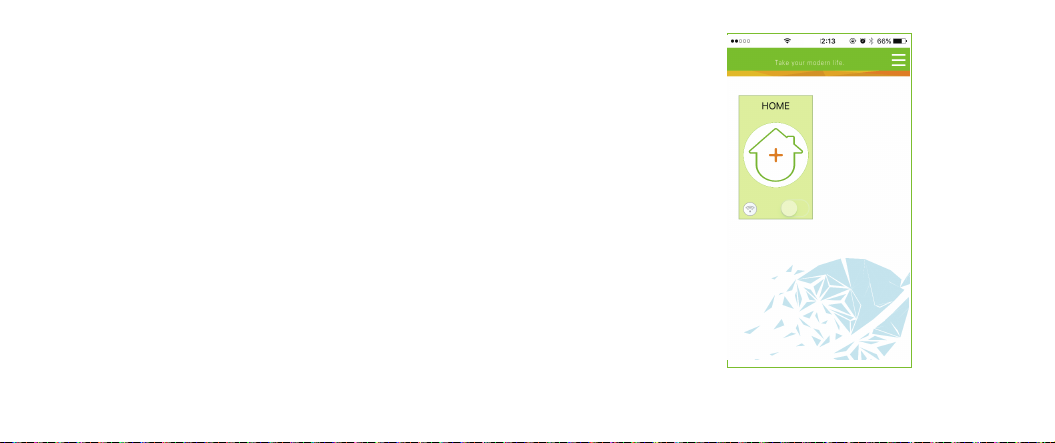
22
Press the “+” icon to add your room. You will be
taken to the second settings page.
(Fig 5)
Note 1:
The room details will show: set temperature, room
temperature, room name, Wi-Fi signal indicator and
power (slide) button.
Note 2:
21
Click Language Choice and select the one you
need. Then press DONE. (Fig 4-1 & 4-2) You will
then be taken to the home page. (Fig 5)
You may add up to 12 rooms in total. More quantity,
please contact with us.

(Fig 6)
23 24
This may typically take up to 5~90 seconds to complete.
Click in the first window to name your room (Emma’s
bedroom, Lounge, Kitchen etc.)
In the “Choose your equipment” window please select
“For Heating” in the drop-down list.
Connect the wireless signal by touching the image
to the right of the “Search your network”
window. The App will automatically search for and list
any available wireless routers. Select your router,
enter the password for your router in the window
below and click “Done”
Your room name
Fan Coil system
or Heating System
The account of your
wireless router
The password of your
wireless router
25 26
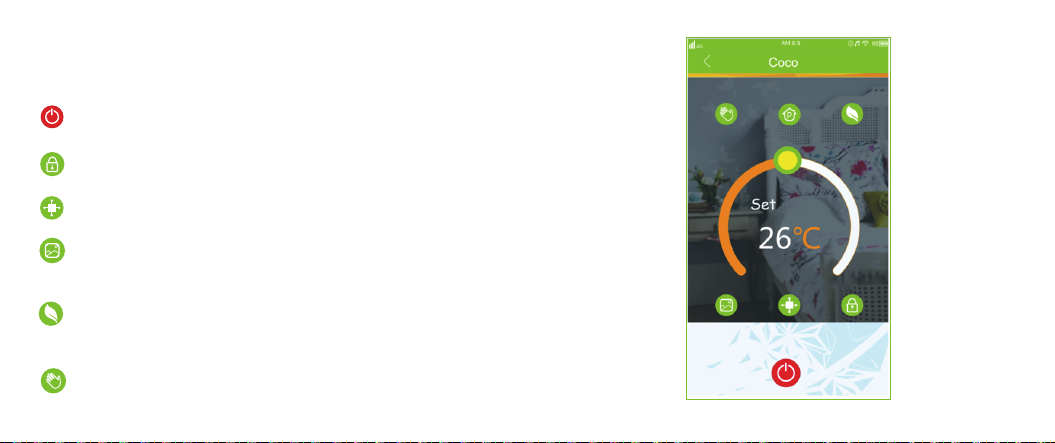
Note 1:
Click on your room from the home screen and begin
programming your thermostat (image 7)
(Fig 7)
Power On/Off button. If button is red, the power is
“On”. If button is grey, the power is “Off”.
Lock/Unlock button. If button is green, the screen is
“locked”. If button is grey, the screen is “Unlocked”
Photo button. Press this button to take a photo of
your room or choose an image from your photo library
as a background image for your room.
Economy button. In this mode, the temperature will be
set to 26 degrees C. This temperature cannot be
changed or adjusted.
Manual button. In this mode your heating can be set
manually (i.e. NOT using the pre-programmed settings)
External Sensor button. Click this button to show the
floor temp.

27 28
When in Manual mode, press the button to select
the Program mode and vice-versa.
Program button. When this button shows, your
thermostat is in program mode and will follow any
pre-set heating schedule.
(Fig 8)
WeekendWorking Days
0 8 :3 0
1 2 :0 0
1 3 :3 0
1 8 :0 0
15℃
25℃
Save
Schedule Setting
* Slide the yellow button backwards or forwards to manually
adjust the temperature, the temperature will show in the centre
of the page. After a few seconds the current room temperature
will show. If this button is grey, there is no Wi-Fi connection.
* When in Program mode, click on the schedule logo (next
to the Program button) to be taken to the schedule page (see
fig 8) where you can simply click on the working days (Mon-Fri)
and then the time/temperature to adjust to your preferred schedule.
* Your thermostat provides two programmed heating periods
each day – You can set the “On” time, “Off” time and the
temperature for each of these daily heating periods.
* Repeat the above after clicking on the Weekend
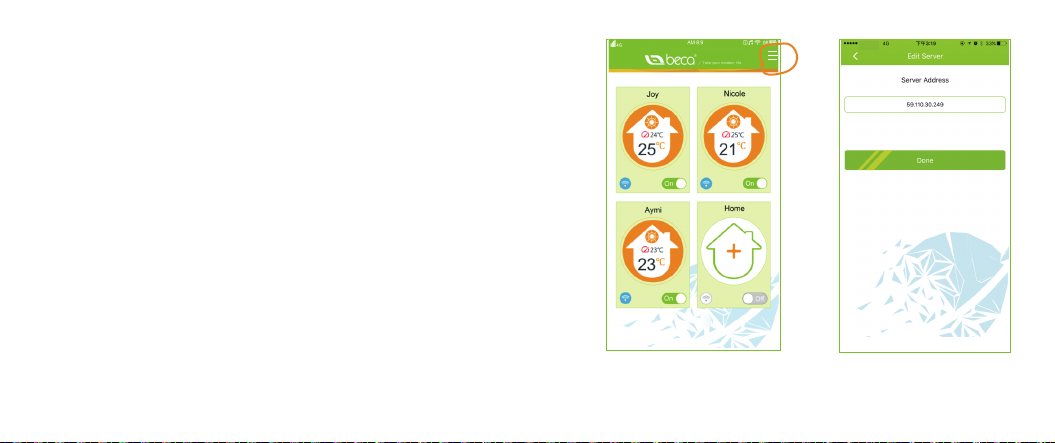
7. If you wish to change/adjust your server settings
or language, press on the menu logo in the top
right of the home page (see Figs 9 & 10 & 4-2).
29
(Fig 9) (Fig 10)
30
(Sat –Sun) settings at the top of the page
* Once your schedule has been set, click on SAVE and
the App will send your schedule to your thermostat and
confirm the schedule has been saved.
* Your thermostat can be controlled by multiple
devices. Simply download the BECA ENERGY App and
go through the initial set-up/connection process.
Multiple devices cannot control one thermostat
simultaneously.
* The unique ID number of your thermostat is
displayed on a sticker on the rear of your thermostat.
This manual suits for next models
1
Table of contents
Other BECA Thermostat manuals


Popular Thermostat manuals by other brands


APW Wyott
APW Wyott HFW-1S owner's manual

CAME BPT
CAME BPT TA/500 Installation and use manual

Neptronic
Neptronic EVCB14NIT2S Specification and installation instructions

I WARM
I WARM 710 User and installation manual

Carel
Carel ir33 smart operating instructions

S+S Regeltechnik
S+S Regeltechnik THERMASGARD RTM1 operating instructions


