2
OPERATION
Recharging Profiller
TM
electro
(Fig. 3)
The Profiller™ electro operates on two (2 x
1.2V) rechargeable, environmentally friendly
NiMH batteries.
• Plug the charger jack (6) into the base of the
Profiller™ electro.
• Plug the charger (5) into a suitable wall
socket. The charger red indicator will light up.
• Allow unit to charge for 14 hours (75 mA/h)
from empty to fully charged.
• Once fully charged, the charger automatically
switches and the red indicator goes off.
A red battery warning light (4) is triggered
whenever the charge is low. Battery should
then be recharged.
Pipetting can also take place while the unit is
connected to the charger.
INBETRIEBNAHME
Aufladen des Profiller
TM
electro
(Fig. 3)
Der Profiller™ electro wird mit zwei (2 x 1.2V)
aufladbaren NiMH Batterien betrieben.
• Ladestecker (6) an Basis des Profiller™ elec-
tro anschliessen.
• Ladegerät (5) an Wandsteckdose anschlies-
sen. Die Ladeanzeige leuchtet rot auf.
• Die komplette Ladedauer für leere Batterien
beträgt 14 Stunden (75 mA/h).
• Sobald das Aufladen beendet ist, schaltet sich
das Ladegerät automatisch aus und das rote
Kontrollicht erlischt.
Bei schwachem Batterieniveau leuchtet die
Akku-Niedrigstand-Anzeige (4) rot auf. Batteri-
en sollten aufgeladen werden.
Pipettiervorgänge sind während der Aufladezeit
durchführbar.
UTILISATION
Recharger Profiller
TM
electro
(Fig. 3)
Le Profiller™ electro fonctionne avec deux piles
NiMH (2 x 1.2V) rechargeables et écologiques.
• Engager la prise (6) dans l’embase du Pro-
filler™ electro.
• Brancher le chargeur (5) à une prise murale.
Un témoin rouge s’allume lors du branche-
ment.
• Le chargement complet s’effectue en 14 heu-
res (75 mA/h).
• Une fois le chargement terminé, le chargeur
stoppe automatiquement et le témoin rouge
s’éteint.
Un voyant d’alarme rouge (4) sur l’instrument
s’allume lorsque les piles sont faibles et doivent
être rechargées.
Pipetage possible pendant la recharge des piles.
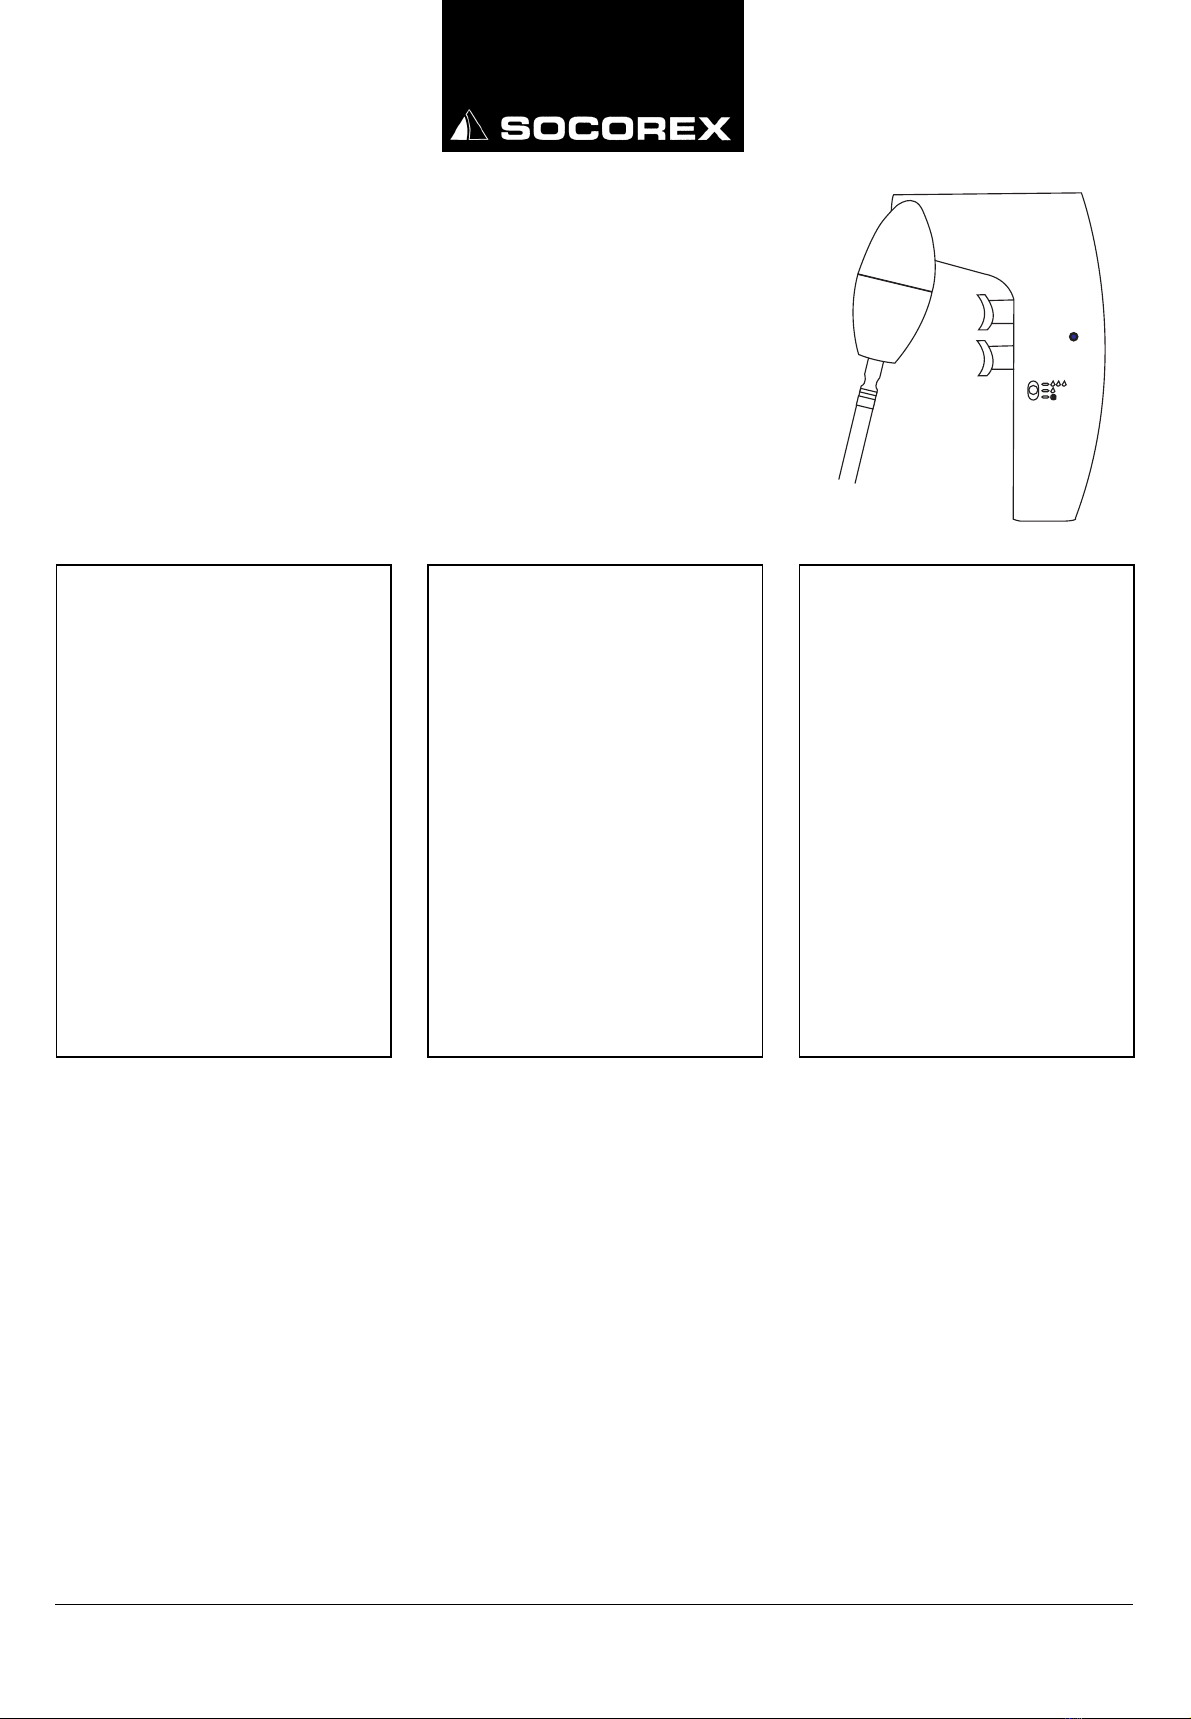
Speed selection:
The Profiller™ electro has a conveniently locat-
ed slide switch (3) which allows the user to se-
lect between three modes of operation:
• Switch position ooo (top): Aspire and dis-
pense at full speed (blow-out pipette)
• Switch position o(middle): Aspire and dis-
pense at reduced speed (blow-out pipette).
• Switch position
G
(bottom): Aspire at reduced
speed, dispense by gravity (to deliver pipette).
Wahl Arbeitsgeschwindigkeit:
Der Profiller™ electro verfügt über einen opti-
mal platzierten Schiebeschalter (3) für die Aus-
wahl von drei verschiedenen Funktionsweisen:
• Position oben ooo: Aufsaugen und Abgabe
bei voller Arbeitsgeschwindigkeit (Ausblaspi-
pette).
• Position mitte o: Aufsaugen und Abgabe bei
reduzierter Geschwindigkeit (Ausblaspipette).
• Position unten G: Aufsaugen bei reduzierter
Geschwindigkeit, Abgabe durch Schwerkraft
(Auslaufpipette).
Sélecteur de vitesse:
Le Profiller™ electro dispose d’un sélecteur
coulissant (3) autorisant trois modes de fonc-
tionnement:
• Position haute ooo: Aspiration et distribution
à vitesse maximale (pipette à écoulement
total).
• Position intermédiaire o: Aspiration et distri-
bution à vitesse réduite (pipette à écoulement
total).
• Position basse G: Aspiration à vitesse réduite
et distribution par gravité (pipette jaugée).
Pipette fitting
Carefully attach glass or plastic pipette by in-
serting it into the holder of the nose cone with-
out using force.
Aufsetzen der Pipette
Glas- oder Plastikpipette vorsichtig und ohne
Gewalt in den Pipettenhalter am Nasenkonus
einfügen.
Fixation de la pipette
Insérer avec précaution et sans forcer l’extrémi-
té de la pipette dans le porte-pipette.
Aspiration
Hold the instrument in a vertical position with
the pipette tip down. Place tip of the pipette into
the liquid to be aspirated. Select mode of oper-
ation – top, middle for “blow-out” pipette or G
for “to deliver” pipette. Depress intake trigger
(1). The harder the pipetting trigger is pressed
the faster the aspiration.
Fill the pipette until the meniscus level has
reached the required mark.
Ansaugen
Instrument in vertikaler, mit der Pipettenspitze
nach unten zeigender Position halten. Pipetten-
spitze in die aufzusaugende Flüssigkeit eintau-
chen.
Funktionsweise auswählen – obere, mittlere Po-
sition des Schiebeschalters für Ablaufpipette
oder Gfür Auslaufpipette. Auf Ansaughebel (1)
drücken. Je mehr Druck ausgeübt wird, umso
schneller erfolgt das Ansaugen.
Pipette auffüllen, bis der Pegel die erforderte
Markierung erreicht hat.
Aspiration
Tenir le Profiller™ electro en position verticale,
la pipette dirigée vers le bas. Sélectionner le
mode de fonctionnement – position haute, in-
termédiaire ou G. Plonger le bout de la pipette
dans le liquide à aspirer. Activer le bouton d’as-
piration (1). La pression exercée sur ce bouton
est proportionnelle à la vitesse d’aspiration.
Remplir la pipette jusqu’à atteindre le niveau du
ménisque souhaité.
Dispensing
Place pipette against wall of the receiving ves-
sel and:
In “Blow out” mode: Switch (3) on top or middle
position, depress the lower trigger (2). The
harder the pipetting trigger is pressed the faster
the dispense.
In “To deliver” mode: Switch (3) on G position,
depress the dispense trigger (2). Lower trigger
(2) opens the air inlet, allowing liquid to run out
by gravity. Wait for the required time indicated
on the pipette (i.e. EX + 10 s) for dispensing to
be completed.
Abgabe
Pipette gegen die Wand des Empfängergefäs-
ses halten und auf Ausgabehebel (2) drücken.
Ausblaspipetten-Modus: Ausgabehebel (2), mit
Schiebeschalter in oberer oder mittlerer Posi-
tion, drücken. Je fester der Dosierhebel belastet
wird, umso schneller erfolgt die Abgabe.
Auslaufpipetten-Modus: Ausgabehebel (2), mit
Schiebeschalter in Position G, drücken. Der
Lufteinlass öffnet sich, Flüssigkeit läuft im
Schwerkraft-Modus aus. Notwendige, auf der
Pipette angezeigte Dauer (z.B. EX + 10 s) abwar-
ten, bis Flüssigkeitsabgabe komplett erfolgt ist.
Distribution
Placer l’extrémité de la pipette contre la paroi
du récipient et:
«Pipette à écoulement total»: Sélecteur (3) en
position haute ou intermédiaire. Appuyer sur le
bouton de distribution (2). La pression exercée
sur ce bouton est proportionnelle à la vitesse de
distribution.
«Pipette jaugée»: Sélecteur (3) en position G.
Activer le bouton de distribution qui ouvre la
soupape. Le liquide s’écoule par gravité. Atten-
dre le temps indiqué sur la pipette (p. ex. EX +
10 s) pour une distribution complète.
Removing the pipette
Hold the pipette and rotate gently while pulling
out from the holder.
Entfernen der Pipette
Pipette vorsichtig unter leichtem Drehen aus
dem Pipettenhalter herausnehmen.
Retrait de la pipette
Extraire la pipette du porte-pipette par un mou-
vement de rotation.
TIGHTNESS
Take care of the instrument to keep it in perfect
working condition. To test tightness, attach a pi-
pette and fill it at least to half of its nominal
capacity. Drops falling from the pipette tip indi-
cate a leak. Unscrew nose cone (10), check pi-
pette holder (9) and membrane filter (8).
Reassemble correctly.
DICHTIGKEIT
Das Instrument unter grösster Sorgfalt benüt-
zen, um den perfekten Betriebszustand auf-
rechtzuerhalten. Kontrolle der Dichtigkeit:
Pipette einsetzen und mindestens zur Hälfte der
Nominalkapazität auffüllen. Tröpfchenfall von
der Pipettenspitze weist auf undichte Stelle hin.
Nasenkonus (10) abschrauben, Pipettenhalter
(9) und Membranfilter (8) überprüfen. Korrekt
zusammensetzen.
ÉTANCHÉITÉ
Prendre soin de l’instrument afin de le garder
en parfait état de fonctionnement. Tester l’étan-
chéité en fixant une pipette sur l’instrument et
aspirer au minimum la moitié de sa capacité no-
minale. Une goutte qui se forme et se détache
de la pointe est le signe d’un manque d’étan-
chéité. Dévisser le cône (10) et contrôler le por-
te-pipette (9) et le filtre à membrane (8).
Remonter chaque composant avec soin.