humimeter.com humimeter FS3 User manual

User manual
food and luxury food moisture meter
humimeter FS3
Version 2.8_en
© Schaller GmbH
2016

page 2 version 2.8_en
1. Place the empty provided cup (0.5 litre)
on the scale and turn the scale on. It
shows 0.0 gram.
2. Make sure that the measuring chamber is
completely empty. It is important that no
material is left in the measuring chamber
when you turn on the device.
3. Switch on the humimeter FS3 by pressing
the power button ( ) for 3 sec.
4. The next step is a self calibration. The
word “reinitialize” will show up on your
display. Accept by pressing the button.
5. Select the right calibration curve for your
material under test using the buttons or
.
6. Fill up the cup with the sample material
(+/- 1.0g). The filling quantity needed is
shown on the upper left corner of the
display of the device.

version 2.8_en page 3
7. Fill up the measuring device with the
sample material. The filling needs to be
done slowly and constantly to ensure
reproducible results.
8. The display shows the measuring result.
9. If the measuring value is blinking, the
valid measuring range has been
exceeded (limits see list on page 5). In
this case the accuracy is decreasing.
10. To save the results in the store menu
press ( button). Storage
was successful when the number in
front of the symbol increases. To
reach the store menu please press ( )
until the appears.
11. To name the saved results press the
button.
12. Empty the humimeter and ensure that no
grain rests are accumulated in the
measuring chamber.

page 4 version 2.8_en
Changing batteries
Your new device is provided with batteries.
If the batteries are empty, please proceed as follows:
1.) Press with your finger onto the arrow of
the battery cap und pull it back.
2.) Remove the empty batteries.
3.) Put four new batteries in the device.
Check the right position of the battery
poles.
4.) Press down the batteries and close the
cap.
If the battery symbol appears in the measuring
window resp. if a critical charge of battery is
shown in the status, the batteries have to be
changed IMMEDIATELY.
If you do not use your humimeter device for a
longer period, remove the batteries. For eventual
resulting damages we cannot provide any
warranty.
List of calibration curves
Press the or key in the measuring
window for at least 3 seconds and a list with
all available sorts will appear. Select your sort
by pressing or and confirm with the
key. The measurement will continue
automatically.

version 2.8_en page 5
Calibration curves
300g wheat
5..28%
300g durum
5..28%
300g rape
5..18%
230g pumpkin seed
2..20%
310g peas
5..25%
300g soybeans
9..18%
277g scarlet runner
8..25%
300g rice peeled
9..25%
250g rice unpeeled
4..30%
300g rice brown
4..26%
285g raw coffee
peeled
9..18%
285g raw coffee
unpeeled
5..40%
160g roasted coffee
1..20%
150g kibbled coffee
2..10%
300
g
poppy
5..15%
220g
cocoa bean
4..20%
300g
flax seeds
7..
15%
2
8
0g
sesame
3..10%
3
00g
millet
5..15%
300g sorghum millet
5..25%

page 6 version 2.8_en
300g buckwheat
5..18%
Empty
Special
products can
be calibrated or
existing curves
can be entered!
Empty
Special
products can be
calibrated or
existing curves
can be entered!
reference
only for internal
use!
Additional calibration curves:
On request Schaller GmbH can develop customized calibration curves
for your specific product. Schaller GmbH can also enter already existing
calibration curves subsequently.
Design of the device
Determination of the material reference moisture
The principle is a comparison measurement with the dehydration
method according to EN ISO712. Take the measured sample and
weigh it. Dry it out in an oven and weigh it again.
measuring
chamber
name of
calibration
curve
water content
batteries slot
(flipside)
POWER button
filler assistance
M
n
: Mass with average moisture content
M
t
: Mass of the dried sample
%F: Calculated moisture content
100% ×
−
=
Mn
MtMn
F

version 2.8_en page 7
Options
Date / Time
Log Time
Language
Unlock
°C / °F
BL On Time
Auto Off Time
Materialcalib.
o Online Send
o Online Print
Password
Reset
Next calibration curve
Previouse
calibration curve
Power off (3 sec.)
Watch the saved data (logs)
Save new value (log)
Power off (3 sec.)
Switch upper
Switch lower
Open this menu / Enter
ype selection
menu
Store menu
Main menu
Edit Logs
Manual Logs
Clear Logs
Print Logs
Last Log
All Logs
Clear Logs
Send Logs
Manual Logs
Clear Logs
Options
Status
Keypad symbols
Measuring window:
Rolling Menu
Power ON / OFF
Switch upper
Switch lower
Save
Hold
Watch the
saved data
Suppliers data
can be added
Menu:
Enter
Switch upper
Switch lower
Exit
Enter numbers
Enter letters
Next or right
Left
Yes
No
Shift
OK
Menu level overview
Overview
main menu

page 8 version 2.8_en
Transfer saved data to the PC
To send your saved logs to the PC, connect
the humimeter device to your PC using the
USB cable that was delivered with your
device. Carefully loose the protection cap on
your humimeter and plug in the USB mini B
connector. The bigger connector has to be
connected to a USB slot on your PC.
Start the LogMemorizer software on your
PC and switch on your humimeter BM2.
The data transfer can be started on your
humimeter or on the software.
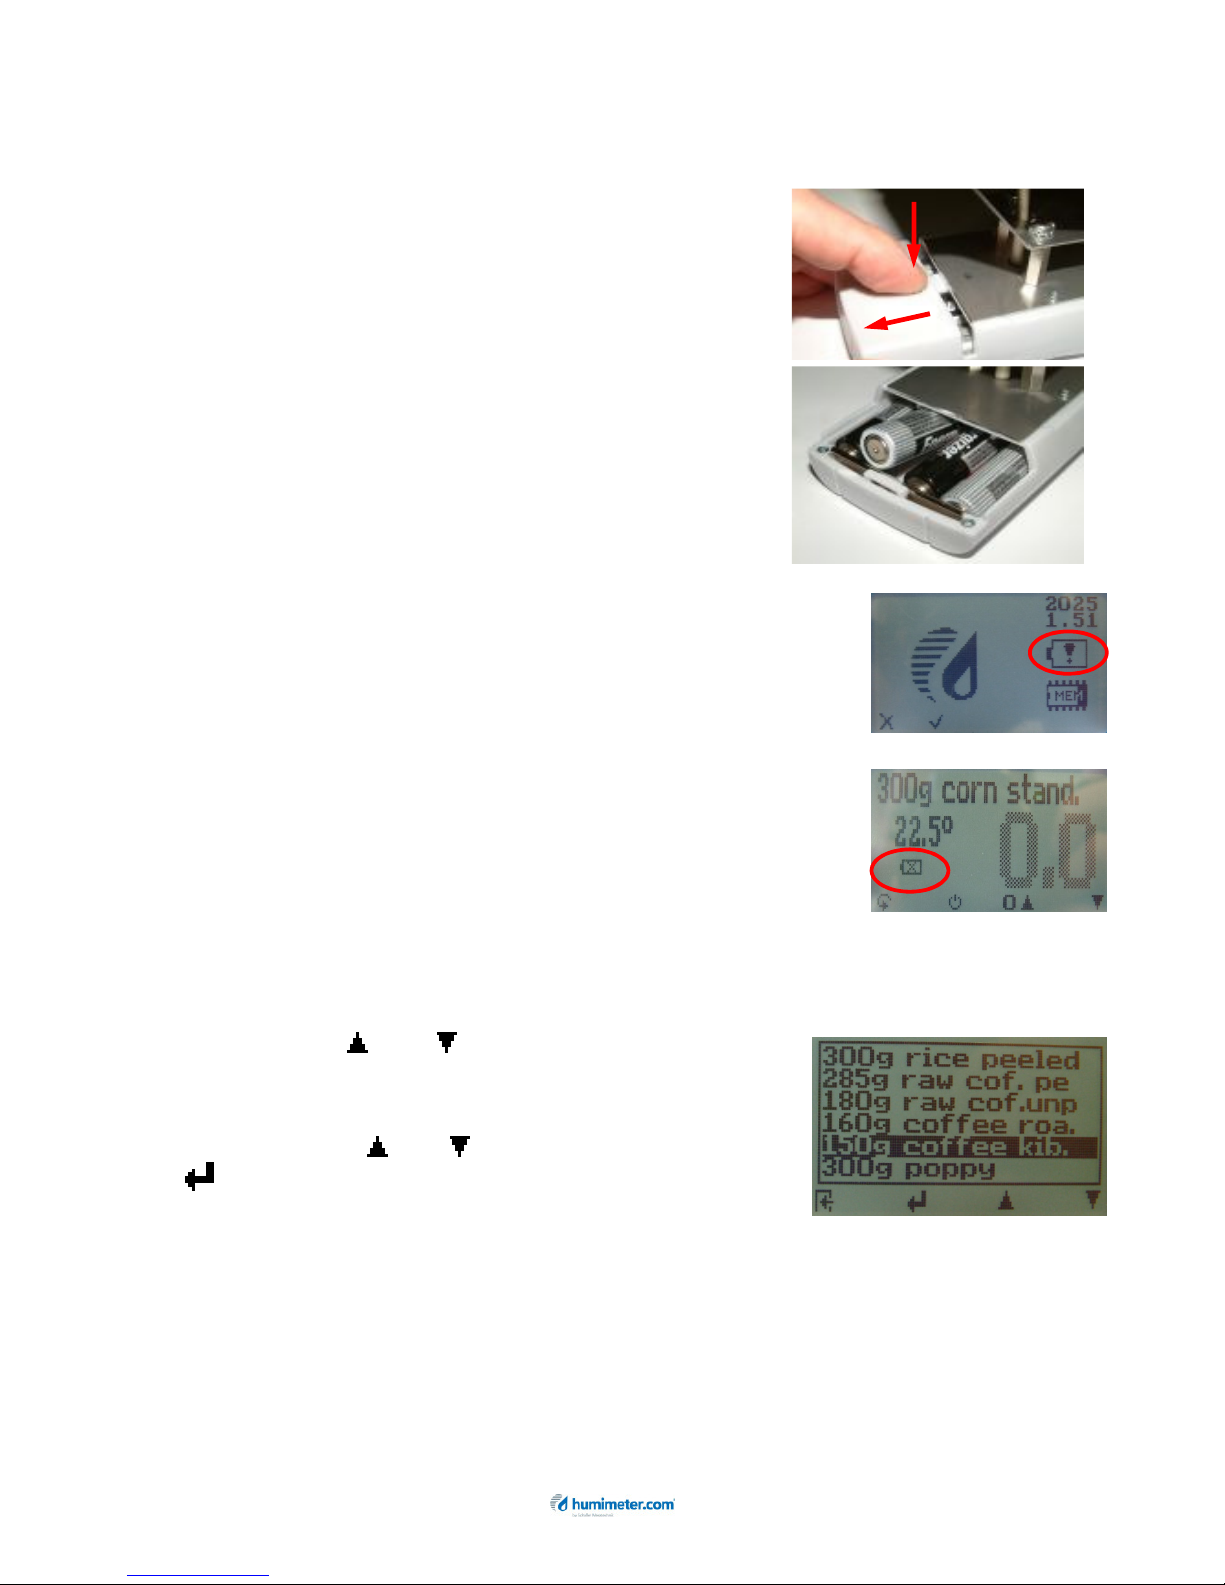
Starting the data transfer on the humimeter:
Press the key until you reach the menu
(see image on the right). Then choose
„Send Logs“ and confirm by pressing the
key. Now choose „Manual Logs“ and
confirm with again. All saved logs will be
sent to your PC.
Starting the data transfer on your PC:
Press the button „communication“ in the
LogMemorizer software. A menu with
several options opens (see image below).
For transferring the data you can select „get
last manual log“ (the last saved measuring
series is transferred) or „get all manual logs“
(all saved logs are transferred).
If you click on one of these buttons, the
transfer starts immediately.
For the basic adjustments of the software
please look through the instructions on the
LogMemorizer USB flash drive.

version 2.8_en page 9
Print saved data
To print your saved data, connect the device
to the printer using the printer cable that
was delivered with your device. Carefully
loose the protection cap on the humimeter.
At first plug in this side of the connector
having the plastic casing close to the end at
the humimeter. Then switch on the device.
Not till then the other side of the cable has
to be plugged in at the printer. Switch on the
printer by pressing . Now the green LED is
blinking. If it does not blink, please change
the batteries and try again.
Press the button at your humimeter until
you reach the menu (see image on the
right). Choose „Print Logs“ and confirm by
pressing .
Now you can select a print of the last saved
measuring series or of all saved measuring
series (logs).
Confirm by pressing again. The selected
logs are printed out now.
To save paper, please think of clearing the
data storage regularly.
Online Print and Online Send
Your device supports the functions “Online
Print” and “Online Send”. These functions
can be activated in the menu „Options“. If an
option is active, every newly recorded log
will immediately be printed or transferred to
the PC after pressing the key.

page 10 version 2.8_en
Exemption from liability
For miss-readings and wrong measurements and of this resulting
damages we refuse any liability. This is a device for the quick
determination of moisture. The moisture depends on multiple
conditions and multiple materials. Therefore we recommend a
plausibility check of the measuring results. Each device includes a
serial number and the guarantee stamp. If those are broken, no
claims for guarantee can be made. In case of a faulty device,
please contact Schaller GmbH (www.humimeter.com) or our
dealer.
Activation of the “super user” function
2 times - Options – Unlock
Enter the 4-digit password by using the button (standard is the
4-digit serial number) and confirm by pressing the button.

version 2.8_en page 11
Technical data
Resolution of the display 0.1% water content
0.5°C temperature
Measuring range 0up to 40% depending on the
material
Operation temperature 0 up to +40°C (32 up to 104°F)
Storage temperature -20°C to +60°C
Temperature compensation automatically
Power supply 4 pcs. 1.5 Volt AA Alkaline
batteries (900 measurements)
Auto Switch OFF after app. 6 minutes
Current consumption 60mA (with light)
Display 128x64 matrix display, lighted
Dimensions 260 x 70 x 250 mm
Weight approx. 1.3 kg (with batteries)
Degree of protection IP 40
Scope of supply FS3 incl. plastic case
digital scale (max.500g, 0,1g)
measuring cup 0,5 liter
4 pcs. 1,5Volt AA Alkaline batt.
rubber protection cover
Optional accessories USB interface for PC transfer,
USB cable,
LogMemorizer software,
portable thermo printer
Device maintenance instructions
To provide a long life of your device please do not expose it to
strong mechanical loads or heat e.g. dropping it or direct sunlight
exposure. Clean your device using a dry cloth. The measuring
chamber needs to be cleaned with a dry and soft brush.
Any kind of wet cleaning damages the device. The instrument is
not rainproof. Keep it in dry areas. When the device is not used for
a longer period (6 months) or when the batteries are empty, they
should be removed to prevent a leakage of the battery acid.

page 12 version 2.8_en
! IMPORTANT ! please read
Most common reasons for miss readings
•Product temperature out of application range
Material of a temperature below 0°C resp. above +40°C (32
to 104 °F) may cause faulty measurements. The storage of
cold material in a warm storage area usually creates
condensed water which may lead to major measuring errors.
•Not adjusted material under test
Let your humimeter adjust to the surrounding temperature of
the material for approx. half an hour.
A very high temperature difference has a negative effect on
the stability of the measurement results.
•Wrong calibration curve
Before measuring your sample please double-check the
correct selection of the calibration curve.
•Wrong filling quantity
Fill in exactly the right weight (± 1.0g) of material in the
measuring chamber.
•Wet or mouldy material
•Frozen measuring material
•Polluted measuring material
Polluted material e.g. barley spikes or other material mixed
with the sample has a negative effect on the measurement
Table of contents
Other humimeter.com Measuring Instrument manuals
Popular Measuring Instrument manuals by other brands

Agilent Technologies
Agilent Technologies 5062-8218 Installation note

Huber
Huber HM28 operating instructions

Savant
Savant SmartEnergy SEM-1024 Quick reference guide

AlphaLab
AlphaLab TriField EM100 quick start guide

Redback
Redback A 4567A manual

Agilent Technologies
Agilent Technologies E8362B Service guide

Metrohm
Metrohm OptiProbe NIRS XDS manual

DISAG
DISAG RM IV operating instructions

Siemens
Siemens AlgoRex DJ1191-Ex installation instructions

PASCO
PASCO SF-9568A instruction sheet

Bosch
Bosch GMS 120 Professional Original instructions

KROHNE
KROHNE LEVEL-SONIC BM90 Series Installation and operating instructions