manuals.online logo
Brands
  1. Home
  2. •
  3. Brands
  4. •
  5. humimeter.com
  6. •
  7. Measuring Instrument
  8. •
  9. humimeter.com RM1 User manual

humimeter.com RM1 User manual

User manual
Universal moisture meter for
recycling-materials
humimeter RM1
Version 1.2_en
© Schaller GmbH
2014
Page 2 Page 1.2_en
Version 1.2_en Page 3
Design RM1 recycling-material probe
(art. no. 12518)
Sensor cable
Measuring
head
Handle
Insertion
probe
Plug
Page 4 Page 1.2_en
Measuring procedure RM1 recycling-material probe
1. For a correct measurement please ensure that the device has
the same temperature than the recycling material (+/-3°C). For
that reason, let your humimeter RM1 adjust to the surrounding
temperature of the material for at least half an hour before
measuring.
2. Switch on the device: Press the
key for
three seconds.
3. Plug the probe of your RM1 recycling-
material probe straight into the
recycling material. It is not allowed to
load the measuring head incorrect or drop
it down!
4. Plug in the sensor cable into the socket of
the RM1. Take care of the correct
position and fix it with the knurled nut.
5. Change the calibration curve: Press one
time the key and then the or key.
The name of the calibration curve can be
seen at the head of the display.
6. Now the display shows the water
content. Left hand the temperature is
displayed.
7. To save the results in the save menu
press the ( button). The storage was
successful when the number in front of
the symbol increased. To reach the
store menu please press ( ) until the
appears.
8. To name the saved results press the
button.
9. Remove the RM1 probe straight with
caution and clean the measuring head.
Version 1.2_en Page 5
Risk of injury by measuring head!
Keep away from children!
Calibration curves RM1 recycling-material probe
Calibration curves
Declaration
Measuring
range
Wood chips
Standard wood chips 10 - 50 %
Waste wood
Wood chips out of waste wood 10 - 50 %
Sawdust
Sawdust 14 - 50 %
Recycling mater.
Standard recycling material 5 - 50 %
Recycling spez 1
Recycling material with a
high plastic content 10 - 50 %
Recycling spez 2
Recycling material with a
very high plastic content 10 - 50 %
Recycling spez 3
Recycling material with a
high cellulose content 10 - 50 %
Recycling spez 4
Recycling material with a
very high cellulose content 10 - 50 %
Digit 2
For special product
Empty 1
Customer calibration made by Schaller GmbH
Empty 2
Customer calibration made by Schaller GmbH
Test block
! Only for testing the RM1 with the test block !
Recycling spez 1 and Recycling spez 2 include the possibility of a
thin water film on the plastic pieces, if the plastic content is really
high. Recycling spez 3 and Recycling spez 4 include the moisture
expansion by a high content of cellulose.
Compression of recycling material
The humimeter RM1 is calibrated for normally compressed
recycling material. If the measured recycling material is
compressed to a much lesser or greater extent, this will cause
measuring imprecision.
Page 6 Page 1.2_en
100% ×
−
=
Mn
MtMn
WG
Selection of calibration curve
Due to the different compositions of recycling material there is no
standardised allocation of calibration curves. The different
calibration curves refer to the different contents of plastic and
cellulose in the material.
To ensure the best accuracy of your measurement you have to
carry out a comparison measurement using your online moisture
measuring system or by kiln-drying (according to DIN 287) once.
1.) Measure the water content of your recycling material using all
calibration curves that offer realistic results and write down the
measuring results of the different calibration curves.
2.) Now please note the effective water content determined by
your online measurement system or carry out a reference
measurement according to EN ISO 287.
3.) Compare the determined reference water content with the
measuring results of the different calibration curves. Use the
calibration curve with the measuring result nearest to the
reference water content.
Determination of the reference water content
The humimeter RM1 determines the water content, which means that it
calculates the moisture referred to the total mass (EN ISO 287):
Mn: Mass of the sample before drying
Mt: Mass of the dried sample
%WG: Calculated water content
Version 1.2_en Page 7
Menu
level overview
Store
menu
Type
selection menu
Next
calibration curve
Previous calibration curve
Power
off (3 sec.)
Watch the saved data (lo s)
Power off (3 sec.)
Save new value
Keypad symbols
Measuring window:
Rolling Menu
Power ON / OFF
Switch upper
Switch lower
Save
Hold
Watch the
saved data
Suppliers’ data
can be added
Rotate display
Menu:
Enter
Switch upper
Switch lower
Exit
Enter numbers
Enter letters
Next or right
Left
Yes
No
Shift
OK
Options
Date / Time
Log Time
Language
Unlock
°C / °F
o User level
BL On Time
Auto Off Time
Materialcalib.
Password
Reset
Edit Logs
Manual Logs
Clear Logs
Print Logs
Last Log
All Logs
Clear Logs
Send Logs
Manual Logs
Clear Logs
Options
Status
Overview main menu
Main
menu
Switch upper
Switch lower
Open this menu / Enter
Page 8 Page 1.2_en
Changing batteries
Please find enclosed the manual for
changing of batteries:
1.) At first remove the rubber protective
housing. For that, hold the rubber
housing at the upper side and pull it
over. If your RM1 is provided with an
optional USB port, you have to remove
the protection cap before.
2.) Press with your finger onto the arrow of
the battery cap und pull it back.
3.) Remove the empty batteries.
4.) Put four new batteries in the device.
Make sure that the position of the
battery poles is correct.
5.) Press down the batteries and close the
cap.
If the battery symbol appears in the
measuring window resp. if a critical charge
of battery is shown in the status, the
batteries have to be changed
IMMEDIATELY. If you do not use your
humimeter device for a longer period,
remove the batteries. For eventual resulting
damages we cannot provide any warranty.
Version 1.2_en Page 9
Running the instrument
Switch on: Press the key for three seconds
Set the clock: Press three times the key -> Options ->
Date/Time
Save measuring value: Save the measuring value by pressing the
button below the symbol. The storage
was successful when the number in front
of the symbol increased. To name the
saved results press the button.
Hold measuring value: At first activate the function in the menu
Options -> Datalog time by choosing
“Hold”. Then press the left key until
appears. Press the key. The
measuring value remains on the display
until another button is pressed.
Display lighting: Press the key; Backlight will turn off
automatically after 30 seconds. Backlight
will be activated by pressing any key.
Power off: Press the key for five seconds; the
device will be switched off when you leave
the key. The device also switches off
automatically when no key is pressed for
four minutes.
Measuring range limit: If the measuring value is
blinking, the valid
measuring range is
exceeded. In this case
the accuracy will be decreasing.
List of calibration curves
Pressing the or key in the measuring for at least three seconds
and a list with all available sorts will appear. Select your sort by
pressing or and confirm it with the
key. The measurement
will continue automatically.
Page 10 Page 1.2_en
Activation of the “super user” function
Two times - Options – Unlock
Enter the 4-digit password by using the button (standard is the
4-digit serial number) and confirm by pressing the button.
Changing the User level
Changing from advanced user to single user:
Make sure that you have activated the “super user” functions
according to the instructions above. Afterwards change to the
menu and choose „Options“.
In the submenu please select „o User level“ (two times - Options
– o User level)
Confirm by pressing the button. Now the single user is activated.
Changing from single user to advanced user:
Keep both the buttons and pressed directly after switching on
the device. Your humimeter automatically starts the main menu.
Activate the the “super user” functions according to the instructions
above.
Navigate to “Options – o User level” and confirm by pressing the
button.
Device maintenance instructions
To provide a long life of your device please does not expose it to
strong mechanical loads or heat e.g. dropping it or direct sunlight
exposure. Clean your device using a dry cloth. Any kind of wet
cleaning damages the device.
It is not allowed to load the measuring head incorrect (stress,
bending), otherwise it can be broken. Plug and remove the
insertion probe of your RM1 straight into the recycling material.
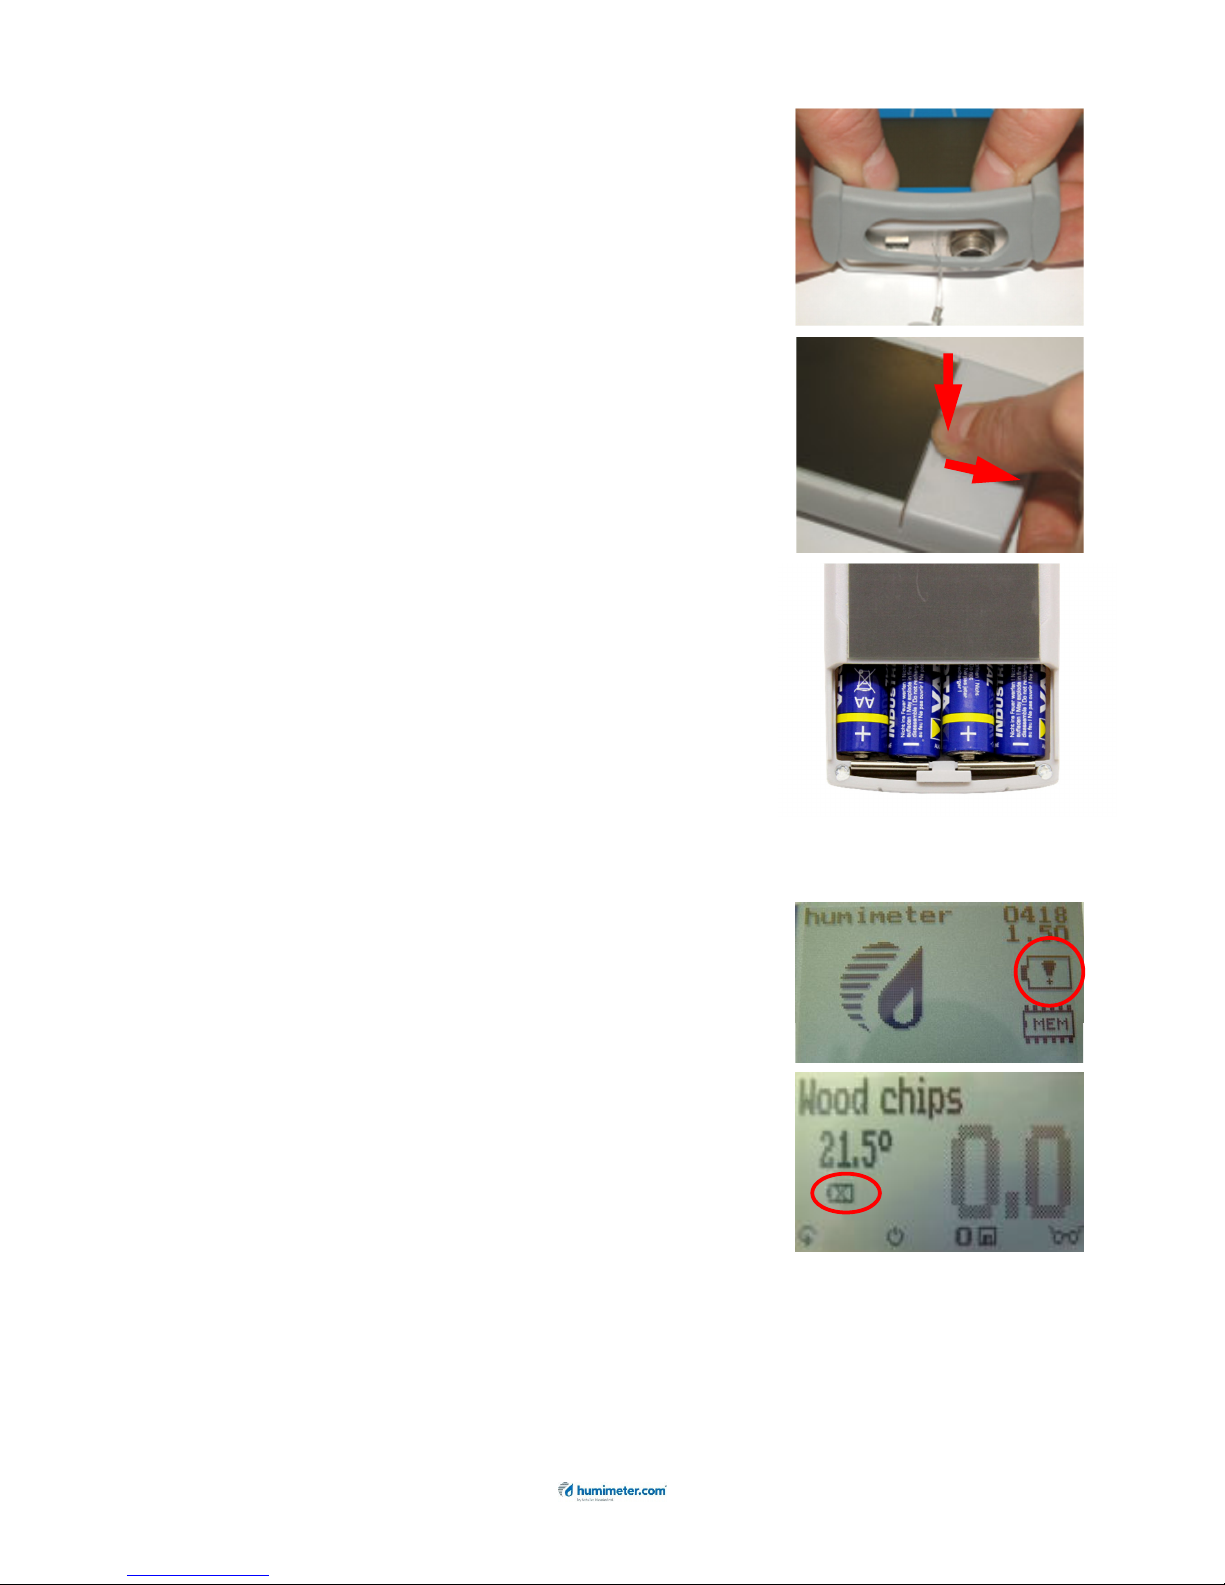
The instrument is not rainproof. Keep it in dry areas. When the
device isn’t used for a longer period (2 months) or when the
batteries are empty, they should be removed to prevent a leakage
of the battery acid.
Version 1.2_en Page 11
Transfer saved data to the PC
(Only possible with humimeter USB
interface module)
To send your saved logs to the PC, connect
the humimeter device to your PC using the
USB cable that was delivered with your
device. Carefully loose the protection cap on
your humimeter and plug in the USB mini B
connector. The bigger connector has to be
connected to a USB slot on your PC.
Start the LogMemorizer software on your
PC and switch on your humimeter RM1.
The data transfer can be started on your
humimeter or on the software.
Starting the data transfer on the humimeter:
Press the key until you reach the menu
(see image on the right). Then choose
„Send Logs“ and confirm by pressing the
key. Now choose „Manual Logs“ and
confirm with again. All saved logs will be
sent to your PC.
Starting the data transfer on your PC:
Press the button „remote control“ in the
LogMemorizer software. A drop-down menu
with several options opens (see image
below).
For transferring the data you can select
„Import last manual log“ (the last saved
measuring series is transferred) or „Import
all manual logs“ (all saved logs are
transferred).
If you click on one of these menu items, the
transfer starts immediately.
For the basic adjustments of the software
please look through the instructions on the
LogMemorizer CD.
Page 12 Page 1.2_en
Print saved data
(Only possible with humimeter USB interface module in
combination with Schaller thermo printer)
To print your saved data, connect the device
to the printer using the printer cable that
was delivered with your device. Carefully
loose the protection cap on the humimeter
RM1. At first plug in the side of the
connector with the close plastic casing at
the humimeter RM1. Then switch on the
device.
Not till then the other side of the cable has
to be plugged in at the printer. Switch on the
printer by pressing . Now the green LED is
blinking. If it does not blink, please change
the batteries and try again.
Press the button at your humimeter until
you reach the menu (see image on the
right). Choose „Print Logs“ and confirm by
pressing .
Now you can select if you want to print the
last saved measuring series or all saved
measuring series (logs).
Confirm by pressing again. The selected
logs are printed out now.
To save paper, please think of clearing the
data storage regularly.
Version 1.2_en Page 13
Technical data RM1 (Art. Nr. 12109)
Operation temperature 0°C to +50°C
Storage temperature -20°C to +60°C
Temperature compensation Automatically
Data logger approximately 10.000 values
Menu languages
German, English, French,
Italian, Spanish, Russian
Power supply 4 pcs. 1.5 Volt AA Alkaline
batteries (900 measurements)
Auto Switch off After approx. four minutes
Current consumption 60mA (with light)
Display 128 x 64 matrix display, lighted
Dimension 150 x 75 x 30 mm
Weight 270 g (with batteries)
Protection class IP 40
Scope of supply humimeter RM1, 4 x 1,5Volt AA
Alkaline batteries, rubber
protective housing
Optional wooden case for RM1, test
block, humimeter USB-data
interface module, portable
thermo-printer
Exemption from liability
For miss-readings and wrong measurements and of this resulting
damage we refuse any liability. This is a device for quick
determination of moisture. The moisture depends on multiple
conditions and multiple materials. Therefore we recommend a
plausibility check of the measuring results. Each device includes a
serial number and the guarantee stamp. If those are broken, no
claims for guarantee can be made. In case of a faulty device,
please contact Schaller GmbH (www.humimeter.com) or our
dealer.
Page 14 Page 1.2_en
Technical data RM1 recycling-material probe
(art. no. 12518)
Resolution of display 0.5% water content
0.5°C temperature
Measuring range 10% to 50% water content
Operation temperature 0°C to +40°C
Temperature measuring range -10°C to +80°C
Dimension 1150 x 35 x 35 mm
Weight 710 g
Protection class IP 40
Version 1.2_en Page 15
Most common reasons for miss readings with RM1
recycling-material probe
•Product temperature out of application range
Material below 0°C resp. above +40°C (32 to 104 °F) may
cause faulty measurements.
•Temperature difference between meter and sample
Please ensure that the device and the material under test are
being stored at the same temperature (+/-3°C) before
measuring. A high temperature difference has a negative
effect on the stability of the measurement results.
•Wrong calibration curve
Before you measure your sample, double check the correct
selection of the calibration curve.
•Frozen or mouldy material
If you measure such products, the accuracy will decrease.
•Water film at the measuring head
After measuring wet material a water film can arise on the
sensor head. This could lead to a too high result in the
following measurement. After measuring wet material clean
both black plastic parts accurately with a dry cloth.
It is not allowed to load the measuring
head incorrect (stress, bending), otherwise
it can be broken. Plug and remove the
insertion probe of your RM1 recycling-
material probe straight into the recycling
material.
Do not move the RM1 probe crosswise to the insertion direction
after plugging in.
Do not drop the measuring head or use it for
any ulterior purposes.
A broken measuring head is no case
of warranty!

Other humimeter.com Measuring Instrument manuals

humimeter.com GF2 User manual

humimeter.com

humimeter.com GF2 User manual

humimeter.com BMA-2 User manual

humimeter.com

humimeter.com BMA-2 User manual

humimeter.com P2 User manual

humimeter.com

humimeter.com P2 User manual

humimeter.com FSG User manual

humimeter.com

humimeter.com FSG User manual

humimeter.com humimeter FS3 User manual

humimeter.com

humimeter.com humimeter FS3 User manual

humimeter.com BP1 User manual

humimeter.com

humimeter.com BP1 User manual

humimeter.com LM6 User manual

humimeter.com

humimeter.com LM6 User manual

Popular Measuring Instrument manuals by other brands

PeakTech P 2790 Operation manual

PeakTech

PeakTech P 2790 Operation manual

wtw DIQ/S 182-MOD System Operating Manual

wtw

wtw DIQ/S 182-MOD System Operating Manual

Sloan TruFlush Repair Parts and Maintenance Guide

Sloan

Sloan TruFlush Repair Parts and Maintenance Guide

McCrometer FPI Mag 394E Installation, operation and maintenance manual

McCrometer

McCrometer FPI Mag 394E Installation, operation and maintenance manual

Michell Instruments MDM50-HP user manual

Michell Instruments

Michell Instruments MDM50-HP user manual

Gemini iKEY manual

Gemini

Gemini iKEY manual

OTR Geotester 3.0 Use and maintenance manual

OTR

OTR Geotester 3.0 Use and maintenance manual

Inficon Micro GC Fusion installation guide

Inficon

Inficon Micro GC Fusion installation guide

SMC Networks PPA Series manual

SMC Networks

SMC Networks PPA Series manual

Bosch Quigo Original instructions

Bosch

Bosch Quigo Original instructions

Sensorsoft SS6610J user manual

Sensorsoft

Sensorsoft SS6610J user manual

Hanna Instruments HI 83141 instruction manual

Hanna Instruments

Hanna Instruments HI 83141 instruction manual

Hach TOC-X5 user manual

Hach

Hach TOC-X5 user manual

Circutor MYeBOX 150 instruction manual

Circutor

Circutor MYeBOX 150 instruction manual

Hanna Instruments 98192 Quick reference guide

Hanna Instruments

Hanna Instruments 98192 Quick reference guide

HBM MVD2555 operating manual

HBM

HBM MVD2555 operating manual

Calian SatService sat-nms user manual

Calian

Calian SatService sat-nms user manual

MONARCH INSTRUMENT Nova-Pro IR 850 instruction manual

MONARCH INSTRUMENT

MONARCH INSTRUMENT Nova-Pro IR 850 instruction manual

manuals.online logo
manuals.online logoBrands
  • About & Mission
  • Contact us
  • Privacy Policy
  • Terms and Conditions

Copyright 2025 Manuals.Online. All Rights Reserved.