Hundure HTA-810PE User manual

HTA-810PE/PM
HTA-820PE/PM
Time & Attendance Recorder
Hardware Manual
Version 1.1

Table of Contents
Chapter 1 Product Overview................................................................................................2
1.1 Package Contents ..................................................................................................2
1.2 Features .................................................................................................................3
1.3 Specifications .........................................................................................................4
Chapter 2 Physical Dimension.............................................................................................5
2.1 Dimension...............................................................................................................5
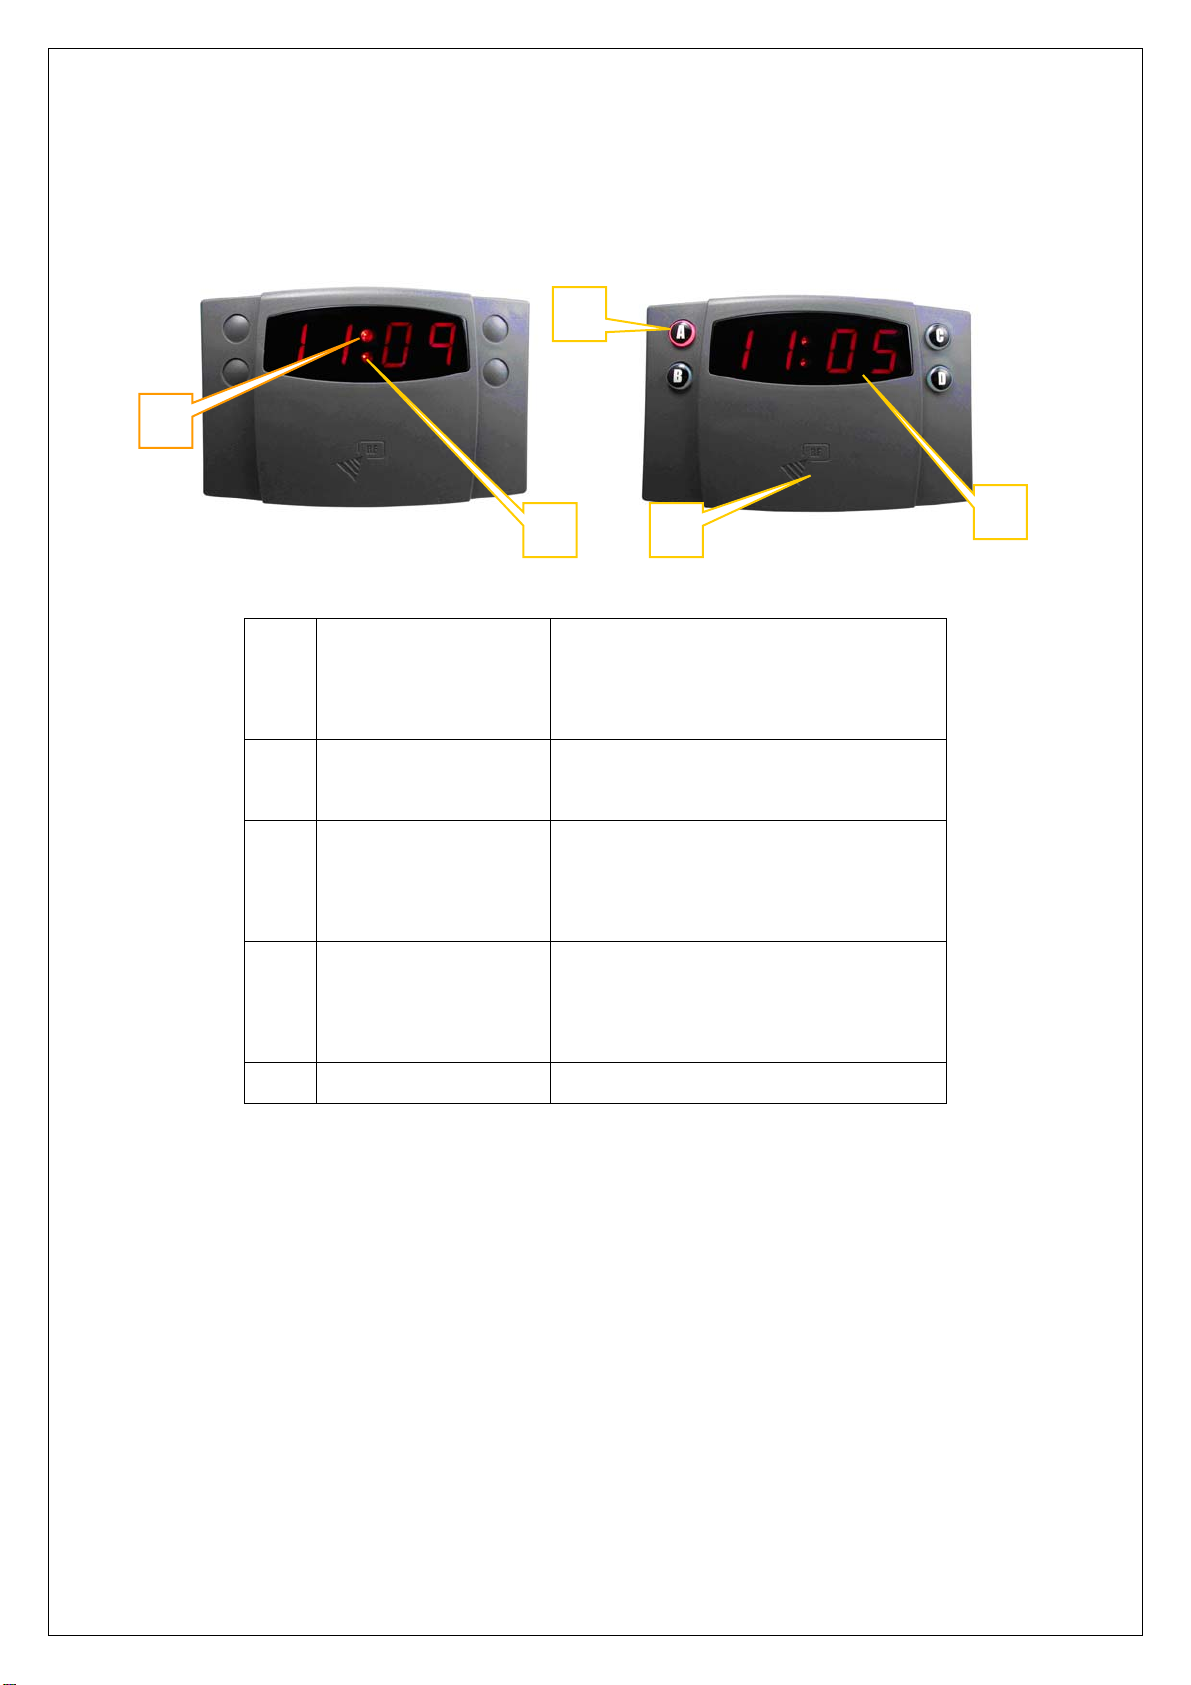
2.2 Appearance Introduction.........................................................................................6
Chapter 3 System Configuration & Wire Connections .........................................................7
3.1 System Configuration .............................................................................................7
3.2 Wire Connections ...................................................................................................8
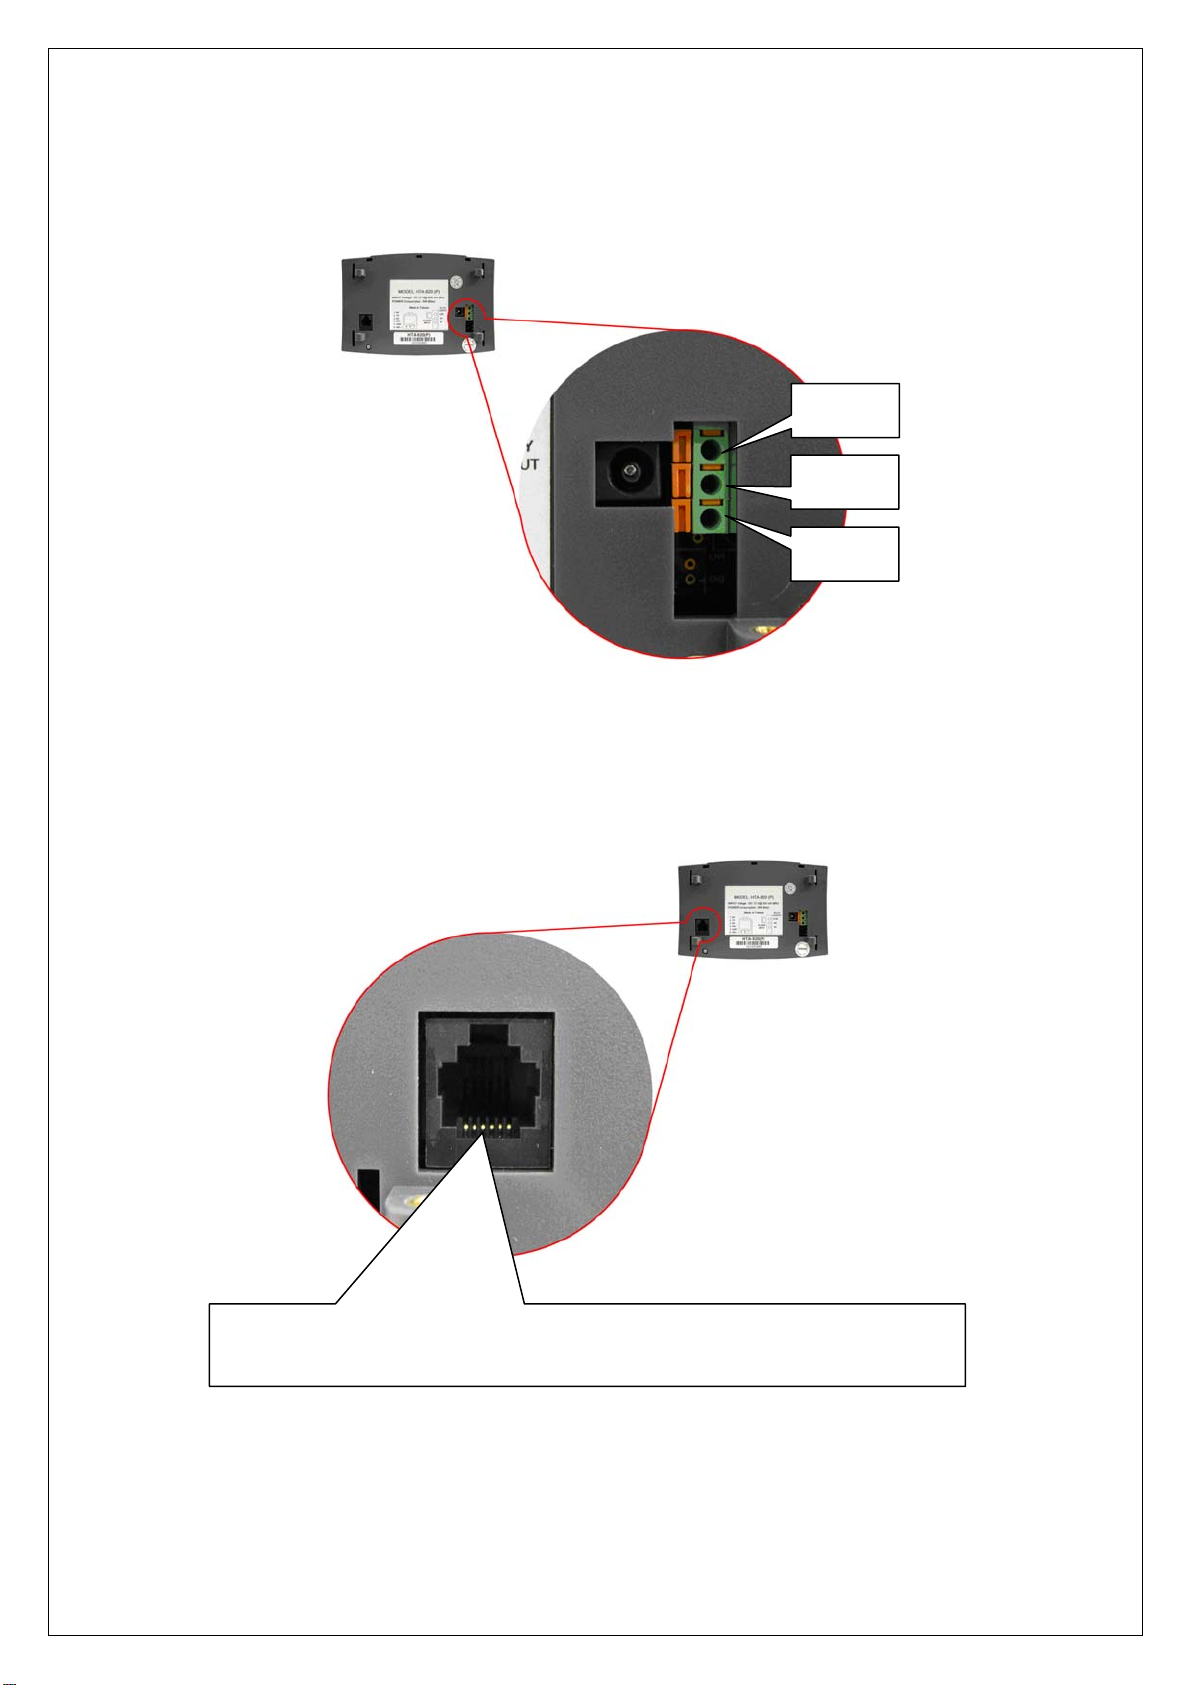
3.2.1 Controller Terminal Introduction ...................................................................8
3.2.2 Siren/Alarm Connection................................................................................9
3.2.3 RS232/RS485 Communication Port .............................................................9
3.2.3.1 RS485 Wiring Connection................................................................10
3.2.3.2 RS-232 Wiring Connection...............................................................10
3.2.4 Power Supply Connection ..........................................................................11
Chapter 4 Installation Guide ..............................................................................................12
Chapter 5 Testing..............................................................................................................13
Chapter 6 Troubleshooting ................................................................................................14
Appendix............................................................................................................................15
Appendix1: Error Message Codes..............................................................................15
Appendix2: Set Controller IP by Tool..........................................................................16
Revision History
HUNDURE 1HTA-810/20 PE/PM Hardware manual
Version Description
V1.0 First Edition
V1.1 Manual format revision

Chapter 1 Product Overview
1.1 Package Contents
Controller x 1 Base x 1 Adaptor x 1
(Option) DC Jack Converter x 1
Hex key wrench x 1
Screw x 4
Cable x 1 Quick Start Guide x 1
HUNDURE 2HTA-810/20 PE/PM Hardware manual

1.2 Features
zSimple, reliable & easily installed, first time set up in 3 minutes.
zSuitable for chains and enterprises.
zCope with seasonal time change - daylight saving control.
zFollows your usual practice – auto or manual clock in / clock out. (HTA-820)
zDynamic control of memory up to 8000 cardholders (max, HTA-820),
z8200 transaction data. (HTA-810/820)
zVisual LED for display of time, card number, communication mode, swiped card
indication.
z16 shift schedule for HTA-820.
z32 sets siren output.
zAuto scheduling for data collection, time synchronization, valid card download.
zInvalid & re-swiped cards off-the-record saves memory capacity.
zMemory full warning.
zAt least 60 days data storage in case of power outage.
zRTC (Real Time Clock) ensures accurate time regardless of power outage.
HUNDURE 3HTA-810/20 PE/PM Hardware manual
zWatchdog function ensures device free from halting.

1.3 Specifications
MODE HTA-810 HTA-820
Processor 8 Bit
Memory 256K
Output Ports 1 Relay (Bell)
Cardholders/Events 8,200 (Events) (max.) 8,000 / 8,200
LED Indicator Visual LED for display of time, Swiped card indication(last 4
digits), COMM. x 1
Keypad x Duty switch by A, B, C, D
Real Time Clock Yes
Beep Tone Buzzer
ID Setting IP tool setting
Read Format & Range Bar Code Type:
Resolution: 0.15mm;
Scanning Speed: 100~1000mm/sec
Magnetic Type:
ISO3554 Standard Track 1 or 2 or 3;
Scanning Speed: 3~40ips
125 KHz (EM Compatible): 8~10 CM (max.)
13.56 MHz (MIFARE® Compatible): 5 CM (max.)
Power Input DC 12V / 1A
Current Consumption 250mA (max.)
Comm. Interface RS-485
Comm. Baud Rate 1,200/2,400/4,800/9,600/19,200 bps-N-8-1
Operating Temp. -10° C ~ 55° C / 14° F ~ 131° F
Relative Humidity 20% ~ 80% (Non-condensing)
Dimension 160mm(L) x 100mm (W) x 40mm (H) (excluding base)
Weight (Device) 300g
HUNDURE 4HTA-810/20 PE/PM Hardware manual

Chapter 2 Physical Dimension
2.1 Dimension
Scale:mm
HUNDURE 5HTA-810/20 PE/PM Hardware manual

2.2 Appearance Introduction
HTA-810/820 Front View
4
3
1
1 Time/ Message
Display
Visual LED to show time, last 4
digits of the card number or error
message.
2 Shift Key(for manual
clock in/clock out) A, B, C, D (4 keys for HTA-820)
3 Communication LED Red LED blinks upon receipt of data
from PC; Green LED blinks upon
trasmission of data to PC.
4 Swipe Card
Indication LED
Green LED blinks upon swipe of
valid card; Red LED blinks when
invalid card is swiped.
5 Card Sensor Area(1) Card sensor
Note 1: This area is card-swiping slot for magnetic models (HTA-810M/HTA-820M) or
barcode models(HTA-810B/HTA820B).
HUNDURE 6HTA-810/20 PE/PM Hardware manual
5
2

Chapter 3 System Configuration & Wire Connections
3.1 System Configuration
HUNDURE 7HTA-810/20 PE/PM Hardware manual

3.2 Wire Connections
3.2.1 Controller Terminal Introduction
Description
A DC 12V Input
B Communication
C Siren Relay Output “COM”
D Siren Relay Output “NO”
E Siren Relay Output “NC”
zCOM: Common contact NC:Norrmally closed NO:Normally open.
HUNDURE 8HTA-810/20 PE/PM Hardware manual

3.2.2 Siren/Alarm Connection
3.2.3 RS232/RS485 Communication Port
6 5 4 3 2 1
RS-485+ GND RS-485- RS-232RX
HUNDURE 9HTA-810/20 PE/PM Hardware manual
RS-232TX NC(N/A)
COM
N.O.
N.C.

3.2.3.1 RS485 Wiring Connection
Note: Assign different IDs for each HTA-810/820 recorder when there are more than one
recorders in the network.
zDefault ID is “1”
zSet your ID with our software.
3.2.3.2 RS-232 Wiring Connection
HUNDURE 10 HTA-810/20 PE/PM Hardware manual

3.2.4 Power Supply Connection
Turn to the back side of HTA-810/820 and connect DC12V/1A power to the power jack
connector.
HUNDURE 11 HTA-810/20 PE/PM Hardware manual

Chapter 4 Installation Guide
(A). Mount the base onto the wall or other desired location.
(B). Connect the wires in accordance with the wiring instruction below.
(C). Install the controller upper cover to the back base.
(D). Mask sure the back base and the controller upper cover guides are aligned.
(E). Using the hex key wrench, fasten the screw onto the bottom of controller.
HUNDURE 12 HTA-810/20 PE/PM Hardware manual

Chapter 5 Testing
1.All LEDs are lit when first
powered on.
(All LEDs are lit.)
2.Then, the device displays
its NODE ID.
(NODE ID: 2)
3.The device displays its
firmware version.
(Firmware Version: 1.8)
4.The device displays
communication baud rate.
(Baud Rate: 9600 bps)
5.The device displays “Time”
for ready mode.
(Ready Mode)
6.When user swipes the card,
the device shows the last 4
digits of the card number.
HUNDURE 13 HTA-810/20 PE/PM Hardware manual
(Swipe card, displaying last 4
digits.)

Chapter 6 Troubleshooting
Q: No LED Display when the device is turned on.
A: Please make sure DC12V power is correctly connected. (Check both the voltage and
the polarity.)
Q: Unable to communicate.
A: 1.If the communication mode if RS-485, please check if NODE ID is correctly set.
2.Please check if the software COM PORT setting (COM PORT number) is correct.
3.Please check if communication baud rate is correctly set.
4.Please check the communication LED-red LED blinks upon receipt of data from
PC and green LED blinks upon transmission of data to PC.
Q: There is no response after swiping cards.
A: 1.Please check if the card is correct and compatible with the type of purchased
HTA-810/820.
2.Please make sure the card is encoded.
3.Make sure the card is swiped over card sensor area.
4.Make sure the right side of the card is used.
Q: There is a response after swiping card, but “Err” or “bad code” appears.
A: Please refer to Appendix 1 for the Error codes descriptions. Contact your dealer if you
find bad codes.
HUNDURE 14 HTA-810/20 PE/PM Hardware manual

Appendix
Appendix1: Error Message Codes
Error Code Description
Err0 Cannot save invalid card
Err1 Re-swipe of card within a limited time prohibited.
Err2 Card number contains non-numeric character under
compression mode.
Err3 Cannot overwrite, memory full.
Err4 Memory buffer 100% full.
Bad0 Flash configuration area damage
Bad1 Flash valid card area damage
Bad2 Flash swiped card area damage
Bad3 SRAM damage
Bad4 Bad sector area damage
Bad5 Flash erase fail (EF)
Bad6 Flash fail
Bad7 Flash fail
When version is V3.03 afterward, Kindly refer to follow figure.
Error Code Description
Err0 Cannot save invalid card
Err1 Re-swipe of card within a limited time prohibited
Err2 Card number contains non-numeric character
under compression mode.
Err3 Cannot overwrite, memory full
Full Memory buffer 90% full
Err A~d Retrieve Invalid Code
HUNDURE 15 HTA-810/20 PE/PM Hardware manual

Appendix2: Set Controller IP by Tool
A、Overview:
HTA-830 Tool.exe is a program that automatically locates TCP/IP based controller as well
as modify the device’s IP address. This program is application to TCP/IP device and does
not require installation. Double click on the programs to execute.
This program used broadcast search and connection method. And the terminal’s firewall
should be shut down in order to locate the devices.
B、Workspace Description:
Device List – Found devices are listed in this area. The following parameters are
also included in the listing:
HUNDURE 16 HTA-810/20 PE/PM Hardware manual
zMAC ID (Media Access Control Identification): It serves as unique identifier of
the device connected over the network. This fixed identification number is set
from the factory and is not allowed to be modified.

zIP (Internet Protocol Address): Default is 172.16.250.100. IP address should be
unique. Kindly differentiate the devices using their MAC ID on the initial search.
zSubmask (Subnet Mask): Default is 255.255.0.0
zGateway: Default is 0.0.0.0
zPort: Communication port, default is 4660.
zBaudRate: Communication baudrate. Different device supports different
baudrate. Kindly check its manual individually.
Function reserved
Search Button: Click this button to search all the devices connected over the network.
New settings area: Modifies device’s IP address, Submask, Gateway, Port and
BaudRate.
Broadcast Setup: This button will set new parameters to a device via broadcast
method.
Connect Setup: This button is connecting with a device and sets its new parameters.
C、Operation Procedure:
C-1 Shut down firewall
C-2 Double click HTA830Tools.exe to execute program.
C-3 Click on “Search” button to locate the devices over the network. Returned results
will be shown in the device list area. Kindly refer to follow figure:
HUNDURE 17 HTA-810/20 PE/PM Hardware manual

zIf found devices have the same IP addresses, kindly differentiate each using their
MAC ID。
C-4 Select a device as shown below:
HUNDURE 18 HTA-810/20 PE/PM Hardware manual
C-5 Current settings of the selected device will be displayed in the ”New” settings area.
To modify it, overwrite the parameters:

zIP:New IP address
zSubmask:Sub Mask
zGateway:Modification is not required if the devices are connected on the same
network.
zPort:Default is 4660 or user-defined port.
zBaudRate:Definition by different devices.
Kindly inquire the necessary information about the network environment from your IT
personnel. All parameter settings should be the same with the system in order to establish
connection with the devices.
HUNDURE 19 HTA-810/20 PE/PM Hardware manual
This manual suits for next models
3
Table of contents
Other Hundure Clock manuals
Popular Clock manuals by other brands

Chacon
Chacon 54420 user manual

Ceridian
Ceridian Dayforce Tuff Clock user manual

Auriol
Auriol 93858 Usage and safety instructions

LA CROSSE CLOCK
LA CROSSE CLOCK BBB85289 quick start guide

Inova Solutions
Inova Solutions ontime Installation and user guide

Oregon Scientific
Oregon Scientific RM313PA user guide