HuntCam HC-300M User manual

User Manual
HC-300M

Contents
1.
Instructions...........................................................................................................1
1.1
GeneralDescription..............................................................................................1
1.2
CameraBodyInterface.........................................................................................1
1.3
Cameracomponentsandfeatures........................................................................1
1.4
RemoteControl.....................................................................................................1
1.5
ShootingInformationDisplay...............................................................................2
1.6
Brief IntroductionforSIM cardand Signal...........................................................2
1.7
Supported Format.................................................................................................2
2.
EasyOperation......................................................................................................2
2.1
PowerSupply........................................................................................................2
2.2
InserttheMICROSD-cardandtheSIM-card.........................................................3
2.3
EnterintotheTEST Mode.....................................................................................3
2.3
.1 UserSettings.........................................................................................................3
2.3.2
Manual Capturing.................................................................................................3
2.3.3
ViewImagesorVideos.........................................................................................3
2.4
Poweron andEnterintotheONMode................................................................4
2.5
PowerOff..............................................................................................................4
3.
Advanced Operations............................................................................................4
3.1
Settings Menu.......................................................................................................4
3.1.1
PhotoSetting........................................................................................................4
3.1.2
Video Setting........................................................................................................4
3.1.3
SystemSetting.......................................................................................................5
3.1.4
MMSMenu Setting...............................................................................................5
3.1.5
SMTPMenuSetting..............................................................................................5
3.2
MMS/SMTP Settings.............................................................................................6
3.2.1
Preparation...........................................................................................................6
3.2.2
MMSsetting:.........................................................................................................6
3.2.3
SMTPsetting.........................................................................................................6
3.3
SMSCommandCode............................................................................................7
4.
Cautions................................................................................................................8
5.
Specifications.........................................................................................................9
6.
Whathavein thebox.............................................................................................9

1
1. Instructions
1.1 General Description
This digital trailcamerawith MMSfunctioncanworkautomaticallydayand night.Itcan
betriggeredbyanymovement ofhuman(oranimals)inacertainregionmonitoredby
motionsensor,andthenautomaticallycapturespictures(upto12Mpixels)orrecords
1080p orHD videoclips(WVGA orQVGA).
Duringdaytimeitbeginstotakecolorphotosandvideotilllightisnotenough,thenit
beginsto takemonochromephotosandvideo.
It supports2G/GSM/MMS/SMTP/SMS.And it iswaterproof IP54.
1.2 CameraBodyInterface
Ithasthefollowinginterfaces:USBconnector,MICROSD-CardSlot,SIMcardslot,TV
output and externalDCpowerconnector.
1.3 Cameracomponentsand features
1) BottomCover
2) Micro SD-CardSlot
3) USBConnector
4) TV Outconnector
5) PIR
6) InfraredFlash
7) Lens
8) GSM Antenna
9) 2 inchcolorLCD Display
10)Soundrecorder
11)SIM cardslot
12)Lock
13)Powerwitch
14)BatteryDepot
15)Portableremotecontroller
1.4 RemoteControl
Theremotecontrolisprimarilyusedformenu settings andpassword input.This is
wireless remotecontrol.Themaximumremotedistanceis 9meters.

2
Note: Press the punctuation ” forlaserlight.
Note(UnderTESTmode):
1.Press Shot”directly,the camerawill takepictureorvideodirectly.
2.Press OK”directly,the pictureorvideorecordedcanbe viewed.
3.Viewingpicture, press Up”or Down”.
4.Viewingvideo,press Left”tostart, again tostop,press OK”toreturn.
ShootingInformation Display
Whenpowerswitchis turntoTESTposition,theshootinginformationwill bedisplayed
in themonitor.
1.5 Brief Introduction for SIMcard and Signal
TherearetwoSIMcardicons. ItmeanstheSIMcardis insertedand itcanwork
well. It meansthenetworksignal inyourlocal placeis verygood.

3
1.6 SupportedFormat
Item Format
Photo JPG
Video AVI
2. Easy Operation
2.1 Power Supply
To supplypowerforthecamera, 8XAAbatteriesareneeded.
Thefollowingbatterieswith 1.5V output can beused:
1.High-densityandhigh-performancealkalinebatteries(Recommended)
2.Rechargeablealkalinebatteries
3.RechargeableNIMHbatteries
WheninTestMode,camerawill beautomaticallyshutdownto savepowerif without
anyoperation within3 minutes;itcouldbewakedup byanymovement detection.
Wheninlow powerstate,camerawill alsoautomaticallyshutdown.Pleasechangethe
batteriesintime.
2.2 InserttheMICROSD-card and theSIM-card
InsertMicro SD-card andSIM card intothecard slot.
WhenuseMMS/E-mailfunction,besuretoinsertSIMcardintotheSIM-cardslot
correctly.
Slot 1
Slot 2
Slot 3
Slot 4

4
2.3 EnterintotheTEST Mode
Turn thepowerswitch totheTEST positionto enterintotheTEST mode.There aresome
functionsinTEST mode:usersetting/manuallycapturing/preview.
2.3.1 User Setting
PresstheMENUbutton.Thecameracanbeset (mode,interval,pictureresolution,video
resolution&length,etc.) thedetailed operationswill bedescribed infollowingchapter.
2.3.2 Manual Capturing
PressOKto manuallycapturephotosorrecord video.
2.3.3 View ImagesorVideos
Therearetwo waysto viewthecapturedimagesorvideos:
1. LCD screen on camera
2. TV monitorswhich connectstocamerawith TV cable
Pressright arrowtoviewcapturedfiles, thelatest imagewill beshown intheLCDscreen
orTVmonitor.Press UPto view thelastandpress DOWNforthenext.Thedetailed
operationslikedeletingimagesorvideoswill bedescribed in AdvancedOperations”
chapter.
2.4 Power onand Enterinto theONMode
Before switchingon,pleasepayattentionto thefollowingitems:
1.Donotfacelight sourcedirectly.whichmaycausefalsetriggers
2.Theheightfromgroundforplacingshouldbe1-2 meters.Forexamplefordeerheight
is good sizeappropriately.
AfterswitchtoONmode,theredlightwill flashforabout 10s.thenyoucanlockthe
bottomcoveranddeployyourcamera.
PowerOff:Slidethepowerswitch to OFF positiontoturnoff thecamera.
Pleaseremovethebatteryifthecamerawill notbeusedforalongtime.
3.AdvancedOperations
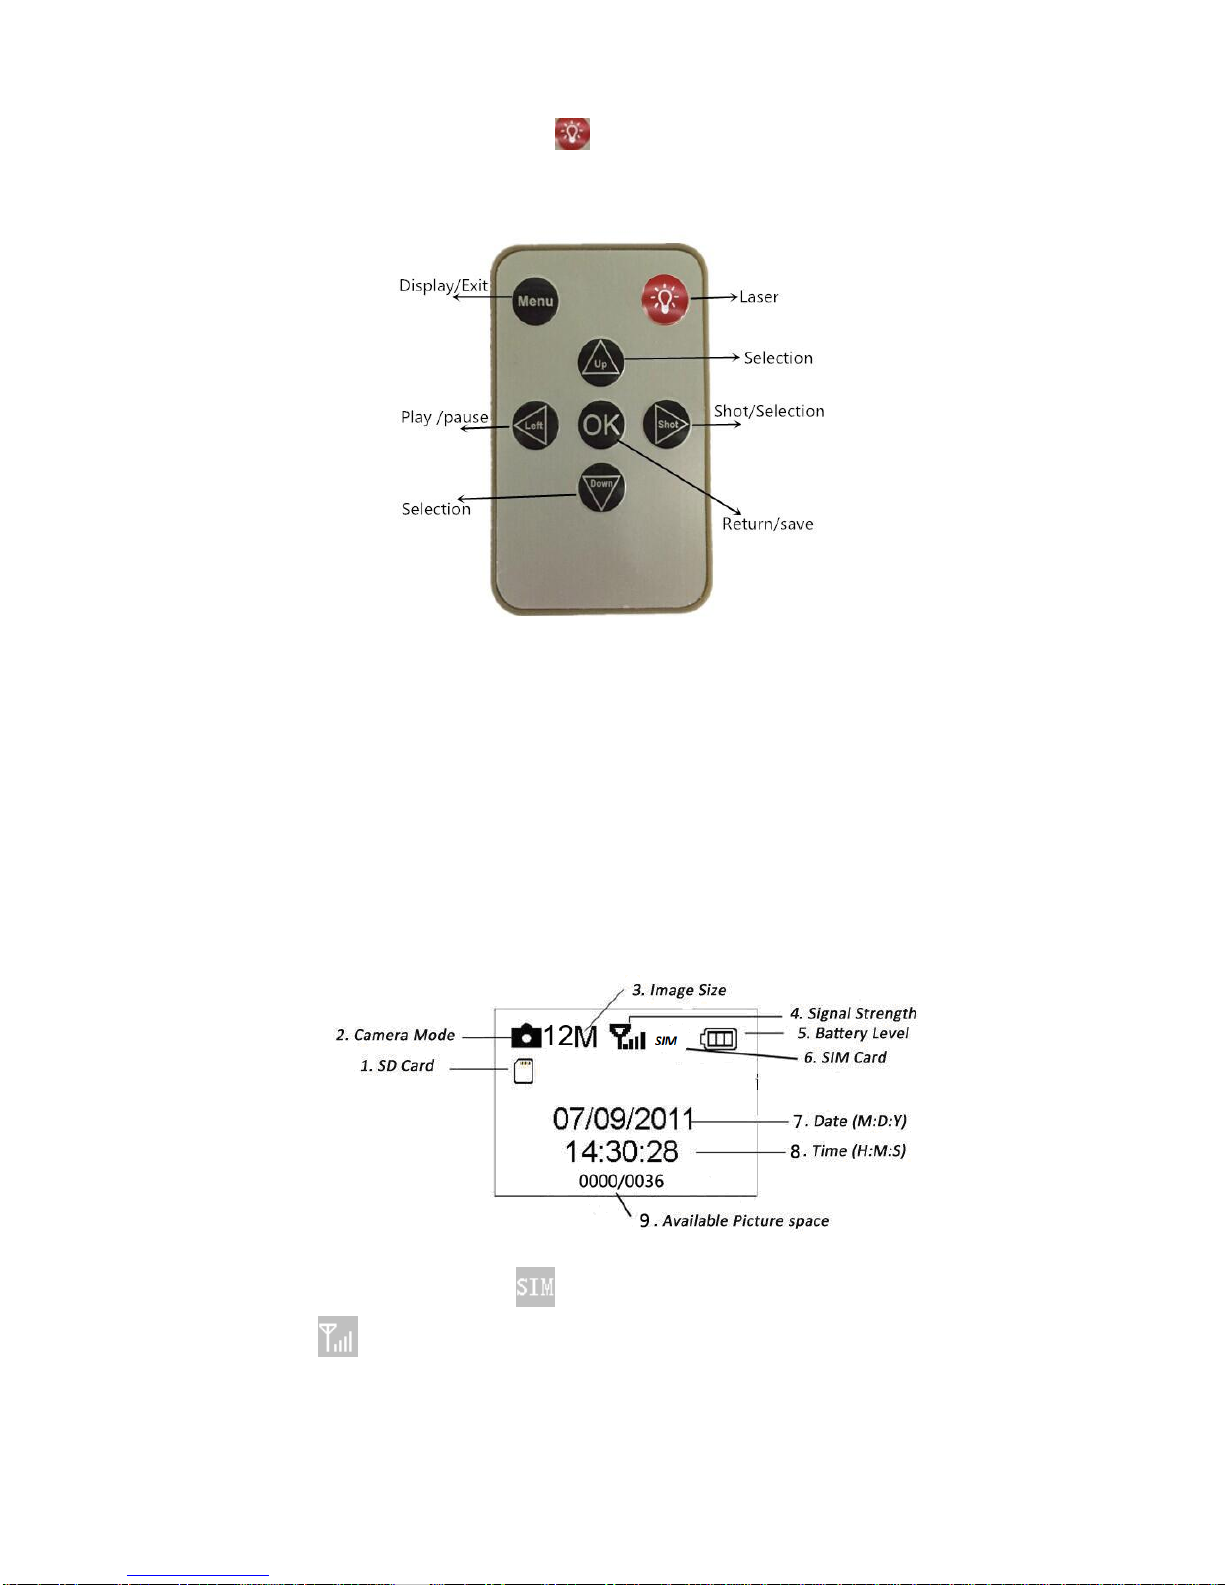
UsersettingcanonlybedoneinTEST modeand theremotecontrolis needed.
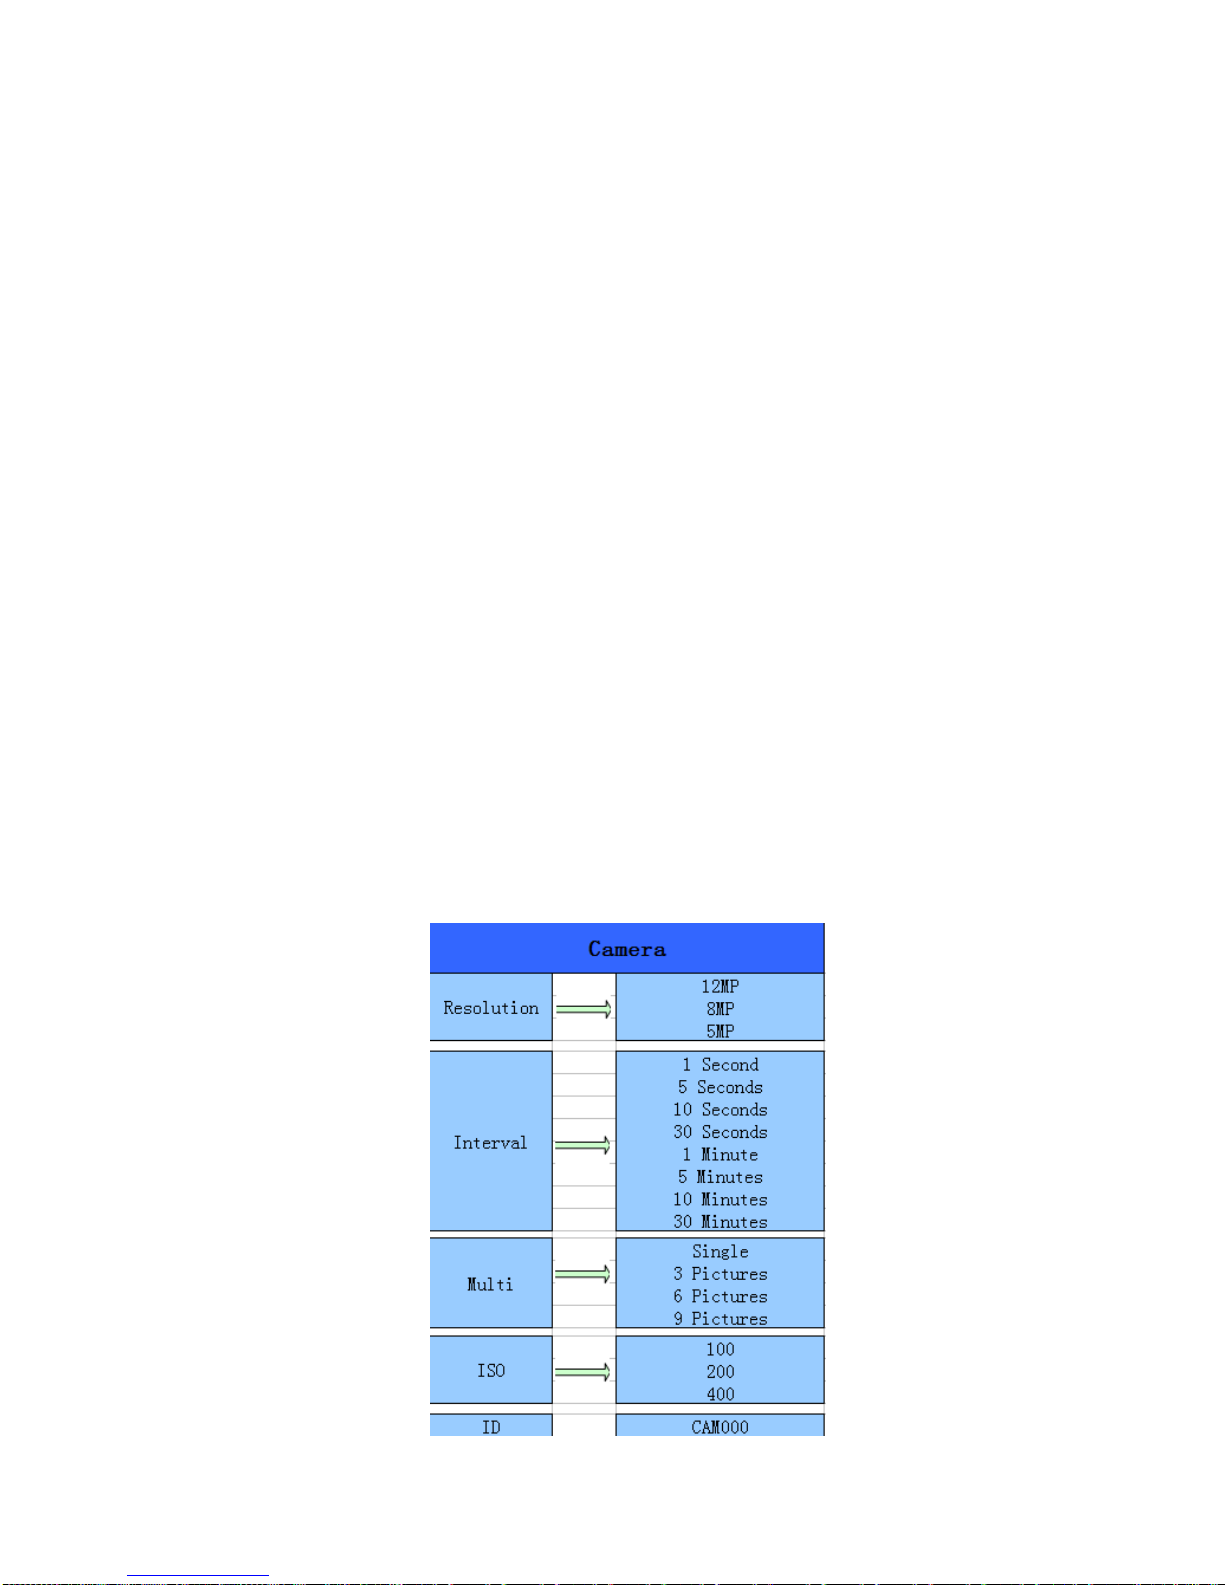
3.1 SettingsMenu
PressMENUwhencameraintheTEST mode.Thesettings menuwill beshown onthe
LCD ortheexternal TV monitor.
3.1.1 PhotoSetting

5
3.1.2 VideoSetting
3.1.3 System Setting
3.1.4 MMS Menu Setting

6
3.1.5 SMTPMenu Setting
This camerawill send picturesinstantlytousermobilevia MMS.Sobeforeusingthis
functionuserneedstofinishthesettingsmms inMMSCONFIG.
3.2 MMS/SMTPSettings
3.2.1 Preparation
1.2G/GSMMobileOperatorService
2.format 2GB+Micro SDorSD card
3.computer(Vista,Windows7,windows8 system)
4.OneSIMcardwithoutPIN lock
5.TheSIM cardshouldbeableto sendimagesvia2G/GSM/GPRS/MMSnetwork
6.6V power(8XAABatteries, or6V inputpowersupply)
7.MMSCONFIGProgram inCD
8.Users canasktheprovider2GMMSdata(APN+Account+Password,MMSC+IP+PORT),
orfindthis infoonproviders homepage.
9.2GGPRSdataforSMTP settingfromprovider(APN+Account+Password)
10. SenderEmailserverinfo(server+port+email+password)
3.2.2 MMS setting:
1. Insert TFcardandSIMcardtocamera,put batteriesincam,screwtheantenna, and
thenturncameratotestmode,checkthereare and onthecamera screen.
ThenconnectthecameratothePCwith theincludedUSBcableinsertCDtocomputer,
openandthendoubleclick
2. Choose or in
,Goto table,select
3. Insert and
4. Fill in and or
5. Go to ,choose
6. Click button and saveasParameter.dattoMicroSD card
7. PlugUSBcablefromcamera

7
8. Goto incamera menu,checkthesubsettingisthe
samewithabovesetting
9. Turncamera toonmode
3.2.3 SMTPsetting
1.Insert card andSIMto camera, putbatteriesin cam, screwantennato itthenturn
camera to testmode,checktherearesignalbarand ''SIM'' onthecamera screen.Then
connectthecamera tothePCwith theincludedUSBcableinsert CDto computer, open
and thendoubleclick
2.Choose or ,Goto
table,select
3.Insertall
4.Fill in senderemail infoin and
5.Go to table,choose
6.Click button and saveasParameter.dattoMICROSD card
7.PlugUSBcablefromcamera
8.Go to in cammenu,checkthesub
settingis thesamewith abovesetting
9.Turncamera toonmode
10. Productoperation video link: https://www.youtube.com/watch?v=fhniN3up2dE

8
3.3 SMS Command Code
mms/smtpneedtobeset on'modebeforeusing thessmscommand
*500* takepicture
(bothmms andsmtp mode)
*505* takepictureandsendtothemobilewho sendssms
*520* checkthepicturequantityand batterystatus
(bothmms andsmtp mode)
*530* turnoncamera
(bothmms andsmtp mode)
*531* turncamera tosleepingmode
(Can workin both mmsand smtpmode)
4. Cautions
1.Theexternalpowervoltageshouldbe6.0V.
2.PleaseunlockandformattheMicro SD card whenyoufirstuseit.
3.InserttheMicro SD card whenthepowerswitch is at OFF position.
4.Donotinsertortakeout theMicroSDcard whenthepowerswitch is atON position.
5.Pleaseensurepowerisgoodenoughwhenfirmwareupgrade,otherwisetheupgrade
process couldbestopped.
6.Ascommunicationsnetworksmayvarywecan’tguarantee100%MMSand GPRScan
workfine

9
5. Technical Specifications
Image SensorType
(True Megapixels) 5MegaPixelsColorCMOS
Memory Micro SD Card 8GB~32GB
Lens F=3.1; FOV=90 °
Size 145mm *80mm *55 mm
IR Filter: Full Automatic IR Filter
TFT DisplayScreen: 2.0 inch
PIR SensorSight Angle 90 Degrees
PIR SensingDistance 65ft/20m
NumberofIR LED 36 LEDsBlackorWhite
Max Night Vision LightingDistance 65ft/20 meters
TriggerSpeed 1.1 second
TriggeringInterval: 1second ~30mins(default 1sec)
Selectable Image Resolution: 12MP/8MP/5MP
Multiple Frame 1/3/6/9
Video Resolution 1080P/720P/VGA
File Format JPEG/AVI
Date Time Imprint Yes
Moon Phase Imprint Yes
Exposure: Auto
MMS/EMAIL/Support Support
SMSControl Support
Password 4Digitsset byyourself
Default camerapassword 1314
Default cameraID CAM000
Periodic shot 1Second~24Hours
Stand-bycurrent 0.2mA
Stand-bytime 3Months(8x AA Battery)
Interface TV out (NTSC/PAL); USB;MicroSD Card
Holder;6V DCExternal
FixMethod Belt,Tripod Nail
Operation Temperature -30 ~+70°C/-22~+158°F
PowerSupply 8×AAbatteries
CameraSocket Yes
Waterproof IP56
Menu Langugae English,French,Germany, Spanish,Russian,
Danish,Dutch,Poland,Portuguese,Swedish,
Italian,Finnish
Securityauthentication FCC,CE, RoHS, REACH, R&TTE,HealthSAR
6. What have inthebox
PartName Quantity
DigitalCamera 1
Wireless controller 1
Antenna 1
USBCable 1
TV cable 1
User’s Manual 2
CD 1
Solarpower supply Optional
Table of contents
Other HuntCam Scouting Camera manuals