Husar Winch BST ANCHOR 35 Operator's manual

Manual & Safety Instruction
BST ANCHOR 35
BST ANCHOR 45
INSTALLATION AND OPERATING INSTRUCTIONS BST ANCHOR

SAFETY ISSUES
Please read and save these instructions. Read carefully before attempting to assemble, install, operate or maintain the
product described. Protect yourself and others by observing all safety information. Failure to comply with instructions could
result in personal injury and/or property damage! Retain instructions for future reference.
Unpacking - When unpacking, inspect carefully for any damage that may have occurred during transit. Make sure any loose
fittings, bolts, etc., are tightened before putting unit into service.
GENERAL SAFETY INFORMATION - Throughout this manual potential safety hazards will be noted with the following
terms. Please read and understand these terms before operating the product.
Danger means a hazard that WILL
cause death or serious injury if the
warning is ignored.
Warning means a hazard that COULD
cause death or serious injury if the
warning is ignored.
Caution means a hazard that MAY cause
minor or moderate injury if the warning
is ignored. It may also mean hazard that
will only cause damage to property.
Read all manuals and instructions included with this product carefully. Be thoroughly familiar with the controls and the
proper use of the equipment. Only persons well acquainted with these rules of safe operation should be allowed to use the
winch.
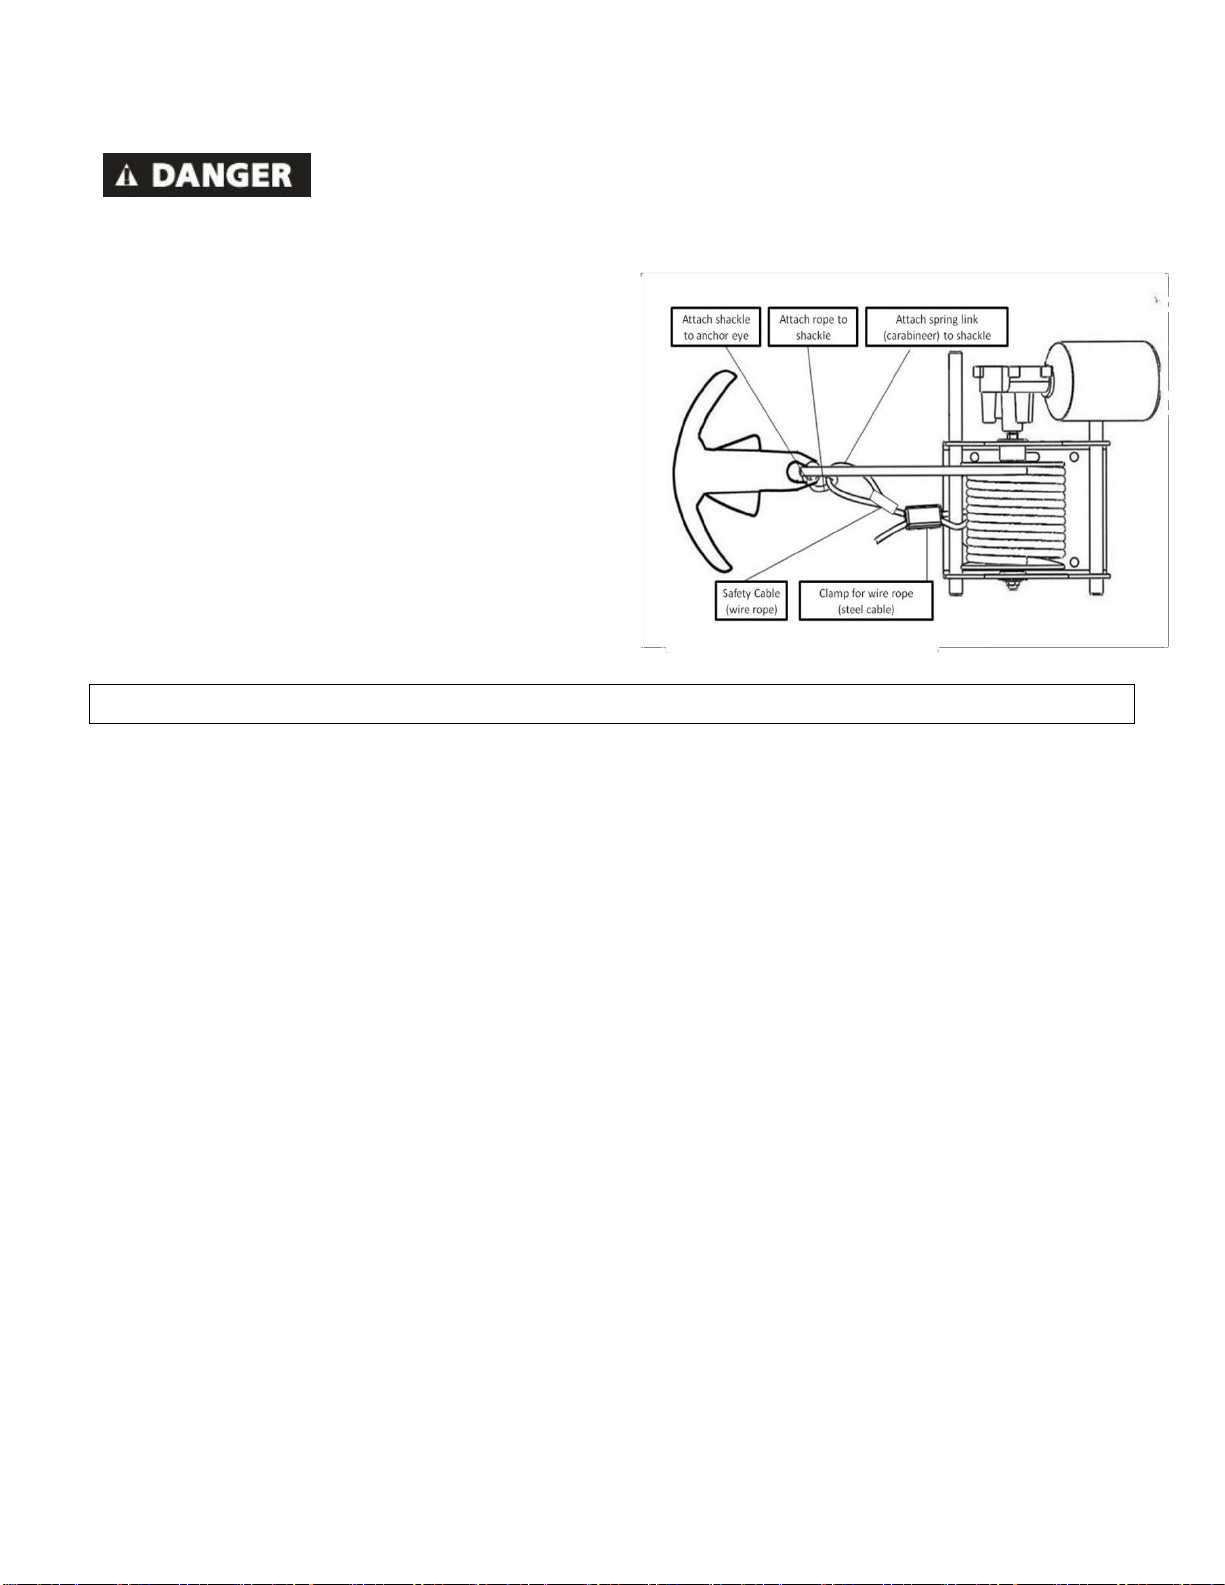
Rope breakage and whiplash hazard
1.
Never allow anyone to be between the anchor and the winch. If the rope breaks it could snap back with enough
force to cause severe injury.
2.
The winch is shipped with a closed loop anchor roller. If the included anchor roller is ever replaced it must be
replaced by a closed loop anchor roller. The closed loop anchor roller will prevent the anchor line from snapping
onto the boat deck in the event the rope breaks.
3.
Always use nylon rope with a minimum of 600 pound tensile strength for this product. Never substitute cable for
rope. Cable is not an acceptable anchor line as it does not stretch and is easily frayed. If cable breaks it can snap back
with more force than nylon rope.
4.
This product is intended to lift anchors. Do not attempt to lift or move people or other objects.
5.
Inspect entire rope for weak or worn condition or kinking (short tight twist or curl) before each use. Replace worn
rope with nylon rope specifically rated for this product.
Electrical shock and fire hazards
1.
Do not use electrical wire sizes smaller than 14 AWG (gauge) with a 105-C temperature rating. Using wire that is too
small could result in overloading and a fire. Large gauge wire is permitted.
2.
Use the supplied circuit breaker or a 20 amp in-line fuse when installing this winch.
3.
Use only suitable wire for electrical connections between the battery, switch and the winch.
4.
Make sure any crimped electrical connectors meet industry strength requirements.
5.
Always disconnect the battery lead wires from the battery before attempting to install, relocate, or service the
winch.
Cruising and boat trailering hazards
When the boat is cruising or being trailered, the anchor must be secured inside the boat. If the anchor breaks free during
cruising or trailering, it could cause serious damage and/or injury.
INSTALLATION AND OPERATING INSTRUCTIONS BST ANCHOR

WINCH DESCRIPTION
INSTALLATION
Anchoring hazards
1.
It is a best practice to tie the anchor line off to a cleat (or other secure point) when the boat is anchored. The winch
life may be reduced if it is used to hold the load of the boat while anchored. Damage to the motor could occur.
Tying to a cleat will extend winch life and prevent wear and possible failure.
2.
Do not pull a load greater than the rating for the winch. If the circuit breaker halts operation of the winch during
retrieval or deployment; the winch may have been overloaded and damage may result.
Entanglement hazards
1.
Never place any object or tool in the rope spool while retrieving or deploying the anchor. The tool or object could
become tangled in the rope resulting in serious injury and/or damage to the winch.
2.
Do not wear loose fitting clothing, scarves, or neck ties during the operation of the winch. Loose clothing may
become caught in moving parts resulting in injury or death.
3.
Do not operate the winch under the influence of drugs and/or alcohol.
The anchor winch retrieves and deploys river and mushroom anchors using nylon rope. This anchor winch features power-up
and free-
winch cover. The anchor winch has an anchor roller that must be installed before the winch is installed. The anchor roller
must be installed on-center and in-line with the rope spool.
TOOLS REQUIRED:
1.
Electric Drill
2.
Drill Bit
3.
Electrical Terminal Crimping Tool
4.
Adjustable Wrench
5.
Phillips Screw Driver
MATERIALS REQUIRED
1.
Winch and Anchor Roller (included)
2.
Seven 8mm bolts, washers and nuts (included). Longer bolts may be required if your deck is very thick.
3.
Shackle for anchor attachment (included)
4.
River or Mushroom anchor (not included up to 40 lbs.)
5.
Battery Wire and Circuit Breaker (included)
INSTALLING ANCHOR WINCH ON BOAT DECK
The anchor winch can be installed on the fore (front) or the aft (rear) of the boat. It is important that the anchor roller line up
with the centerline of the rope spool for proper operation. To mount the anchor winch, follow these steps:
1.
Locate anchor roller and winch on deck in desired location. The anchor roller must be located at the edge of the
deck and must extend over the edge to allow the anchor to clear the deck when it is docked in the anchor roller.
2.
Look below the deck and check for any obstructions underneath the desired anchor roller and winch locations.
Also make sure there is enough space for the rope spool on the winch to be centered on the anchor roller.
3.
Using a marker, mark the anchor roller and winch mounting holes on the deck. NOTE: There are several bolt
holes in winch frame to choose from. The easiest to use are the four slots (2 on each end of the frame). There
are also holes for the battery lead wires so you can route the wires through the deck if you desire.
4.
Remove winch and anchor roller. Drill the holes. Bolt to deck. Use fender washers and/or marine plywood under
the deck to ensure the greatest strength and to spread the load.

WIRING SELECTION & SPECIFICATION
Do not use wire sizes smaller than 14 AWG with 105 degree C rated insulation. Using wire that is insufficient could result in
overloading and a fire. The use of larger diameter wire (small gauge number) is permitted and can improve the flow of
electrical current. If the length of wire that was included with the winch was not long enough, consider acquiring the next
larger wire size (12 AWG) for your installation. Use the supplied circuit breaker or an in-line 20 amp fuse. Using incorrect
circuit breakers may result in a fire.
WIRING
The wires and switch are all properly connected. You will need to route the battery wires from the winch to battery and
connect the RED positive (+) wire to the silver post on the circuit breaker. The small hole on the buss bar (flat stamped metal
part with two holes) is attached to the colored post on the circuit breaker and the large hole on the buss bar is attached to
the battery positive terminal. The BLACK negative (-) wire is attached to the battery negative terminal.
ROPE INSTALLATION
Anchor rope comes pre-installed from the factory, but if you need to install new rope, insert the rope through the hole
located on the inside of the drum (where the rope spools) and tie an overhand knot on the outside of the spool so the knot
can be pulled into the countersunk hole on the outside end of the spool. Pull the rope so the knot is tight against the counter
sunk hole. Make sure the rope is not tangled and not looped around anything and is free to wrap on the spool. Hold tension
of the rope while wearing a glove.
spool. Release the switch button at anytime during the wrapping of the rope on the spool if an unsatisfactory wrap is
occurring.
The spool will hold as much as of anchor rope. Use anchor rope with a minimum of 500 pounds of tensile strength.
The rope that is installed on the winch is suitable for this winch.
ANCHOR ATTACHMENT
Use a river or mushroom type anchor up to a maximum weight of 45 lb. Use a lighter anchor when possible. Attach the
shackle to the anchor shank eye. Tie the rope to the anchor shackle.
.
The knot must be securely fastened and tested by the user before anchoring.

ANCHOR WINCH OPERATION
SAFETY CABLE ATTACHMENT
When the boat is being trailered, the anchor must be placed in the boat and secured. If the anchor breaks free during
trailering, it will cause serious damage and/or injury. The safety cable is only designed to hold the anchor in place when the
boat is underway in the water.
Follow the procedures outlined below to attach a safety cable.
1.
After the winch is installed and the anchor attached to the
rope and power the winch UP until the anchor is in the
docked position (in the anchor roller/davit).
2.
Attach the safety cable snap ring hook on the anchor
shackle.
3.
Loosen the safety cable clamp and adjust the cable so the
slack is removed, but so the snap ring hook can still be
removed from the shackle. The cable will need some slack
to be able to unhook the snap ring hook. Tighten cable
clamp.
4.
The excess cable may be cut and removed. You may want
to leave a few inches of extra cable for later adjustment.
The anchor winch is simple to operate. To lower the anchor press and hold the
seconds and release the switch. The anchor will freefall to the lake or river bottom. Allow the boat to drift and pull additional
rope out of the winch. To stop the rope from coming out of the winch, press the switch UP button for a couple seconds. This
will lock the spool and keep it from letting more rope out. To raise the anchor, press and hold the switch in the position.
Helpful hints:
1.
If you are in 20 feet of water, you may need 100 feet of rope to hold in wind or current. The ratio of rope length to
depth is called scope and a scope of 5 to 1 in common in wind or current. The more scope, or anchor line out, the
better the anchor will hold.
2.
Using more scope (more line out) is better than using a heavier anchor.
3.
Always raise the anchor before moving the boat. Do not try to drag the anchor with the power. This can
cause product damage or injury.
Maintenance: Salt Water Rinsing
To minimize common corrosion from salt water, it is a best practice to rinse off the winch after each use with fresh water.
Simply point a hose inside the rope opening, over the cover and around the surrounding boat deck to wash away any salt
water residue.

PART
NUMBER
DESCRIPTION
QTY
PART
NUMBER
DESCRIPTION
QTY
1
BOLT AND NUT
2
17
SHAFT
1
2
CU PLATE
1
18
MOTOR
2
3
LOCK NUT
2
19
IDLER GEAR ASSEMBLY
2
4
SHAFT
1
20
ANTI-REVERSE GEAR
1
5
LOCK NUT
2
21
FRAME
1
6
WASHER
2
22
CONTROL UNIT
1
7
BEARING CLIP
2
23
CIRCUIT BREAKER
1
8
BEARING FOR SHAFT
2
24
BOLT AND NUT FOR CU
1
9
CLIP FOR SHAFT
1
25
BOLT FOR MOTOR
1
10
SPOOL
1
26
GEAR
1
11
ANCHOR ROPE
1
27
HEXGON FLANGE BOLT
1
12
SHAFT
1
28
BOLT FOR COVER
4
13
SPOOL GEAR
1
29
HOUSING
1
14
FREE-FALL GEAR ASSEMBLY
1
30
SWITCH AND SWITCH
1
15
CLIP FOR SHAFT
2
31
LED LIGHT
1
16
BEARING FOR SHAFT
2
32
DAVIT ASSEMBLY
1
ANCHOR WINCH PARTS


Instrukcja
BST ANCHOR 35
BST ANCHOR 45
BST ANCHOR

BEZPIECZEŃSTWO
Przeczytaj i zachowaj
lub uszkodzenie mienia! Zachowaj instrukcje do
Rozpakowanie -
s
-
zostan
produktu.
oznacza
SPOWODUJE
zignorowane.
zostanie zignorowane.
li zostanie
zagro
uszkodzenie mienia.
i tylko osobom dobrze zaznajomionym z niniejszymi
z ograniczeniem dla kotwicy
.
liny . Inna lina syntetyczna nie jest
4. Ten produkt jest przeznaczony do podnoszenia kotwic
zy temperaturze znamionowej
105
2. Podcz lub wbudowanego bezpiecznika 20 A.
przewodu.
BST ANCHOR

OPIS WYCIĄGARKI
INSTALACJA
na przyczepie
bezpieczona
.
1.
ego
w
arki pod wp/lub alkoholu.
do kotwic i opuszcza
- na
,
. Rolka kotwiczna m
1. Wiertarka elektryczna
3. Elektryczna praska
4. Klucz nastawny
1.
jest bardzo gruby.
3. Szekla do mocowania kotwicy (w zestawie)
4. Kotwica rzeczna lub grzybowa (brak w zestawie -
)
(w zestawie)
do kotwic rufa t, aby rolka kotwicy
1.
Ustaw

2.
kotwicznej.
3.
4.
lub sklejki
morskiej
Sto
szynoprzewodzie jest przymocowany do dodatniego bieguna akumulatora. CZARN -) jest
MOCOWANIE LINY
w
(30,5m)
ZAMONTOWANIE KOTWICY
dla BST ANCHOR

OBSŁUGA WYCIAGARKI
ustaw
w
regulacji.
do kotwic (down)
swobodnie o
na kilka
i (up).
1.
(6 m) (30m)
z wiatrem em zakres od 5 do 1 i jest
lub
2.
3.

NUMER
OPIS
NUMER
OPIS
1
2
17
1
2
1
18
SILNIK
2
3
2
19
2
4
1
20
PRZECIWZWROTNA
1
5
ZABEZPIECZAJACA
2
21
RAMA
1
6
2
22
STEROWANIE
1
7
2
23
1
8
2
24
1
9
1
25
1
10
1
26
1
11
LINA KOTWICZA
1
27
1
12
1
28
4
13
1
29
OBUDOWA
1
14
SWOBODNEGO OPADU
1
30
1
15
2
31
1
16
2
32
PROWADNICA
1
CZĘŚCI


This manual suits for next models
1
Table of contents
Languages:
Other Husar Winch Winch manuals
Popular Winch manuals by other brands

AWD
AWD AWD0907A instruction manual

Ingersoll-Rand
Ingersoll-Rand Man Rider MR150K Series Product information

Kolpin Outdoors
Kolpin Outdoors KAWASAKI MULE PRO-FX Assembly & owners manual

Keeper
Keeper KW7.5RM Assembly & operating instructions

Jun Kaung
Jun Kaung HP-111 Operating instruction

Warn
Warn PULLZALL 24Vdc Service guide