Hy-Ram K9 30 LED User manual

Operating Instructions
Thank you for purchasing the Hy-Ram K9 30 LED. This product
design represents the latest technology in LED portable lighting
and is designed to be virtually maintenance free and robust
enough to deal with the rigours of a harsh work environment.
PORTABLE WORKLIGHT
www.hyram.com

2
Thank you for purchasing the K9 30 LED
OPERATION - QUICK START
Although the K930ALED is full of features it is still simple to use. When the unit is
packed down in torch/storage mode the (on/off) switch is recessed to prevent
accidental switch on, yet is still accessible to the user when needed.
Press once to switch on and again for off. Whenever the unit is first switched on it
will default to the 100% brightness setting regardless of how the unit was last used.
At switch on you will hear a bleep from the unit to signal all is well, the battery status
LED, near to the on/off switch, will illuminate to show the units state of charge.
Always remember to put your K9 30 LED on charge after use to prolong the life of the
high capacity rechargeable battery.
CHARGING YOUR K9 30 LED
Whichever SLA battery charger you have selected to recharge your K9 30 LED, it was designed to be
left connected indefinitely to the battery unit so your lighting product is always topped up and ready for
use. Your K9 30 LED can be charged and run at the same time, this may be useful when using the light
as an emergency back up should the mains power fail.
It is good practice to always put your K9 30 LED light back on charge even when used for a short
period of time, leaving the unit discharged will have an adverse effect on the longevity of the
battery life.
All the chargers supplied show a combination of lights to indicate each stage of the charging process.
For more details on charging please see the separate instructions included with the charger.
NOTE always charge your K9 30 LED in a dry, well ventilated environment.
Plug charger into spare
socket on rear of unit

3
USING YOUR K9 30 LED
The K9 30 LED can be set up in two basic modes. Torch mode allows the user to carry the unit with the
extension arm and head folded down and locked in position.
Worklight mode allows the user to site the unit in a suitable position on the ground or on a platform
where the extension arm can be swung up and locked into position. The height of the extension arm
can then be adjusted by lifting up the locking lever on the extension arm clamp and moving the light
head up or down to the desired position. The locking lever can then be clicked back in to place to hold
the position. The light head can be turned in either direction and the angle can be adjusted using the
clamping handle. The button on the clamping handle allows the user to park the handle at a particular
point, this may be useful to increase or decrease the frictional force applied to the light head when held
in position.
Twin sockets - either socket can be used to charge and / or run the K9 30 LED light. In addition two
light heads can be run simultaneously, or additional 12V equipment such as a phone charger can be
powered. Please contact your point of purchase for further details.
To use your K9 30 LED make sure the plug from the light head is inserted into either of the two sockets
on the battery unit, the red locking ring on the plug should then be turned clockwise to prevent the plug
from being accidentally pulled out.
Your K9 30 LED is designed to work in a harsh environment from low to high temperatures. While high
temperatures can have an adverse effect on LEDs this unit has been designed to counteract this if ever
the situation arose. A temperature sensor monitors the LED light engine output and adjusts the power
output accordingly, but still maintains a slightly reduced light output.
Torch Mode
Worklight Mode

OPERATION - ADVANCED FEATURES
To use the unit simply press the on button and the light will come on to 100% power/brightness and is
ready for use. The additional buttons listed below allow other features to be accessed.
(Button 1) = ON/OFF
(Button 2) = MODE - Flashing, SOS, Alternate flashing (between inner and outer LED arrays).
(Button 3) = BRIGHTNESS - 100%, 125%, 8%, 25%, 50%, 75%.
(Button 4) = SELECT - Inner, outer, both inner and outer LED arrays.
(Button 1) – Used for switching the unit either ON or Off. Note that after switching off allow a few
seconds before switching back on to allow the system to shut down and restart as it checks its battery
status.
Button 2/3/4 – Used to put the light into different profiles as listed above. Switch on the unit
(button 1), select a mode (button 2), then select brightness (button 3), and next select a
channel (button 4) as required.
In addition you can mix and match modes between the two channels, for example you can switch
ON (button 1), select a brightness (button 3), select a channel (inner for example, button
4) then select a mode (button 2, SOS second press). Next select a channel (button 4, outer for
example), then select a mode (button 2, flashing or static) then select the channel (button 4) to
bring both channels on to create different light options.
Pressing and holding the (brightness) button allows dimming up and down regardless of what
brightness mode the unit has been set at.
Light management
The unit features a retractable vari-focus system to allow a tightly focused spot beam through to a fully
diffused flood of light so any working environment can be catered for. Use the two control knobs
4
g 1 - Controls
Battery Status

5
together to move the diffuser blind up and down in front of the LEDs, as the blind gradually passes over
the LEDs you’ll notice the projected light pattern change.
SOS Mode
The unit may be set to flash the LED’s in the SOS sequence if the need ever arises. To do this, switch
on, select the power level (brightness) you wish to use (8%,25%, 50%, 75%,100% or 125%). Next
press the MODE button twice, pressing the SELECT button allows the inner outer or both channels of
LEDs to be run.
Flashing Mode
The unit may be set to constantly flash the LEDs to provide a warning signal to others. To select this
option first switch on, select a power level you wish to use (8%,25%, 50%, 75%, 100% or 125%) then
press the MODE switch once, pressing the SELECT button allows the inner, outer or both channels of
LED’s to be run.
Battery Status Indication
A low battery warning with cut-off function is included with your K9 30 LED to help prevent deep
discharging the high performance cyclic SLA battery. Deep discharging can lead to reduced battery
performance and life. Note this isn’t a failsafe to prevent damage, the battery must be recharged
after use within 24 hours regardless of how long it has been run.
The user is signalled to help pre-warn of the amount of energy left in the battery able to run the LED
light in 3 ways: 3 colour LED, audible bleeper and flashing of the LEDs on the main panel. As the fully
charged battery discharges, the indicator LED (located next to the power on/off switch) will show green.
As the battery discharges further this indicator LED will change from green through to amber. At this
point the unit will give an audible bleep and blink the main LEDs once to alert the user that a stage has
been reached in the discharge process.
The next change is when the LED indicator changes from amber to red; here again the user will hear
an audible bleep and see a blink of the main LEDs to signal another change nearer to the end of battery
duration.
Finally the indicator LED will change from constant red to flashing red where upon the lamp brightness
will default from any of the power settings down to 25%, the beeper will then sound every 30 seconds
and at the same time the main LEDs will blink once. This process will continue until the battery voltage
INCREASE
FLOOD
INTENSITY
INCREASE
SPOT
INTENSITY
Adjusting Beam from Spot to Flood

6
falls to a point where the unit will automatically switch off. This process will give users
adequate time to retreat to an area of safety without being left in the dark.
The light should not be switched back on until the battery has been
recharged to prevent deep discharge and possible irreversible damage to the
battery.
Performance
The SLK930ALED uses 30 high power LED’s to produce a crisp white light ideal
in a working environment. To efficiently harness and project the light, this unit has
a bespoke lens array with the addition of an infinitely variable focusing system. In
addition, conscious of the lack of an infinite power source, we have developed a
market leading LED driver system to ensure very little energy is wasted with the
majority being converted to light to give a better, brighter light for longer.
Stability
The unit features a pair of fold-out stability enhancing legs that allow
the unit to become an effective tripod system without the
need to carry additional equipment.
Height
Additional height can be achieved with the optional four quicklok
extension poles. This extends the height of the light head from
820mm to 1800mm. These uniquely designed interlocking poles
allow a very simple but unjamable system that can be quickly
deployed yet store in a bespoke retainer on the unit when not
needed.
Remote control system
The optional remote control system allows complete control of
brightness, modes and battery status allowing the unit to be placed
out of reach yet with full control at your fingertips. In addition any
number of extra K930ALED units can be automatically switched
on and controlled by the one remote through the mesh networking
technology employed. One button press can switch on over
a hundred units instantly, each unit allows the signal to be
rebroadcast, so infinite distances and areas can be covered.
Emergency System
Using the same technology as that employed in the remote
control system the optional emergency system can be
configured to detect a failure in a building or site voltage supply
(permanent mains or generator) and automatically signal any
number of K930ALED units to switch on and provide a
wireless emergency lighting system adding new levels
of safety and convenience to the work environment.
K9-30/POLE
K9-30HND
K9-30AMF
(Needs K9-30HDR)

7
On board charging
An optional built in charging system can be added to allow full automatic charging from any 12 or 24
volt vehicle. A single multi-colour LED gives full indication of the charge process. In addition the charger
benefits from a vehicle battery protect mode to prevent over discharge of the vehicles primary battery.
The in-built charger has a temperature monitor to accurately measure and control the charge to the high
performance cyclic battery. This means that whether the unit is charged in a hot or cold environment
the battery is always charged to 100% to stop the reduced effects on performance associated with less
advanced charging systems.
Accidental Overload Protection
The K9 30 LED has an in-built M.C.B (Minature Circuit Breaker) which allows you to easily reset if
over loaded. This prevents accidental overloading of the wiring if a high load is placed on either
of the two outlet sockets. If the M.C.B is tripped the button on the rear of the unit will pop out
from its housing. Check the cause of the problem then simply press the button home to reset the
circuit breaker.
Construction
The K9 30 LED has been constructed using high quality materials to produce a tough, long lasting
product for the professional user. High impact engineering polymers combined with stainless steel
fittings ensure the K9 30 LED is impervious to everyday knocks and bangs. The K9 30 LED employs an
internal steel chassis to retain the battery. This construction makes the K9 30 LED a very strong robust
unit, giving reliability throughout the K9 30 LED’s life.
OPTIONAL EQUIPMENT
Additional height
The overall lamp head height can be lifted from 820mm – 1800mm by using four of the quicklok
extension poles, which store conveniently in the base of the K9 30 LED. Simply slot and twist the poles
together to create a quick extension pole system. With the in-built stability legs this creates a unique
compact self-contained tripod system.
M.C.B Circuit Breaker
45º 45º 45º

8
On board charging (Product Code K9-30/VP)
The optional in-built charging system (VEPAC) gives the user the option of charging from a 12 or 24 volt
DC vehicle system without the need for additional equipment in the vehicle.
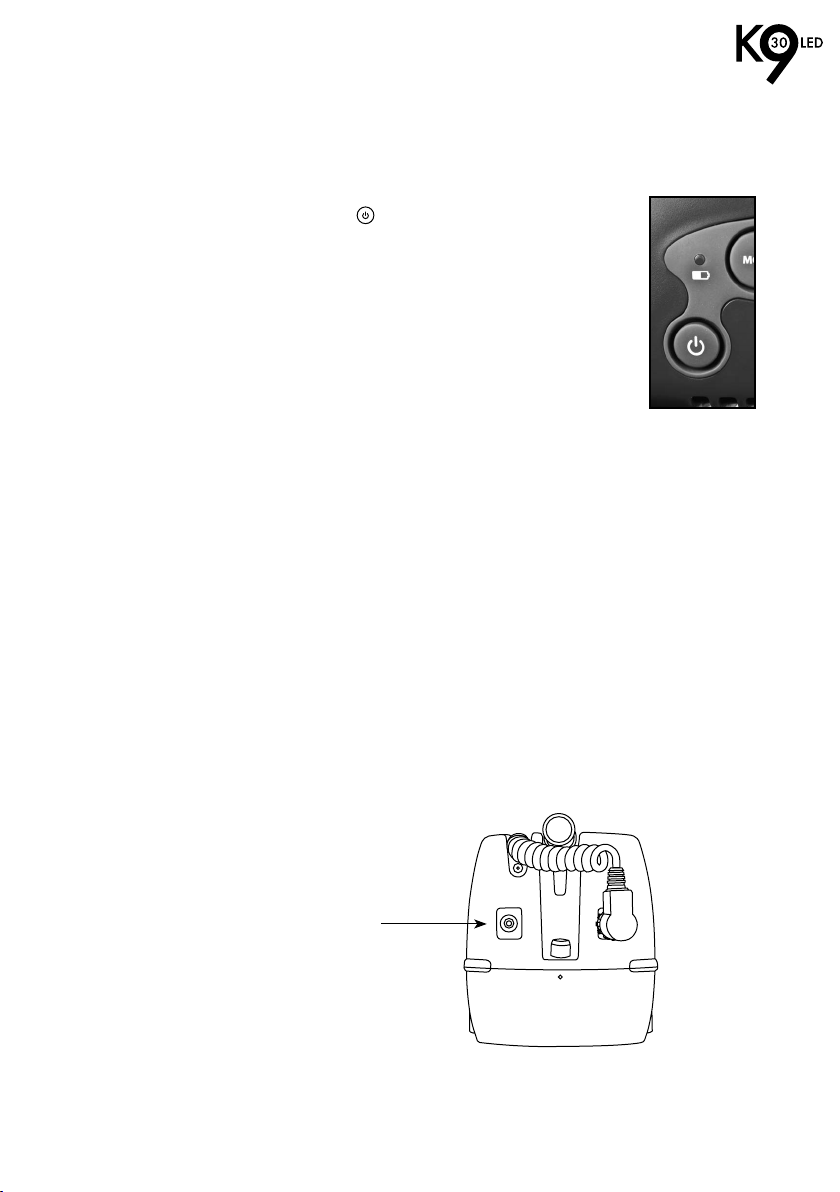
The unit has a multi-coloured LED to show the state of charging. At initial
connection to the 12-24 volt DC supply the charge indication LED will flash
twice green then twice red in a self test process to show all is ok. A constant
red shows bulk charging where the majority of charge is fed into the
battery, when the red LED starts to flash this shows the battery is 80%
charged, when the LED turns to green the battery is then fully charged and
ready for use. The charger only needs a simple cable (included) from the vehicle to any one of the
two multifunction sockets on the rear of the K9 30 LED.
The charger also employs a ‘vehicle battery protect system’ which prevents over discharge of the main
supplying vehicle’s battery. It detects when the vehicle alternator has started to charge the primary
battery then starts to charge the K9 30 LED. Once the alternator stops charging the vehicle battery,
the K9 30 LED charger will continue till end of charge or until it sees the voltage of the primary
supplying battery fall to a point. It then terminates charge to the
K9 30 LED to prevent further discharge which could cause
the vehicle not to start. The on board vepac charging system can also be configured to ignore the
‘vehicle battery protect system’, please confirm this at point of ordering. This may be useful when
a permanent 12-24 volt DC supply is available or where the supplying batteries have more than
enough capacity to cope with a full recharge of the K9 30 LED. In addition the in built charger can
measure the battery’s ambient temperature and adjust the charging profile to suit. This unique process
ensures the battery is charged to full capacity even when used in temperatures outside of the ‘normal’
25ºC for 100% capacity.
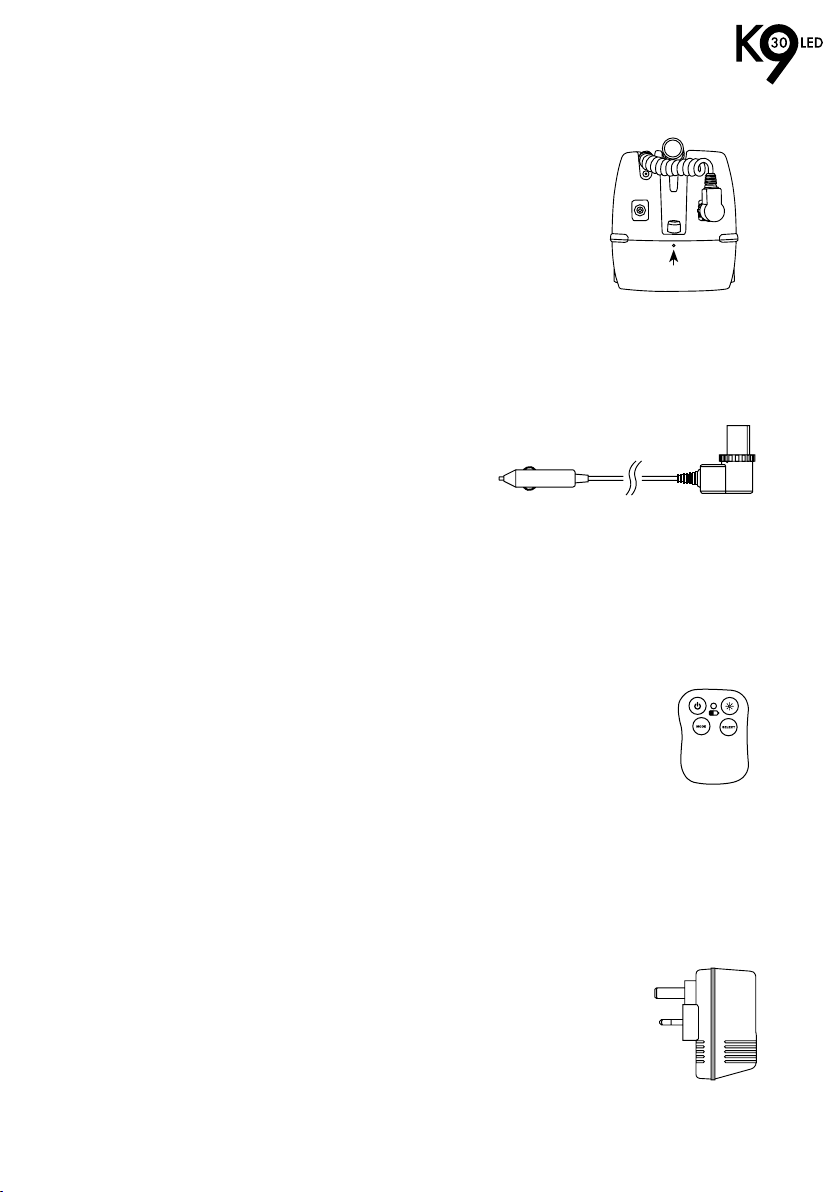
Remote Control (Product codes K9-30HDR + K9-30HND)
The optional remote control system allows operation of all the functions on the K9 30 LED
from a distance of up to 100 metres. In addition as each command is given the LED on the
remote will show the status of the K9 30 LED battery, the battery status can also be seen
without changing a function by pressing the top two buttons on the remote simultaneously.
As a button is pressed you will hear a bleep from the remote, then a second one as confirmation that the
action has been received and processed.
The remote control system uses Zigbee® mesh networking technology to control multiple K9 30 LED
units, as each unit receives a command it re-broadcasts it to other units thus extending the effective
range and eliminating failed attempts. See page 10 for further information on the remote.
Emergency System (Product codes K9-30/AMF + K9-30HDR)
Using the same technology as the remote control this simple “plug in the wall” (or any
110V to 240V AC generator power source) will monitor the power then automatically
broadcast a signal to all K9 30 LED’s to switch them on in a mains failure situation.
This simple but effective solution makes a very versatile, wireless portable emergency
lighting system.
Bi-Coloured LED

9
STORAGE
If the K9 is to be left unused for an extended period of time or the unit is to be put into storage we advise
you fully recharge the battery and disconnect the light head plug from the battery unit to prevent any
accidental switch on. The unit can then be stored up to 6 months without having to recharge.
MAINTENANCE
Your K9 LED should need little or no maintenance during its life span other than periodic cleaning of the
exterior surfaces where we suggest using a light detergent and water to sponge off any dirt deposits.
Should you encounter a problem then please contact Hy-Ram Engineering Co. Ltd for technical assistance.
We suggest the unit be returned to us for any problems that can’t be rectified by telephone. Please note
there are no user serviceable parts inside and that a competent person must carry out any repairs.
RECYCLING AND THE ENVIRONMENT
Your K9 LED contains various parts that need to be recycled at the end of its life span, please contact
your original point of purchase to organise correct recycling of this product to help protect the
environment.
TROUBLESHOOTING
1. LIGHT DOESN’T POWER UP WHEN (BUTTON 1) IS PRESSED
a) Is light head plug inserted all the way? Make sure plug is inserted fully and locking ring turned
clockwise.
b) Is the battery charged up? Recharge battery fully.
2. LIGHT COMES ON BUT FLICKERS WHEN (BUTTON 1) IS PRESSED
a) Incompatible battery fitted in K9 base unit – only use approved replacement batteries available
through your point of purchase.
b) Battery to light head communication fault – press (Button 1) off then on – If problem still
persists unplug the light head completely for 2 minutes then replace plug and retry.
3. THE EXTERNAL BATTERY CHARGER WON’T RECHARGE THE BATTERY
a) Is charger plug inserted all the way? Make sure plug is inserted fully and locking ring turned
clockwise.
b) Has battery been left completely flat for an extended period of time? Contact Hy-Ram Engineering Co.

10
4. THE INTERNAL (VEPAC) CHARGER SHOWS NO LED INDICATION FOR THE CHARGING PROCESS
a) Supply cable from vehicle is not connected or there is a poor connection – check supply and
connections from the DC power source.
b) Supply voltage is not high enough to trigger the charger to start – check supply voltage is 13.5
volts DC or higher (vehicle must be running with alternator charging the supplying battery).
Supply cable must be of adequate size to prevent voltage drop from the supplying battery to the
K9 30 charging lead.
c) The K9 30 internal battery is not connected – battery has been left too long in a discharged
state, the battery will need replacing.
5. THE INTERNAL (VEPAC) CHARGER LED SHOWS A RAPIDLY FLASHING AMBER
This is a fault indication, the charger has timed out after 18 hours because it can’t recharge the battery –
replace K9 30 LED battery with the approved type – SLK930SB replacement intelligent SLA battery.
CONFORMANCE
CE Marked. This product has been tested and conforms to EN 61000-6-3 and EN 61000-6-4.
IP54 Rated - Protected against dust with limited ingress, and against water spray from all directions.
OPTIONAL REMOTE CONTROL
Contains Transmitter Module FCC ID: OA3MRF24J40MA
This device complies with part 15 of the FCC rules. Operation is subject to the following two conditions:
1) This device may not cause harmful interference, and
2) This device must accept any interference received, including interference that may cause
undesired operation.

11
LAMP TYPE 30 x High Power / Flux SMD LED’s
COLOUR TEMPERATURE 6500 Kelvin
LUMENS OUTPUT AT 125% SETTING ≥5000
NOMINAL LIFE EXPECTANCY OF LED’S 50,000 Hours
BATTERY TYPE 12V / 22AH high rate discharge SLA battery
POWER CONSUMPTION 43 Watts (125% mode)
OPERATING MODES Choice of 4 main modes
1. WORKLIGHT 7 brightness levels + infinitely variable focusing
2. FLASHING SIGNAL 2 channel LED - simultaneous flashing
3. SOS SIGNAL International SOS signal
4. FLASHING SIGNAL - ALTERNATING 2 channel LED - alternating flashing
FOCUSING SYSTEM Variable intensity from spot to full flood
DURATION / BRIGHTNESS LEVEL * SUBJECT TO AMBIENT TEMPERATURES
1. (8%) Approx 110 hours
2. (25%) Approx 33 hours
3. (50%) Approx 16 hours
4. (75%) Approx 11 hours
5. (100%) Approx 8 hours
6. (125%) Approx 6 hours
RECHARGING TIMES
K9-30/VP - VEPAC 12V/24V VEHICLE CHARGER (Option)
12V / 4A OUTPUT Approx 6 hours
SL/PTC/12V/2.7A - 230V MAINS CHARGER (Option)
12V / 2.7A OUTPUT Approx 9 hours
NOMINAL OPERATING VOLTAGE 12V DC
CIRCUIT PROTECTION MCB circuit breaker - 10A thermal circuit breaker
PROTECTION CLASS IP54
WEIGHT (INCLUDING EXTENSION POLES) 11.8 Kg
DIMENSIONS (L x W x H) 390mm x 195mm x 255mm
SL/PTC/12V/2.7A Mains charger: Input 230V, Output 12V 2.7A (UK plug)
SL/PTC/12V/2.7AE Mains charger: Input 230V, Output 12V 2.7A (EU plug)
K9-30/VP VEPAC vehicle charger: Input 12V-30V DC 5A, Output 12V 4A
K9-30/POLE Max. 4 x poles can be stored directly in the base of the K9 30 LED
= 1800mm working height
K9-30/HND MESH remote control: Maximum range 100m in open space
K9-30/HDR Upgrade to remote head funtionality
K9-30/AMF K9 Auto Mains Failure module (UK plug)
K9-30/AMF/EU K9 Auto Mains Failure module (EU plug)
TECHNICAL DATA
OPTIONAL EXTRAS

CAUTION
• Always read the manual fully before use.
• Use the approved chargers only, other chargers may cause a
detrimental effect on the performance of this unit.
• Ensure adequate ventilation for this unit whilst charging.
• Do not stare directly into the light head when powered up.
• Do not completely submerse the unit in water.
• No user serviceable parts inside. Leave servicing to a qualied person.
The contents of this manual are subject to change without prior notice. We take no responsibility
for errors or admissions.
Hy-Ram Engineering Co. Ltd
Pelham Street, Mansfield, Nottinghamshire, NG18 2EY
Tel. 01623 422982 Fax. 01623 661022
www.hyram.com
V3H 130611
Patents Pending GB 0922370.2 - PCT/GB2010/001619
Table of contents