Hyco Opal Specification sheet

Product Instruction Manual
Opal
Holster Style Hair Dryer
OP1200
v23.8.1

Overview
Thank you for purchasing an Opal Holster Style Hair Dryer. A compact solution for hotels
and light commercial applications. Not suitable for heavy usage applications such as public
swimming baths and sports facilities.
Please read and follow these instructions to ensure that installation and operation are as
simple and safe as possible.
This appliance can be used by children aged from 8 years and above and persons
with reduced physical, sensory or mental capabilities or lack of experience and
knowledge if they have been given supervision or instruction concerning use of the
appliance in a safe way and understand the hazards involved.
Children shall not play with the appliance.
Cleaning and user maintenance shall not be made by children without supervision.
If the supply cord is damaged, it must be replaced by the manufacturer, its service
agent or similarly qualied persons in order to avoid a hazard.
This appliance should only be installed and maintained by a competent person in
accordance with any local electrical regulations.
The appliance is only intended for xed installations.
This appliance is not designed for outdoor use.
Only connect the appliance to an electrical supply that meets the specication
detailed on the rating label.
The appliance must be permanently connected to the electrical supply through an
appropriately rated isolating switch with a contact separation in all poles.
Important Safety Points
2

3
1. Wall Mounting
• If concealed cable entry is desired fully read instructions before commencing wall
mounting.
• Select a suitable mounting location for the appliance considering the reach of the
handheld section of the appliance.
• Secure the mounting bracket to the wall using one each of the supplied wall plug
and screws.
• Align the corresponding hole at the rear of the appliance just above the bracket and
slide it down to engage into the bracket.
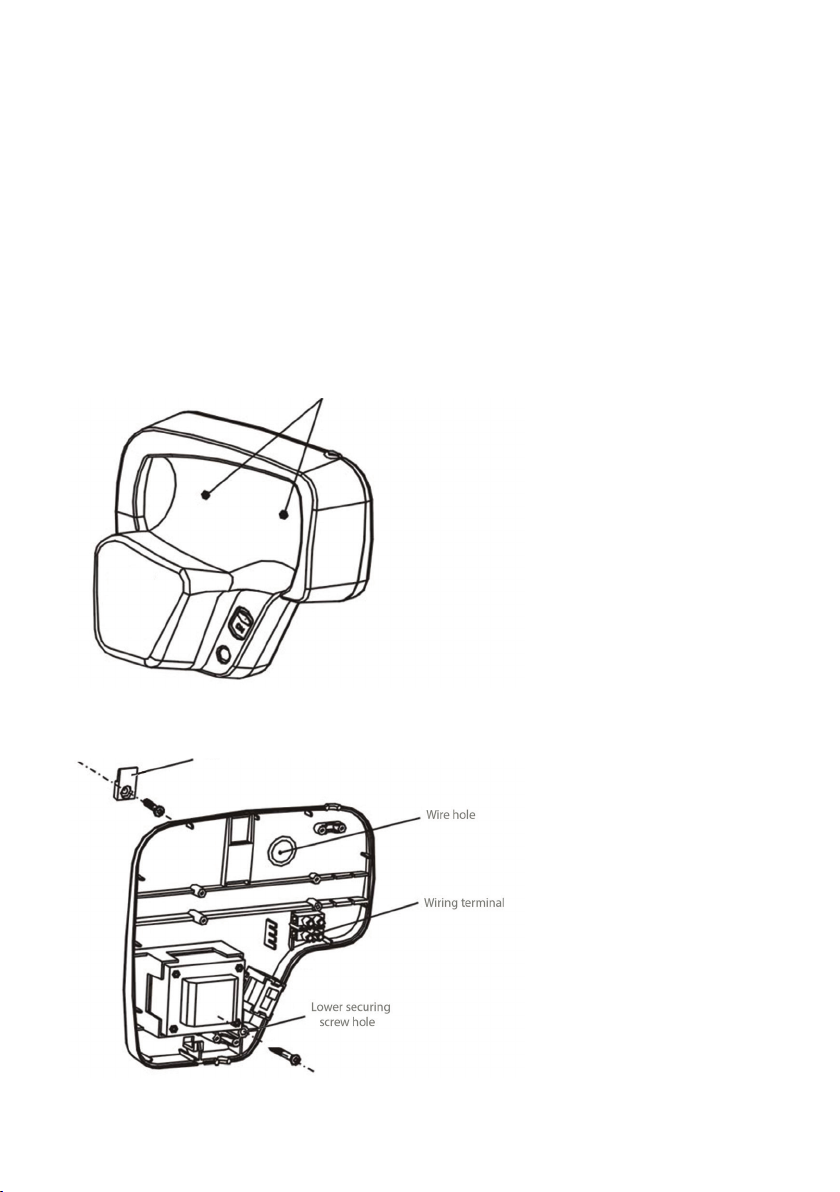
• Locate the lower securing screw hole beneath the handheld section of the appliance
and mark the position on the wall.
• Remove the appliance from the wall by sliding it up and clear of the bracket.
• Drill the marked hole and insert the nal wall plug.
• Return the appliance to the bracket as per the previous instruction and secure the
appliance to the wall using the remaining screw.
• Insert the large white cap to conceal the screw hole before replacing the handheld
section to complete the mounting.
Concealed Cable Entry - If Desired
• Remove the hair dryer from the holster and locate 2 screws (see diagram 1).
• Remove both screws and pull the cover away.
This appliance should only be installed and maintained by a competent person in
accordance with any local electrical regulations.
The appliance is only intended for xed installations.
This appliance is not designed for outdoor use.
When installed, the hand-held part of this appliance, when fully extended, must be
out of reach of a person taking a bath or shower.

4
• Remove the power cord from the wiring terminal (see diagram 2).
• Push to remove the circular plastic piece to create wire hole (see diagram 2) and place
your prepared power cord through this hole.
• Make electrical connection to the wiring terminal as per the electrical section of these
instructions.
• Ret the cover by reversing the above steps.
• Fit supplied small white cap into the original cable entry hole.
Diagram 1
Diagram 2
Screws
Mounting bracket

5
3. Operation
• Remove the hair dryer from holster.
• Ensure the on / o switch on the holster is in the on position.
• Use the sliding switch to select ‘high’ or ‘low’ temperature.
• Press and hold the power button to activate.
• Release power button to cease operation.
• Place appliance in holster when not in use.
2. Electrical Connection
Only connect the appliance to an electrical supply that meets the specication
detailed on the rating label.
The appliance must be permanently connected to the electrical supply through an
appropriately rated isolating switch with a contact separation in all poles.
• Electrical connection should be made via a 13A switched fuse spur.
• Make connections as below;
- Brown live wire to the terminal marked‘L’
- Blue neutral wire to the terminal marked ‘N’

6
4. Cleaning and Maintenance
Ensure the appliance has cooled down before performing any maintenance task.
Isolate the appliance from the electrical supply before performing any maintenance
task.
Do not use abrasive chemicals to clean this appliance.
Use a soft damp cloth when cleaning, avoid excessive use of liquids.
Ensure any future maintenance or modications to the appliance complies with the
guidelines in these instructions.
• Use a soft brush or vacuum cleaner to gently remove any dust or debris that could
adversely aect the airow through and around the appliance.

7
5. Specication
Model OP1200
Power 1.2 kW
Voltage 230 V
Dimensions (h x w x d) 240 x 165 x 100 mm
Weight 0.8 kg

Hyco Manufacturing Ltd
Normandy Court
Express Way
Castleford, WF10 5NR T 01924 225 200
E sales@hyco.co.uk
hyco.co.uk
INFORMATION FOR CORRECT DISPOSAL OF THE PRODUCT IN ACCORDANCE
WITH THE EUROPEAN DIRECTIVE 2012/19/EU.
At the end of its working life this equipment must not be disposed of as household
waste. It must be taken to a local authority waste collection centre or to a dealer
providing this service. Disposing of electrical and electronic equipment separately
enables its components to be recovered and recycled to obtain signicant savings
in energy and resources. In order to underline the duty to dispose of this equipment
separately, the product is marked with a crossed out dustbin.
6. Guarantee and Service Policy
This product is covered by a standard parts or replacement warranty for a period of
12 months from the date of purchase.
If there is a manufacturing defect within the warranty period we will send spare parts,
repair and return the unit or, at our discretion, supply a replacement product.
Incorrect installation and failure to follow correct operating instructions are excluded.
Consequential costs such as labour charges or damage to surroundings are expressly
excluded.
If you experience a problem with this product you should rst contact our service
department on 01924 225 200 before taking any further action. Experience has shown
that issues can often be resolved without the need to return or uninstall the product.
7. Contact Us
This manual suits for next models
1
Table of contents
Other Hyco Hair Dryer manuals