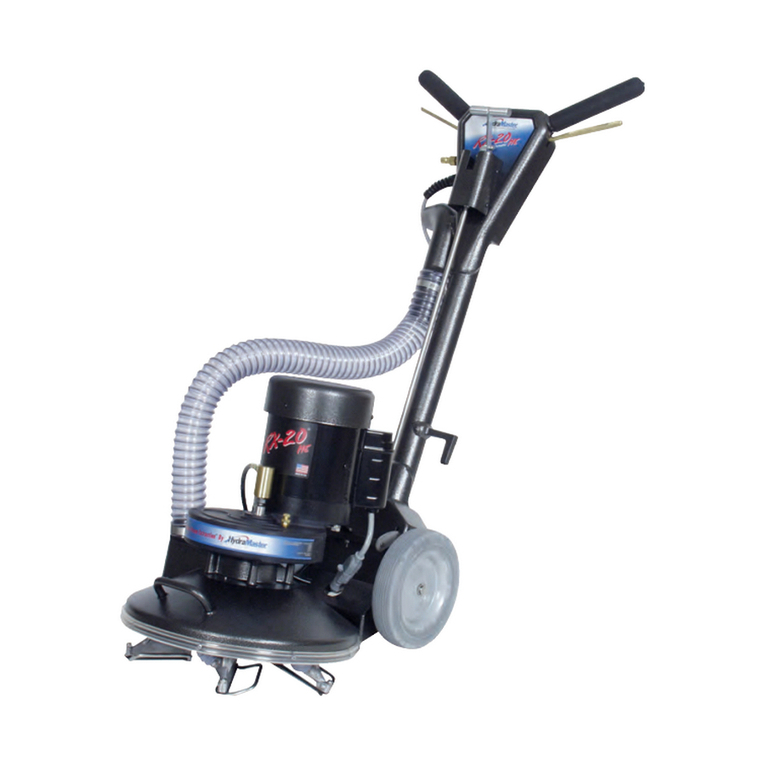
HydraMaster RX20 NEXTGEN 120 VAC User manual

RX-20 / CMX-20
Owner’s Manual
HydraMaster North America, Inc.
11015 47th Avenue West, Mukilteo, Washington 98275
MAN-33272 Rev. 0, April 23, 2010
(182-006-D)
No part of this manual may be reproduced or used in any form or by any means (i.e. graphic, electronic, photocopying
or electronic retrieval systems) without the express written permission of
HydraMaster North America, Inc.
All rights reserved. © 2010 HydraMaster North America, Inc.
DOMESTIC AND INTERNATIONAL

RX-20 / CMX-20
RX-20 / CMX-20 Owner’s Manual - ii
Table of Contents
INTRODUCTION.......................................................................................... SECTION 1
Contact Information................................................................................. 1-2
Warnings, Cautions and Notices............................................................. 1-3
MACHINE SPECIFICATIONS ...................................................................... SECTION 2
Congurations......................................................................................... 2-2
ASSEMBLY INSTRUCTIONS ...................................................................... SECTION 3
OPERATING INSTRUCTIONS..................................................................... SECTION 4
Preparation.............................................................................................. 4-1
Operation ................................................................................................ 4-2
CLEANING INFORMATION ......................................................................... SECTION 5
Cleaning Patterns.................................................................................... 5-1
Special Information ................................................................................. 5-2
Cleaning Hints......................................................................................... 5-2
MACHINE MAINTENANCE.......................................................................... SECTION 6
Daily Maintenance................................................................................... 6-1
Periodic Maintenance.............................................................................. 6-4
Transport and/or Storage ........................................................................ 6-4
Freeze Warning and Protection .............................................................. 6-4
ELECTRICAL DIAGRAMS ........................................................................... SECTION 7

RX-20 / CMX-20
iii - RX-20 / CMX-20 Owner’s Manual
ASSEMBLY DRAWINGS AND PARTS LISTS.............................................. SECTION 8
Final Assembly Parts List ....................................................................... 8-3
Upper and Lower Handle Assembly Parts List ....................................... 8-7
Handle Locking Linkage Assembly Parts List ........................................ 8-8
Base and Drive Train Assembly Parts List ............................................. 8-9
Gear Box Assembly Parts List ................................................................ 8-10
Vacuum Head (Original Style) Assembly Parts List ................................ 8-14
Vacuum Shoe and Skid (Original Style) Assembly Parts List.................. 8-15
RX-20/CMX-20 - 110 V Assembly Parts List (P/N 604-999-004 ) ........... 8-16
RX-20/CMX-20 - 110 V, Extended Handle Assembly
Parts List (P/N 604-999-005)............................................................. 8-17
RX-20/CMX-20 - 220 V Assembly Parts List (P/N 604-999-220) ............ 8-18
RX-20/CMX-20 - 220 V, Extended Handle Assembly
Parts List (P/N 604-999-225)............................................................. 8-19
REPAIR AND REPLACEMENT .................................................................... SECTION 9
Felt Vacuum Seal ................................................................................... 9-1
High Pressure Valve Assembly .............................................................. 9-2
TROUBLESHOOTING ................................................................................. SECTION 10
WARRANTY INFORMATION ....................................................................... SECTION 11

RX-20 / CMX-20
RX-20 / CMX-20 Owner’s Manual - iv
List of Figures and Tables
Figure 2-1. RX-20 / CMX-20 Optional Equipment................................................. 2-3
Figure 3-1. Fully Assembled RX-20 / CMX-20 ...................................................... 3-1
Figure 4-1. Pull or Push on Adjustment Lever....................................................... 4-1
Figure 4-2. Location of 440 Male Quick Connect.................................................. 4-1
Figure 4-3. Location of Control Triggers and Momentary Switch.......................... 4-2
Figure 4-4. Lift or Lower Handle to Maneuver....................................................... 4-3
Figure 4-5. Correct Cleaning Patterns .................................................................. 4-4
Figure 5-1. Clean into Area or Room .................................................................... 5-2
Figure 6-1. Remove Nut/Inline Filter ..................................................................... 6-1
Figure 6-2. Check Jet Spray for Even Flow .......................................................... 6-2
Figure 6-3. Loosen Cleaning Head Assembly....................................................... 6-2
Figure 6-4. Location of Rotary Union .................................................................... 6-2
Figure 6-5. Clean Off Debris from Gear Box Shaft ............................................... 6-2
Figure 6-6. Lubricate Vacuum Seal on Top of Hub ............................................... 6-3
Figure 6-7. Lubricate Shaft and Re-install Head Assembly................................... 6-3
Figure 7-1. Wiring Diagram - 110 V, 60 Hz............................................................ 7-1
Figure 7-2. Wiring Diagram - 220 V, 50 Hz ........................................................... 7-2
Figure 8-1. Final Assembly.................................................................................... 8-3
Figure 8-2. Upper and Lower Handle Assembly - Overview ................................. 8-4
Figure 8-3. Upper and Lower Handle Assembly - Parts View 1 of 2 ..................... 8-5
Figure 8-4. Upper and Lower Handle Assembly - Parts View 2 of 2 ..................... 8-6
Figure 8-5. Handle Locking Linkage Assembly ..................................................... 8-8
Figure 8-6. Base and Drive Train Assembly.......................................................... 8-9
Figure 8-7. Gear Box............................................................................................ 8-10
Figure 8-8. Vacuum Head Assembly.................................................................... 8-11
Figure 8-9. Vacuum Shoe and Skid Assembly ..................................................... 8-13
Figure 8-10. Vacuum Head (Original Style) Assembly ......................................... 8-14
Figure 8-11. Vacuum Shoe and Skid (Original Style) Assembly .......................... 8-15
Figure 9-1. Carefully Pry Seal Up and Lift Out...................................................... 9-1
Figure 9-2. Quick Connect, Back Plate and Stainless Steel Hose........................ 9-2
Table 8-1. RX-20 / CMX-20 Congurations............................................................ 8-2

1-1: Introduction
RX-20 / CMX-20
1- Introduction
Congratulations,
You now own a piece of equipment that incorporates the latest in carpet, tile and grout
cleaning technology. Your foresight in purchasing an RX-20 / CMX-20 shows that you
care enough to give your customer the maximum cleaning process available. You have
invested in not only a cleaning tool, but
a marketing tool that will enhance your
professional image in every way.
The RX-20 and the CMX-20 are basically
the same machine, with different names
and labels. HydraMaster truckmount owners
know this tool as the RX-20 whereas
CleanMaster portable owners know it as the
CMX-20.
The RX-20 / CMX-20’s features will almost
certainly increase your productivity while
decreasing the fatigue factor that may have
prevented you from going after some of the larger cleaning jobs that are available to
carpet cleaners and maintenance professionals today.
Your new RX-20 / CMX-20 is a powerful Rotary Jet Extractor that has been precision
engineered to bring you to the state-of-the-art in carpet, tile and grout cleaning. The
RX-20 / CMX-20’s weight distribution and rotary motion enable the operator to maneuver
the unit easily with less fatigue and without back strain.
The RX-20 / CMX-20’s electric motor drives its precision
transmission which, in turn, rotates the head, or star,
assembly.
Cleaning solution is injected through the center of the
gear box shaft directly to the three spray jets.
Soiled solution is then extracted from the carpet by ve
stainless steel cleaning heads and drawn through the
aluminum exhaust manifold to your cleaning system’s
recovery tank.

Introduction: 1-2
RX-20 / CMX-20
CONTACT INFORMATION
If you have any questions regarding the operation, maintenance or repair of this machine,
please contact your local distributor.
To nd a local distributor, please visit the HydraMaster website at http://www.hydramaster.
com/owners/locate/index.asp.
If your question cannot be resolved by your distributor or by the information within this
manual, you may contact HydraMaster Customer Service direct using the following phone
numbers.
Hours Telephone Numbers E-mail Addresses
Monday-Friday (425) 775-7275 Service Tech Support:
techsupport@hydramaster.com
7:00 a.m. to 5:00 p.m. (425) 775-7276 Parts Parts Support:
parts@hydramaster.com
Pacic Standard Time (800) 426-4225 Parts /
Service FAX
When calling your distributor, be sure to reference the serial number and date of
purchase.
FOR YOUR REFERENCE:
Serial No.____________________________________________________
Date of Purchase:_____________________________________________
Purchased From (Distributor): __________________________________

1-3: Introduction
RX-20 / CMX-20
WARNINGS, CAUTIONS AND NOTICES
HydraMaster uses this WARNING symbol throughout the manual to warn of
possible injury or death.
This CAUTION symbol is used to warn of possible equipment damage.
This NOTICE symbol indicates that federal or state regulatory laws may apply,
and also emphasizes supplemental information.

Introduction: 1-4
RX-20 / CMX-20

2-1: Machine Specications
RX-20 / CMX-20
2- Machine Specications
RX-20 / CMX-20 - 110 V RX-20 / CMX-20 - 220 V
Length 23” 23”
Base Width 16” 16”
Height - Standard Up to 43” Up to 43”
Height - with
Extended Handle Up to 49” Up to 49”
Weight 70 lbs 70 lbs
Motor 1/2 HP Totally Enclosed
Fan-Cooled
1/2 HP Totally Enclosed,
Fan-Cooled
Voltage 110 V, 60 Hz 220 V, 50 Hz or 60 Hz
Gear Box
1,725 rpm Input
130 rpm Output
Permanently Lubricated
Helical Gear Drive
220V, 50 Hz 220V, 60 Hz
1,450 rpm
Input
109 rpm Output
Permanently
Lubricated
Helical Gear
Drive
1,725 rpm
Input
130 rpm Output
Permanently
Lubricated
Helical Gear
Drive
Oil Capacity 12 oz 12 oz
Star Head Plate Replaceable, Spring Steel
Arms
Replaceable, Spring Steel
Arms
Cleaning Heads Five Cast Aluminum Five Cast Aluminum
Solution Jets Three Stainless Steel, 80015
Veejet 80
Three Stainless Steel, 80015
Veejet 80
Solution Strainer Mesh, Stainless Mesh, Stainless
Solution Valve Stainless Steel,
High Pressure
Stainless Steel,
High Pressure
Cleaning Rate
Five Heads Rotating at
130 rpm = 650 Cleaning
Passes/Minute
220V, 50 Hz 220V, 60 Hz
Five Heads
Rotating at
109 rpm = 545
Cleaning
Passes/Minute
Five Heads
Rotating at
130 rpm = 650
Cleaning
Passes/Minute

Machine Specications: 2-2
RX-20 / CMX-20
RX-20 / CMX-20 - 110 V RX-20 / CMX-20 - 220 V
Handle
Assembly*
Foam Grips,
Adjustable Height
Foam Grips,
Adjustable Height
Transportation
Wheels
8” diameter, 1-1/2” Wide;
Grey, Non-Marking
8” diameter, 1-1/2” Wide;
Grey, Non-Marking
Electric Cord 50 ft, 14/3 50 ft w/M-F IEC Ends 220 V
The base, exhaust manifolds, handle, gear box housing and cleaning heads are all cast
aluminum. Other parts are either metal or high impact plastic.
The operating temperature and pressure of the cleaning solution as well as the
vacuum power depend entirely on the type of cleaning system you use.
CONFIGURATIONS
When selecting your high efciency rotary extractor machine, you have several models
from which to choose:
If you want this conguration: Order this P/N:
RX-20 - 110 V 700-041-006
RX-20 - 110 V, Extended Handle * 700-041-106
RX-20 - 220 V 700-041-007
RX-20 - 220 V, Extended Handle * 700-041-107
CMX-20 - 110 V 700-041-008
CMX-20 - 110 V, Extended Handle * 700-041-108
CMX-20 - 220 V 700-041-009
CMX-20 - 220 V, Extended Handle * 700-041-109
RX-20 and CMX-20 units are also available in these electrical congurations:
110 V - 60 Hz•
220 V - 50 Hz•
220 V - 60 Hz•
See Table 8-1 for detailed parts lists for all eight congurations.
* To accommodate operator comfort, HydraMaster designed the Extended Handle congurations which
increase overall length of the handle by 6”.

2-3: Machine Specications
RX-20 / CMX-20
OPTIONAL EQUIPMENT
To better meet your business needs, HydraMaster offers these options that you can add
to your basic rotary extractor system:
If you want this
option:
Order this P/N:
Pad and Bonnet
Driver
190-041-020
(Top Photo,
Figure 2-1)
Hard Floor
Attachment (LD)
190-041-024
(Middle Photo,
Figure 2-1)
Hard Floor
Attachment (MD)
190-041-026
(Middle Photo,
Figure 2-1)
Hard Floor
Attachment (HD)
190-041-025
(Middle Photo,
Figure 2-1)
Mounting
Bracket
000-163-018
(Bottom Photo,
Figure 2-1)
Figure 2-1. RX-20 / CMX-20
Optional Equipment

Machine Specications: 2-4
RX-20 / CMX-20

3-1: Assembly Instructions
RX-20 / CMX-20
3 - Assembly Instructions
To prepare your RX-20 / CMX-20 for use, follow these instructions:
Remove the machine from the packaging. Inspect the machine carefully for any1.
damage that may have occurred during shipping.
Remove the solid shipping plug from the top of the gear box (see2. Figure 3-1).
Check the gear box lubricant level (see page3. 6-4 of this Owner’s Manual).
Insert the vented plug (provided) into the gear box in place of the solid shipping plug.4.
The solid shipping plug may be discarded.
Remove the protective wrapping material from the wheels.5.
Attach the cleaning head, or star, assembly to the base of the RX-20 / CMX-20 (see6.
Figure 3-1).
Lean the machine back and rest it on the handle.a.
Thread the star assembly (cleaning head) onto the exposed shaft in ab.
counterclockwise direction.
Be sure to remove the solid shipping plug from the top of the gear box and replace
it with the vented plug provided before operating the machine (see Figure 3-1).
Failure to follow these directions may result in damage to the gear box and seal.
Your RX-20 / CMX-20 is now ready to operate.
Figure 3-1. Fully Assembled RX-20 / CMX-20
Head, or Star, Assembly
Shipping Plug
Base

Assembly Instructions: 3-2
RX-20 / CMX-20

4-1: Operating Instructions
RX-20 / CMX-20
4 - Operating Instructions
PREPARATION
Handle Adjustment
Pull or push on the adjustment lever to adjust the
height of the handles (see Figure 4-1). Several
adjustments may be needed before a desirable
operating position is found.
Most operators have better control and less
fatigue when the handle is in a lower position,
at the operator’s hip line. For each person,
there is an ideal position which ensures the
RX-20 / CMX-20 does the work instead of the
individual.
Solution and Vacuum Hose Connections
Your RX-20 / CMX-20 is equipped with a
440 male quick connect for the solution hose
connection and a 2” O.D. vacuum hose inlet
(see Figure 4-2). The vacuum inlet requires a
2” I.D. vacuum hose for proper air ow with a
truckmounted system.
The vacuum hose must be in good
condition to ensure maximum airow.
A solution hose with a 440 female quick connect is also required. If you do not
have a 440 female quick connect, order it from your distributor.
To nd a local distributor, please visit the HydraMaster website at
http://www.hydramaster.com/owners/locate/index.asp.
or the CleanMaster website at:
http://cleanmaster.com/reps/.
Figure 4-1. Pull or Push on
Adjustment Lever
Figure 4-2. Location of 440 Male
Quick Connect

Operating Instructions: 4-2
RX-20 / CMX-20
Electrical Cord Connection
The 50 ft electrical cord on your RX-20 / CMX-20 (110 V/60 Hz conguration) is a
permanently attached, three-prong grounded line requiring a three-prong, 15 Amp
receptacle.
A three-prong to two-prong adapter may be used if its ground wire is properly attached
to a grounded terminal.
Do not, under any circumstances, remove the ground prong from your RX-20 /
CMX-20 power cord. Serious injury or death may result.
For best results, vacuum the carpet thoroughly prior to using the carpet cleaning
system.
OPERATION
Control Functions
Control triggers are located on each side of the handle under the rubber hand grips (see
Figure 4-3).
To operate the RX-20 / CMX-20, squeeze the1. motor trigger on your right-hand side
to control the electric motor which drives the cleaning heads (see Figure 4-3).
Figure 4-3. Location of Control Triggers and Momentary Switch as Viewed from
Front of Machine (Opposite of Operator’s Position)
Motor Trigger on OPERATOR’s
Right-Hand Side
Solution Trigger on OPERATOR’S
Left-Hand Side
Momentary Switch

4-3: Operating Instructions
RX-20 / CMX-20
To fully engage the motor as you are cleaning, you also need to hold down the2.
momentary switch, or button, at the same time you as you squeeze the motor
trigger (see Figure 4-3). The momentary switch is an integrated safety feature on
the RX-20 / CMX-20 which cuts power to the machine if the operator’s hands leave
the machine for any reason.
On the left-hand side, squeeze the solution trigger to control the high pressure3.
solution spray (see Figure 4-3).
Notice that the air ows constantly while the RX-20 / CMX-20 is in operation.
Do not operate your RX-20 / CMX-20 on dry carpets The friction generated by the
revolving cleaning heads may damage bers in the carpet.
Maneuvering Your RX-20 / CMX-20
Your RX-20 / CMX-20 maneuvers like a rotary oor machine.
To move the RX-20 / CMX-20 to the right, lift the handle slightly (see1. Figure 4-4).
The more you lift or lower the handle, the faster the RX-20 / CMX-20 will move.
Figure 4-4. Lift or Lower Handle to Maneuver; Illustration to the Right
Shows Incorrect Maneuver

Operating Instructions: 4-4
RX-20 / CMX-20
To move forward and backward, position the handle so that the unit remains stationary,2.
then push forward or pull back. To familiarize yourself with your RX-20 / CMX-20,
practice on an open area. Depress both the solution trigger and motor trigger and
move the RX-20 / CMX-20 slowly in a 3 to 5-ft arc, as shown in Figure 4-5.
After you have become familiar with the speed and movement of the machine, practice
making it hover in one spot. (The hovering maneuver is useful for removing stubborn
stains, as well as removing furniture indentions.)
Do not tilt RX-20 / CMX-20 sideways while moving forward and backward. A loss
of control may result in damage to the unit or cleaning area.
Figure 4-5. Correct Cleaning Patterns

5-1: Cleaning Information
RX-20 / CMX-20
5 - Cleaning Information
CLEANING PATTERNS
For regular carpet cleaning use an overlapping arc pattern three times over the same
area (two passes with solution and one pass for drying). When cleaning carpets, rst
clean in circular pattern, then use the overlapping arc pattern to dry the area.
Dirtiest areas may require two or more cleaning passes. Using either pattern
shown in Figure 4-5, you should develop a comfortable rhythm. To obtain maximum
performance from your RX-20 / CMX-20, move it slowly and deliberately with a
50% overlap, giving it time to clean and extract. A steady pace rather than a
frenzied one will increase efciency and production, and decrease fatigue.
The following cautions should be observed while cleaning:
DO NOT operate your RX-20 / CMX-20 over metal oor moldings. Damage to 1.
both the molding and the cleaning head will result.
DO NOT operate your RX-20 / CMX-20 on hardwood oors.2.
DO NOT operate your RX-20 / CMX-20 over loose or unraveled carpet seams.3.
The cleaning head may catch and cause further damage.
DO NOT operate your RX-20 / CMX-20 on concrete oors. It will develop sharp 4.
edges on the extraction heads that will damage carpet bers.
DO NOT clean over the edge of a loose carpet. Instead, clean only up to the5.
edge. Damage may occur if the extraction heads catch the loose carpet.

Cleaning Information: 5-2
RX-20 / CMX-20
SPECIAL INFORMATION
When you clean some plush carpets, you may notice a “pilling” effect. (Pilling occurs
when uffy particles appear on carpet surfaces; it is caused by bers that loosen because
of a weak twist or snags.)
With an RX-20 / CMX-20, loose yarns form balls and are kicked aside as the cleaning
heads revolve. This is normal when aggressive cleaning or even normal vacuuming takes
place, as evidenced by a number of dead, loose yarns in the vacuum cleaner bag. These
loose yarns, in most cases, are short staple yarns or ller yarns used to give the carpet a
denser appearance.
Because your RX-20 / CMX-20 weighs approximately 70 lbs and rests on ve 4” cleaning
heads, the yarns are not sucked up into the vacuum heads as they are with a vacuum
cleaner or old-style cleaning wand.
On older, rubber backed, glued down carpets that may be delaminating with age,
the RX-20 / CMX-20 may cause further delamination. When in doubt, DO NOT
use your RX-20 / CMX-20 on such carpets.
CLEANING HINTS
Most cleaners customarily clean their way out of1.
an area or room. With the RX-20 / CMX-20, you
can clean into an area or room, as shown in the
Figure 5-1, so that the hoses are dragged behind
you during the cleaning process rather than kicked
out of the way as you back out of an area. The
“cleaning into” method works especially well in
hallways or conned areas.
The RX-20 / CMX-20 is a very aggressive carpet2.
cleaning power head and will leave the carpet with
a freshly cleaned appearance. The carpet should
be brushed or groomed after the cleaning process
to remove any swirl marks left behind.
The RX-20 / CMX-20 has been very successful in restoring badly matted trafc 3.
lanes in front of doorways and sofas. Even pivot areas can be brought back to life
again, in most cases. “Cornrowing” in hallways can also be eliminated with minimal
effort.
Figure 5-1. Clean into Area
or Room
Other manuals for RX20 NEXTGEN 120 VAC
3
This manual suits for next models
1
Table of contents
Other HydraMaster Scrubber manuals
Popular Scrubber manuals by other brands

Sprintus
Sprintus Titan Original user manual

Minuteman
Minuteman RoboScrub 20 Operation manual

ADIATEK
ADIATEK diamond 100s Use and maintenance

Powr-Flite
Powr-Flite PFX1380 SERIES Operators manual and parts lists

Clarke
Clarke BEXT 100H Operation?and safety

Numatic
Numatic TTV 678G / 300T Owner's instructions