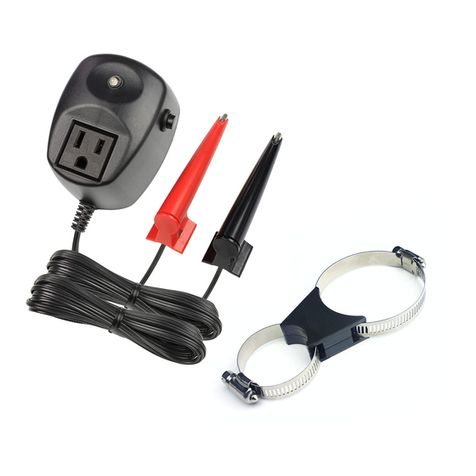
HydroCheck HC8000T User manual

HC8000T Timed Sump Pump Controller
(Float Switch)
Overview:
The HC8000T Timed Sump Pump Controller will provide years of reliable and trouble-free service after completing a
simple and straightforward installation process. See Alarm & LED Guide, Smart Button Features, and Trou-
bleshooting sections for product details. This product is not rated for outdoor use.
READ PRIOR TO INSTALLATION:
1. The “piggyback plug” attached to the mechanical float switch cannot be used with the HC8000T. It
must be disconnected and remain disconnected.
2. If your sump pump has internal float switch wiring, i.e. does not have a “piggyback plug”, then you
must secure the float in an upward position as if the pit were full. This assures that the internal switch
is always closed and that the pump is enabled.
Step-by-Step Installation
Step 1
Unplug the sump pump from the back of “piggyback
plug”.
Step 2
Unplug the “piggyback plug” from the 120 VAC and set
aside. The HC8000T completely replaces this component.
Step 3
Secure the SENSOR to the discharge pipe with tie wrap
where the pump is intended to turn on.
NOTE: Recommended height for the Sensor is slightly
below the Drain Tile (Water Inlet Pipe).
!
""
1
Rev-A
←
“Piggyback Plug”
←
Sump Pump
“Piggyback Plug”
←
←
←
←
Sensor
Tie Wrap
Discharge Pipe
Drain Tile
←

Step 4
Plug the control module into the 120 VAC outlet. #
Step 5
Plug the sump pump motor into the control module. #
Step 6
Adjust run time by following Run Time Adjustment steps
on Page 3.#
NOTE: This product defaults to a 10 second run duration
and can be reprogrammed at anytime.#
Step 7
TEST YOUR INSTALLATION BEFORE LEAVING IT FOR
UNATTENDED USE.#
NOTE: This product will not work if tested in a cup of
water. See How the Sensor Works: Do I need a ground
wire? below for more information.#
•Fill the pit with water until the water level
reaches the tip of the sensor.
•The pump should turn on and the water
level drop.
•When the adjusted runtime is up, the
switch should turn off the pump.
!
""
2
Rev-A
Control Module
←
Control Module
←
Sump Pump
Power Cord
←

Run Time Adjustment
This product defaults to a 10 second run duration and can be reprogrammed at anytime by following these steps.#
How the Sensor Works: Do I need a ground wire?
The sensor detects the presence of water by using a continuity circuit. The continuity circuit works by allowing a
small current to flow from the sensor, through the water, to the ground when the tip of the sensor is in water. When no
water is present, the circuit is broken and no current flows. Normally, the pump provides the ground reference need-
ed for the continuity circuit to work, but occasionally it won’t. When this happens, it is necessary to provide a ground
reference for the sensor to work.#
Adding a Ground Wire:
Alarm & LED Guide
Step 1
Silence or eliminate all active alarms: There should be no audible alarms active (See “Smart Button
Features” on how to disable alarm).
Step 2
Press and hold the Smart Button for approximately 5 seconds, or until the output turns on and the light
starts to flash green. The output turning on marks the start of the desired run time duration
NOTE: If the pump is in the middle of a run cycle when the Smart Button is pressed and held, the output
will turn off for a moment (canceling the cycle) then restart to mark the start of the run time programming.
Step 3
Release the Smart Button when the desired run time is reached. The output will turn off and the switch is
now reprogrammed with the new run time duration.
NOTE: Loss of power does not affect the programmed run time.
Step 1
Strip 1 inch of insulation offeach end of a 14 AWG
length of wire.
Step 2
Secure one end of the wire to a metal water pipe or oth-
er metal electrical conduit.
Step 3
Place the other end of the wire into the pit so that it is
below the bottom sensor.#
NOTE: No danger of electrocution. Visit our website
www.hydrocheckproducts.com for more information.
Meaning
Possible Cause
Green LED
The switch’s output is on (the pump
is on).
None—Normal operation
Red LED
The switch’s output is off (the pump
is off).
None—Normal operation
2-Beep Alarm
The switch did not detect a motor
current during the previous pumping
cycle.
•Pump is not plugged in#
•Mechanical float switch is not
disabled#
•Pump failure
3-Beep Alarm
(High Water Alarm)
Water level did not drop below the
sensor within 30 seconds of pump
cycle start.
•Pump failure#
•Blocked or frozen discharge pipe
""
www.hydrocheckproducts.com | customersupport@hydrocheckproducts.com | 1(877)-225-2124
3#
Rev-A

Smart Button Features
Troubleshooting
Warranty:
STAK Enterprises Inc. warrants the model HC8000T Timed Sump Pump Controller to be free from defects in materials and workman-
ship for its normal, useful life, for a period of 5 years from the date of purchase. STAK Enterprises Inc. makes no other express warranty
for this device. No agent, representative, dealer, or employee of STAK Enterprises Inc. has the authority to increase or alter the obliga-
tions or limitations of the warranty. The company's obligation of this warranty shall be limited to the repair or replacement of any part of
the HC8000T which is found to be defective in materials or workmanship under normal use and service during the 5 year period of prod-
uct use by original product owner commencing with the date of purchase. Owner must pay all shipping charges necessary to replace
product covered by this warranty. This warranty shall not apply to acts of God, nor shall it apply to products which, in the sole judgment
of STAK Enterprises, Inc. have been subject to negligence, abuse, accident, tampering, alteration, misapplication, or improper installa-
tion. Units in need of repair should be returned, shipping prepaid, to:
Customer Service Department
STAK Enterprises, Inc.
2413 West Algonquin Road #309
Algonquin, IL 60102
THE DURATION OF ANY EXPRESS OR IMPLIED WARRANTY, INCLUDING THAT OF MERCHANTABILITY OR FITNESS FOR ANY
PARTICULAR PURPOSES, SHALL BE LIMITED TO THE NORMAL, USEFUL LIFE OF THE PRODUCT, COMMENCING WITH THE
DATE OF PURCHASE. IN NO CASE SHALL THE COMPANY BE LIABLE FOR ANY CONSEQUENTIAL OR INCIDENTAL DAMAGES
FOR BREACH OF THIS OR ANY OTHER WARRANTY, EXPRESS OR IMPLIED, WHATSOEVER.
Goal
Method
Silence Alarm
Pressing and releasing the Smart Button while an alarm is active will silence the alarm for
24hrs.
Disable Alarm
Pressing and holding the Smart Button while an alarm is active will disable the alarm until
the switch is reset. The Smart Button should be pressed and held until the device sounds
a short beep followed by a long beep, indicating that the alarm was successfully disabled.
Switch Reset
Press and hold Smart Button while plugging switch into a 120 VAC outlet.
Manually Run Pump
Press and hold the Smart Button for 5 seconds while the LED is solid red. The pump will
run until the button is released.
Turn Pump Off
Press and hold the Smart Button for a minimum of 5 seconds while the pump is on. The
pump will turn off when the button is released.
Problem
Meaning
Method
Pump doesn’t turn on
Sensor is in water, but the
pump doesn’t start. LED is
solid Red.
The sensor isn’t getting a good ground from the pump.
Install a ground wire. See Adding a Ground Wire.
Pump turns off too soon
The pump starts a cycle, but
turns off before the cycle is
complete.
Check that the switch is programmed for the proper run
time. See Run Time Adjustment.
Pump doesn't turn off
The pump is drawing in air
but continues to run.
•Check that the sensor isn’t placed too low. The pump
needs to be able to pump the water level below the tip of
the sensor. #
•Check that the switch is programmed for the proper run
time. See Run Time Adjustment.#
•Check that the isn’t anything creating a bridge between
the sensor and the pump. This can cause an alternate
ground path for the sensor.
Pump turns on when no
water present
Something is triggering the
sensor, causing the switch to
“think” water is present.
Check that the isn’t anything creating a bridge between
the sensor and the pump. This can cause an alternate
ground path for the sensor.
""
www.hydrocheckproducts.com | customersupport@hydrocheckproducts.com | 1(877)-225-2124
4
Rev-A
Other HydroCheck Controllers manuals
Popular Controllers manuals by other brands

Astrolite
Astrolite LED CONTROLLER II user manual

Hunter
Hunter PSC-Z Series Owners manual and programming instructions

HORNER
HORNER XLW PRIME Quick reference guide

J+J
J+J J3-35 quick guide

Mountz
Mountz ECD-5000U operating instructions

National Instruments
National Instruments cRIO-9039 Getting started guide

RTK
RTK ST 5112 Series Installation and operating instructions

SPENCE
SPENCE 2000 Series instruction manual

Orion
Orion Multiple Battery Regulator MBR70 installation manual

Siemens
Siemens DESIGO PX user guide

Endless Pools
Endless Pools Gecko Service instruction

Mitsubishi Electric
Mitsubishi Electric Melsec A Series user manual