Hydrotechnik Multi-Handy 2040 User manual

-1-
Please read the user instructions carefully, before putting the measuring instrument in operation.
User Manual
User Manual
for
for
Multi-Handy 2040
Multi-Handy 2040
L3160-00-25.00E
L3160-00-25.00E
COPYRIGHT ©1998 HYDROTECHNIK GmbH L3160-00-25.00E, Edition 1998 Oct.12
p
1
Q
Prog ENT
T
p
p
2
US
SI
0-204-20
p
(
p
1
-p
2
)
Multi Handy 2040
OFF
ON
128.6
n
p1 =
[bar]

-2-
Preface
The user manual in hand is a description of the hand held measuring instrument Multi-Handy 2040 with the following measuring
inputs:
- 2 measuring inputs for sensors with standardised, analogue output signals of 0 to
20 mA or 4 to 20 mA. The measuring channel p1 is prepared for the measurement
of pressure only. In the second measuring channel p2 temperature, volume flow rate
and RPM can be measured additionally, besides pressure.
You will surely have no problems in handling the Multi-Handy 2040, but you will only be able to use all possibilities of the
instrument, if you know it well.
Should you have any difficulties in understanding nevertheless, please do not hesitate to contact us, we will do our best to help
you.
We reserve the right to make modifications, necessary for the technical progress.
We wish you a lot of success for the application of our hand held measuring instrument
Multi-Handy 2040

-3-
Preface
General ..................................................................................................................................................................
Instruction for the correct charging of the internal instruments batteries ...................................................................
Important comments .................................................................................................................................................
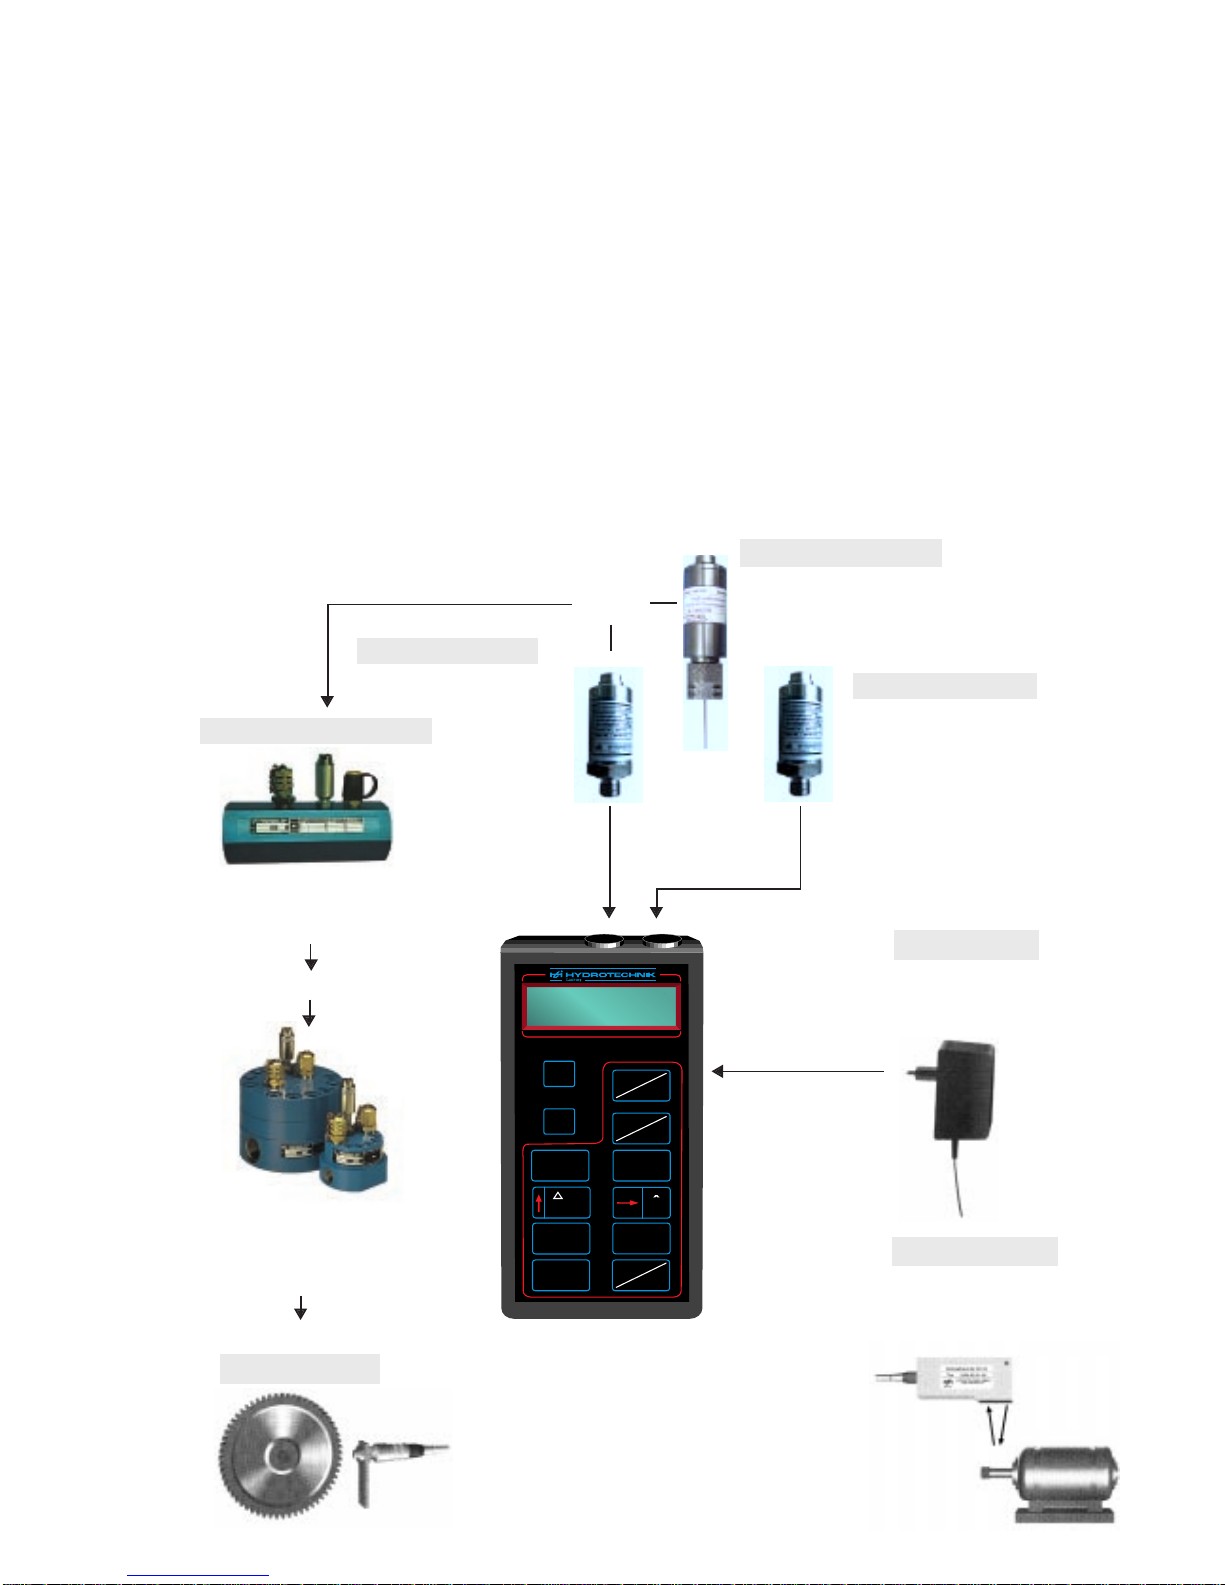
1. Operation Multi-Handy 2040 .............................................................................................................................
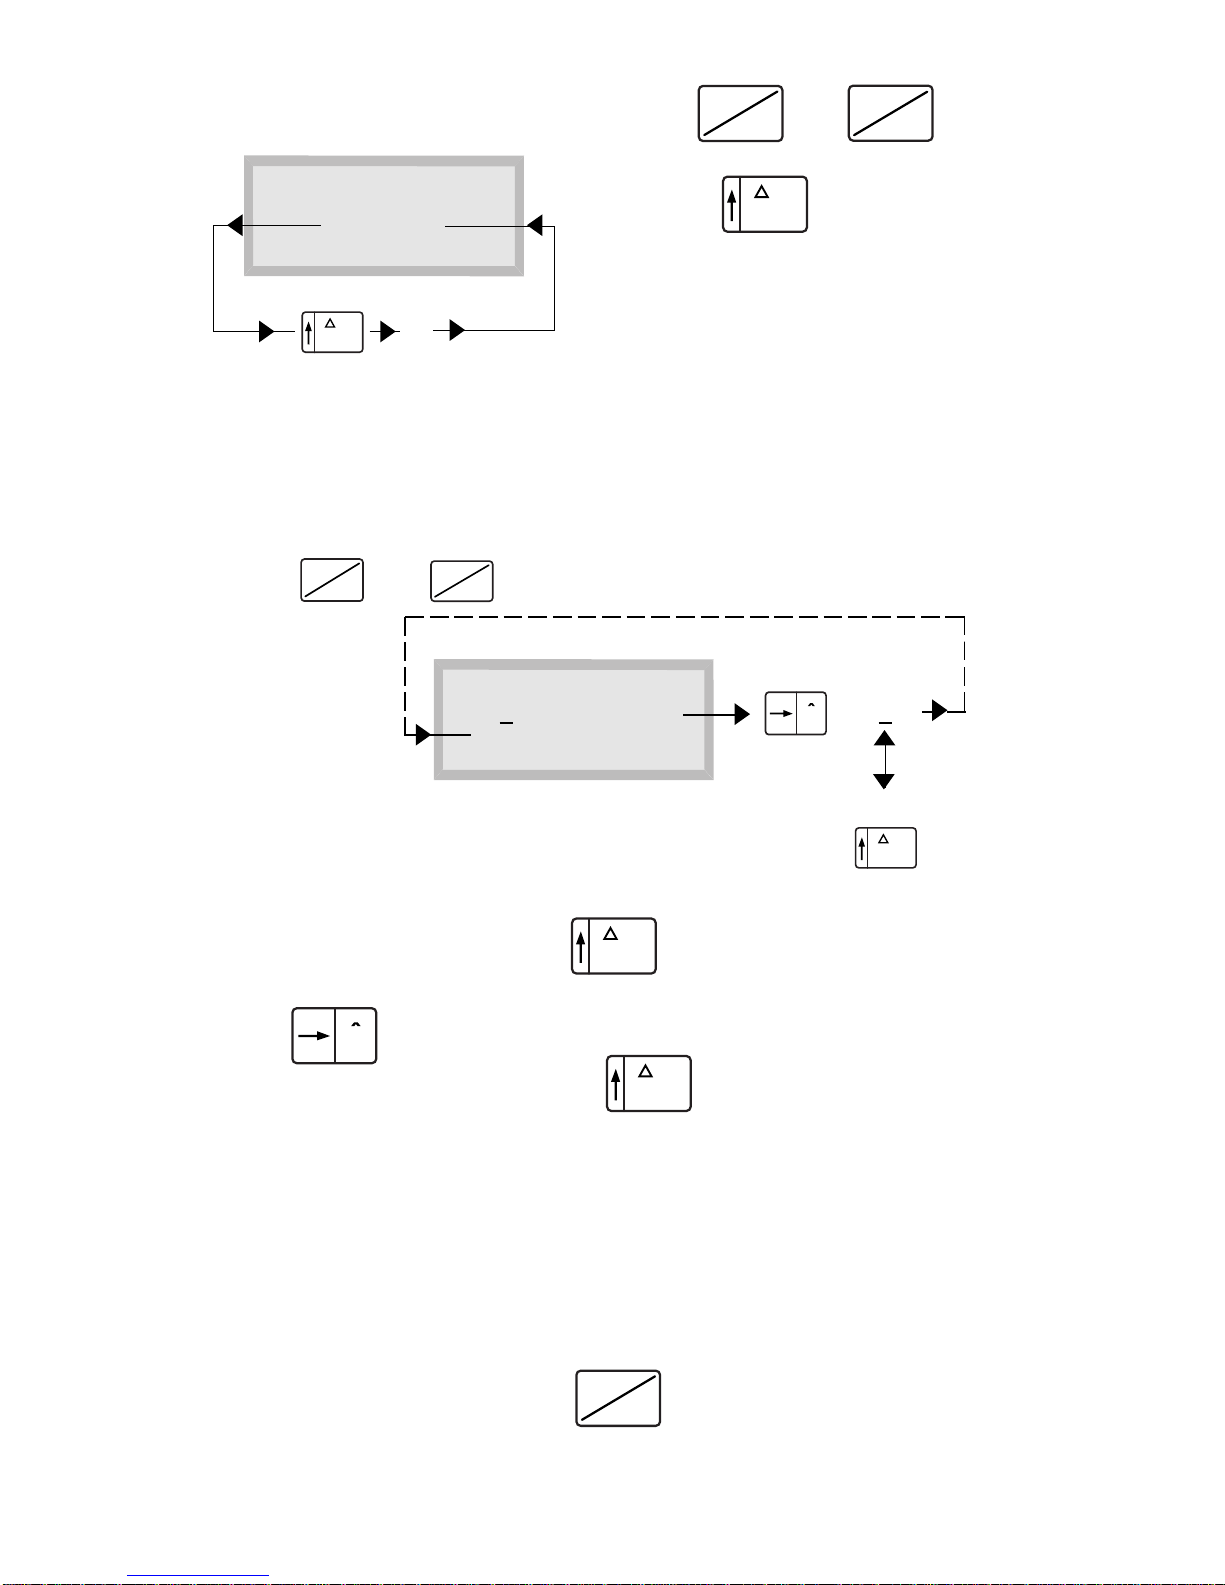
1.1 Display examples .....................................................................................................................................................
1.2 Initialisation...............................................................................................................................................................
2. Programming.........................................................................................................................................................
2.1 Selection of unit of measurement .............................................................................................................................
2.2 Selection of pressure sensor for signal 0 to 20 mA or 4 to 20 mA ...........................................................................
2.3 Checking of current signal adjustment......................................................................................................................
2.4 Error message at 4 to 20 mA sensors .......................................................................................................................
2.5 Measuring value display at 4 to 20 mA sensors .......................................................................................................
3. Measurement of pressure .................................................................................................................................
3.1 Selection of pressure measuring ranges ...................................................................................................................
3.2 Zero point alignment ................................................................................................................................................
3.3 Measurement of pressure peaks ...............................................................................................................................
3.4 Invocation of min/max. values in the display ............................................................................................................
3.5 Deletion of pressure peak .........................................................................................................................................
3.6 Change-over from measurement of pressure peaks to normal pressure measurement .............................................
3.7 Measurement of pressure differential .......................................................................................................................
4. Measurement of temperature ..........................................................................................................................
5. Measurement of volume flow rate ..................................................................................................................
5.1 Input of calibration value ..........................................................................................................................................
5.2 Zero point alignment ................................................................................................................................................
6. Measurement of rev. speed...............................................................................................................................
6.1 Input of calibration value ..........................................................................................................................................
6.2 Zero point alignment ................................................................................................................................................
6.3 Further technical advice for the measurement of rev. speed ......................................................................................
7. Technical data of Multi-Handy 2040 ...............................................................................................................
8. Pin connections of Multi-Handy 2040..............................................................................................................
8.1 Technical background information for connection of pressure sensors,
0 to 20 mA- and 4 to 20 mA-type..............................................................................................................................
9. Error detection .....................................................................................................................................................
10. Information on guarantee ..................................................................................................................................
11. Maintenance..........................................................................................................................................................
4
5
6
7
7
9
10
10
10
11
11
11
12
12
13
14
14
14
14
15
16
17
17
17
18
18
18
19
20
21
22
23
24
24
Index

-4-
General
The measuring instrument Multi-Handy 2040 of company HYDROTECHNIK GmbH, Limburg is an efficient hand held measuring instrument for
the measurement of pressure, pressure peaks, pressure differential, volume flow rate, rev. speed and temperature.
The Multi-Handy 2040 doesn’t depend on a fixed power supply due to its rechargeable batteries.
For the recharge of the batteries an external plug-in power supply unit is provided.
The instrument disposes of 2 measuring inputs for the connection of sensors with a standardised, analogue output signal of 0 to 20 mA or
4 to 20 mA.
A direct measurement of frequency can’t be realised with this instrument.
However, with corresponding frequency/current converters (F/DC-converters), it is possible to convert the frequency signals into standardised
4 to 20 mA signals, which can be evaluated by the measuring instrument.
In doing so it is possible to measure RPM and volume flow rate.
It is also possible to connect sensors that were not produced by HYDROTECHNIK.
In doing so, you only have to pay attention to the above-mentioned output signals of the sensors and to a supply voltage among 14,4
and 30 VDC.
Temperature sensor
4 to 20 mA
Mains adapter 230 VAC
secondary 24 VAC
Gear flow meters GFM, with
magnetoresistor sensor
and F/DC-converter
output signal 4 to 20 mA
Measurement of temperature
Charging of battery
or
Connection possibilities for the Multi-Handy 2040 with HYDROTECHNIK-sensors
p1p2
or
alternatively
Pressure sensor type HD
4 to 20 mA
Scanning of rev. speed from gear wheels:
inductive transducer with F/DC-converter
output signal 4 to 20 mA
Measurement of volume flow rate
Measurement of pressure
Pressure sensor type HD
Measuring turbine RE3/RE4
inductive transducer with F/DC-converter
output signal 4 to 20 mA
Measurement of RPM
With optical rev. speed probe DS 03
with F/DC-converter
output signal 4 to 20 mA
Measurement of pressure
Measurement of RPM
p
1
Q
Prog
ENT
T
p
p
2
US
SI
0-20
4-20
p
(
p
1
-p
2
)
Multi Handy 2040
OFF
ON
128.6
n
p1 =
[bar]

-5-
Instructions for the correct charging of the internal instrument batteries
Before using the measuring instrument you should ensure, that the internal NiCd-batteries have their full capacity.
By use of the HYDROTECHNIK plug-in power supply unit (primary 230 VAC, secondary
24 VDC) a continuous charging of the batteries is guaranteed.
When using the instrument the first time, you should take into consideration, that the batteries aren’t charged completely by HYDROTECHNIK.
Therefore we recommend you to connect the plug-in power supply unit for charging the batteries for at least 14 to 16 hours.
This time should be kept in any case.
If a power supply unit from another manufacturer or a car battery of 12V is used, the instrument can be used for measuring, but the recharging
of the batteries can’t be guaranteed.
For a safe recharging of the batteries you always need a stabilised power source with a direct voltage from 24V to max. 30V.
Should the batteries be discharged, a charging time of 16 hours needs to be kept.
During this, the instrument should be switched-off !
The service life of NiCd-cells can be very long, but this always depends on the operating conditions. You should avoid a 100% discharging as
well as a permanent charging or a charging after each operation.
If the batteries are recharged after a discharging below 50% only, the service life of the NiCd-cells will be influenced positively.
A recharging after a very short operation of the instrument will affect the batteries, as the well-known memory effect of the NiCd-cells will
reduce their capacity.
That means, if you use the instrument only for a short period and if only a part of the batteries’ capacity is used up, you shouldn’t charge them
directly afterwards.
If you do so for a longer time, the capacity of the cells will be reduced and the batteries may be damaged permanently.
However, they can be regenerated again by several charging- and discharging cycles, that means by using the measuring instrument for a
longer period and a following recharging.
If the charging of the batteries isn’t sufficient, a message „Charge battery !“ will be displayed. In this case the batteries are discharged in a way,
that you will have to recharge them for at least 16 hours !

-6-
Please take the following,
Important comments
concerning your security and the operational security of your instrument, into consideration:
-Don’t submit the instrument to extreme heat or humidity.
-Never open the instrument by yourself.
-Please pull the mains adapter out of the wall socket under the following circumstances:
1.during a thunderstorm
2.if you detect a bad smell or smoke
-Please protect your sensors from overloads:
1.exceeding the allowed voltage supply range
2.overloading the allowed pressure measuring range mechanically
3.wrong pin configuration, especially at sensors from other manufacturers
For your special attention:
Should the housing be polluted, please clean it with a soft cloth, moistened with a mild detergent (Please pay attention to the notes of the
manufacturer).
Strong chemical solvents may not be used, as they attack the housing.
Make a contribution to the environmental protection
Used batteries do not belong into the household refuse.
Please throw your batteries into a special receptacle for disposal of refuse and sewage.
Recycling for environment’s sake !

-7-
Two measurable variables can be shown at the same time on the 2-line LCD-
display.
The first line is reserved for the pressure channel p1. In the second line either
pressure p2, temperature T, volume flow rate Q or rev. speed n can be shown.
On the keyboard you will find several keys, which can only be pressed in
connection with another key.
These are the keys and .
In doing so you have to take into consideration that the period between pressing
the first and the second key must not be longer than three seconds.
After three seconds the key pressed first will be ignored.
All inputs need to be finished with „Prog/ENT“.
Depending on the number and the type of variables, the values are displayed in
different sizes.
In the following you will find several examples about the display-possibilities of
your instrument.
After having switched on the instrument, this menu will appear for approx. three
seconds.
When the instrument is switched on again, the display for pressure p1 and p2 will
always appear.
By pressing for example key the measuring value display can be
switched to an enlarged display. However, only the pressure measuring value of
p1 is shown, see left.
If the measuring value of p2 shall be shown in the same size, the user only has to
press key .
The pressure measuring value of p2 is shown.
Another stroke of key returns to the usual display with two lines,
indicating the measuring values of p1 and p2, see picture on the left.
1. Operation Multi-Handy 2040
1.1 Display examples
initialisation
version 1.0
128.5
96.4
p1
[bar]
p2
[bar]
p1
[bar] 128.5
p2
[bar] 96.4
128.5
96.4
p1
[bar]
p2
[bar]
Prog ENT
p
p
2
p
1
p
2

-8-
p1^ 128.5 / 345.2
p2^ 96.4 / 297.3
Display of extreme values (min/max.) of for example p1 min. and p1
max. in the first line and p2 min. and p2 max. in the second line.
You can have the extreme values displayed by pressing the keys
and and in the second line by pressing the
keys and .
The normal pressure display is shown by pressing the keys P1 and P2.
Display of the two pressure measuring values p1 and p2.
The next display shows a pressure differential out of these values.
After a stroke of key the measuring value from
Dp = p1 - p2 is displayed in the second line.
As already described on page 7, an enlargement of the display can be
achieved by pressing key and key .
The two pictures show the display (enlarged) of „p1“ and „dp“, as an
example.
Measurement of volume flow rate Q instead of p2 in the second line of
the display.
Temperature measurement T instead of p2 in the second line of the
display.
These two displays can be enlarged, too.
We have refused to give further examples to avoid confusion.
128.5
96.4
p1
[bar]
p2
[bar]
128.5
32.1
p1
[bar]
dp
[bar]
p1
[bar] 128.5
dp
[bar] 32.1
p1
[bar]
Q
[l/min]
128.5
146.7
p1
[bar]
T
[°C]
128.5
19.7
p
(
p
1
-p
2
)
p
1
p
(
p
1
-p
2
)
p
p
1
p
p
2

-9-
The re-initialisation is started by switching the measuring instrument on and by
pressing the following keys within 3 seconds:
and and
Afterwards the user can select one of the three fixed languages, German, English
or French.
By pressing key , which is now acting as a cursor, one language
can be chosen directly in the display.
The selection needs to be confirmed with key .
The instrument automatically asks for the initialisation. The user can decide
whether he wants to initialise or not.
If no initialisation is requested any key except „Prog/Ent“ may be pressed and the
measuring value display is shown.
If you request an initialisation and press key , all data like
calibration value, language, units of measurement, selection of the output signal
of the pressure sensors, entered previously by the user, is deleted or reset to a
work’s adjustment.
The display „INIT“ is shown for a short period with a rotating bar.
This indicates, that the preadjustments are stored in the EEPROM.
Afterwards the instrument returns directly into the measuring value display.
After an initialisation, the following basic adjustments are integrated
automatically:
- Pressure measurement p1 and p2 in the display
- Pressure measuring range programmed to 0 to 200 bar
- Signal inputs of p1, p2 and T (temperature) adjusted to 0 to 20 mA
- All calibration values of Q (volume flow rate) set to zero
- Pulses per revolution of rev. speed measurement set to zero
- Language: German
- Measuring units in SI
1.2 Initialisation
It can happen, that the information in digital storage systems is distorted, due to very heavy electromagnetic interference, which still can occur
today in industrial plants.
This shows itself in an amount of data that must be considered unrealistic or the instrument doesn’t react on a keystroke any more.
For this case the instrument has the possibility to set all data back to a given state by a so-called re-initialisation. However then, all data like
calibration value, language, units of measurement, output signal of the pressure- and temperature sensors and all parameters, entered
previously by the user, are deleted.
SPRACHE / LANGUAGE
Deutsch
p
(
p
1
-p
2
)
p
(
p
1
-p
2
)
p
(
p
1
-p
2
)
english francais
initialisation
version 1. 0
INIT?
Prog ENT
0.0
0.0
INIT? 26.05.98
PROG->yes
p1
(bar)
p2
(bar)
INIT? 26.05.98
PROG->yes
p1
[bar]
p2
[bar]
0.0
0.0
p
1
p
2
p
(
p
1
-p
2
)
p
(
p
1
-p
2
)
Prog ENT
Prog ENT

-10-
The change-over to 4 to 20 mA is made by a stroke of key , which is now acting as a cursor and which switches p1 to the
requested current signal. Please take into consideration, that a flashing bar signalises the switching from 0 to 4 (mA) in the example.
A stroke of key , which is also used as a cursor in this case, switches directly to p2.
Here the current signal can be switched to 4 to 20 mA with key , too, as already mentioned above.
The switching back to 0 to 20 mA is made in the same way.
Please don’t forget to press key „Prog/ENT“ to confirm your selection. The above diagram shows the course of the operation in detail.
In the example both sensors were switched to 4 to 20 mA, of course the adjustments of every single channel can differ.
With the cursor key, showing to the right, the corresponding measuring channel will be selected.
With the cursor key, showing upwards, the current range 0 to 20 mA or 4 to 20 mA can be selected.
The selection must be confirmed with key .
By pressing key and key this menu is invoked.
With a stroke of key , which serves now as a cursor, you can
switch over from SI- to US-units.
The SI-units are for example bar, °C, l/min., etc..
After the change-over to US-units, the usual units like psi, °F,
gal/min. are used.
The calibration and the selection of the measuring range are always
carried out in the corresponding SI-unit.
As it is possible to connect pressure sensors with an output signal of either
0 to 20 mA or 4 to 20 mA, it is imperative to inform your measuring instrument
about the signal-type of your sensor.
2.2 Selection of pressure sensor for signal
0 to 20 mA or 4 to 20 mA
By pressing key and key , the following program is invoked.
0-204-20
Prog ENT
2. Programming
2.1 Selection of unit of measurement
* * * UNIT * * *
SI
p
(
p
1
-p
2
)
US
* * PROG SENSORTYPE* *
p1: 0-20 p2 : 0-20 mA
T : 0-20 Q : 0-20 mA
N : 0-20
4
p
p
(
p
1
-p
2
)
p2 : 0-20
Prog ENT
US
SI
p
(
p
1
-p
2
)
p
(
p
1
-p
2
)
p
p
(
p
1
-p
2
)
Prog ENT

-11-
A display of this message can be caused by the fact, that no current
signal is lead to the measuring input. This can, for example, be a
missing connection to the pressure sensors (measuring cable between
sensor and measuring input is missing), a parting of a cable or a
defective sensor.
An optical status display (life-zero recognition) is used to inform the
user directly about possible errors, as i.e. the above-mentioned one.
Please take into consideration, that different adjustments of the current
signals can be made for pressure- and temperature sensors (p1, p2
and T).
For example: p2 = 4 to 20 mA
T = 0 to 20 mA
If the pressure sensor works correctly, the measuring value display
will be shown in the usual way without horizontal lines (see picture on
the left side). These visual signals are only possible for current signals
of 4 to 20 mA.
3 s
2.3 Checking of current signal adjustment
Measuring value display
2.4 Error message at 4 to 20 mA sensors
2.5 Measuring value display at 4 to 20 mA
sensors
p1
[bar]
p2
[bar]
0.00
0.00
p1
[bar]
p2
[bar]
p1
[bar]
p2
[bar]
0.0
0.0
* * PROG SENSORTYPE * *
p1: 4-20 p2 : 4-20 mA
T : 0-20 Q : 0-20 mA
N : 0-20
* * PROG SENSORTYPE * *
p1: 4-20 p2 : 4-20 mA
T : 0-20 Q : 0-20 mA
N : 0-20
* * * * * * PROG * * * * * * After key was pressed a rotating bar will be shown for
approx. 3 sec. and the selected signal will be stored in the instrument.
After this, the measuring value display will be shown automatically.
Example of a display after having switched the pressure channel p1 and p2 to
4 to 20 mA.
Prog ENT
0-204-20
You have the possibility to check which current signals were chosen, when
invoking this display with key . In the example the same current
signals were chosen for p1 and p2.
After approx. 3 seconds, the display switches automatically into the measuring
value display.

-12-
To be able to measure pressure, you have to select the measuring range of the
pressure sensor with the keys and .
The following display is shown.
With key , which acts as a cursor now, you can select among
calibration value and zero point alignment. In the example the calibration value is
selected. Please pay attention to the star symbol (*) which marks the selected
possibility.
By pressing key the menu is selected and the following display is
shown.
With key which is acting as a cursor, -1 or 0 can be entered as
the beginning of the measuring range. Please pay attention to the flashing cursor
below the figure to be selected.
After the selection, key and the cursor will lead you to the input of
the end of the measuring range. In the example 60.0 is entered as the end of the
measuring range.
To store the pressure measuring range in the measuring instrument
key must be pressed.
During the storage a rotating bar is displayed for approx. 2 sec. and afterwards
the measuring value display is shown again.
The pressure measuring range for p2 is adjusted in the same way !
3. Measurement of pressure
3.1 Selection of pressure measuring ranges
* * * PROG p1 * * *
*calibr. value
zero point
Prog-> confirm
* * * * PROG P1
0 . . . 60.0 bar
p
(
p
1
-p
2
)
p
p
(
p
1
-p
2
)
6
p
p
(
p
1
-p
2
)
p
p
(
p
1
-p
2
)
0.0
Prog ENT
Prog ENT
p
1
p
(
p
1
-p
2
)
Prog ENT
* * * PROG p1 * * *
-1 . . . 6.00 bar
p
(
p
1
-p
2
)
p
(
p
1
-p
2
)
0
p
p
* * * * * * * PROG * * * * * * *
Prog ENT

-13-
* * * ZERO POINT * * *
PROG-> start
When measuring negative pressures and precise pressure differentials
and if the connected pressure sensor has a small zero point deviation,
it is advantageous to submit it to a zero point alignment.
Starting from menu „PROG P1“ you select the programme „Zero point
alignment“ by pressing key . Please pay attention to the
start symbol *and that your selection needs to be confirmed with key
.
For the alignment the pressure p1 must be removed from the plant what
means, that the zero point alignment must always be carried out on a
depressurized sensor.
If the sensor has no pressurisation its zero point can be aligned with a
stroke of key . The display shows „WAIT“.
The zero point deviation of the pressure sensor is determined and stored
as a correction value while a rotating bar is displayed.
After the zero point correction the measuring value display is shown
automatically.
If pressure measurements are carried out now, an existing zero point
deviation is taken into consideration by the internal software as a
correction value for all measurements.
If you want to carry out a zero point correction for another pressure
sensor, e.g. p2, you should act as described above. You only have to
press keys „Prog“ and „p2“ instead of „Prog“ and „p1“.
3.2 Zero point alignment
p
(
p
1
-p
2
)
* * * PROG p1 * * *
calibr. value
*zero point
Prog-> confirm
Prog ENT
Prog ENT
* * * ZERO POINT * * *
WAIT
Prog ENT
* * * * * * * PROG * * * * * * *
Prog ENT
p1
[bar]
p2
[bar]
0.0
0.0

-14-
The extreme values (min/max. values) of pressure p1 and p2 are continuously
stored in a memory in the background and can be shown in the display,
if the user requests it.
This can be achieved by a stroke of the keys and .
The display shown on the left side appears.
To switch the lower line to pressure peaks, too, the keys and
must be pressed.
In both lines the min. and max. values are displayed.
By pressing the keys and , you can
delete both extreme value memories of p1 and p2. The note, that both
min/max. memories are deleted, is shown briefly in the display.
If the pressure sensors have certain operational pressures, the extreme
value memories will be set back to these pressure levels.
As an example the next picture shows a deletion and a setting back to the
current operational pressures, which can occur in a hydraulic plant.
With a stroke of key and key , you can
switch the instrument back to normal pressure measurement.
The example shows the switching over to pressure p1 and p2
(both keys have to be pressed one after the other), carried out.
3.3 Measurement of pressure peaks
3.4 Invocation of min/max. values in the
display
p1^ 0.0 / 0.0
p2
[bar] 0.0
min.- and max.-values
for pressure p1 und p2
p1^ 42.2 / 267.2
p2^ 130.4 / 377.9
p
p
1
p
p
2
3.5 Deletion of pressure peak
* * * * DELETE * * * * *
MIN/MAX-MEMORY
Prog ENT
p
p
1
p
2
3.6 Change-over from measurement of pressure
peaks to normal pressure measurement
p1
[bar]
p2
[bar]
42.2
377.9
The extreme values (min/max.) can only be shown for the pressure of
p1 and p2.
Please take into consideration, that a measurement of pressure peaks is
only possible up to the pressure measuring range end value of the
pressure sensor, chosen by you, with an additional tolerance of max.
10%. The pressure measuring range end value 600 bar for example,
plus additionally 10%, results in a maximum pressure peak value
acquisition of 660 bar.
Higher pressure peaks will be limited to 660 bar.
p1^ 320.4 / 320.4
p2^ 290.2 / 290.2
p1^ 42.2 / 267.2
p2^ 130.4 / 377.9

-15-
Precise pressure differential measurements are only possible, if an
alignment of both pressure sensors was executed first, at the same
operational pressure level, at which the measurement shall be
carried out later.
To carry out a pressure differential alignment, you have to mechani-
cally connect both pressure sensors p1 and p2 to the same pressure
level via a distributor (see scheme „Pressure differential align-
ment“).
You can also use pressure sensors with different pressure measur-
ing ranges, but in this case you should always pay attention to their
pressure load on the sensor to avoid a damage of the sensor.
In the example an operational pressure of 308 bar is shown in the
display.
The change-over with key shows a pressure
differential of 0,5 bar.
With a stroke of the keys and you can
carry out an automatic alignment for approx. 2 seconds, what is
shown in the display.
The deviations of both pressure sensors are set to zero at the
corresponding operational pressure level, see display (pressure
differential of both pressure sensors = zero).
After the alignment you have to mechanically connect the pressure
sensor p2 to the connection B (see scheme „Pressure differential
alignment“).
Now you can carry out precise measurements of pressure differen-
tial without being influenced by sensor deviations, temperature
drifts and offsets.
Please take into account, that a pressure differential must always be
displayed with the correct sign, corresponding to the mathematical
formula.
(Dp = p1 - p2)
3.7 Measurement of pressure differential
308.7
308.2
p1
[bar]
p2
[bar]
p1
[bar]
dp
[bar]
308.7
0.5
Prog ENT
p
(
p
1
-p
2
)
p
(
p
1
-p
2
)
* * * PROG dP * * *
alignment 2 sec
p1
[bar]
dp
[bar]
308.7
0.0

-16-
Instead of pressure p2 a Pt 100 temperature sensor with a current
output signal of 0 to 20 or 4 to 20 mA can be connected to this
measuring input.
You only have to press key and a temperature of
-50°C to +200 °C can be measured.
The temperature measurement is shown in the lower line of the display.
The way to switch over the current signal from 0 to 20 mA to 4 to 20 mA
and vice versa, is already described on page 10, chapter 2.2.
Please take into account, that the temperature measuring range is fixed
(calibration: -50 °C to +200 °C).
4. Measurement of temperature
p1
[bar]
T
[°C]
308.7
23.8
T
[°C] 23.8
Example of a single display by a stroke
on key "T"
T

-17-
A condition for the measurement of volume flow rate with the Multi-Handy
2040 is the connection of a measuring turbine or a gear flow meter with
integrated F/DC-converter.
That means, the frequency signals measured by the volume flow rate sensor
must be converted into current signals from 4 to 20 mA.
When connecting a volume flow rate sensor (turbine or gear flow meter)
to the instrument, the max. volume flow rate needs to be entered as a
calibration value.
The programme for entering this calibration value is invoked with the keys
and .
Key serves for the switching between the input of the
calibration value and the zero point alignment.
Please take into consideration, that the star * marks the selected line, in this
example the line „calibration value“.
With key the selection needs to be confirmed and the
max. volume flow rate (measuring range end value) must be entered
immediately.
The max. volume flow rate can be seen on the label of the volume flow rate
sensor, in the example the max. volume flow rate is 300.0 l/min.
The input is made as already described on page 12, paragraph 3.1, however
for volume flow rate sensors you have to programme the end of the
measuring range, only.
Starting from menu „Prog Q“ the key serves for the switching
between the input of the calibration value and the zero point alignment.
In the example the zero point alignment is selected ( * !) and confirmed with
key .
Please carry out the zero point alignment as described on page 13,
paragraph 3.2.
5. Measurement of volume flow rate
5.1 Input of calibration value
* * * PROG Q * * *
*calibr. value
zero point
PROG -> confirm
Prog ENT
Q
p
(
p
1
-p
2
)
Prog ENT
p
(
p
1
-p
2
)
* * * PROG Q * * *
MAX : 300.0
[l/min]
* * * PROG Q * * *
calibr. value
* zero point
PROG -> confirm
5.2 Zero point alignment
Prog ENT

-18-
A condition for the measurement of RPM with the Multi-Handy 2040 is the
connection of a rev. speed sensor with integrated F/DC-converter.
That means, the frequency signals measured by the rev. speed sensor must
be converted into current signals from 4 to 20 mA.
When connecting an optical rev. speed sensor with F/DC-converter to the
instrument, the calibration value needs to be entered as follows:
- when using one reflective foil, the calibration value 9999 needs to be
entered
- when using more than one reflective foil, the calibration value can be
calculated as follows:
10.000 : Number of reflective foils = calibration value
When connecting an inductive rev. speed sensor with F/DC-converter, e.g.
acquisition of the RPM at a gear ring, the calibration value is calculated as
follows:
10.000 : Number of pulses per rotation (number of teeth) = calibration value
The programme for the input of the calibration for the rev. speed sensor is
invoked with the keys and .
The following display is shown.
Key serves for the switching between calibration value and
zero point alignment.
Please take into consideration, that the star * marks the selected line, in this
example the line „calibration value“.
With key the selection needs to be confirmed and the max.
rev. speed (measuring range end value) must be entered immediately.
The max. rev. speed can be seen on the label of the rev. speed sensor,
in the example the max. rev. speed is: 9999 U/min. (referring to one
reflective foil).
The input is made as already described on page 12, paragraph 3.1,
however for rev. speed sensors you have to programme the end of the
measuring range, only.
Starting from menu „Prog N“ the key serves for the switching
between the input of the calibration value and the zero point alignment.
In the example the zero point alignment is selected ( * !) and confirmed with
key .
Please carry out the zero point alignment as described on page 13,
paragraph 3.2.
6. Measurement of rev. speed
6.1 Input of calibration value
* * * PROG N * * *
*calibr. value
zero point
PROG -> confirm
* * * PROG Q * * *
MAX : 9999
[U/min]
* * * PROG N * * *
calibr. value
* zero point
PROG -> confirm
6.2 Zero point alignment
Prog ENT
Prog ENT
Prog ENT
p
(
p
1
-p
2
)
p
(
p
1
-p
2
)
n

-19-
6.3 Further technical advice for the measurement of rev. speed
The rev. speed probe DS 03 with F/DC-converter, used by HYDROTECHNIK, is working as a reflective light barrier, that
means, the light-sender as well as the receiver is in one housing.
To measure rev. speed the user only has to stick a reflective foil on the turning object to be measured.
Pollution, borings or keyways are suppressed effectively by the measuring principle (polarisation filter), only the light
reflection of the foil is evaluated as a turning pulse.
At very large diameters of shafts or fans it can happen, that instable or interrupted rev. speeds are displayed.
If this is the case, the number of reflective foils should be increased, that means several foils need to be stuck on the
object to be measured, one besides the other.
This will improve the optical scanning and a correct measurement of rev. speed is achieved.
If you request rev. speed measurements below 60 min-1, you can realise this by sticking-on several reflective foils.
In any case you should modify the input of the pulses per rotation (see above) and take the instructions for the input of
calibration values on page 18, paragraph 6.1, into consideration.
Rev. speed measuring range relating to one reflective marking: 60 min-1 to 30.000 min-1.
If you request measurements of rev. speed on gear wheels, an inductive transducer with integrated amplifier and F/DC-
converter needs to be used.
Here, the number of teeth of the gear wheel needs to be entered into the measuring instrument as pulses per revolution,
too (see paragraph 6.1 on page 18).
The ideal distance for sticking on the reflective markings depends on the form of the teeth. Usually the distance between
the inductive transducer and the tooth is 1 to 2 mm.
For these very small measuring distances the sensor needs to be fixed very safe and stable.

-20-
7. Technical data of Multi-Handy 2040
(Reference of the specified data 20 °C ±3 K)
Measuring inputs:
Measuring ranges:
Error limit:
Temperature coefficient:
Measuring rate:
Resolution A/D-converter:
Extreme value memory:
Display:
Power supply:
Sensor supply voltage:
Ambience conditions:
Generally:
2 x 5-pole input jacks (Amphenol-Tuchel)
Measuring input p1: for pressure only
Measuring input p2: for pressure, can be switched to measurement
of temperature or volume flow rate and rev. speed via F/DC-converter.
Both measuring inputs support standardised current signals of 0 to 20 mA and
can be switched over to 4 to 20 mA by internal software.
Pressure:
can be freely adjusted to the corresponding pressure measuring range end value
Temperature: - 50°C to +200 °C
Volume flow rate:
measuring range end value of the volume flow rate corresponds to an output
current signal of 0 to 20 mA or 4 to 20 mA on the F/DC-converter
Rev. speed: 9999 min-1
Analogue inputs: ±0,5% of full scale ±1 digit
Frequency input: ±1 digit
±0,2% / 10 K
Analogue inputs: pressure 1 ms
Digital inputs (pulses): between 1 Hz and 60 Hz a single measurement of the
period duration is carried out.
From 60 Hz on the measuring time is constant = 16 ms.
10 Bit
Extreme value storage (min/max.) of p1 and p2 in the background,
display by a keystroke
Graphic display, display of the measuring ranges: max. 5 digits
(depending on measuring range and channel)
Internal 14,4 V NiCd-battery, 0,7 Ah for approx. 6 to 8 hours continuous
operation with integrated NiCd-battery charger and battery warning device.
External voltage supply via power supply unit 230 VAC or 115 VAC, secondary
24 VDC or via external voltage supply unit (stabilised 24 V - 30 VDC)
recommended power supply: 200 mA.
supply from the instrument, for battery operation 14,4 V,
for plug-in power supply 24 V
Working temperature: 0 °C to + 50°C
Relative humidity: <80%, no condensation
Material of housing: Aluminium/ABS-plastic
Dimensions: 152 x 80 x 40 mm (L x W x H)
Weight: 0,695 kg
Modifications, necessary for the technical progress, are subject to change without
notice.
Our measuring systems are manufactured according to the European Production Standards
and fulfil the EC-directives concerning the electromagnetic compatibility (EMC) according to
EN 50081 and EN 50082.
Table of contents
Popular Test Equipment manuals by other brands

COM-power corporation
COM-power corporation LI-1100 instruction manual

Megger
Megger TTR20 instruction manual

insize
insize IST-TT Series Operation manual

Besantek
Besantek BST-GFL31 user manual

Top Tronic
Top Tronic T1151 instruction manual

Pace Technologies
Pace Technologies OMEGA SRT-15/150 instruction manual