HYE HY-1500 User manual


Copyright
Copyright © 2013 Guangzhou HY Energy Technology Co., Ltd.
All rights reserved.
Trademarks
All product, font and company names mentioned in this manual may be trademarks or registered trademarks of their respective
companies.

Preface
Dear HYE owner:
Thank you for your purchase of HY wind turbine. We believe you will find it easy to install, moreover, we are confident you will experience years of
dependable service from it.
Please make sure you have read the manual carefully before any assembly, installation or operation of HYE wind turbine, which is helpful for better &
safe operation of HYE wind turbine. If any property loss due to the failure to follow the requirements and instructions of this manual, Guangzhou HY
Energy Technology Co., Ltd (hereinafter, HYE) will not be liable for it.
This manual can help you better understand and properly use the HY series small wind turbine, but any contents of hardware will not be included.
Concerning to the product configuration, please refer to the related contract (if any) or the distributor. Pictures in the manual are for reference only. If
any difference from objects, please be subject to objects.
If you have any questions or comments, we would like to hear from you, and please call during working hours (Monday-Friday 9:00a.m. to 6:00 p.m.
Beijing Time) if you need. Office number: 0086-20-36888000.
Sincerely,
HY Energy
Serial number and Model number
Serial number________________
Modelnumber________________

4
Safety Instructions
PLEASE READ THESE INSTRUCTIONS CAREFULLY BEFORE ASSEMBLING, INSTALLATING OR OPERATING OF YOUR HY WIND TURBINE.
1. Before HY series small wind turbine installation, you must know:
1) Do not install wind turbine on a windy day or dusty day with wind speed more than 8m/s.
2) Wearing wet gloves or clothes are forbidden.
3) Installing or maintaining wind turbine must be under professionals’ guidance or contacting distributors.
4) Please Using cables as the standard mentioned in this user manual section 4 (wire size selection), cables too thin or with poor quality may lead to
leakage or fires and line losses.
5) Non-professionals do not open the controller and inverter enclosure, any warranty claim will not be accepted if controller or inverter opened
unauthorized.
6) Grounding device installation must be in accordance with application standard and installation instruction.
7) Battery wiring may splash spark, please makes sure without any inflammables near the work environment.
8) Please do not place the controller, inverter and battery at damp, rain, vibration, corrosion and strong electromagnetic interference environment, the
places in direct sunlight, near heater or other heat sources are not allowed either.
2. Selection and installation requirements of controller and inverter:
1) Controller specification should be accordance with voltage, power, current of battery, solar panel battery set, and wind turbine and laden.
2) It is appropriated to install controller and battery in the same distribution box, and place it at a drafty room out of people reaching. Take some
methods to prevent children from entering or stretching out hands into box.
3) Controller and battery installation should be accordance with relevant electrical equipment installation specification and comply with the operation
specification constituted by manufacturer.
4) It is appropriated to use sealed lead acid battery for distribution box at inhabited room.
3. Wiring requirements:
1) The hardwired connect between components in system should be fixed and reliable. Do not use plugs or sockets.

5
2) Connect between system output terminal and external circuit should be fixed, or use socket for system output terminal.
3) Do not use two-way plug adapter for the connection of system’s output terminal with external circuit.
4) Apart from the installation of the permanent circuit, any cables or wires that might be damaged due to outdoor exposure should be sheathed with
conduit for protection.
4. Safety Precautions:
Operating personnel must full understand the safety precaution. Safety relies on our joined effort.
1) All operations must:
a. Follow instruction in this manual.
b. Operated by specialize workers.
c. Wrong operation might result in accident and injury to workers and equipments.
2) Operating personnel must master:
a. Equipment
recognition
b. Correct equipment operation ability
c. Relevant safety knowledge
In this manual:
WARNING: Indicates risk of severe injury or death or possible severe damage to equipment - proceed
with caution and follow instructions.
TIP: Indicates instruction or advice that may simplify or ease task or operation.
IMPORTANT: Indicates instruction or advice that is critical for correct assembly or operation. Damage to
equipment may result if not heeded.

6
Content
Safety Instructions.....................................................................................................................................................................................................4
Warranty .....................................................................................................................................................................................................................7
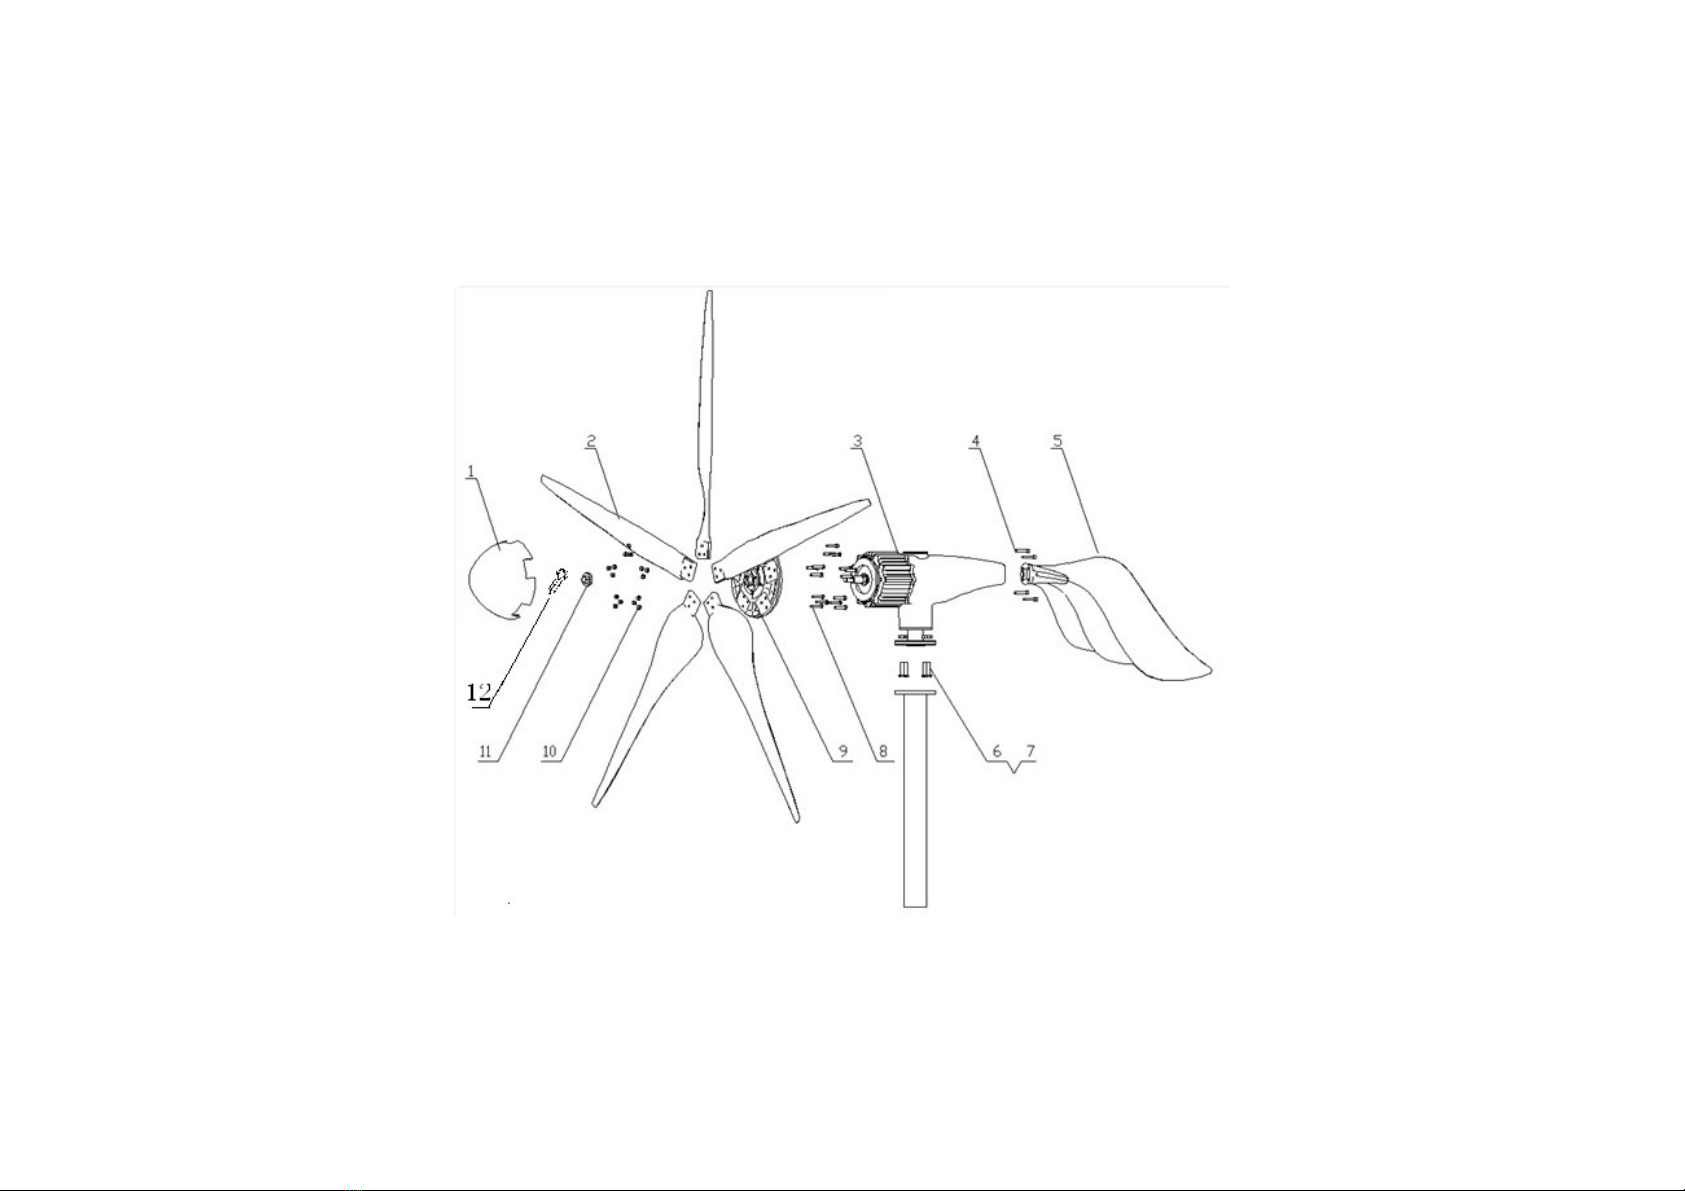
Exploded View & Parts List......................................................................................................................................................................................9
1. Technical Specifications..................................................................................................................................................................................... 11
2. Wind Turbine Assembly .....................................................................................................................................................................................12
2.1 Mounting Blades on The Hub ...................................................................................................................................................................12
2.2 Generator and Tail Vane Assembly..........................................................................................................................................................13
2.3 Connecting lead wires to Wind Generator..............................................................................................................................................14
2.4 Mounting Turbines on The Pole ...............................................................................................................................................................15
2.5 Hub/Blades and Generator Assembly .....................................................................................................................................................15
3 Tower Installation .................................................................................................................................................................................................17
3.1 Siting.............................................................................................................................................................................................................17
3.2 Design Requirements ................................................................................................................................................................................18
4. Wire Size Selection ............................................................................................................................................................................................22
5. Troubleshooting...................................................................................................................................................................................................23
5.1 Wind Turbine Troubleshooting..................................................................................................................................................................23
5.2 System Troubleshooting ............................................................................................................................................................................25
6. Maintenance ........................................................................................................................................................................................................27
Appendix .................................................................................................................................................................................................................28

7
Warranty
Guangzhou HY Energy Technology Co., Ltd (HYE) provides 5 years limited warranty for wind turbine from the date of shipment, warranty covers all
parts of wind turbine damaged within warranty period, free replacement part or complete wind turbine will only be provided after remote troubleshooting
and analysis of the problem by HYE technicians, HYE hold the rights of providing the most appropriate solutions in terms of parts & complete turbine
replacement and means of shipment.
Restrictions
Following defects will not be covered in this warranty:
1. Wind turbine has not been installed, operated, repaired, or maintained in accordance with instructions supplied by HYE; has been altered or
modified unauthorized.
2. Damage caused by abnormal physical, thermal or electrical stress, negligence, misuse.
3. Damage caused by force majeure like lightning, hurricane force winds, flood, earthquake etc.
4. Damage caused by the use of any unauthorized controller, inverter or tower not provided or confirmed by HYE.
Warranty Claim Procedures
In order to get service under this warranty, customer must provide HYE with following information for analysis:
1. Serial number of wind turbine, running time, malfunction date.
2. Detailed description of the defects and corresponding test result has been done in accordance with the troubleshooting HYE provided.
3. HYE technician may ask for some extra testing in order to identify the defects so solutions could be provided promptly and precisely. HY series wind
turbine users are liable to conduct these extra testing and provide referable test result.
4. Installation pictures (see details on the installation location and its surrounding).
5. Damaged machine pictures or videos.
6. HYE technician will provide final solution according to defect description and the test result of troubleshooting.

8
Customer is responsible for shipping the defect or damage part to HYE for repairing if needed, then HYE will repair or replace with new one for free and
ship to owner on HYE cost, if no defected piece ship back to HYE but need replacement, HYE will provide the part for free but shipping expense will be
at buyer side.
Consequential Losses
HYE is not responsible for any responsibility of consequential losses. Consequential losses mean:
1. Indirect, unexpected or special losses or damages;
2. Losses of margin or expected margin of products or any ways related with products

9
Exploded View & Parts List

10
Item Description Qty
1 Nosecone 1
2 Blades 5
3 Generator 1
Socket head cap screw M8×45 4
Spring washer Ø8 4
4
1
5 Tail vane 1
Hex bolt M12×45 4
6 Nut M12 4
Spring washer Ø12 4
7 Flat washer Ø12 4
8 Hex bolt M8×45 15
9 Hub 1
Locknut M8 15
10 Flat washer Ø8 15
11 Nut M20 1
12 Cotter 1

11
1. Technical Specifications
Model HY-1500
Rated Power 1500W
Max. Power 1800W
Rated Voltage 48Vdc 110Vdc 120Vdc
Rated rotation speed 750rpm
Start-up Wind Speed 2.0m/s
Cut-in Wind Speed 2.5m/s
Rated Wind Speed 12m/s
Survival Wind Speed 50m/s
Rotor Diameter 2m
Blades Quantity 5
Swept area 3.3m²
Noise Level <20 dB (5m behind turbine @5m/s gusting)
Generator Type Three phase PMA
Wind Turbine Type Upwind
Tower connection Flange connection
Temperature -40°C~60°C
Strong wind protection mode electromagnetic brake, blades aerodynamic brake
Service life 20 years
Net weight 35kg
Gross weight 46kg
Package size 112×70×30cm

12
2. Wind Turbine Assembly
Installation on site is simple, mainly including mounting blades on the hub, securing the hub to the turbine body, installing the nosecone on the blade
hub and mounting wind turbine on the pole.
Please install the whole turbine in accordance with the following instructions.
2.1 Mounting Blades on The Hub
①Check if all components are in good condition. The hub②, washer, bolt and locknut The blades.③
④Pass the hex bolts through from the P⑤lace blade, flat washer and locknut, ⑥Assembled.
back side of the hub. and tighten the nut to 18N.m

13
2.2 Generator and Tail Vane Assembly
①wind generator main body ②remove the dustproof pad ③the tail vane and accessories
④waterproof pad between tail and generator, ⑤tighten the nut to 18N.m ⑥Complete connection
use M8 bolts to fix the tail vane.

14
2.3 Connecting lead wires to Wind Generator
①wind generator main body Unscrew②cablecover. Passthe③wires through the cover.
④Connect the three-phase lead wires into Screw⑤up the cable cover. ⑥Screw up the waterproof cover.
the terminals (make sure three phases are
not short circuited)

15
2.4 Mounting Turbines on The Pole
①Pass the cable through from the pole ②Connect the turbine to the pole by hex bolts. P③lace flat washer, spring washer and nut,
tightenthenutto60N.m
2.5 Hub/Blades and Generator Assembly
①The nosecone and accessories. ②Place the hub with blades onto the rotor shaft ③Fully tighten the nut to 290N.m
and “spin” it completely onto the turbine alternator shaft,
then place in sequence of flat washer, spring washer and hex nut.

16
④Insert the cotter into the shaft bore and ⑤Snap the nosecone into position over the outside ⑥Completed assembly.
separate the tails as shown. edges of the blade hub. Make sure all five edges of
the nosecone snap over the edge of the blade hub. After
installation tug on the nosecone to make sure it is securely
attached and turn the blades to make sure it is not rubbing
against the front cover of the generator.

17
3 Tower Installation
3.1 Siting
An ideal location for wind generator is required with stable speed and direction of prevailing wind. Small changes in wind speed and direction can
have a dramatic effect on power production. In general, the higher the tower, the greater the wind speed and ultimately power production are.
Therefore, the site of your wind turbine should be carefully considered. Each installation is different and is often compromised among the tower
height, distance from the battery bank, local zoning requirements and obstacles such as buildings and trees. Following requirements should be
followed:
• The minimum recommended tower height is 20 ft (6 m) on open ground or 20 ft (6 m) above nearby obstructions (refer to following figure).
• Try to locate the wind turbine in the “cleanest” turbulent free air as possible. Turbulence will reduce the efficiency of wind turbine and may
accelerate wear on rotating components.
• Try to locate the turbine without obstacles within 200m of installation center.

18
• The installation distance between two turbines should be 8-10 times of the rotor diameter.
• Installation site should be complied with local regulations.
Safety must be the primary concern when selecting the mounting location. Even if installing the wind turbine in a less ideal location, don’t attempt to
mount the turbine while blades are spinning. Safety has precedence over efficiency.
WARNING: Even if installing the turbine in a less windy location, the three-phase wires must be short circuited during installation to prevent the
turbine from turning.
3.2 Design Requirements
The tower has a direct effect on the safety of the wind turbine. HYE offers some tower choices for HY series wind turbine. The following section
provides a summary of the available towers.

19
Flange
connection
Dimension requirement:
①Minimum ODΦ76×thickness 5mm seamless pipe
②100 ≤Length “L“(pipe length)≤150
③150 ≤Distance“ L“ (blade tip to pole)
④Pole Diameter “D“
Self support—same diameter: Φ110 ≤D ≤Φ150
Self support—taper shape: Φ110 ≤D (upper diameter) ≤Φ150
⑤Reinforcing rib 4 pcs
Unit: mm

20
Special installation 1: pitched rooftop
Explanations:
1. This installation is workable for pitched rooftop house.
2. This wall-mounted installation is used expansion bolt to fix
the supporting structure.
3. The wall should be concrete or solid wall.
4. Try to install the turbine in an upwind direction position.
5. The lowest point of the blade should be above the rooftop.
Dimension requirement:
①1.2 m ≤distance from rotor centre to top of rooftop
“L“≤2.0 m
②1.5 m ≤distance from rotor centre to the first
supporting point “L“≤2.5 m
③1.0 m ≤distance between the two supporting points
“L”≤1.5 m
④Pole diameter ≥Outer DiameterΦ76mm×thickness
5.0mm seamless pole
Table of contents