HYRIS bCUBE 2.0 User manual

Hyris Ltd
_________________________________________
Hyris Headquarters
Lower Ground Floor, One George Yard,
EC3V 9DF, London UK
Phone: +44.2036082968
_________________________________________
Hyris Research Center
Corso Garibaldi, 60
20121 Milano, Italy
Phone: +39.02.82951302
_________________________________________
Hyris Asia Pac
38 Ang Mo Kio Industrial Park 2 #02-07A
569511 Singapore
Phone: +65.8160.7207
_________________________________________
www.hyris.net
London, September 2019
bCUBE® 2.0 Quick Start Guide
Hyris Platform guide
Version 1.2.5

September 2019
bCUBE® 2.0 Quick Start Guide - Hyris Platform guide - Version 1.2.5
2
Copyright ©2019 Hyris Ltd. All rights reserved.
Reproduction of this document, either in printed or electronics form, is prohibited without the
permission of Hyris Ltd.
Information in this document is subject to change without notice. Hyris Ltd assumes no responsibility
for any incorrect information that may appear in this document.
Notice:
bCUBE® 2.0 is only for research purpose and for all other fields except for in vitro diagnostics.
HYRIS LTD DISCLAIMS ALL WARRANTIES WITH RESPECT TO THIS DOCUMENT,EXPRESSED OR IMPLIED,INCLUDING BUT NOT
LIMITED TO THOSE OF MERCHANTABILITY OR FITNESS FOR A PARTICULAR PURPOSE.IN NO EVENT SHALL HYRIS LTD BE LIABLE,
WHETHER IN CONTRACT,TORT,WARRANTY,OR UNDER ANY STATUTE OR ON ANY OTHER BASIS FOR SPECIAL,INCIDENTAL,
INDIRECT,PUNITIVE,MULTIPLE OR CONSEQUENTIAL DAMAGES IN CONNECTION WITH OR ARISING FROM THIS DOCUMENT,
INCLUDING BUT NOT LIMITED TO THE USE THEREOF.
Trademarks:
bCUBE® and bDATA® are registered trademarks of Hyris Ltd.
Microsoft® and Windows® are registered trademarks of Microsoft Corporation. FAM™, HEX™ and
ROX™ are a trademark of Thermo Fisher Scientific or its subsidiaries in the U.S. and certain other
countries.
Technical Support Contacts:
Hyris Ltd –Italian Branch
Corso Garibaldi 60, 20121 Milano (MI) –ITALY
Phone: +39 02 82951302
Website: https://www.hyris.net/

September 2019
bCUBE® 2.0 Quick Start Guide - Hyris Platform guide - Version 1.2.5
3
Index
Hyris bCUBE® 2.0....................................................................................................................................4
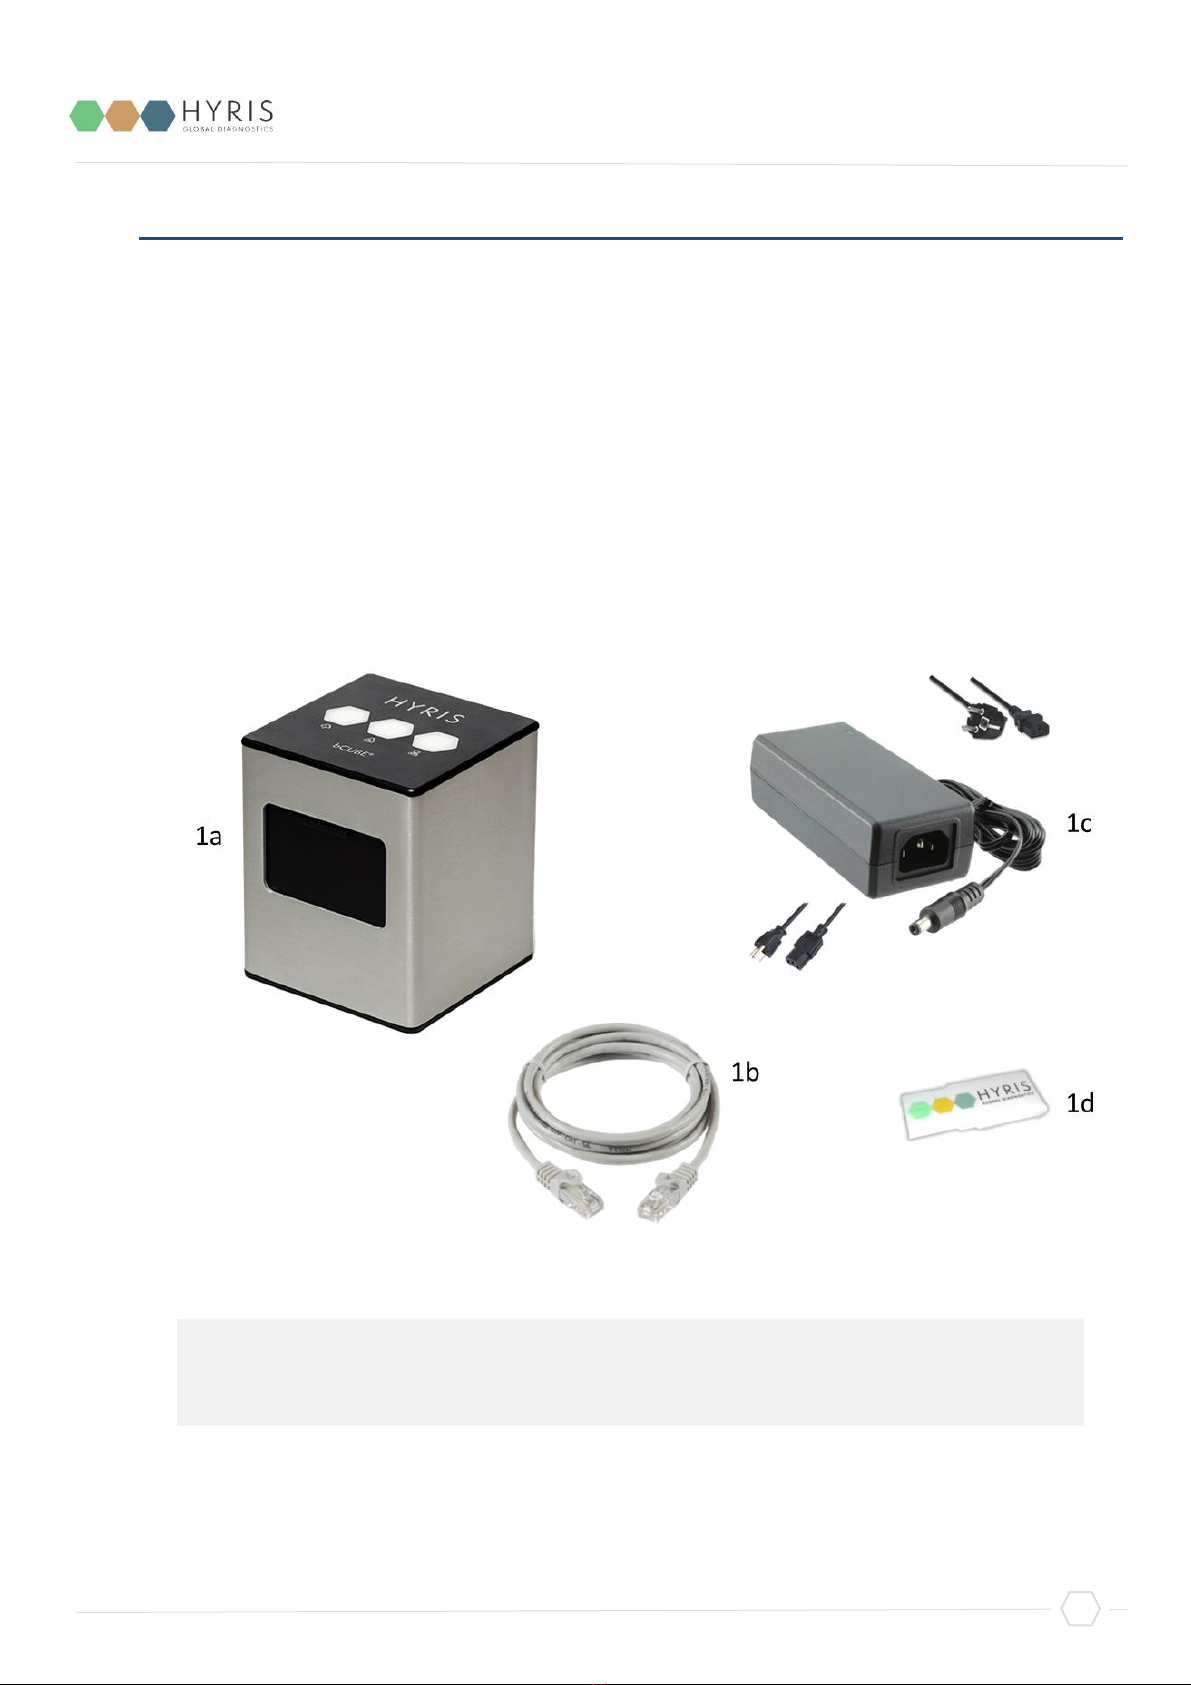
Box Opening.........................................................................................................................................4
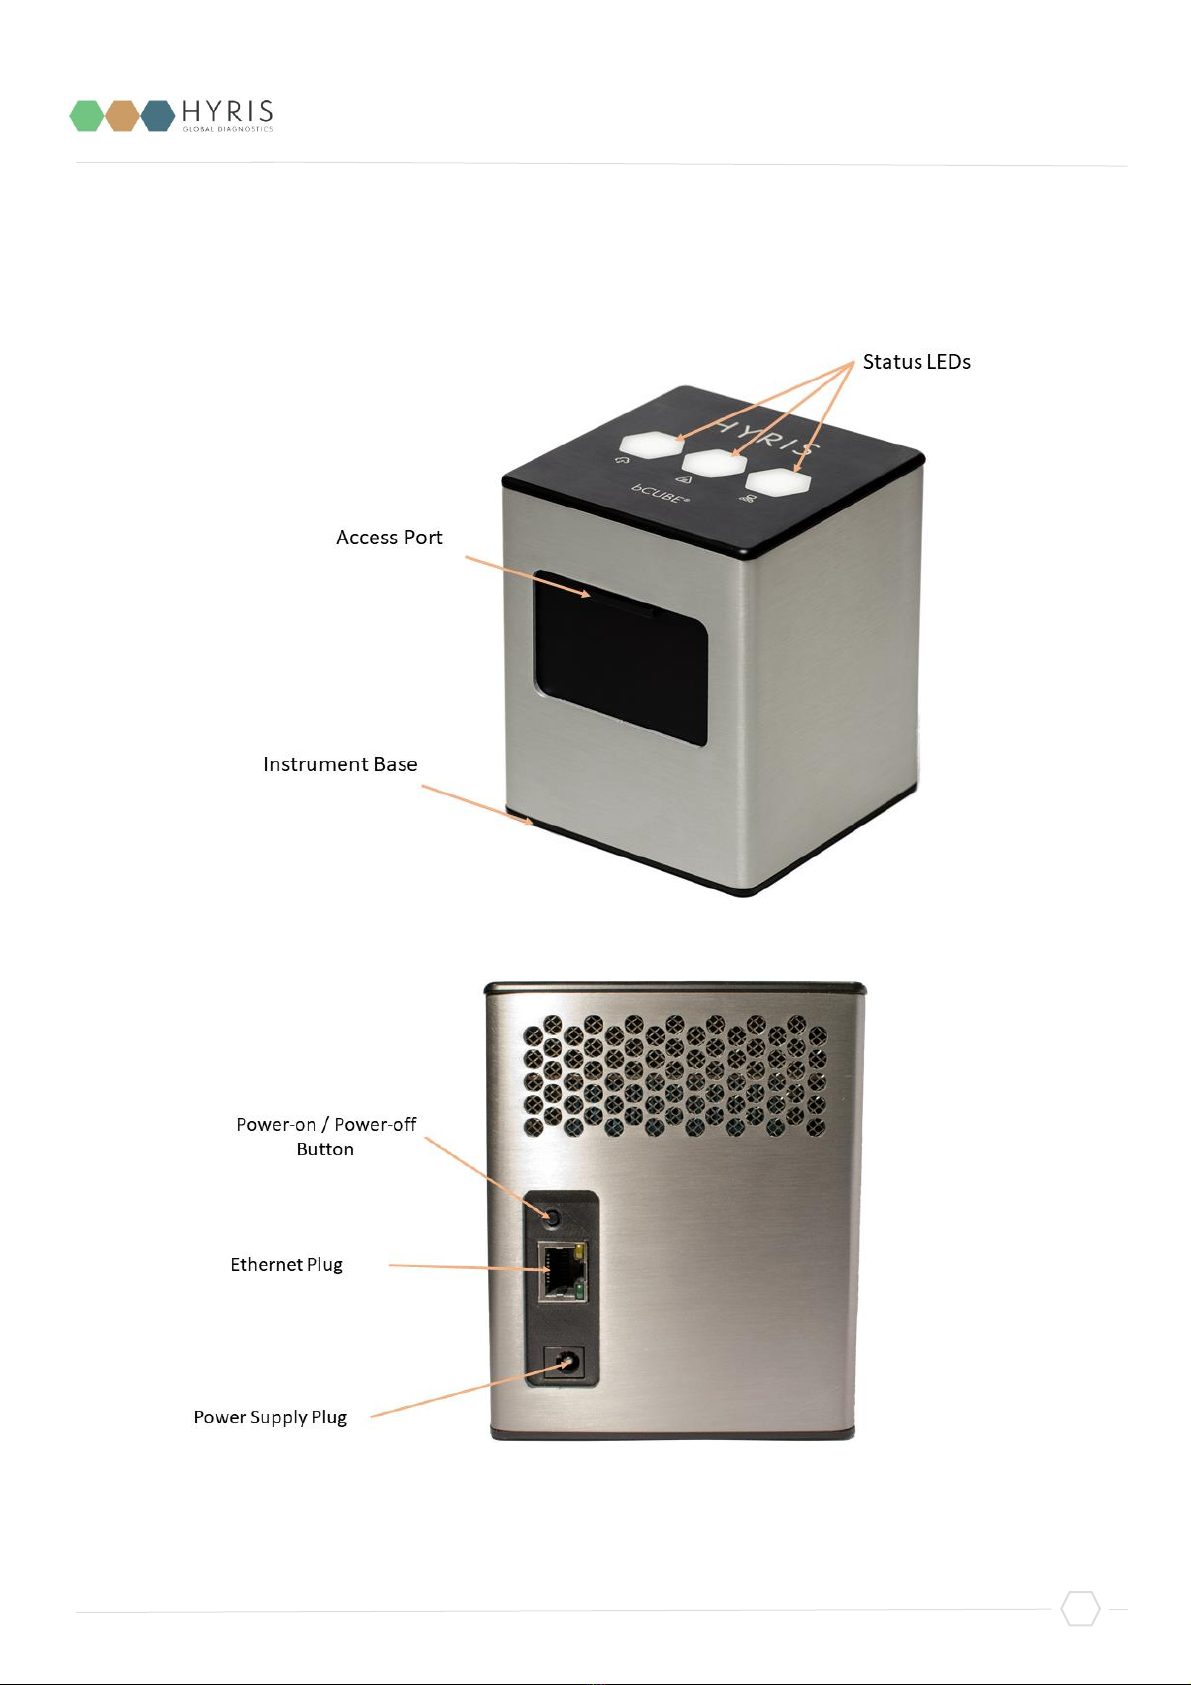
Device Overview ..................................................................................................................................5
Status LEDs...........................................................................................................................................6
First set up..............................................................................................................................................8
PC settings............................................................................................................................................8
bCUBE® 2.0 Connection .......................................................................................................................8
Interacting bCUBE® 2.0: bAPP and bPANEL .........................................................................................10
bAPP interface....................................................................................................................................10
Access the bAPP...............................................................................................................................10
Create a New Analysis: general information...................................................................................11
Create a new analysis: the cartridge ...............................................................................................13
Analysis details ................................................................................................................................15
bPANEL 2.0 interface .........................................................................................................................18
Installation.......................................................................................................................................18
Main view ........................................................................................................................................18
Settings: Log in/Sync and bCUBE® 2.0 connection..........................................................................19
New analysis creation......................................................................................................................20
Run the analysis...............................................................................................................................21
Old analyses view ............................................................................................................................21
Flow Chart ............................................................................................................................................23
Appendix-1: Set bCUBE® 2.0 Wi-Fi from bCUBEs® menu ....................................................................24
Appendix-2: Custom Recipe .................................................................................................................25
Appendix-3: Cartridge Preparation ......................................................................................................26
Load samples......................................................................................................................................26
Load/Unload the cartridge to/from bCUBE® 2.0...............................................................................26

September 2019
bCUBE® 2.0 Quick Start Guide - Hyris Platform guide - Version 1.2.5
4
Hyris bCUBE® 2.0
Box Opening
The following items will be found in the provided box:
obCUBE® 2.0 (Figure 1a)
oEthernet cable (Figure 1b)
oPower Supply including European and North American power cords (Figure 1c).
Characteristics:
-Input: 100 ~ 240 V c.a. 1.4A 50/60Hz
-Output: 12V DC 5A
-Power: 60W
oUSB stick with Hyris bPANEL software installer and User Manuals (Figure 1d)
Note: Please check the presence of all these items. Remove the items carefully from the
shipping box and inspect them for any external damage. If any of the parts is missing or
damaged, contact the manufacturer prior to installation.

September 2019
bCUBE® 2.0 Quick Start Guide - Hyris Platform guide - Version 1.2.5
5
Device Overview

September 2019
bCUBE® 2.0 Quick Start Guide - Hyris Platform guide - Version 1.2.5
6
Description of the features highlighted in the pictures above:
oAccess Port Slider: opened to insert/remove the cartridge inside bCUBE® 2.0. To be kept
closed during operations.
oAccess port: insert the cartridge here. Always push the cartridge up to the end of the port.
oThermal Block: precisely controls the temperature of the cartridge and contained samples.
Heating/Cooling is obtained with a Peltier element.
oDetection block: features high brightness LEDs with dichroic filters for fluorophores
excitation. Detection is obtained thanks to a CMOS sensor with dichroic filters matched to
fluorophores emission wavelengths.
oTop venting holes: allows air exchange between the inside of the Instrument and the
ambient
oPower supply Plug: insert here the 12 VDC adapter jack
oPower-on/Power-off button: press shortly to wake up the instrument from Stand-By. When
the machine is running, long press (about 5 seconds) to safely power down the bCUBE®
oEthernet Plug: insert here the Ethernet cable for Windows PC / Network communication
oStatus LEDs: Give information about the status of the instrument
Status LEDs
The status of the bCUBE® and its functioning are communicated to the user by the different colour
combinations of the status LEDs on the top of the device.
obDATA®LED: corresponding to the symbol, it indicates the connection status to Hyris
server.
Ready colour: green
When Ready colour is on, bCUBE® 2.0 is connected to bDATA®
oThermal LED: corresponding to the symbol, it indicates if the cartridge is hot or not.
Ready colour: orange
When Ready colour is on, the internal temperature of the bCUBE® 2.0 is not hot. If

September 2019
bCUBE® 2.0 Quick Start Guide - Hyris Platform guide - Version 1.2.5
7
cartridge is inserted, it can be safely handled
oConnection LED: corresponding to the symbol, it indicates the internet connection state
of the bCUBE® 2.0
Ready colour: blue
When ready colour is on, bCUBE® 2.0 is connected to a network
For a graphical representation, the symbol (from left to right: bDATA®, Thermal and
Connection LEDs) will be displayed in this document when colour code explanation is required.
Some examples are reported in the following table:
LEDs Colours
DESCRIPTION
INTERPRETATION
-bDATA® LED steady green
-Thermal LED steady
orange:
-Connection LED steady
blue:
-bDATA® connection
OK
-Cartridge not hot
-Network connection
OK
-bDATA® LED steady green
-Thermal LED blinking
orange and red
-Connection LED steady
blue
-bDATA® connection
OK
-WARNING: Cartridge
hot
-Network connection
OK
-bDATA® LED blinking
green and yellow
-Thermal LED steady
orange
-Missing bDATA®
connection
-Cartridge not hot

September 2019
bCUBE® 2.0 Quick Start Guide - Hyris Platform guide - Version 1.2.5
8
-Connection LED blinking
red and yellow
-Missing network
connection
-bDATA® LED blinking
green and yellow
-Thermal LED steady
orange
-Connection LED steady
blue
-Missing bDATA®
connection
-Cartridge not hot
-Network connection
OK. bCUBE® 2.0 can
be used locally
-bDATA® LED multicolour
-Thermal LED multicolour
-Connection LED
multicolour
-Experiment is running
on bCUBE® 2.0
-bDATA® LED off
-Thermal LED off
-Connection LED off
-bCUBE® 2.0 off
First set up
PC settings
PC has to be connected to a stable internet connection.
bCUBE® 2.0 Connection
In order to properly work, the following steps have to be respected:
1. Make sure the bCUBE® 2.0 is set on a flat and stable surface
2. Make sure to have correctly provided the condition explained in the PC Set-up section
3. Connect one end of the Ethernet cable to the bCUBE® 2.0 and the other to the PC according
the following configuration
Note: not all the Status LEDs colour combinations are shown. For further information,
please read the Owner’s Manual.

September 2019
bCUBE® 2.0 Quick Start Guide - Hyris Platform guide - Version 1.2.5
9
4. Power on the PC. Wait until PC is ready
5. Connect the PC to internet. Make sure internet connection is stable
6. Power on the bCUBE® 2.0. Status LEDs colours:
7. bCUBE® will start booting. Status LEDs colours:
8. Wait until Connection Status LED colour is steady blue: or
If LEDs colours are different from the above mentioned, try to repeat the steps. Otherwise,
check the Owner’s Manual
9. Access the bAPP (see the Access the bAPP section) and go to the bCUBEs® section. Select the
desired bCUBE® by checking the Serial number of the machine (see the Owner’s manual).
The “Connected” flag should be a green icon, indicating that the bCUBE® is connected to a
network. An action menu should be show
10. Click in the button to access the “Local settings page”, then go to the “Network” section.
Select one of the “Available WIFI Networks” and enter the related password, then click on
. See the Owner’s manual to perform WPS connection to the router or to manually add
a network. The saved Wi-Fi should immediately appear in the “Saved WIFI Networks”
column.
11. When all the desired Wi-Fi networks are saved, go back to the bAPP and unplug the Ethernet
cable from the bCUBE®. After some seconds, the Status LEDs should show the Hyris Ready
colours . If not, check the troubleshooting section on the Owner’s manual.
Note: Status LEDs may display different colours while bCUBE® 2.0 is looking for network
connection. If no connection is detected, the following LEDs colours may be displayed
after a minute of waiting time: . If the problem persists, see the Owner’s Manual.

September 2019
bCUBE® 2.0 Quick Start Guide - Hyris Platform guide - Version 1.2.5
10
Interacting bCUBE® 2.0: bAPP and bPANEL
bCUBE® 2.0 can be controlled and monitored with two Hyris tools: bAPP and bPANEL.
obAPP: it’s a web app software and there’s no need to install it on the PC. Ready-to-use
recipes or custom recipes (see dedicated section) can be used to create and run analyses on
the available devices according to the account permissions. Account and devices
management are possible by this application. It can be run on PC or Smartphone. Internet
connection is mandatory.
obPANEL: this software interface is designed for offline usage of the bCUBE® device, while
also providing internet data sharing when connection is available. bPANEL 2.0 can start new
analyses by using the already existing recipes (created on bAPP).
bAPP interface
Access the bAPP
1. Make sure to have properly followed the instruction described in the bCUBE® 2.0
Connection section.
If bCUBE® 2.0 is ready for operations, open the internet browser (Google Chrome
browser recommended) on the PC and type https://bapp.hyris.net in the address bar. Then
press enter to access the bAPP.
2. The Home window will be shown. The screen is mainly divided in two sections:
oMain Menu: list of available bAPP sections:
-Home: Welcome Window. Log-in credentials required when starting a new
session on bAPP
-Analyses: all the available analyses are listed in this section. New analyses can be
created
-bKITs: bKITs are reagent sets used to analyse a specific genetic sequence. The
bKITs developed and sold by Hyris Ltd are listed in this section
-Recipes: a “Recipe” is a detailed list of steps and settings that the bCUBE® has to
execute while performing an analysis. New recipes can be customized from this
menu (see Appendix-2: Custom Recipe). All the available recipes are listed here
-Swarms: “Swarm” is used to define a collector of analyses and recipes. User can
have access to multiple swarms according to his permissions. Visible Swarms are
listed in this section
-Users: list of available users and relative permissions (see Owner’s Guide for
further information)
-bCUBEs®: list of available bCUBEs® with relative extra information (see Owner’s
Guide for further information)
-Certificates: list of requested certificates.

September 2019
bCUBE® 2.0 Quick Start Guide - Hyris Platform guide - Version 1.2.5
11
oTab View Area: content is related to the selected Main Menu section
3. After the Main Window is displayed, Login is required.
Insert your email and password, which are corresponding to the credentials used to register
the user to the Hyris Ltd web site or the bAPP.
In order to sign up, push the button and follow the steps.
In case of forgotten password, press on and insert the user mail. Then check your
mail box for further instructions.
Create a New Analysis: general information
Go to the “Analyses”section from the Main Menu. The already existing analyses will be listed in a
table.
In order to create a new analysis, click on the button.
The user will be guided through few steps to correctly fill all the requested information.
The first step refers to the general information of the analysis:
oName: name of the analysis
oDescription (Optional): brief description of the experiment
oSwarm: select the Swarm to which the analysis will be linked to
oRecipe: choose a recipe among the ones related to the selected Swarm.
obKITs: show available bKITs (associated to the relative global recipe) instead of Swarm
recipes
Click on to proceed to the following step

September 2019
bCUBE® 2.0 Quick Start Guide - Hyris Platform guide - Version 1.2.5
12
Custom recipe choice
In case of disabled “bKITs” option:
1. Select the desired Swarm among the list. In case only one available swarm for the user, it will
be automatically selected. After the selection, the relative swarm recipes are loaded.
2. Select the desired Recipe among the list. Click on the button to see the recap of the
thermal protocol relative to the selected recipe.
bKIT choice
In the new/edit analysis page, after enabling bKITs [A], the following parts have to be filled:
A. bKITs Flag: if bKITs are enabled, fields [B], [C], [E] and [F] are shown
B. bKITs categories (mandatory): the available bKITs depend on the selected category
(examples: Probiotics, Plant Health, Botanicals ...)
C. bKIT part number (mandatory): list of available bKITs according to the selected category.
The bKIT part number is reported on the bKIT package as shown below.

September 2019
bCUBE® 2.0 Quick Start Guide - Hyris Platform guide - Version 1.2.5
13
D. QR Code Scanner: if the desired bKIT is provided with dedicated QR code, click on this
button and scan it. The QR code could be placed on the bKIT box and / or in the provided
datasheet. In this case, the fields [B] and [C] are automatically set.
E. Global Recipe:this is a read only field, which shows the name of the Global Recipe
associated to the selected bKIT. It’s automatically filled once [C] is selected
F. Datasheet/DNA extraction method download buttons: click on the desired button to
download a .pdf file of the desired document
Create a new analysis: the cartridge
Select the desired cartridge among the available ones (for example: “4x4 samples”).
1. The wells information is filled while compiling the selected recipe.
Note: Each VERSION of the bKIT is associated with a specific Global Recipe. Verify that
the selected bKIT and its Version match the part number and version reported on the
package.

September 2019
bCUBE® 2.0 Quick Start Guide - Hyris Platform guide - Version 1.2.5
14
2. Wells can be deleted (press the linked to the desired well), modified or added. In this last
case:
a) Click on the desired well on the cartridge model on the right, according to the loaded
sample
b) A dedicated window will appear
c) Select the Sample Type from the drop-down menu (Mandatory)
d) Enter the Sample Name (Mandatory)
e) Choose the Well Colour
f) Click on button
Other selection modalities are available for desktop mode:
oMultiple selection of contiguous wells: hold down the left button of the mouse. A cross
cursor will appear. Holding down the button, drag the mouse on the cartridge to select
many contiguous wells. Click on the button to open the “edit well” window.
oMultiple selection of non-contiguous wells: hold down the ctrl button (a pointer cursor will
appear) and click on the desired wells. Click on the button to open the “edit well”
window.

September 2019
bCUBE® 2.0 Quick Start Guide - Hyris Platform guide - Version 1.2.5
15
You can then add a new well by repeating this procedure or click on .
If the “Launch now” option is selected, a new window will open. Select the desired bCUBE® among
the available devices. The selected bCUBE® status LEDs will blink. You can make the Status LEDs
blinking again by clicking on the button. A recap of the thermal protocol that will be executed is
visible by clicking the button. Click on to immediately launch the analysis. The live
analysis view page will be shown.
The status LEDs of the device will start to show multiple and changing colours .
Otherwise, check the Owner’s manual for further information.
If the “Save for later” option is selected, the user will be brought back to the Analyses list view.
Analysis details
GENERAL tab
This section shows the cartridge temperature measured by the instrument during the experiment
and some information about the operating bCUBE® 2.0 (for example, its name and software
version) or the analysis.
Each of these parameters are updated in real time while analysis is running and bCUBE® 2.0 is
connected to the internet.
If the analysis state is “Running”, the user can send commands to the operating bCUBE® 2.0:
o: the running analysis will be immediately stopped
o: the extend button will add 5 cycles/minutes to the current step. This
operation is not allowed when the “Melting Curve - VAL” step is running.
o: this command instantly ends the current step in order to start with the
following one.
Each of the previous actions will be tracked both in the analysis report and in the step preview on
the Tab View Area.

September 2019
bCUBE® 2.0 Quick Start Guide - Hyris Platform guide - Version 1.2.5
16
WARNING
Make sure the previews command has been executed by bCUBE® 2.0 before sending a
new command.
STEPS tab
All analysis steps are listed in this tab.
Each step data can be consulted individually by clicking on the correspondent name on the list.
The step view will be expanded, showing extra data, such as the fluorescence/time graphic, which is
updated in real time while the analysis is “Running” and bCUBE® 2.0 is connected to the internet.
If the analysis is completed, a computed parameter table will be added next to the graphic (if
specified in the recipe).

September 2019
bCUBE® 2.0 Quick Start Guide - Hyris Platform guide - Version 1.2.5
17
RESULTS Tab
In this tab a graphic representation of the selected cartridge is shown. After the analysis is
completed, each sample is marked with a label indicating the result of the experiment (if specified
in the recipe).
Action button
Click on the button in the tab section to open the action menu.
Different actions are available depending on the analysis status:
obutton will immediately start the download of the report (.pdf file) of the
current analysis
obutton allows the user to change some wells information, such as the wells
names or types.
oallows the user to change some settings of each step and to recompute the
analysis results accordingly.
othe extend button will add 5 cycles/minutes to the current step. This operation is not
allowed when the “Melting Curve - VAL” step is running.
obutton: the running analysis will be immediately stopped
obutton: this command instantly ends the current step in order to start with the
following one.

September 2019
bCUBE® 2.0 Quick Start Guide - Hyris Platform guide - Version 1.2.5
18
bPANEL 2.0 interface
Installation
Open the bPANEL 2.0 installer located in the provided USB.
1) Insert into an available USB port the Hyris® USB Stick containing bPANEL installer.
2) Launch the file Setup.msi, located inside bPANEL folder.
3) On the welcome screen, click on Next.
Figure 1: bPANEL installation - Welcome screen
4) On the next page, carefully read the licence agreement. Tick the check-box and click Install
to continue.
5)
6) Wait for the installation process to end. Click on Finish on the last page to complete the
installation.
No driver installation is required for using bCUBE® 2.0.
Main view
Make sure all the steps described in bCUBE® 2.0 Connection have been correctly performed.
Open the bPANEL 2.0 program. The main view will be shown:
oCommand Buttons: list of command to send to the connected bCUBE®
oTab selection: each tab provides different information about the loaded analysis or the user
settings. The analysis related tabs are updated in real time while the selected analysis is
running and the correspondent bCUBE® is connected

September 2019
bCUBE® 2.0 Quick Start Guide - Hyris Platform guide - Version 1.2.5
19
oTab View Area: shows the content of the selected tab
Figure 2: bPANEL Overview
Settings: Log in/Sync and bCUBE® 2.0 connection
Go to “Settings” tab:
1. Click on
2. Insert your email and password, which are corresponding to the credentials used to register
the user to the Hyris Ltd web site (same as used credential to access the bAPP. See Access
the bAPP section for further information). Then click “OK”

September 2019
bCUBE® 2.0 Quick Start Guide - Hyris Platform guide - Version 1.2.5
20
3. Click on . After the operation completion, the available bCUBEs® devices will be
listed in the dedicated drop-down menu. Select the desired one
4. Click on the button to connect to the selected device. After connection, the button will
turn green
New analysis creation
1. Click on the button
2. Insert the Analysis Name (Mandatory)
3. Select the desired Swarm among the available ones (Mandatory)
4. Click on Global recipes
5. Select the desired Recipe
6. Click on button.
Table of contents
Other HYRIS Laboratory Equipment manuals