i-Blue iBlue User manual


zContents
zPackage Contents
zFeatures
zProduct Views
zIndication Light Status
zBattery Charging
zPower ON/OFF
zUsing iBlue with Bluetooth Mobile Phone
zUsing iBlue with iPod / mini iPod
zProduct Specifications

Package Contents
iBlue standard package contains the following items:
ziBlue Main Unit x1
zEarpiece with Microphone Cable x1
zUSB Cable x1
Features:
ziBlue is a Bluetooth device which combine the
application of iPod / mini iPod and Bluetooth mobile
phone.
zSupport headset and hands free functions.
zEasy to setup, just plug iBlue into iPod for personal portable using.
zEnjoy MP3 music without missing any incoming calls .
zNo need to remove the earphone when you listen to the
musicorreceiveincomingcalls.
zSmall, light and Integrated forming design.
zWireless connectivity up to 10 meters (33 feet).
zLED light for Bluetooth status indication.
zEasy operation, all in one control interface with one button only .

Product Views
(1) LED Indicator (2) Earphone Plug
(8)Volume Control
(3) Mini USB Port
(4) Fixed Mounting
(5)Connector (6)Control Button
(7)Earphone Jack
(1) LED Indicator (2) Earphone Plug
(3) Mini USB (5)Connector(4) Fixed Mounting
(7)Earphone Jack
(8)Volume Control (6)Control Button

(1) LED indicator:Indicate Bluetooth operation status.
(2) Earphone Plug:For earphone cable using.
(3) Mini USB Port:For battery charging.
(4) Fixed Mounting : Fix the device to iPod / mini iPod.
(5) Connector:Connect to iPod or mini iPod.
(6) Control Button : Power ON/OFF; Pairing; Phone calling for Bluetooth.
(7) Earphone Jack :For earphone plug connection.
(8) Volume Control:To increase or decrease the volume.
Indication Light Status
Indication Light Status Function
When the indicator light between red
light and green light flash slowly Pairing mode
The green indicator light stay ON Connect Bluetooth mobile phone
The green indicator light flash fast Phone calling
The green indicator light flash slowly 1.Stand by
2.Battery charging
The red indicator light flash slowly Battery low
The yellow indicator light stay ON The battery is full charged

Battery Charging
The first charging takes approximately 5 hours
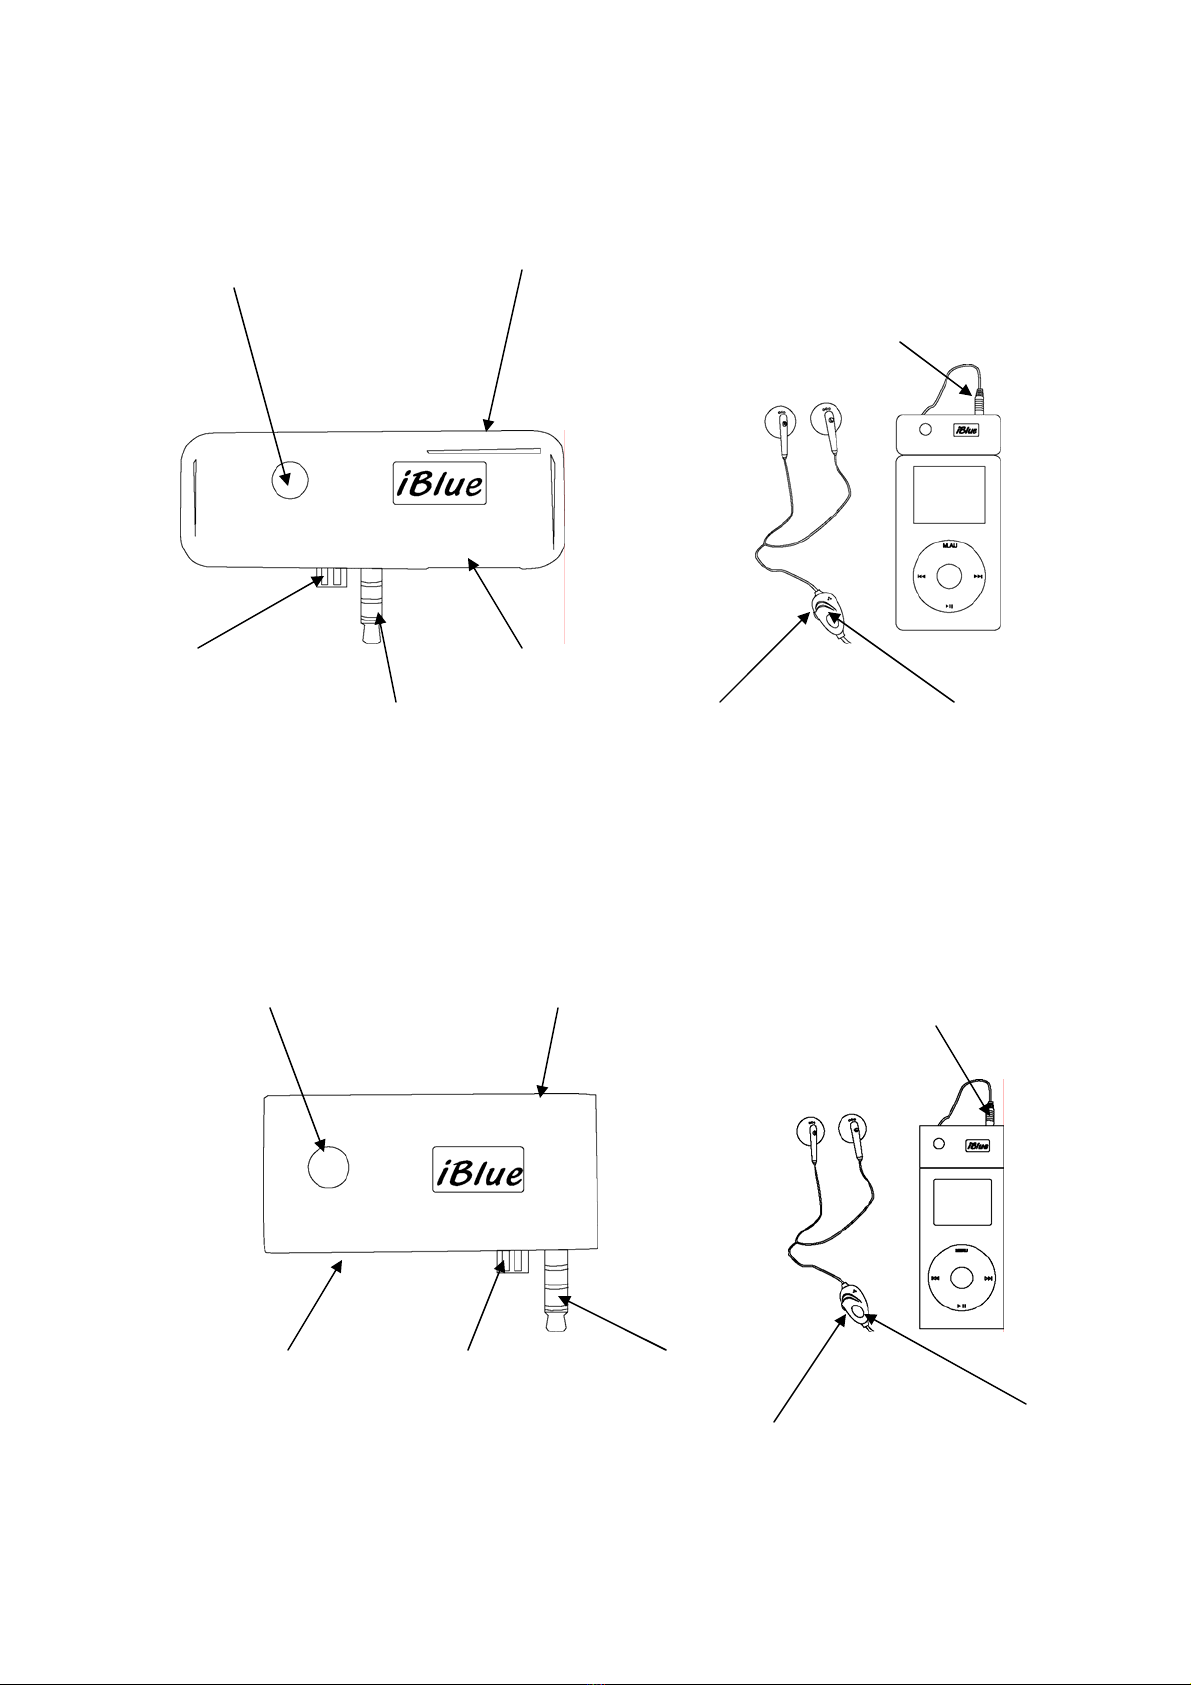
zConnect the mini USB terminator to the iBlue USB port.
zConnect the USB terminator to the computer’s USB port.
zThe green indicator light stays on during the recharging process.
zWhen the LED indicator turns to yellow light the battery is full charged,
the iBlue is ready for normal operation.
Note:
zFor extending battery life,you must charge the iBlue at least once per
month, whatever use it or not.
zConnect the USB cable to charge the iBlue,iBlue will be auto reset .
Power ON/OFF
¾Power on: Press (6) control button 2 sec to turn on this device, the
LED indicator would be flash green light slowly, and the earphone will
have one short beep sound.
¾Power off: Press (6) control button 2 sec to turn off iBlue ,the LED
indicator light would be snuff out, and the earphone will have one
short beep sound.
Using iBlue with Bluetooth Mobile Phone
Pairing with Bluetooth mobile phone
“Please use the Bluetooth mobile phone for searching iBlue(the detailed
operation of mobile phone and refer to your mobile phone user manual)”
A. Put the iBlue with mobile phone within short distance
B. Be sure iBlue in power off mode
C. Press (6) control button for 3 seconds to enter pairing mode, when
enter pairing mode the (1) LED indicator would be flash between red
light and green light flash slowly, and the earphone will have one
short beep sound. If user likes to cancel the pairing procedure, please
repeat the operation as same as pairing set up procedure, then the
cancellation of pairing would be activated immediately.
D. After searching, the mobile phone will display the model name as
iBlue.

E. Please select iBlue as adding.
F. Enter the ID code “0000”.
G. After the pairing is completed, the LED indicator would be turned to
green light, and please transfer the display of your mobile phone to
main menu.
zStandby:
¾For power save, iBlue would auto switch from linking mode to standby
mode, when in standby mode the (1) LED indicator would be flash per
4 seconds.
¾But some kinds of mobile phone would be always in linking mode
(please refer to your mobile phone user manual.)
zAnswer for incoming call :
¾When mobile phone receive incoming call ,the earphone would
have beep sound to notice you and the (1)LED indicator flash green
light fast, you could press (6) control button to pick up the call.
¾If your mobile phone had setting auto answer function that you could
auto pick up the call without press (6) control button to.
zHang up the phone: press (6) control button then could hang up
the phone call and the MP3 music would turn on immediately.
zAdjusting the phone calling volume: To rotate the (8)Volume Control or
adjust mobil phone to control volume down or up.
Using iBlue with iPod / mini iPod
zInsert (5) Connector into iPod earphone jack hole.
zInsert (7) Earphone Jack into main body’s (2) earphone plug.
ziBlue auto power on
ziBlue auto switch to link mode for searching Bluetooth mobile pone.
zAdjusting the music volume: To rotate the (8)Volume Control or rotate the
iPod/mini i Pod volume Adjustment to control volume down or up.
Product Specifications

Bluetooth Specification V1.1
Output Power Class Class 2
Piconet Point to Point
Security Pairing, Encryption, and Authentication
Power Consumption Talking (HV3, 1s sniff mode) 30mA @ 3.3Vdc
Standby 1.8mA @ 3.3Vdc OFF (Idle) 0.15mA @
3.3Vdc
Rechargeable Battery Lithium Ion Polymer Battery /120mAh
DC Power Input 5.0Vdc (450mA)
Talk Time Max 4hrs
Standby Time Max 100hrs
Battery Charging Time 2 to 2.5hrs

This device complies with Part 15 of the FCC Rules. Operation is subject to the following two
conditions:
(1) This device may not cause harmful interference.
(2)This device must accept any interference received, including interference that may cause
undesired operation.
15.105 Federal Communications Commission (FCC) Requirements, Part 15
This equipment has been tested and found to comply with the limits for a class B digital
device, pursuant to part 15 of the FCC Rules. These limits are designed to provide
reasonable protection against harmful interference in a residential installation.
This equipment generates, uses and can radiate radio frequency energy and, if not
installed and used in accordance with the instructions, may cause harmful interference
to radio communications. However, there is no guarantee that interference will not
occur in a particular installation. If this equipment does cause harmful interference to
radio or television reception, which can be determined by turning the equipment off and
on, the user is encouraged to try to correct the interference by one or more of the
following measures:
---Reorient or relocate the receiving antenna.
---Increase the separation between the equipment and receiver.
---Connect the equipment into an outlet on a circuit different from that to which the
receiver is connected.
---Consult the dealer or an experienced radio/TV technician for help.
Any changes or modifications (including the antennas) made to this device that are not
expressly approved by the manufacturer may void the user's authority to operate the
equipment.
FCC RF Radiation Exposure Statement: This equipment complies with FCC RF radiation
exposure limits set forth for an uncontrolled environment. This device and its antenna must not
be co-located or operating in conjunction with any other antenna or transmitter.
Table of contents
Popular Automobile Accessories manuals by other brands

PUTCO
PUTCO MOLLE PANELS RAM 2500 Instruction guide

tams elektronik
tams elektronik FCS-2 manual

HUSKY LINERS
HUSKY LINERS 6145FR Care and use instructions

Rosco
Rosco SAFE -T-SCOPE STSK7165 Installation & user manual

Kargo Master
Kargo Master 4081M installation guide

Webasto
Webasto thermo top evo Installation documentation