I-CAN i-CAN 2850ST User manual

2850ST
USER GUIDE
2850ST

TABLE OF CONTENTS
Table of contents.................................................................. 2
About your high definition receiver................................... 3
What is HDTV? ..................................................................... 3
Getting started..................................................................... 5
Safety first.......................................................................... 5
Unpacking your digital receiver...........................................5
Front panel......................................................................... 5
Basic connections ...............................................................6
TV connections................................................................... 7
Surround sound .................................................................7
Internet set up.................................................................... 8
Remote control..................................................................... 6
First installation ................................................................. 11
How to set up your receiver.............................................. 11
Changing resolution......................................................... 11
First time installation ........................................................ 11
Using your decoder............................................................ 12
Channel information ........................................................13
What is channel banner?.................................................. 13
More information............................................................. 15
How to change channels? ................................................15
How to change program options? .................................... 15
Channel lists..................................................................... 16
Parental control................................................................18
Using your decoder............................................................ 20
Interactive applications .....................................................20
Electronic program guide.................................................. 20
Language options............................................................. 20
Screen saver and banner duration..................................... 20
TV settings .......................................................................20
2
Satellite antenna configuration......................................... 20
Software upgrade ............................................................21
Factory reset..................................................................... 21
Troubleshooting................................................................. 22
Maintenance ....................................................................22
Before requesting service.................................................. 22

USER GUIDE
2850ST
3
ABOUT YOUR HIGH DEFINITION RECEIVER
Your receiver allows you to watch programs filmed in High
Definition with much greater picture and sound quality than ever
before. In addition you can do everything you would expect with
a state of the art TV receiver, including the following:
■Watch free-to-air and pay TV channels including scrambled
programs
■Full parental control to prevent your children watching unde-
sirable programs
■Access to interactive applications such as home shopping,
games, and e-voting
■Find your favourite channels quickly on your personal lists
WHAT IS HDTV?
HDTV (High Definition Television) is a new digital broadcasting
standard bringing you much higher quality video and audio
compared with the previous technology.
There are several reasons why HDTV provides a superior TV
viewing experience:
1. Higher resolution pictures give smarter images
The picture on your TV screen is made up of dots known as pixels,
and more of them give sharper pictures and display movement
more realistically. The number of such dots on the screen, given
as the number of lines, is a measure of the quality, known as
resolution, and the higher the better. Standard definition pictures
have 576 lines per screen, while High Definition TV sets can
display either 720 or 1080 depending on the model.
2. Surround Sound
Many HD programs are broadcast with surround sound (Dolby
Digital), which combined with the panoramic picture creates a
cinema-like experience, with much higher audio quality than
most standard definition TVs.
To get surround sound you’ll need to have an appropriate TV set
or connect your receiver via S/PDIF to a home cinema device.
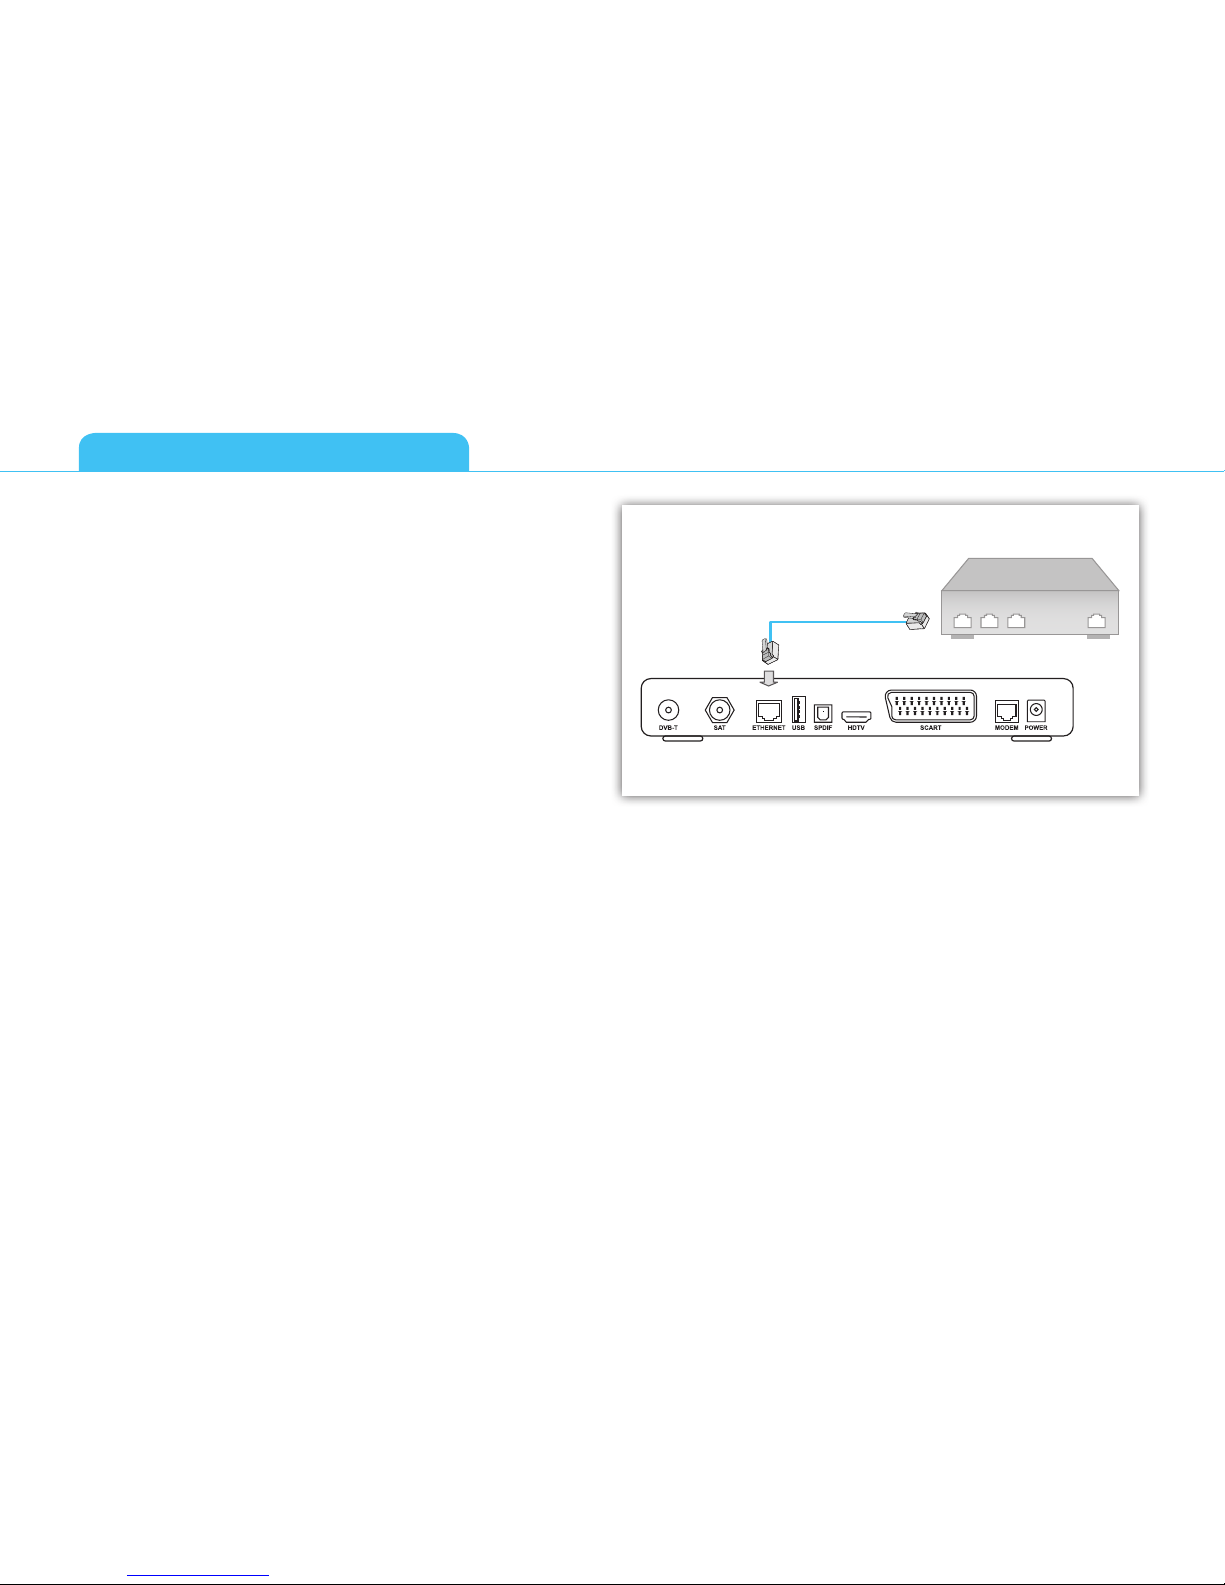
3. HDMI Connector
The HDMI connector transmits the HDTV pictures and sound to
your TV set with the best possible quality. You must check though
that your TV set supports High Definition Content Protection
(HDCP), which is needed for the HDMI connector to work. If the
HDMI cable cannot be used, your receiver can be connected to
the TV set with a conventional SCART cable.
You will need a TV capable of displaying HD pictures at full
quality to enjoy HD programs. Such TVs are labelled ‘HD
Ready’ or ‘Full HD.’ Check in your TV manual if unsure whether
it is ‘HD ready.’

This receiver has an external power supply that works in the range
100 to 240V AC, 50/60 Hz. Ensure you plug the power input lead
into a standard AC wall outlet, and not any DC power source. Re-
member that contact with the AC power supply can be lethal.
Ensure that all cables, including the power input lead, are inserted
properly into the receiver before connecting it to the AC power
supply. Similarly always unplug the receiver from the power supply
first, before disconnecting cables from the receiver or reconnecting
them.
Never attempt to repair or reconstruct the receiver yourself. You
can get a serious electric shock if you attempt to open the casing.
Be extremely careful if this receiver gets wet for any reason. Im-
mediately unplug it from the mains supply.
DO
•If any object falls into the casing, unplug the receiver and have
it checked by a qualified technician.
•Allow adequate air circulation around the unit to prevent internal heat
build-up. Do not place the unit next to a radiator or any heat source,
and make sure that the air vents are left clear.
DO NOT
■Do not expose the receiver to extreme temperatures, direct
sunlight, or high humidity.
■Do not place any objects on top of the receiver since that
could restrict air circulation.
■Do not place the receiver on fabric furnishings, carpets or
other flammable materials.
This digital receiver has been manufactured to meet international
safety standards. However, safety precautions must be followed
to ensure the safe and reliable operation of the device.
Please take note of the following guidelines to avoid the
risk of an electric shock.
SAFETY FIRST
Thank you for purchasing an i-CAN 2850ST!
Removing the cover of the receiver may lead to a
severe and potentially fatal electric shock
4
GETTING STARTED

USER GUIDE
2850ST
UNPACKING YOUR DIGITAL RECEIVER
FRONT PANEL
LED INDICATOR
Blue - operating mode.
Red - standby mode.
The LED blinks when your device is receiving signals from the
remote control.
SMART CARD SLOT
Smart Card allows you to view scrambled TV channels. Gently
push the card into the slot. Its chip should face downwards
and the symbol of an arrow should face inwards.
Two Nagra Smart Cards (e.g. Mediaset and TIVU) can be used
at the same time. If you are using two Cards, it does not
matter to which slot you place a Card first.
If you are using just one Card, it does not matter which slot
you use.
Receiver Remote Control Power Supply BatteriesTelephone Cable
5

GETTING STARTED
6
BASIC CONNECTIONS
The following connections need to be made in order for the decoder to work properly.
SD TV
Presa d’antenna
Home Cinema
Internet
DVD Recorder
Presa di corrente
HD TV
Plug in all cables before connecting the receiver to the
power supply. Similarly always unplug the receiver
from the power supply first, before disconnecting
cables from the receiver or reconnecting them.
!

USER GUIDE
2850ST
7
TV CONNECTIONS
There are three ways of connecting the receiver to your TV set.
■Connection with HDMI cable is the most recommended one.
It provides the highest picture and audio quality. The receiver
automatically detects the best resolution for your TV. But
this requires support for the High Bandwidth Digital Content
Protection (HDCP) standard from your TV set.
■If there is no possibility of connecting the receiver with HDMI
cable, use SCART cable.
SURROUND SOUND
If you would like to enjoy Dolby surround sound, connect your
home cinema system to the receiver with S/PDIF cable.
To enjoy surround sound, press , select “Audio
Mode” in “Your Preferences” menu and choose “Yes”.
Surround sound will be audible only if it is broadcast
with the program.
SD TV
HD TV
Home Cinema
If your receiver is connected with SCART cable, please
make sure that the picture resolution is set to 576i. If
the reslution of the screen is different, then the graph-
ic is not displayed. Keep pressing on the remote
control unit of your i-CAN receiver until it switches on
to 576i mode and the graphic appears.

INTERNET SET UP
You may need to set up or reconfigure your Internet connection
for interactive services to work properly. First connect an Ethernet
cable to the Ethernet connector on the back of your receiver, then
set up the connection by going to the Network Configuration
window (Menu then Installation then Network Configuration).
This gives you two options for Internet configuration:
■Automatic Configuration - try this option first, as in most
cases your Internet Service should be able to support auto-
matic discovery of your new device.
■Manual Configuration allows you to enter data manually if
automatic configuration is not possible. You can contact your
Internet Service Provider for help.
GETTING STARTED
8

Button Action
Sets the remote control to operate your receiver.
Sets the remote control to operate your TV.
In viewing mode or in the Channel Banner, displays/
leaves teletext if it is available.
Switches your decoder between standby and operating
modes.
Color buttons are seldom used in some of the menu
screens.
Used in external applications.
Switches between TV and Radio mode.
Displays/leaves the menu system.
Displays/leaves the applications window.
Button Action
Changes the video resolution.
In viewing mode or in the Channel Banner, alternates
between the current and previous program within the
same channel list. In the menu or in the Program Guide,
returns to the previous screen.
In the Channel Banner, removes the Channel Banner,
or Extended Information from the screen. In the menu
system or Program Guide, returns to normal viewing.
In the Channel Banner, switch between the current
program information and the next program information.
In the menu, select menu items or change parameters
with pre-defined values.
In Channel Banner, scroll channel information up/down.
The decoder remains tuned to the current channel. In the
menu, select menu items or menu options.
9
REMOTE CONTROL

Button Action
Displays/leaves the Program Guide.
In the Channel Banner, tunes to the channel the Channel
Banner refers to. In the menu, selects the currently
highlighted menu item or confirms your choices made
in the menu screens.
Switches circularly between: viewing mode, Channel
Banner, Channel Banner with Extended Information. In
menu screens displays help texts.
Reserved for future use.
Increases/decreases audio volume level.
Button Action
Mutes the sound. Pressing this button once again will
restore the previously set volume level.
In viewing mode, or in the Channel Banner, tunes to
the next/previous channel. In the Channel List, menu,
or in the Program Guide, scrolls the channel list page
up/down.
Number buttons allow you to type your choice directly,
for example channel numbers or a PIN code (default PIN
code: 1234).
Displays/leaves currently used channel list. Select the
channel you want to tune to, and press .
Displays the Options menu where you can change
the audio and subtitles language and screen format.
Particular options are available only if they are broadcast
with the program.
10
REMOTE CONTROL

HOW TO SET UP YOUR RECEIVER
The LED indicator on the front panel will light up to confirm you
have connected your receiver correctly to the TV set and plugged
into the mains. The Welcome Screen should then appear on your
TV screen after a few seconds. Wait until this Welcome Screen
disappears and is replaced by the Select On-Screen Language
screen. If however the Welcome Screen does not appear in the
first place, this may indicate that the receiver’s resolution should
be changed.
CHANGING RESOLUTION
If necessary change the resolution by pressing twice the
button on the remote control. Press the button once to show
the current resolution mode on the TV screen. Press this button
again to change the mode.
FIRST TIME INSTALLATION
Select On-screen Language
The Select On-screen Language screen allows you to set the
language you want to display on-screen information. Press
to highlight the on-screen language and press to make your
selection. Please note that you can also change the on-screen
language in the Language Options screen (Select Your Preferences
from the Main Menu).
FIRST INSTALLATION
Select TV Screen Format
This window allows you to adjust the shape of your TV display.
Numbering Method
You can arrange your channels in two ways.
■If you choose Automatic Order, the channels will be num-
bered as the broadcaster set them.
■If you choose No Order, the channels will be numbered in the
order they are found during the channel search process.
Channel List Ordering
This screen allows you to select your preferred type of channels. If
you select a particular type of channels e.g. Terrestrial, then those
channels will appear on the list first.
Installation
This screen allows you to choose two types of Installation:
■Standard
■Advanced - this screen allows you to set up your satellite an-
tena. Use if you need special configuration or have a different
installation type e.g. Unicable.
11

BASIC FUNCTIONALITY
Search for Terrestrial and Satellite Channels
After selecting the Installation method the channel search
process starts automatically. The decoder looks automatically for
terrestrial and satellite channels. When the process is completed,
the decoder will inform you about the total number of channels
found. You can then press to save the list.
If the channel search procedure is not completed successfully the
decoder will display an error message. You can now press to
go to Language Selection screen or press to enter Main Menu
where two options are available Installation and Help.
Help
In order to open the Help menu, press the button on your
remote control. Then, using the buttons highlight the Help
item and press the button.
Additionally, any time the icon appears on the screen,
pressing displays a help text.
Note that your receiver will automatically select any
action you have highlighted after 10 seconds if you
have not chosen the item yourself in that time.
12

USER GUIDE
2850ST
CHANNEL INFORMATION
The channel name and number appear on the bottom left corner
of the screen immediately after changing channel. However this
information soon disappears (after a preset time) and you can
then obtain more detailed information about both the channel
and the current program you have selected by pressing the
button. This takes you into the Channel Banner window at the
bottom of the screen.
You can turn off the basic display of channel name and number
so that the full Channel Banner information can be obtained
immediately after changing channel by going to Menu, and
selecting Your Preferences, then Display Options, then Banner
Duration. You can then change how long the basic channel
information stays on the screen, or turn it off.
WHAT IS CHANNEL BANNER?
Channel Banner appears at the bottom of the screen when you
press during normal viewing. This gives the channel name
and number, but also basic information about the current and
next program.
Extended Information on programs
Extended Information is available about some programs, indicated
by the icon. Press again when the Channel Banner is
displayed to obtain Extended Information about the current
program. This may run over more than one page, but you can
then press to scroll through the pages.
To close the Extended Information window press when the
last page is displayed, or press at any stage.
13

There are more soundtracks available for the
program. To change the soundtrack, press .
The channel is locked.
The channel is temporarily unlocked.
There is Extended Information available for the
program.
To display the information, press .
Pressing tunes to the channel whose name
and number is displayed in the Channel Banner.
Surround sound is available for this program.
There are subtitles available for the program.
Press to choose a subtitle language.
This program/channel is presented in High Defini-
tion.
The program is blocked, because its rating ex-
ceeds the set parental level.
Interactive services are available on this channel.
Teletext is broadcast on the currently tuned
channel.
Content of this channel is scrambled.
14
BASIC FUNCTIONALITY

USER GUIDE
2850ST
BASIC FUNCTIONALITY
MORE INFORMATION
You can also learn about your receiver’s functionality from help
texts available for each window or function. You can access
these by going to the Help menu under Menu or by pressing
whenever the icon is displayed.
HOW TO CHANGE CHANNELS?
You can change channels in several ways:
■Press number keys on your remote control.
■Press CH+ / CH-.
■When the Channel Banner is displayed press on
remote control to browse through channels and select one.
Then press to tune to the selected channel.
■In the Channel List press select a channel, then press
HOW TO CHANGE PROGRAM OPTIONS?
You can change from the languages you originally set for audio,
subtitles, or teletext, and also alter the display format, all at any
time while watching a program.
1. Press to enter the Program Options window.
2. Using select an item you would like to change.
3. Using the keys, change to the language or display the
format you want.
4. Press to accept the changes or to reject them.
15

16
BASIC FUNCTIONALITY
CHANNEL LISTS
How to Create a New Channel List?
You can create up to 20 different lists of your favorite channels.
1. Press and select Channel Lists.
2. Select New TV List or New Radio List and press .
3. Use arrow keys and press then enter the name for your new
list (for example films, documentaries) and select Accept.
4. When the list of channels appears, use to scroll up or
down and highlight the one you want to add. Then press to
add that channel to that list.
5. When you have finished adding channels to the list, press .
Note that you cannot mix TV and Radio channels in the same
channel list. You must have separate lists for TV and radio channels.
How to change your Channel Lists?
1. Press and select Channel Lists.
2. Select a list you want to change and press .
3. From the commands list select the action you would like to
perform and press .
4. Your next response will depend on the command you have just
chosen. Please note there are guiding prompts at the bottom of
the screen.

USER GUIDE
2850ST
17
How to select channels from your Channel Lists?
You can move easily between your favorite lists, including radio
and TV lists.
1. Press .
2. Use to choose the list with the channel you want.
3. Use CH+/ CH- to scroll up or down through pages on the
chosen list if necessary. Then use , or the number keys, to
select a channel from that list.
4. Press to tune to that selected channel.
Note you can also switch between your All TV and All Radio lists
using the button.

BASIC FUNCTIONALITY
18
PARENTAL CONTROL
How to lock a program/channel?
Your receiver supports two types of lock. You can stop your
child from watching programs on the basis of their suitability for
particular ages with Parental Level, or block whole channels with
Channel Lock.
Parental Level
The Parental Level option lets you set a particular viewing age and
blocks all programs labeled as unsuitable for children younger
than that. For example if you set Parental Level to 7 years, all
programs unsuitable for viewers under 7 would be locked under
PIN code protection. You can access these locked programs
yourself by entering your PIN, which is set to 1234 as the default
but can be changed. You can also disable all locks at any time by
changing the Protection Status in the Parental Control submenu
to ‘Inactive’.
This must be set to ‘Active’ for Parental Control to work.
To set the Parental Level:
1. Press to access Main Menu and select Parental Control.
2. Choose Parental Level.
3. Using set the age limit and press .
Channel Lock
To set the Channel Lock:
1. Press and select Parental Control.
2. Choose Channel Lock menu.
3. In the Channel Lock window, select either All TV or All Radio.
4. Using select a channel to be locked and press .
How to Change your PIN code?
To change your PIN code you need to know what it is currently - it
is set at 1234 when the receiver is delivered to you.
1. Press to access Main Menu and select Parental Control.
2. Select Change PIN.
3. Enter the current PIN code.
4. Enter the new PIN code and repeat it to confirm.

USER GUIDE
2850ST
19
INTERACTIVE APPLICATIONS
Interactive applications give you access to social networking,
gaming, information, or other sources of entertainment. The
options available depend on your broadcaster, but your receiver
has all the potential you need to enjoy a full range of interactive
services.
If there is an interactive service or function available on the channel
you are watching, the icon will be displayed in the Channel
Banner. To see a full list of interactive services on all your channels,
press the button.
By default, some interactive services start automatically, such as
voting, when you tune to a channel. If you do not want these
processes to run automatically, set the Application AutoSTART
option (go to Menu then Your Preferences then Display Options)
to No.
ELECTRONIC PROGRAM GUIDE
The Electronic Program Guide (EPG) provides you with an on-
screen TV schedule and information about current program
content. Please bear in mind that this information is available only
if provided by the broadcaster.
To access the Electronic Program Guide press key on your
remote control. Use the buttons to navigate through the
days of the week and the buttons to scroll through the
program list for a particular day.
LANGUAGE OPTIONS
The Language Options screen (Menu – Your Preferences –
Language Options) allows you to select options concerning
preferred languages.
On-screen Language – specifies the language in which all the
menus and screens are displayed.
Primary Audio – specifies the first choice of language you would
like to use for your audio soundtracks.
Secondary Audio – specifies the second choice of language you
would like to use for your audio soundtracks (when the Primary
Audio is NOT available).
Subtitles – specifies whether subtitles are displayed (if available).
Primary Subtitles – specifies the first choice of language you
would like to use for your subtitles.
Secondary Subtitles – specifies the second choice of language
you would like to use for your subtitles (when the Primary Subtitles
are NOT available).

OTHER FUNCTIONS
20
SCREEN SAVER AND BANNER DURATION
Banner Duration
The Banner Duration option allows you to decide how long
channel information is displayed after tuning to another channel.
If the Disabled option is assigned to the Banner Duration option,
the information will not be displayed.
Screen Saver
Some TV screens may suffer “screen burn-in” when static images
are displayed for a long time. To prevent this effect, after the time
specified in the Screen Saver option, most of the TV screen gets
dark.
TV SETTINGS
TV Screen Format
If you have changed the TV and its format is different than the
one chosen during the First Time Installation, adjust the TV Screen
Format option to correspond with the format of the TV you are
currently using.
Display Format
If your TV screen format is different than the format of the
program currently broadcast, you can choose the way the picture
is ‘transformed’. You can choose between Full Screen, Letter-Box
and Pan-Scan.
SATELLITE ANTENNA CONFIGURATION
In the Antenna Configuration screen you can adjust the settings
of your antenna. If you have a single LNB installation choose Off in
the Antenna Control option. However, if you have more advanced
installation you can choose between DiSEqC and Unicable control.
Unicable
For Unicable control you have to set the following options:
■Unicable Channels - select the number of channels of your
Unicable LNB. You can choose between 4 and 8.
■Channel Number - select the appropriate output number of
the LNB your decoder is connected to.
■Unicable Channel Frequency - once you select the Channel
Number the decoder assumes standard frequency for this
number. However, you can change it by editing this option.
Table of contents
Other I-CAN TV Receiver manuals