i-mate Pam User manual

1
TechFaith
Pam
User Manual Version 0.1

2
Please Read Before Proceeding
Microsoft, MS-DOS, Windows, Windows NT, Windows Server, Windows Mobile, ActiveSync, Excel, Internet Explorer,
MSN, Outlook, PowerPoint, and Word are either registered trademarks or trademarks of Microsoft Corporation in the
United States and/or other countries.
THIS DEVICE IS NOT CHARGED WHEN YOU TAKE IT OUT OF THE BOX. DO NOT REMOVE THE BATTERY PACK WHEN THE DEVICE IS CHARGING.
WHEN INSERTING YOUR SIM CARD, MAKE SURE THE DEVICE IS POWERED OFF, AND THAT THE SIM CARD SNAPS INTO THE SOCKET.
YOUR WARRANTY IS INVALIDATED IF YOU OPEN OR TAMPER WITH THE DEVICE'S OUTER CASING.
PRIVACY RESTRICTIONS
Some countries require full disclosure of recorded telephone conversations, and stipulate that you must inform the
person with whom you are speaking that the conversation is being recorded.
Always obey the relevant laws and regulations of your country when using the recording feature of your Pocket PC
Phone.

3
Contents
CHAPTER 1 ....................................................5
GETTING TO KNOW YOUR DEVICE AND
ACCESSORIES ...................................................6
INSTALLING THE SIM CARD .............................12
BATTERY INFORMATION ..................................13
CHARGING AND DISCHARGING.............................13
STARTING UP ...................................................16
TURNING ON/OFF THE DEVICE..............................16
DEVICE LOCK ..................................................16
LOCKING/UNLOCKING YOUR DEVICE .....................16
THE TODAY SCREEN ..........................................17
CHAPTER 2 ..................................................21
INTRODUCTION:INPUT PANEL......................22
BLOCK RECOGNIZE .........................................23
START TRANSCRIBER ........................................24
WRITE WITH TRANSCRIBER.................27
OPTIMIZE HANDWRITING
RECOGNITION FOR TRANSCRIBER.....28
SHOW OR HIDE THE TRANSCRIBER
TOOLBAR.....................................................29
DRAWING AND WRITING ON THE SCREEN.....30
CHAPTER 3 ..................................................33
USING THE PHONE ............................................34
MAKING CALLS.................................................35
FUNCTIONS DURING A CALL .................................38
RING TONE SETTINGS.........................................39
PHONE SERVICES..............................................40
NETWORKS......................................................40
CHAPTER 4...................................................41
CHAPTER 5...................................................47
CUSTOMIZING THE TODAY SCREEN .......................48
CUSTOMIZING THE START MENU ..........................49
SETTING DATE/TIME/ALARM/LANGUAGE/REGIONAL
OPTIONS..........................................................49
OTHER HELPFUL SETTINGS.................................51
REMOVING PROGRAMS ......................................53
MANAGING MEMORY..........................................54
BACKING UP FILES .......................................55
CHAPTER 6...................................................59
CONNECTING TO THE INTERNET....................60
USING WIRELESS MANAGER ........................62
BLUETOOTH..................................................65
INTERNET EXPLORER MOBILE ......................69
USING TERMINAL SERVICES CLIENT.............72
CHAPTER 7 MESSAGING (TEXT MESSAGES,
EMAIL AND MMS)..............错误!未定义书签。
TEXT MESSAGES SERVICE...................................75
OUTLOOK E-MAIL .............................................76
MMS..............................................................76
MENU IN TEXT MESSAGE/MMS/EMAIL LIST.............77
FOLDERS OF MAILING SYSTEM ............................78
OPTIONS .........................................................79
USING POCKET MSN MESSENGER.......................80
CHAPTER 8 CONTACTS (PHONE BOOK)...........84
OVERVIEW OF CONTACTS ...................................84
FIND A CONTACT ...............................................84

4
SEND A MESSAGE TO A CONTACT..........................85
REMOVE A PICTURE FROM CONTACT
INFORMATION...............................................90
CREATE A SIM CONTACT ..............................90
SEND CONTACT INFORMATION......................91
CHAPTER 9 MULTIMEDIA EXPERIENCES..........92
GAMES...........................................................92
BUBBLE BREAKER.............................................92
SOLITAIRE .......................................................94
CHANGE SOLITAIRE OPTIONS ..............................95
PICTURES &VIDEOS .........................................96
PREVIEWING PICTURES......................................96
MENU.............................................................96
CHAPTER 10 CAMERA (PENDING)....................98
BEFORE USING THE BUILT-IN CAMERA ON YOUR PHONE,
PLEASE READ THIS:...........................................98
CAPTURING STILL IMAGES...................................98
CAPTURING A VIDEO ..........................................99
WHERE PHOTOS AND VIDEO FILES ARE STORED.......99
PERSONALIZING YOUR CAMERA ...........................99
CHAPTER 11 WINDOWS MEDIA ......................101
AUDIO/VIDEO FORMAT SUPPORTED ....................101
PLAYING A FILE ...............................................101
LIBRARY SCREEN............................................104
PLAYER OPTIONS ............................................105
CHAPTER 12 USING OTHER APPLICATIONS ..108
WORD MOBILE...........................................108
EXCEL MOBILE........................................... 110
VIEWING SLIDE SHOWS WITH POWERPOINT
MOBILE...................................................... 112
CALCULATOR .................................................114
NOTES ........................................................115
TASKS.........................................................117
CALENDAR .................................................120
JAVA .............................................................121
APPENDIX.......................................................125
REGULATORY NOTICES ...............................126
PC REQUIREMENT TO RUN ACTIVESYNC 4.X
...................................................................129
SPECIFICATIONS..........................................130
ADDITIONAL SAFETY INFORMATION...........135
BATTERIES .....................................................137
COMMON PROBLEMS AND SOLUTIONS.................140
MAINTENANCE GUIDE................................142

5
Chapter 1
Getting started
Getting to know your device & accessories
Installing the SIM Card
Battery Information
Starting up
6
Getting to know your device and accessories
23 4
5 6
78
1
7
10 11
9 12
8
14
15
16
17
18
19
20
21
22
23
24
25
26
27
13

9
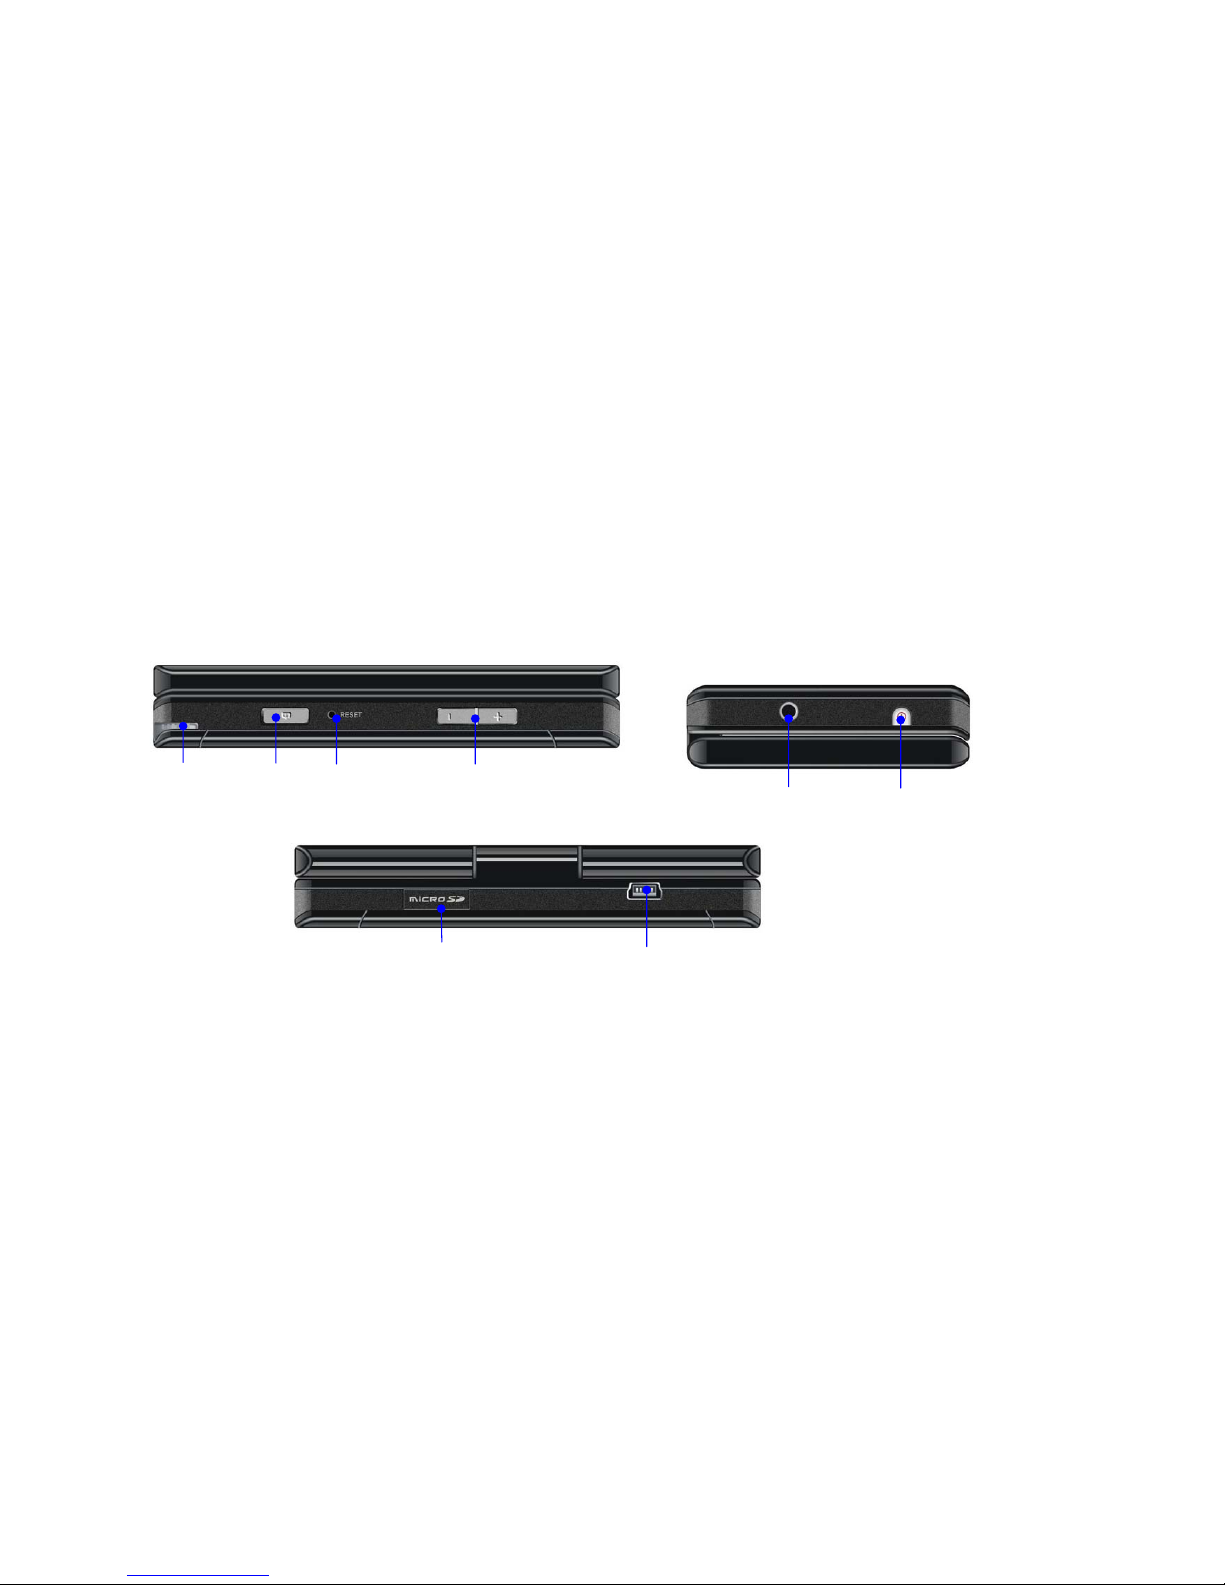
No. Item Function Instruction
1 Stylus slot Insert stylus in the slot.
2 Camera Button Press to launch Camera.
3 Reset Button With the stylus, press the Reset button to soft-reset your device.
4 Volume controller
Press to adjust the volume of the phone and the receiver
5 Earphone jack Plug the earphone to listen to audio media, or use the hand-free kit.
6 Power/Backlight Press and hold it to power on/off the device. Press briefly to turn on the backlight.
7 Micro-SD card slot
Insert a storage card here to store data.
8 Mini-USB Use this connector for synchronizing data or recharging the battery.
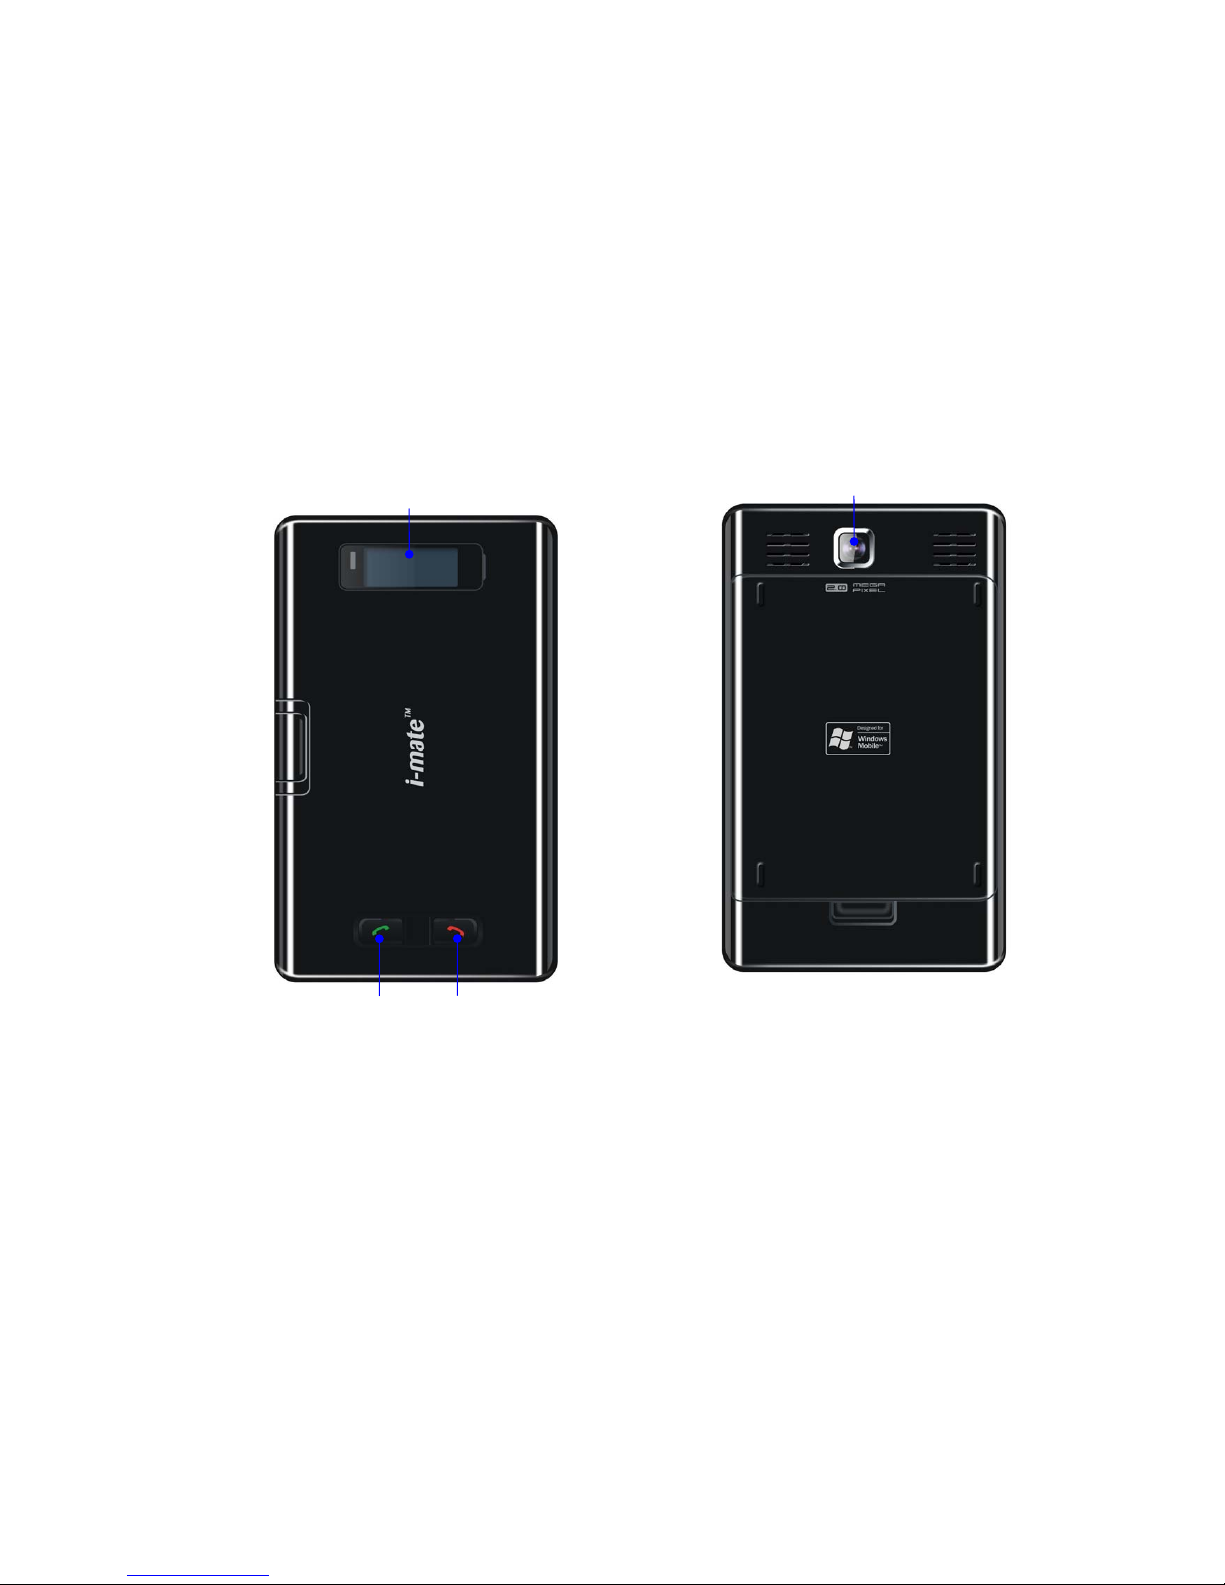
9 Sub-LCD Show the status of time, signal, SIM and so on
10 Talk Button Press to enter the phone pad in the standby mode. Answer a call, or dial numbers.
11 End Button End a call or back to the Today screen
12 Camera Lens Taking pictures or videos through this lens, when Camera mode is active.
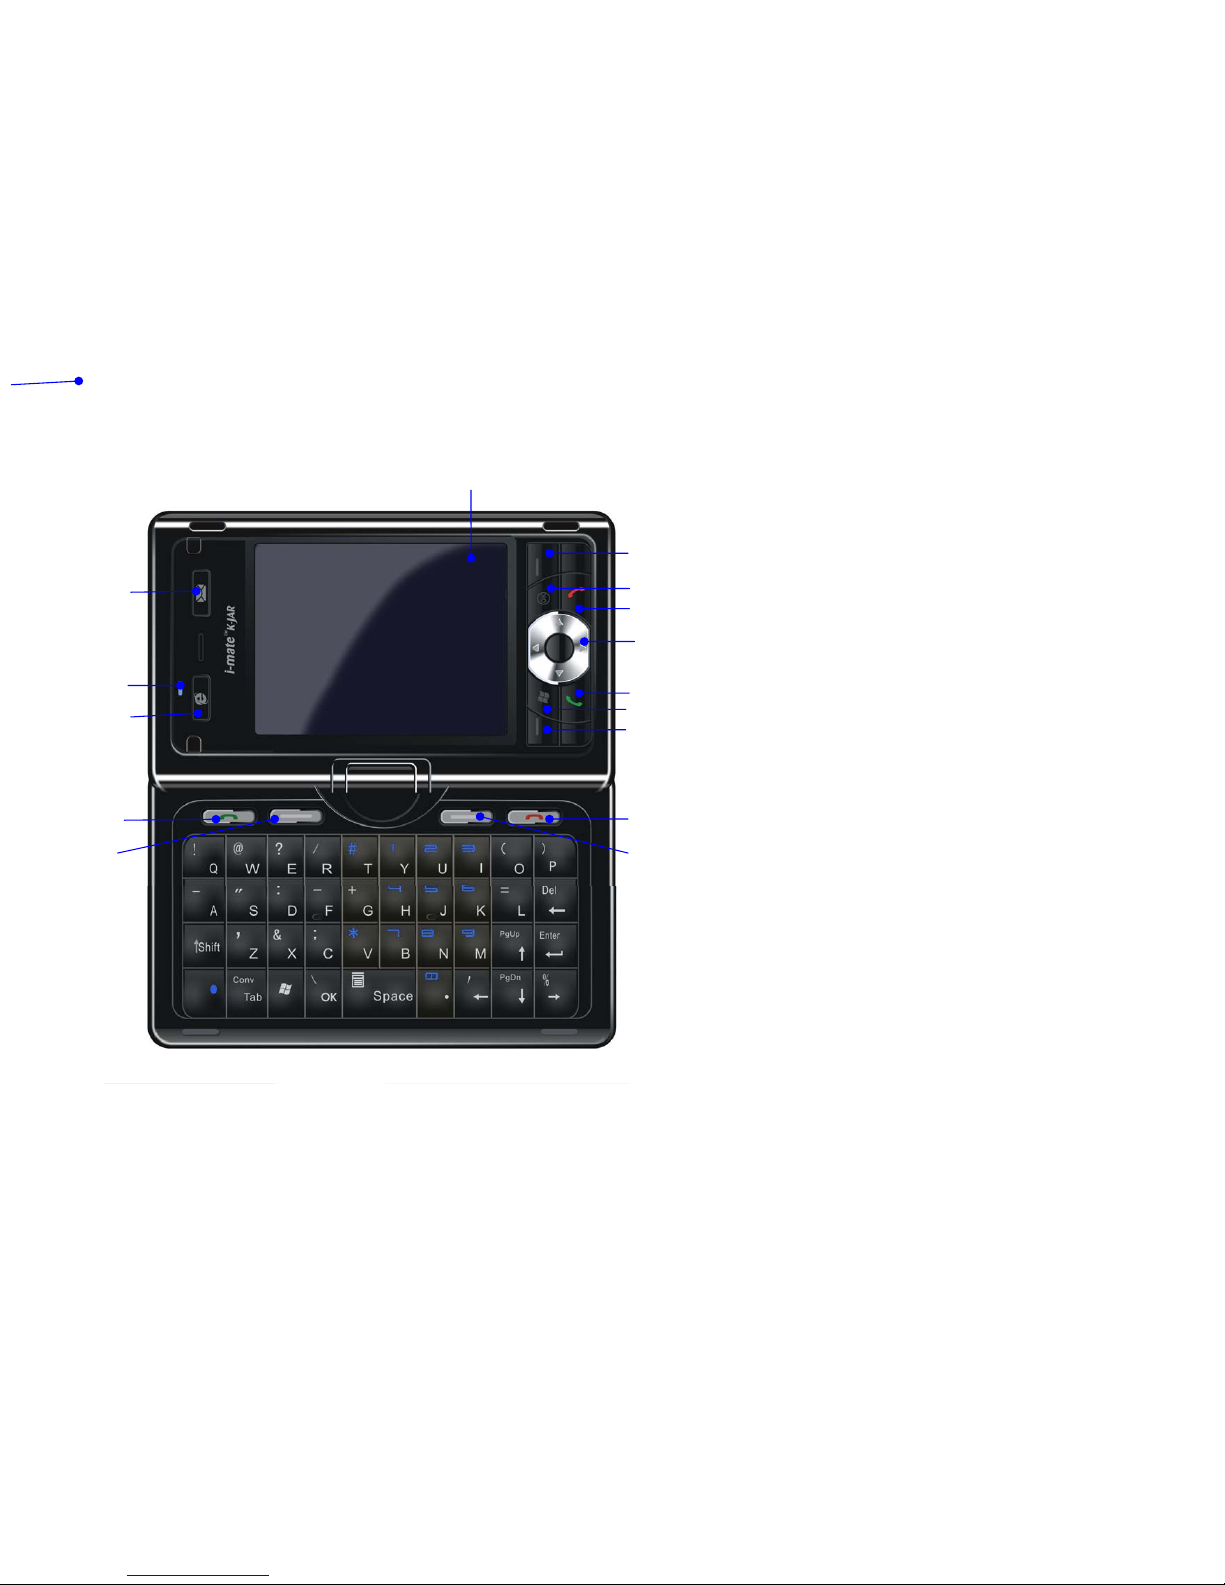
13 Touch screen Use to write, draw, or make a selection with the stylus.
14 Messaging Button
Press to enter Text message screen quickly
15 Notification LED Phone and change indicator
16 IE Button Press to enter internet explore quickly.
17 Right soft Button Press to execute the command shown in the label above the button.
18 Ok Button Press to confirm your data entries, or to exit the program in use.
19 End Button End a call or back to the Today screen
20 5-way Navigator Press this multi-directional control up, down, left, or right to move through menus and program
instructions; carry out the selection by pressing the center button.
21 Talk Button Press to enter the phone pad in the standby mode. Answer a call, or dial numbers.
22 Start Button Press to open the Start menu.
23 Left soft Button Press to execute the command shown in the label above the button.
24 Talk Button Press to enter the phone pad in the standby mode. Answer a call, or dial numbers.

10
25 Left soft Button Press to open the Start menu.
26 End Button End a call or back to the Today screen
27 Right soft Button Press to execute the command shown in the label above the button.
This user manual is published by TECHFAITH. TECHFAITH reserves the right to correct the typos or description errors, modify the contents on function
improvement and technical update in this manual at any time. We feel sorry that the contents of this manual are subject to change without prior notice.
Accessories
The following accessories are provided with the device:

11
No. Item Function Instruction
1 AC adapter Connect it to a power supply to recharge the battery.
2 USB cable Connect it to a PC to synchronize data.
3 Stereo-wired earphone,
with volume control jog,
and Send/End button
Listen to audio media, or answer/reject/end a phone call.
Speak to it to create a voice note.
1
2
3

12
Installing the SIM Card
Follow these steps to install a 3G USIM (Universal IC Card) or a GSM SIM (Subscriber Identity Module) card provided by your local network service provider
that contains your phone number, service details, and phonebook/message memory:

13
1Press the cover latch and slide down to remove the back cover.
2Find the gap between the battery and the casing at the bottom. Stick it upward to lift the bottom end.
3Insert the SIM card into the SIM card slot with its gold contacts facing down. Its cut-off corner should match the cut-off corner in the slot. Push down lightly
and forward to snap it into place.
4Replace the battery and gently push down to snap it into place.
5Replace the cover: Slide it back on, and then push down lightly at the bottom to snap it securely into place.
Battery information
Charging and Discharging
Your device contains a rechargeable Li-ion polymer battery. The battery can be charged and discharged hundreds of times but it will eventually wear out. When
the talk and standby times are noticeably shorter than normal, replace the battery. Use only TECHFAITH approved batteries, and recharge your battery only with
TECHFAITH approved chargers designated for this device. Unplug the charger from the electrical plug and the device when not in use. Do not leave a fully
charged battery connected to a charger, since overcharging may shorten its lifetime. If left unused, a fully charged battery will lose its charge over time.
If the battery is completely discharged, it may take a few minutes before the charging indicator appears on the display or before any calls can be made. Use the
battery only for its intended purpose. Never use any charger or battery that is damaged. Do not short-circuit the battery. Accidental short-circuiting can occur
when a metallic object such as a coin, clip, or pen causes direct connection of the positive (+) and negative (-) terminals of the battery. (These look like metal
strips on the battery.) This might happen, for example, when you carry a spare battery in your pocket or purse. Short-circuiting the terminals may damage the
battery or the connecting object. Leaving the battery in hot or cold places, such as in a closed car in summer or winter conditions, will reduce the capacity and
lifetime of the battery. Always try to keep the battery between 15°C and 25°C (59°F and 77°F). A device with a hot or cold battery may not work temporarily,
even when the battery is fully charged. Battery performance is particularly limited in temperatures well below freezing.
Do not dispose of batteries in a fire as they may explode. Batteries may also explode if damaged. Dispose of batteries according to local regulations. Please
recycle when possible. Do not dispose as household waste.

14
Battery life estimates (approximations):
•Standby time:
GSM: 220 –260 hours
•Talk time (Screen off):
GSM:5 –8 hours
Checking the battery power
•On the Today screen, Tap Start > Settings > Power (on the System tab)
•Tap the battery level icon on the Today screen
Warning
To reduce risk of fire or burns:
•Do not attempt to open, disassemble, or service the battery pack.
•Do not crush, puncture, short external contacts, or dispose of in fire or water.
•Do not expose to temperatures above 60˚C (140˚F).
•Replace only with the battery pack designated for this product.
•Recycle or dispose of used battery as stipulated by local regulation.
Charging the battery
New batteries are shipped partially charged. Before you can use your device, you need to install and charge the battery. Some batteries perform best after
several full charge/discharge cycles. You can charge the battery by:
•Connecting your device directly to an external power source.
•Plugging the device sync cable into the USB port on your PC.
15
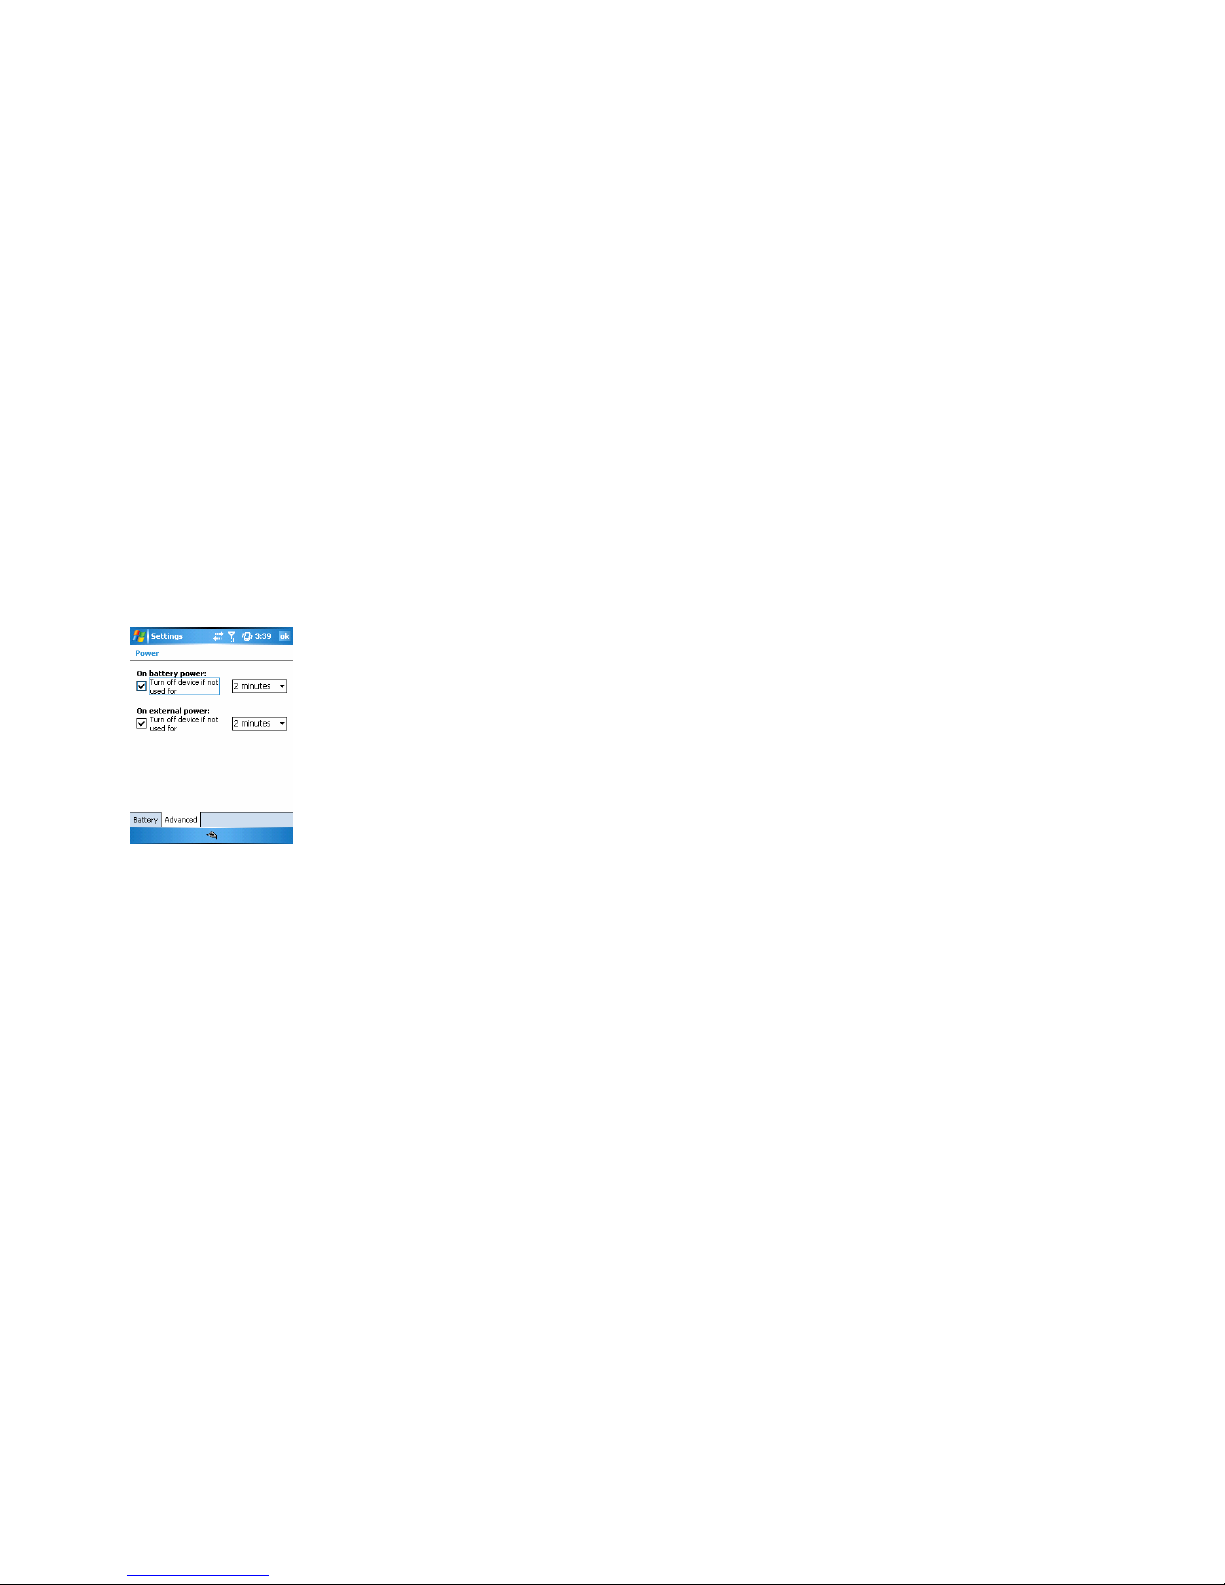
Optimizing the power performance
How long your battery power lasts depends on battery type and how you use your device.
Try the following to help preserve battery life:
•Tap > Settings > System tab > Power. On the Advanced tab, you can specify when your device turns off to conserve battery power. For optimum
conservation, specify 3 minutes or less.
•Use the AC adapter to plug your device into external power whenever possible, especially when using a Micro-SD card or when using a modem or other
peripherals.
•Adjust the backlight settings.
Set the backlight to dim after a time delay
If your device supports it, you can set the backlight to dim after a specific amount of time has elapsed.
1Tap > Settings > System tab > Backlight.
2Tap the Battery power tab or the External power tab.
3Select the Turn off backlight if device is not used for check box, and specify the time delay.

16
Dealing with low battery
In case that the battery is running out, you are supposed to:
•Charge the battery using the AC adapter, especially when you are using a Micro-SD card, modem, or other peripherals.
•Save all unsaved data if necessary
•Power off your device
Starting up
Turning on/off the device
Press and hold Power key to turn it on. First time you do this, you are asked to complete a calibration process. For more information, see Section Calibrate the
device.
To turn off the device, press and hold Power again.
☺Note When your phone is switched on, you can press briefly Power to temporarily turn it off and switch it to sleep mode. However, you can still receive
messages and calls in this status.
Device Lock
You can lock your device to prevent the items on the Today screen from responding to any tap, or applications being accidentally launched. Once you have your
device locked, press Power to light it.
Locking/Unlocking your device
•On Today screen, tap Device unlocked section.
•To unlock it, just tap Unlock, in the middle screen, tap Unlock button again.
17
Calibrating the device
To complete a calibration process:
•Following the cross as it moves about, tap the center of it when it holds and is still. The calibration process helps you tap an item more precisely with the
stylus.
If your device does not respond to screen taps that accurately, follow the steps to re-calibrate it:
Tap Start > Settings > System tab >Screen
On the General tab, tap Align screen,
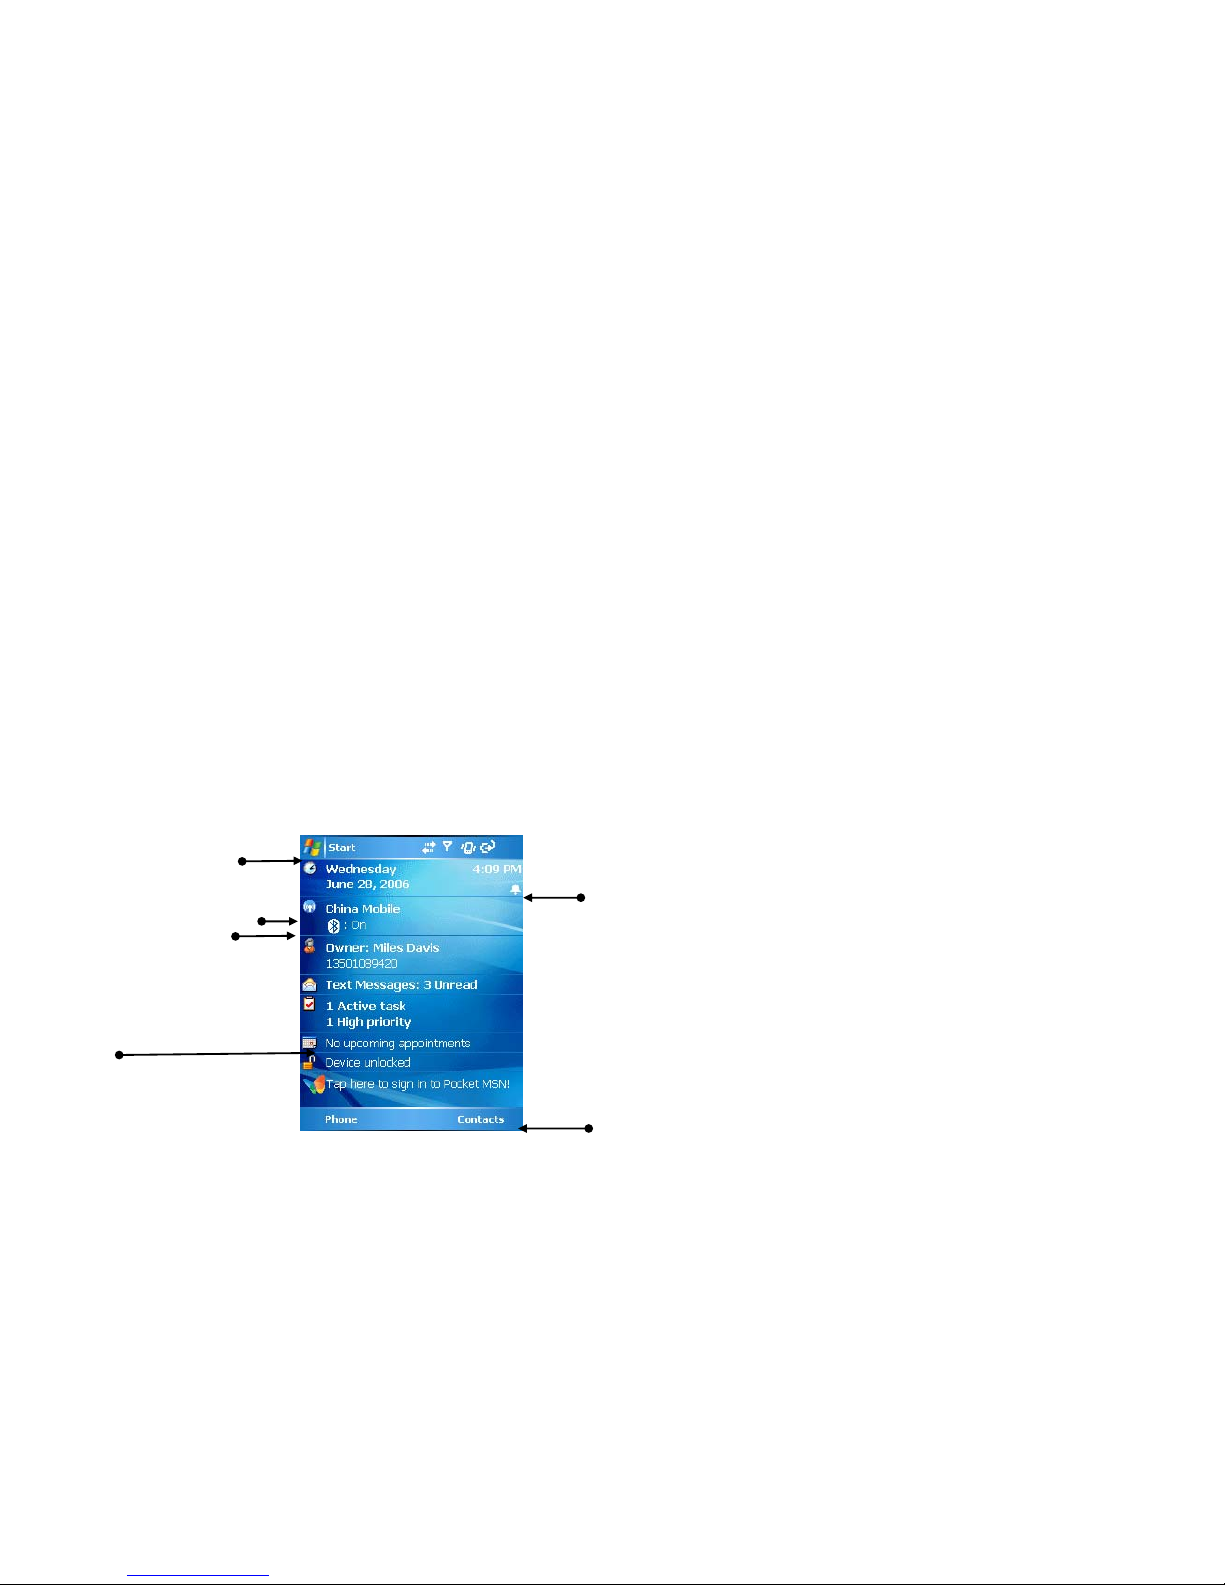
The Today screen
The Today screen displays important information, such as upcoming appointments, status indicators, the current date and time, profile, text messages. At
shortcut bar, icons of programs you have recently used are lined, in which you can tap one to open a program directly.
Shortcut bar
Status bar
Soft key bar
Appointments display area
Wireless service provider
Bluetooth status
Start Menu icon

18
•To access the Today screen from anywhere, tap Start > Today.
•To personalize your Today screen, see “Personalizing your Pocket PC Phone” in Chapter 5
•Soft key bar
Perform the function indicated on top of it.
Status Indicators
The common status indicators are listed and indicated as follows:

19
The max signal strength
Phone is turned off
The battery is full charged
Battery power is very low
Battery power is used up.
Battery charging
Call in progress
Sound on
Mute
Call on hold
Call is diverted
MSN instant message
Missed call
Unread message
New voice message
GPRS is enabled
Synchronization errors
Bluetooth is enabled
Bluetooth voice gateway
No SIM card
Data transfer in progress
Wi-Fi on
Wi-Ficonnection in progress
Wi-Fidata call

20
Start Menu
On Today screen, press Home or tap Start to draw out Start Menu. Some common programs are listed on it.
To start a program on Start Menu:
•Using Navigation up/down to scroll to a program, and then press OK
•Tap a program with the stylus.
1
2
3
4
5
1 Tap to switch to a program.
2 Tap to switch to a recently-used program.
3 Tap to see more programs.
4 Tap to change device settings.
5 Tap to see a Help topic for the current screen.
This manual suits for next models
1
Table of contents
Other i-mate Cell Phone manuals


