i-mate JAMA 101 User manual

contents
Chapter 1.Getting to know your Device / 07
1.1 Getting Started 10
1.2StatusIndicators 11
1.3 Entering Information 13
Chapter 2.Personalising your phone // 16
2.1 Today Screen 17
2.2 Start Menu 19
2.3 Ring Tone and Notification 20
2.4 General Settings 23
2.5 Security 31
Chapter 3.Using your phone /34
3.1 Making a Call 35
3.2 Receiving a Call 38
3.3 In-Call Options 39
3.4 Special Dialing Requirements 40
3.5 Additional Settings 40
Chapter 4.Getting connected 44
4.1 Automatic setup of your data connections / 45
4.2 Manual setup of your data connections /45
4.3 Bluetooth /48
4.4 Beams /53 1
i-mat
e
™

JAMA101
Chapter 5.Messaging //55
5.1 Text messaging /56
5.2 Email /60
5.3 Windows Live Message /71
Chapter 6.Synchronizing //79
6.1 Introduction to ActiveSync /80
6.2 Installing and Configuring ActiveSync /80
Chapter 7.Applications & Multimedia 93
7.1 Contacts ///94
7.2 Calendar ///96
7.3 Tasks ///99
7.4 Camera & Video Recorder /101
7.5 Using Pictures & Videos /105
7.6 Using Windows Media Player /109
7.7 Internet Explorer Mobile /117
7.8 Notes /121
7.9 Word Mobile /123
7.10 Excel Mobile /125
7.11Viewing Slide Shows with PowerPoint Mobile128
7.12 Internet Sharing 129
7.13 Using Terminal Services Client /131
7.14 File Explorer 132
7.15 Adding more programs to your device 133
2
i-mate™

Chapter 8.Maintaining you phone /135
8.1 Maintaining your phone 136
8.2 Resetting your Phone 137
8.3 Installing your SIM card 138
8.4 Managing Programs Memory 139
Appendix. Other Applications /141
A.1 Battery Information 142
A.2 PC Requirement to Run ActiveSync 4.2 143
A.3 Specifications 148
3
i-mat
e
™

JAMA101
Copyright ® 2006 i-mate. All Rights reserved.
No part of this manual, including the product and software described in
it, may be reproduced, transmitted, stored in a retrieval system, or
translated into any language in any form, by any means, without prior
written permission from i-mate.
i-mate provides this publication “as is” without warranty of any kind. This
information could include technical inaccuracies or typographical
errors. i-mate may make improvements and/or changes in the product.
Information and specifications contained in this document are subject
to change at any time without notice.
The information contained in this document does not affect or change the
product specifications or warranties. i-mate is not liable for any damages
resulting from the use of this product.
IMPORTANT SAFETY INFORMATION
Please read the following information carefully before
you start using your device to avoid any damages
caused by improper usage:
•The device is not charged when you take it out of
the box. The battery should be charged for at least 8
hours before first use. Do not remove the battery while
charging.
•Do not use batteries, which have not been specified
by the manufacturer, as this may cause leakage or
rupture.
•Do not change the battery with an unspecified AC
Adapter, as this may cause damage to both the device
and the battery.
4
i-mat
e
™

•When discarding the batteries, dispose of them
in a proper manner, according to the battery
manufacturer’s instructions and your local laws.
•Power off the device and remove the battery before
inserting the SIM card. Make sure the SIM card snaps
correctly into the SIM socket.
•Do not open or tamper with the device cover as it will
void your warranty.
•Do not press hard on this product, as it may cause
damage to the screen or the internal components.
•Do not use the device at gas or refuelling stations,
chemical plants and places containing explosives or
flammable materials.
•Do not strike, shake or heat the device in a way which
may cause battery leakage or rupture and damage to
the device.
•Do not scratch the screen with hard objects.
•Do not clean the screen with chemical detergents. Only
use cloths, specifically designed for cleaning liquid
displays, to wipe the screen.
•Do not expose the device to direct sunlight, or leave the
device in a humid environment, for extended periods
of time, as this may cause damage to the device and
battery.
•Do not immerse the device in water.
•The device may interfere with the navigation and/ or
communication systems on aircraft. The use of the
device on aircraft is prohibited by laws in most
countries.
•Use hands-free devices, if you need to use the
telephony services, while driving a vehicle.
5
i-mat
e
™

JAMA101
Interference with Medical Equipment Functions
This product may cause medical equipment to malfunction. The use of
this device is forbidden in most hospitals and medical clinics.
Non-ionizing Radiation
This product should be operated in the suggested normal condition
only to ensure the radiative performance and safety of the interference. As
with other mobile radio transmitting equipment, users are advised that for
satisfactory operation of the equipment and for the safety of
personnel, it is recommended that no part of the human body be allowed to
come too close to the antenna during operation of the equipment.
Trademark Information
Microsoft, MS-DOS, Windows, Windows NT, Windows Server, Windows
Mobile, ActiveSync, Excel, Internet Explorer, MSN, Outlook, PowerPoint
and Word are either registered trademarks or trademarks of Microsoft
Corporation in the United States and/or other countries.
6
i-mat
e
™

Chapter
.
G
e
tt
i
n
g
t
o
K
no
w
Y
ou
r
D
e
v
i
c
e
1.1 Getting Started
1.2 Status Indicators
1.3 Entering Information

Device View
No.
Item
F
unction
1.
T-Flash Card Slot Lets
y
ou insert an external stora
g
e card.
2.
Ear Piece For use during phone calls.
3.
Left Soft KEY Performs the command shown in the label above the button.
4.
Start menu KEY Press and hold on one second to display your START menu.
5.
TALK Button Press to answer an incoming call or dial a number.
6.
Earphone Jack
Allows you to listen to audio media or use the phone’s hands-
free kit.
7.
Right Soft KEY Performs the command shown in the label above the
button.
8.
OK Button Press to confirm your data entries or exit the program in use.
9.
END Button Press to end the phone call.
8
i-mat
e
™

No.
Item
F
unction
10.
Centre Button Carry out the selection from the Navigation pad scrolling by
pressing the center button.
11.
Navigation Pad Press this multi-directional control up, down, left, or right to
move through menus, program instructions.
12.
Mini-USB
Connector Connects to the AC adapter or USB cable.
13.
Reset Button Use this button to soft reset the device.
14.
Microphone Speak into the microphone when receiving or making a phone
call or voice recording.
15.
Volume Controller Scroll up or down to adjust the volume.
16.
CAMERA Button Press to launch the camera. Press again to take a picture.
17.
Stylus Use the stylus to write, draw, or select items on the touch
screen.
18.
Camera Lens Used for capturing photos and videos.
19.
External Speaker Allows you to listen to audio media or
Hands-free calls.
20.
Mirror Aim camera lens for self portraits.
9
i-mat
e
™
JAMA101
Chapter 1
.
Getting
to
Know
your
Device
1 Getting Started
When you turn on the device for the first time, you are asked to
complete a screen calibration process. Calibrating the device screen
involves tapping the center of a cross with the stylus as the cross moves
around the screen. This process ensures that when you tap the screen with
your stylus, the tapped item is activated.
The Today screen displays important information, such as upcoming
appointments and status indicators. You can tap a section on the screen to
open the associated program. If at any point you need to access the Today
Screen, just press/tap Start > Today.
10
i-mat
e
™

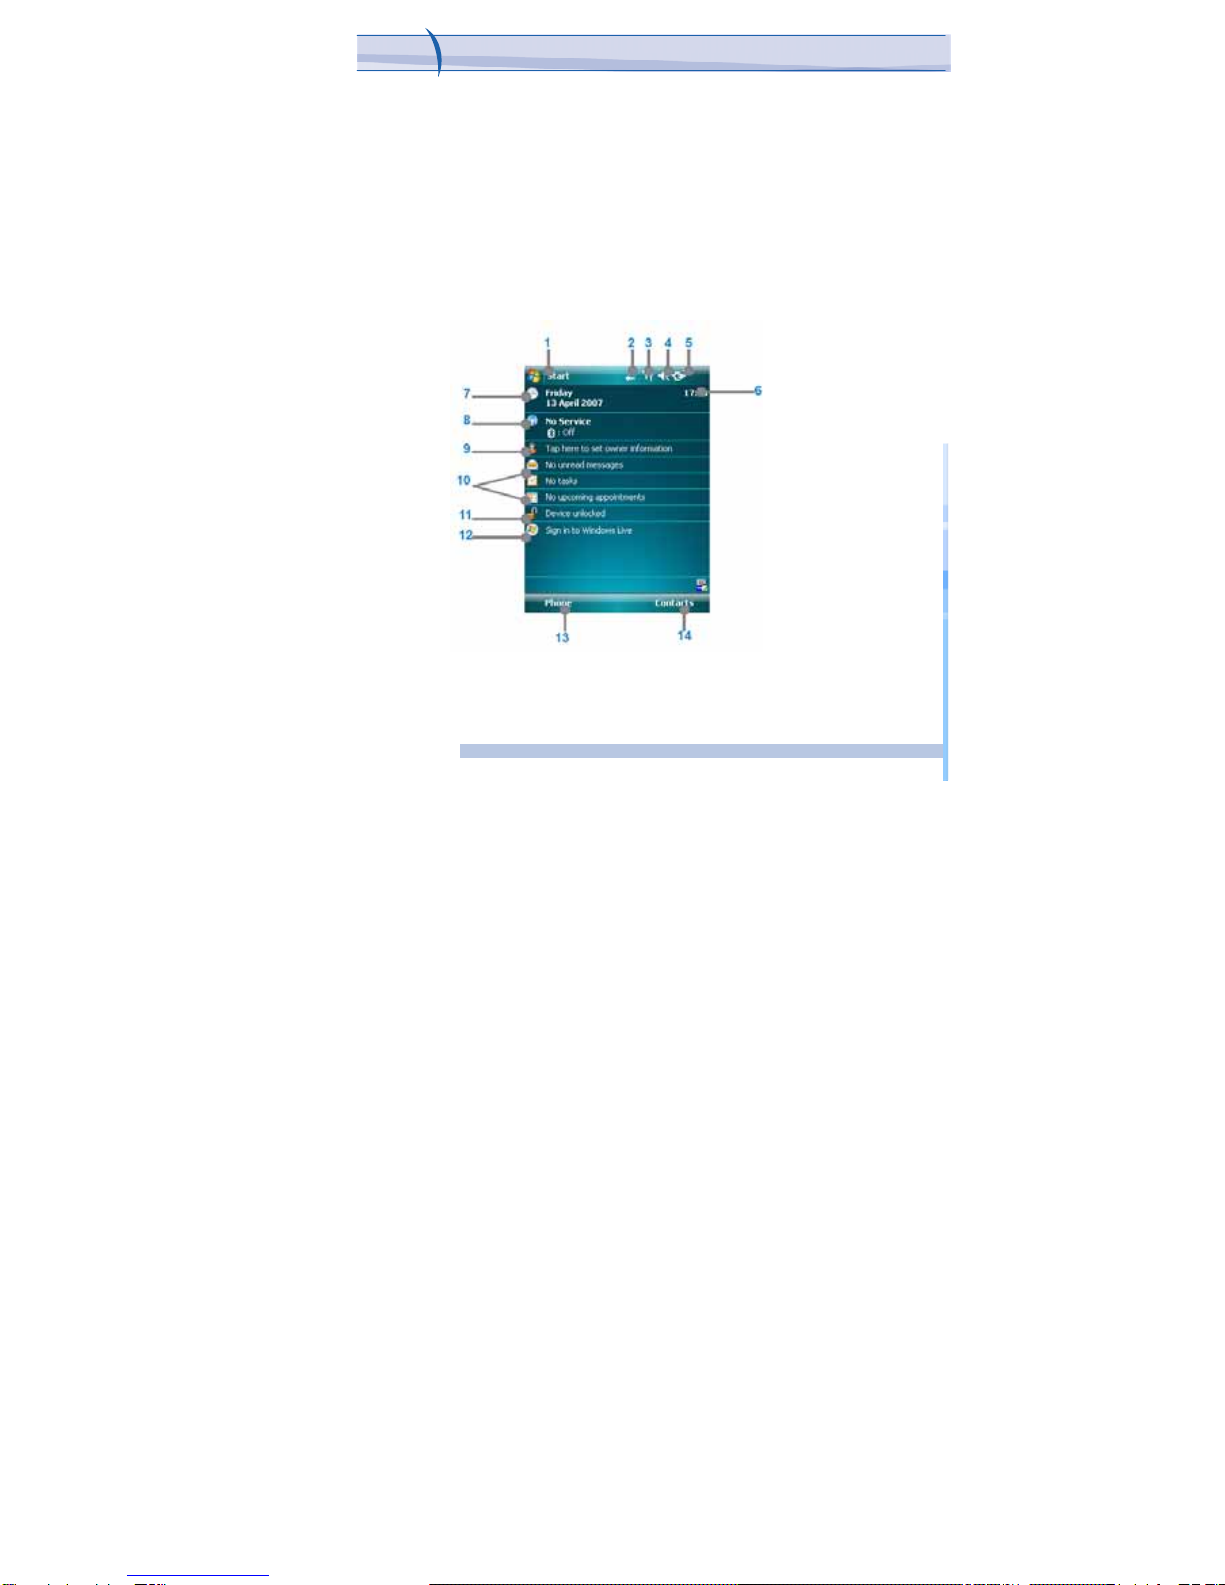
1. Tap to open the Start menu.
2. Tap to view connectivity status.
3. Indicates the radio signal strength. Tap to configure the phone settings.
4. Tap to control device/ringer volume level.
5. Indicates the battery status. Tap to open the Power Settings screen
6. Displays the current time.
7. Displays the current date. Tap to setup date, time, alarm, and
more.
8. ,Tap to start Wireless Manager; it also shows Bluetooth interfaces
9. Tap to set owner information
10. Your day at a glance with reminders. Tap to open the related
program: messages, tasks, and appointments.
11. Tap to lock or unlock the device. : locked; : unlocked
12. Tap to open the Windows Live.
13. Tap to open the Calendar screen.
14. Tap to open Contacts screen.
To completely turn OFF your device must unpack battery. A single quick
press of the POWER button will set your device into Sleep mode. In
Sleep mode you can still use the phone function to receive calls. In order
to save battery, your device will automatically go into sleep mode if not
used for a period of time.
11
i-mat
e
™
JAMA101
Chapter 1
.
Getting
to
Know
your
Device
1.2
Status
Indicators
Following
are
some
of
the
status
icons
that
you
may
see
on
your
device.
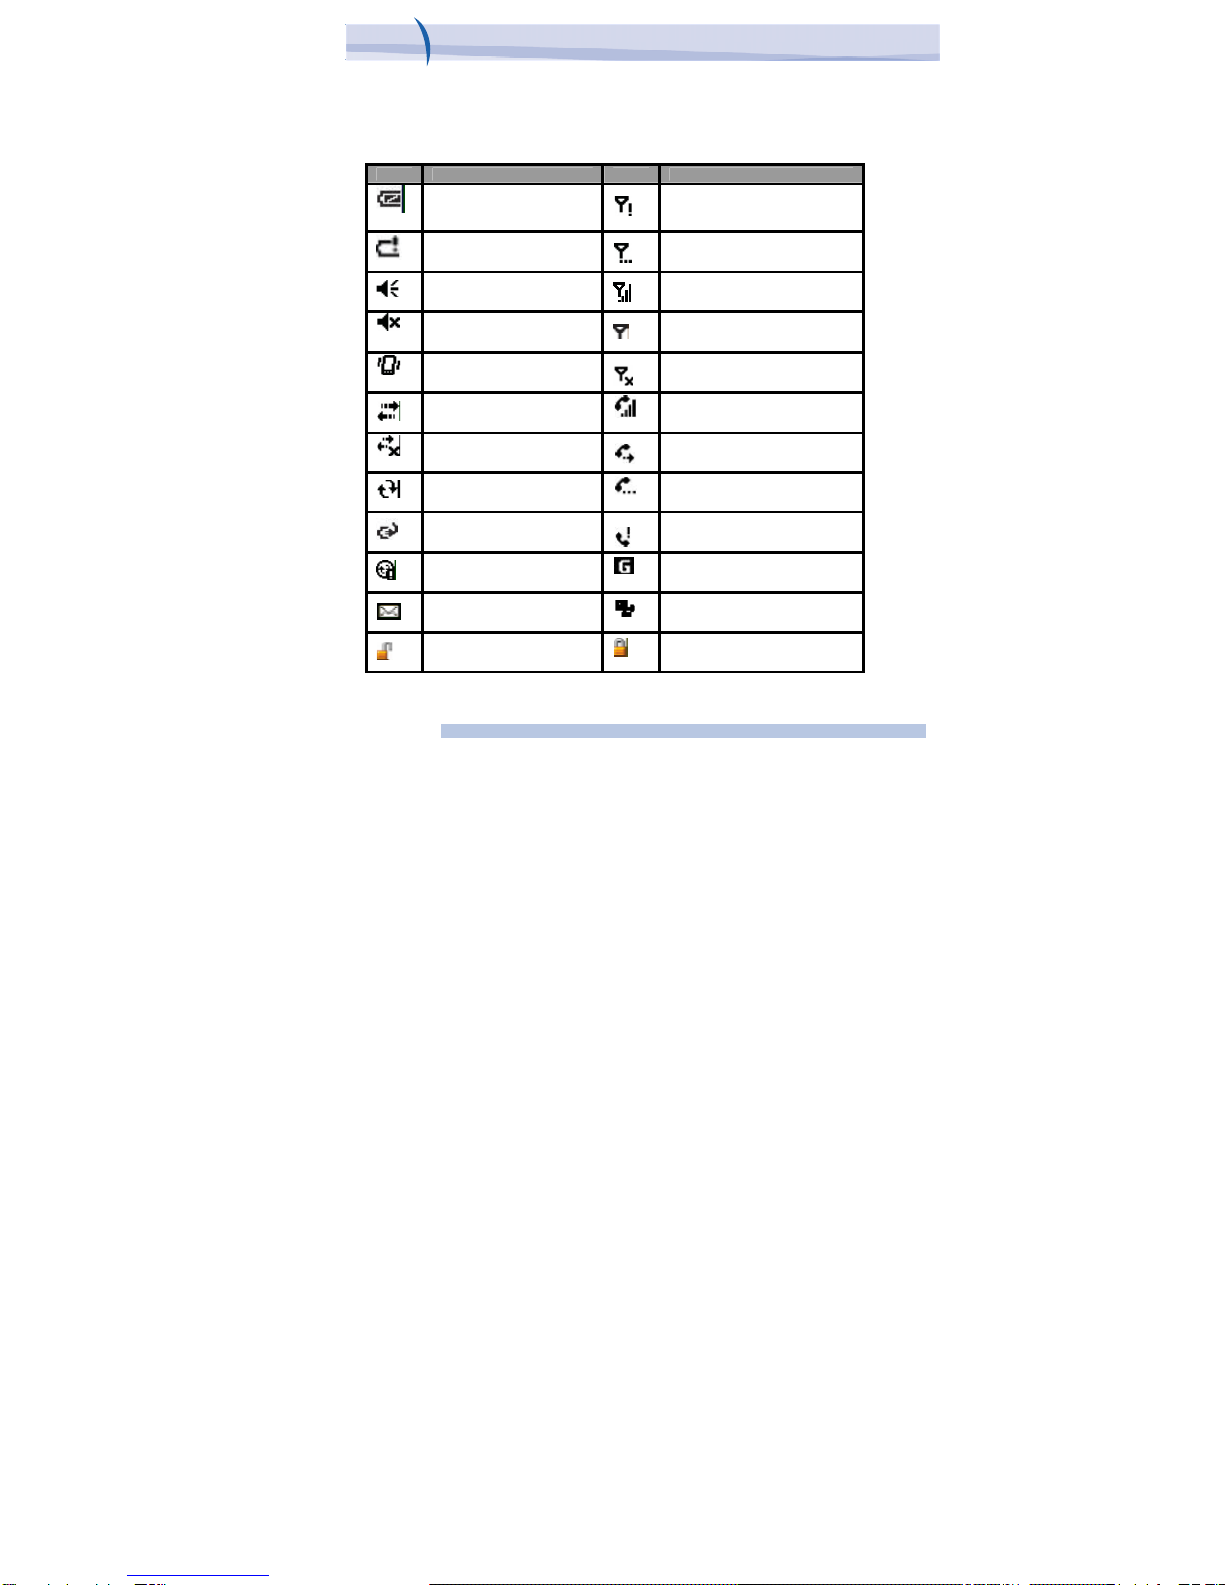
Icon Description Icon Description
Indicates the battery
Is fully charged. No phone service.
Indicates the battery is
Very low. Searching for phone service.
Sound on.
Indicates maximum signal strength.
Sound off.
No signal.
Ringer in vibration mode. Phone is turned off.
Connection is active. Voice call in progress.
Connection is not active. Calls are forwarded.
Synchronization in progress. Call on hold.
Battery charging. Missed call.
Synchronization error. GPRS available.
New e-mail or text messages. GPRS is in use.
Indicates the device is locked. Device unlocked.
12
i-mat
e
™

1.3 Entering Information
Input Panel
Input Panel provides access to the various input methods available on your
device, including Block Recognizer, Keyboard, Letter Recognizer, and
Transcriber. By default, the Input Panel icon appears on the menu bar to
indicate which input method is currently selected. The Input Selector arrow
(shown at the right side of the Input Panel icon) opens a list of available
input methods.
The
following
input
methods
are
available
when
text
entry
is
possible.
Icon Input method
The on-screen keyboard.
Letter Recognizer or Block Recognizer.
Transcriber.
13
i-mat
e
™
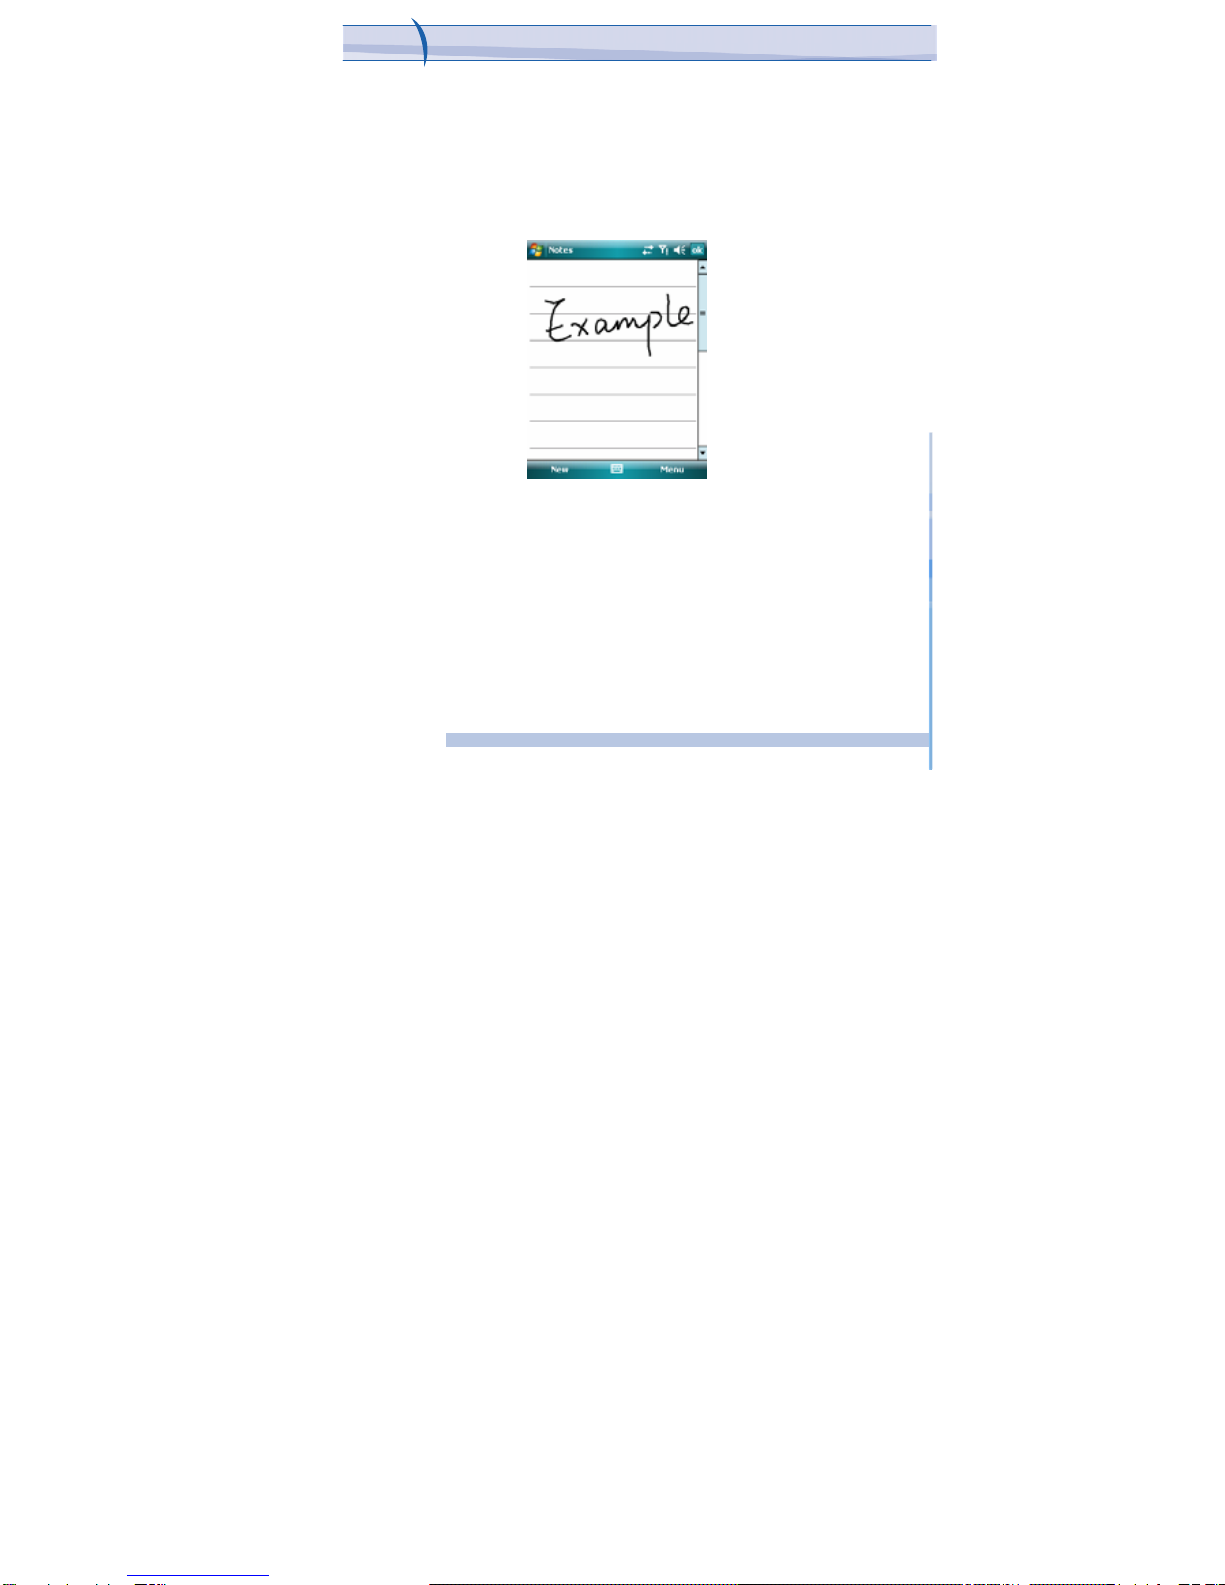
Drawing
and
W
riting
on
the
Screen
With your device, you can draw directly on the screen, or write on
the screen and save notes (Start > Programs > Notes) in your own
handwriting. To do this, you must set the input mode in Notes to
Writing. If you prefer to use handwriting or frequently add drawings to
your notes, you may find it helpful to set Writing as the default input mode.
If you prefer typed text, set Typing as the default input mode.
Drawing
on
the
Screen
14
i-mat
e
™

(
To change the default input mode in Notes, tap Menu > Options in
the notes list and then, in the Default mode box, tap either Writing or
Typing depending on your personal preferences. Then Tap OK.
Voice Recording
You can create a stand-alone recording (voice note) or you can add a
recording to a note. To create a voice note
1.
2.
3.
4.
5.
6.
7.
8.
9.
10.
11.
Tap Start > Programs > Notes.
Do one of the following:
To create a stand-alone recording, record from the note list. To
add a recording to a note, create or open a note.
If you do not see the Recording toolbar, tap Menu > View
Recording Toolbar.
Tap the record icon ( ) to begin recording.
Hold your device’s microphone near your mouth or other source of
sound.
Tap the stop icon ) when finished recording.
If you adding a recording to a note, tap OK to return to the note list
when finished.
If you are recording in an open note, an icon will appear in the
note.
If you are creating a stand-alone recording, the recording will
appear in the note list.
To change recording formats
1. Tap Start > Settings > Personal tab > Input.
2. Tap the Options tab, and in the Voice recording format list, tap the
format you want.
3. Tap OK.
15
i-mat
e
™

Chapter
2.
Personalising
your phone
2.1 Today Screen
2.2 Start Menu
2.3 Ring Tone and Notification
2.4 General Settings
2.5 Security
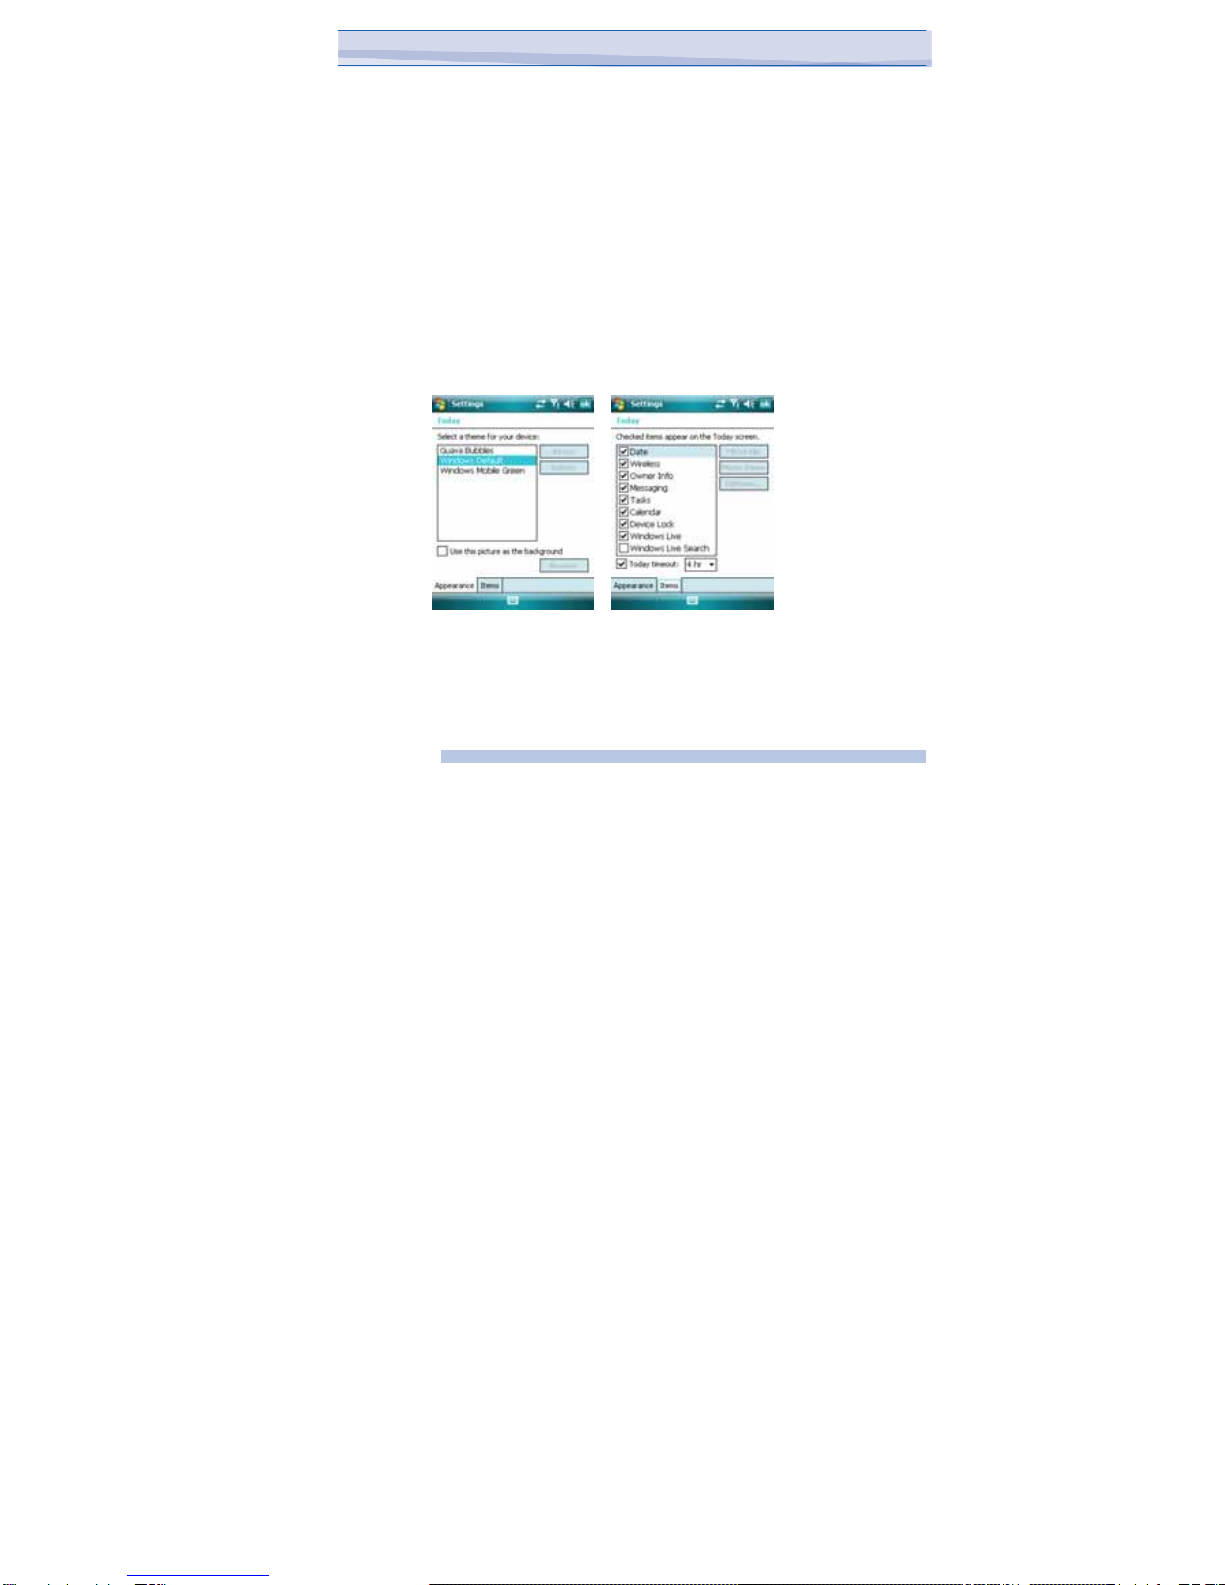
2.1 Today screen
The Today screen shows your upcoming appointments, active tasks, and
information about e-mail messages.
You can customize the items and background presented in the Today
screen on your device:
1. Tap Start > Settings > Personal tab > Today.
2. On the Appearance tab, select the desired theme for the
background of the Today screen. You can use one of your own
pictures as the background image on the Today screen selecting
“Use this picture as the background” check box, and tap Browse to
view a list of your picture files.
3. On the Items tab, select the items you want to appear on the
Today screen. To change the order of items displayed on the Today
screen, tap the item, and then tap Move Up or Move Down.
4. Tap OK.
You can also customize the presentation of the upcoming Appointments
in the Today Screen:
1. Tap Start > Settings > Personal tab > Today.
2. Tap the Items tab.
17
i-mat
e
™

3. Select Calendar and tap Options.
4. Do any of the following:
• Select Next appointment to show only the next appointment
in your schedule, or Upcoming appointments to show multiple
appointments.
• Clear the Display all day events check box if you do not want to
display all-day events.
If you have a large number of tasks, you may want to specify the kind
of tasks that are displayed on the Today screen. To set options for
displaying tasks on the Today screen:
1. Tap Start > Settings > Personal tab > Today.
2. Tap the Items tab.
3. Select Tasks and tap Options.
4. Do any of the following:
• Under Display number of, select the type of tasks you want to
appear on the Today screen.
• In the Category list, select whether to display only tasks assigned
to a specific category or to display all tasks.
18
i-mat
e
™

JAMA101
Chapter
2.
P
ersonalising
your
phone
Entering and displaying owner information in the Today Screen are best
practices; they allow someone to return the device to you in case it is
lost.
1. Tap Start > Settings > Personal tab > Owner Information.
2. On the Identification tab, enter your personal information.
If owner information is displayed on the Today screen, you can open
and edit the information directly from the Today screen. Just tap that
section of the screen.
2.2 Start Menu
The Start menu, located at the top left corner of the Today screen,
displays a list of programs. It lets you close a screen and switch from one
program to another. You can start a program by scrolling through the
programs list and then pressing ENTER, or by tapping a program with the
stylus.
1. You can choose which items appear in the Start menu:
2. Tap Start > Settings > Personal tab > Menus.
3. Select the check boxes of the items you want to appear in the Start
menu. You can select up to seven items.
19
i-mat
e
™

Y
ou
can
also
create
folders
and
shortcuts
to
appear
on
the
Start
menu.
In
ActiveSync
on
your
PC,
click
Explore.
In
the
Mobile
Device
window
,
double
-
click My
Windows
Mobile
-Based
Device
>
Windows
>
Start
Menu,
then
create
the
folders
and
shortcuts
that
you
want.
Y
ou
will
see
the
added
items
after
you
synchronize.
2.3 Ring Tone and Notifications
To change the ring tone
1. From the Phone keypad, tap Menu > Options > Phone tab.
2. In the Ring tone list, tap the sound you want to use.
To use custom *.wav, *.mid, *.mp3, or *.wma files as ring tones,
use ActiveSync on your PC to copy the file to the /Windows/Rings
folder on your device. Then, select the sound from the Ring tone
list. For more information about copying files to your device, see
ActiveSync Help on your PC.
20
i-mat
e
™
Table of contents
Other i-mate Cell Phone manuals


