i-mate JAMA User manual

Copyright i
Copyright® 2007 i-mate.
TM All Rights Reserved.
No part of this manual, including the product and software described in it,
may be reproduced, transmitted, transcribed, stored in a retrieval system, or
translated into any language in any form, by any means, without prior written
permission from i-mate™.
i-mate™ provides this publication "as is" without warranty of any kind. This
information could include technical inaccuracies or typographical errors.
i-mate™ may make improvements and/or changes in the product. Information
and specications contained in this document are subject to change at any
time without notice.
The information contained in this document does not affect or change the
product specications or warranties. i-mate™ is not liable for any damages
resulting from the use of this product.
Important Safety Information
Please read the following information carefully before you start using your
device to avoid any damages caused by improper usage:
The device is not charged when you take it out of the box.
The battery should be charged for at least 8 hours before rst use. Please use the charger
supplied. Do not remove the battery while charging.
Do not use batteries, which have not been specied by the manufacturer, as this may
cause leakage or rupture, or personal injury.
Do not charge the battery with an unspecied AC Adapter, as this may cause damage to
both the device and the battery.
When discarding the batteries, dispose of them in a proper manner, according to the
battery manufacturer’s instructions and your local laws.
Power off the device and remove the battery before inserting SIM card. Make sure the SIM
card clips correctly into the SIM socket.
Do not open or tamper with the device cover, as it will void your warranty.
Do not press hard on this product, as it may cause damage to the screen or the
internal components.
•
•
•
•
•
•
•
•
Version 5.3

ii i-mate | User Manual
Do not use the device at gas or refueling stations, chemical plants, and places containing
explosives or ammable materials.
Do not strike, shake, or heat the device in a way which may cause battery leakage or
rupture and damage to the device.
Use only manufacturer specied stylus. Do not scratch the screen with hard objects.
Do not clean the screen with chemical detergents. Only use cloths, specically designed
for cleaning liquid displays, to wipe the device screen.
Do not expose the device to direct sunlight, or leave the device in a humid environment, for
extended periods of time, as this may cause damage to the device and battery.
Do not immerse the device in water.
The device may interfere with the navigation and/or communication systems on aircraft.
The use of the device on aircraft is prohibited by laws in most countries.
Use hands-free devices, if you need to use the telephony services, while driving a vehicle.
Interference with Medical Equipment Functions
This product may cause medical equipment to malfunction. The use of this
device is forbidden in most hospitals and medical clinics.
Non-ionizing Radiation
This product should be operated in the suggested normal condition only to
ensure the radiative performance and safety of the interference. As with other
mobile radio transmitting equipment, users are advised that for satisfactory
operation of the equipment and for the safety of personnel, it is recommended
that no part of the human body be allowed to come too close to the antenna
during operation of the equipment.
Trademark Information
© 2007 i-mate plc. All rights reserved. i-mate, the i-mate logo are either
registered trademarks or trademarks of i-mate plc or its afliated companies.
Microsoft®, MS-DOS®, Windows®, Windows NT®, Windows Server®, Windows
Mobile®, ActiveSync®, Excel®, Internet Explorer®, MSN®, Outlook®, PowerPoint®,
and Word®are either registered trademarks or trademarks of Microsoft
Corporation in the United States and/or other countries.
•
•
•
•
•
•
•
•
•

Table of Contents iii
Chapter 1
Getting to Know Your Device
2 Views of the device
3 Getting Started
5 Status indicators
6 Entering Information
Chapter 2
Personalising Your Phone
10 Today screen
13 Start Menu
15 RingTone and Notications
19 General Settings
30 SIM Security
Chapter 3
Using Your Phone
34 Making a Call
38 Receiving a Call
39 In Call Options
40 Special Dialing Requirements
40 Additional Settings
Contents

iv i-mate | User Manual
Chapter 4
Getting Connected
44 Automatic setup of your GSM/GPRS data connections
44 Manual setup of your data connections
49 Bluetooth
57 Beams
Chapter 5
Messaging
60 Text messaging
65 MMS
70 E-mail
83 Pocket MSN®
Chapter 6
Synchronising
94 Introduction to ActiveSync
95 Installing and Conguring ActiveSync
Chapter 7
Applications & Multimedia
108 Contacts
110 Calendar
113 Tasks
117 Camera and Video recorder
119 Using Pictures & Videos

Table of Contents v
123 Using Windows Media Player
131 Internet Explorer Mobile
136 Using MIDLET Manager
139 Notes
141 Microsoft Word Mobile®
144 Microsoft Excel®Mobile
146 Viewing Slide Shows with Microsoft PowerPoint Mobile®
148 Internet Sharing
150 Using Terminal Services Client
151 File Explorer
152 Adding more programs to your device
Chapter 8
Maintaining your phone
154 Maintaining your phone
155 Resetting Your Pocket PC Phone
156 Installing your SIM card
157 Managing Programs Memory
Appendix
160 Battery Information
161 Regulatory Notices
165 Specications

vi i-mate | User Manual

Views of the device
Getting started
Status indicators
Entering information
Chapter 1
Getting to Know
Your Device

2 i-mate | User Manual
VIEWS OF THE DEVICE
Device buttons and connectors
No. Item Function
1 RF Plug Cover for the GSM plug.
2 Micro SD Card Slot Insert micro SD memory card with metal contacts facing downwards.
3 Earpiece For use during phone calls.
4 Left Soft Key / Start
Menu Key
Performs the command shown in the label above the button. Press
and hold for 2 seconds to access the Start Menu.
5Talk / Send Key Press this key to answer an incoming phone call, or press to dial
a number.
6 End Call Key / Power
Off Button
Press to end a phone call. Press and hold for 2 seconds then
release to put the device in Standby mode. Press and hold for 5
seconds to shut down and turn off the device.
7 Right Soft Key / OK Key Press to perform the command shown in the label above the button.
Press and hold to close the current application.

Getting Started 3
8 Navigation Pad Press this multi-directional control up, down, left, or right to move
through menus, or programs.
9 Action Button Conrm the selection from the Navigation pad by pressing the
centre button.
10 Earphone Jack Allows you to listen to music or make phone calls with the included
headset.
11 Microphone Speak into the microphone when receiving or making a phone call.
Also used when making a voice recording.
12 Soft Reset Insert stylus to soft reset your device.
13 Mini-USB Connector Connects to the AC adapter or USB cable.
14 Stylus Use the stylus to write, draw, or select items on the touch screen.
15 Lanyard Eyelet Eyelet to attach an optional lanyard.
16 Volume Up Press to increase the volume.
17 Volume Down Press to reduce the volume. Also press once to silence the device
when receiving an incoming call.
18 Camera Button Press to launch the camera functionality. Press again to take a
picture or start a video recording.
19 Camera Lens For taking pictures or video images.
20 Mirror To help position camera for self-portraits.
21 External Speakers Allows you to listen to music without headset. Also used for hands-
free calls.
GETTING STARTED
When you turn on the device for the rst time you may be asked to select a
permanent language setting, before being asked to complete a screen
calibration process. Calibrating the device screen involves tapping the centre
of a cross with the stylus as the cross moves around the screen. This process
ensures that when you tap the screen with your stylus, the tapped item
is activated.
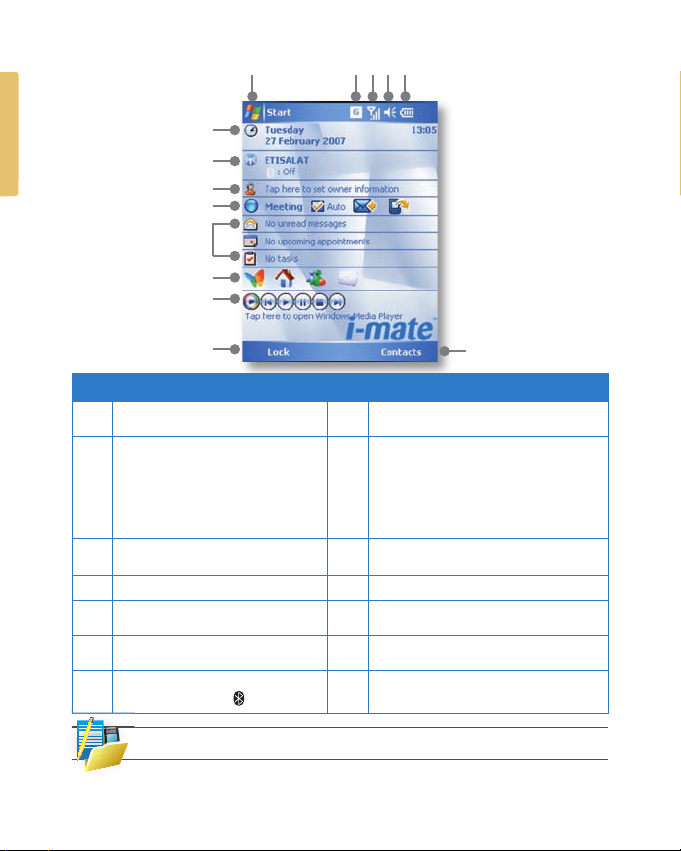
The Today screen displays important information, such as upcoming appoint-
ments and status indicators. You can tap a section on the screen to open the
associated program. If at any point you need to access the Today Screen, just
press/ tap Start > Today.
4 i-mate | User Manual
No. Description No. Description
1. Tap to open the Start menu. 8. Personalise your phone by tapping here to
enter your contact details.
2. Tap to view connectivity status. 9. Indicates the current Pro le Settings.Tap to
adjust the Pro le details. The Auto tickbox
controls your pro le automatically based on
your schedule. The envelope icon appears
when you have an Exchange e-mail account
setup and allows you to change between
Push Mail and manual synchronisation.
3. Indicates the radio signal strength. 10. Tap to open the related program:
messages, tasks, and appointments.
4. Tap to control device/ringer volume level. 11. Tap to open the MSN sign-in screen.*
5. Indicates the battery status. Tap to
open the Power Settings screen.
12. Control the Windows Media Player
functions with this Media Control Panel.
6. Displays the current date and time.
Tap to setup date, time, alarm, etc.
13. Shows the current function of the left soft
key. Tap to lock or unlock the Device.
7. Tap to open the Wireless Manager.
Also shows Bluetooth status.
14. Shows the current function of the right soft
key. Tap to open the Contacts screen.
NOTE: Not supported on all language versions of Windows Mobile Operating System.*
1 2 3 4 5
6
7
9
10
11
12
13
8
14

Getting Started 5
To simply put the device in standby mode, so it can still receive calls, hold the
power button for 2 seconds, then release. To power off the device completely,
press and hold the POWER button for 5 seconds and the system will prompt
you to power off the device. In this state, the device cannot receive calls or text
messages etc. In order to save battery, your device will automatically go into
standby mode if not used for a period of time.
STATUS INDICATORS
Status indicators appear at the top of the screen and on the Today screen.
The following table lists common status indicators and their meanings.
Icon Description Icon Description
Battery level. Voice call in progress.
Battery is very low / Charge
battery soon.
GPRS Connecting.
Battery charging. Calls are forwarded.
Battery fault. Call on hold.
New instant message. Missed call.
New e-mail or text message. GPRS is in use.
There are more notications. Tap the
icon to view all.
G
GPRS available.
Ringer on. Ringer off.

6 i-mate | User Manual
Connected to the PC. Synchronisation error.
Roaming. No SIM card installed.
GSM signal strength. The number of
bars indicates the signal strength.
Flight Mode.
ENTERING INFORMATION
Input Panel
Input Panel provides access to the various available input methods on your
device, including Block Recognizer*, Keyboard, Letter Recognizer*, and
Transcriber*. By default, the Input Panel icon appears on the menu bar to
indicate which input method is currently selected. The Input Selector arrow
(shown at the right side of the Input Panel icon) opens a list of available
input methods.
NOTE: Not supported on all language versions of Windows Mobile Operating System*.
Getting Started 7
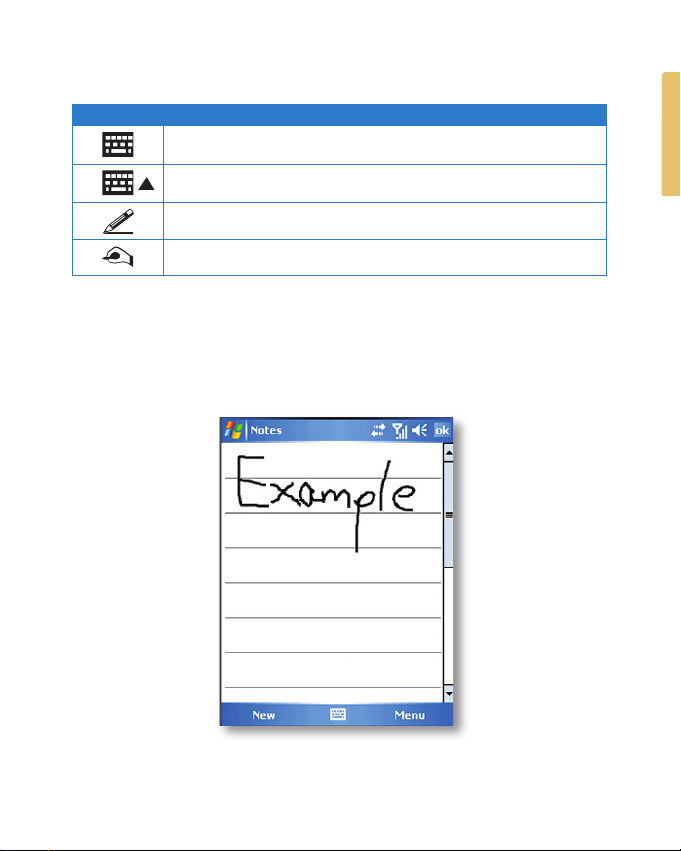
The following input methods are available when text entry is possible.
Icon Input method
Press to switch the keyboard input on or off.
Input Panel Icon / Press the Input Selector Arrow to change input methods.
Letter Recogniser or Block Recogniser.
Transcriber.
Drawing and Writing on the Screen
With your device, you can draw directly on the screen, or write on the screen
and save notes (Start > Programs > Notes) in your own handwriting. If you
prefer to use handwriting or frequently add drawings to your notes, you may nd
it helpful to set Writing as the default input mode. If you prefer typed text, set
Typing as the default input mode.

8 i-mate | User Manual
To change the default input mode in Notes, tap Menu > Options in the notes list
and then, in the Default mode box, tap either Writing or Typing depending on
your personal preferences. Then Tap OK.
Voice Recording
You can create a stand-alone voice recording or you can add a recording to a note.
To create a voice note
Tap Start > Programs > Notes.
Do one of the following:
If you do not see the Recording toolbar, tap Menu > View Recording Toolbar.
Tap the record icon ( ) to begin recording.
Hold your device’s microphone near your mouth or other source of sound.
Tap the stop icon ( ) when nished recording.
To change recording formats
Tap Start > Settings > Personal tab > Input.
Tap the Options tab, and in the Voice recording format list, tap the format you want.
Tap OK.
1.
2.
3.
4.
5.
1.
2.
3.

Chapter 2
Personalising your phone
Today screen
Start menu
Ringtone and noti cations
General settings
SIM security

10 i-mate | User Manual
TODAY SCREEN
The Today screen shows your upcoming appointments, active tasks, and
information about e-mail messages.
To customise background items on the Today Screen on your device
Tap Start > Settings > Personal tab > Today.
On the Appearance tab, select the desired theme for the background of the Today screen.
You can use one of your own pictures as the background image on the Today screen by
selecting :“Use this picture as the background” checkbox, and tap Browse to view a list of
your picture les.
On the Items tab, select the items you want to appear on the Today screen. To change the
order of items displayed on the Today screen, tap the item, and then tap Move Up or
Move Down.
Tap OK.
1.
2.
3.
4.

Personalising Your Phone 11
To customise appointments presentation on the Today Screen
Tap Start > Settings > Personal tab > Today.
Tap the Items tab.
Select Calendar and tap Options.
Do any of the following:
Select Next appointment to show only the next appointment in your schedule, or Upcoming
appointments to show multiple appointments.
Uncheck the Display all day events checkbox if you do not want to display all day events.
1.
2.
3.
4.
•
•

12 i-mate | User Manual
To Customise Tasks
If you have a large number of tasks, you may want to specify the kind of tasks
that are displayed on the Today screen. To set options for displaying tasks on
the Today screen:
Tap Start > Settings > Personal tab > Today.
Tap the Items tab.
Select Tasks and tap Options.
Do any of the following:
Under Display number of, select the type of tasks you want to appear on the Today screen.
In the Category list, select whether to display only tasks assigned to a speci c category or
to display all tasks.
1.
2.
3.
4.
•
•

Personalising Your Phone 13
To Enter Owner Information
Entering and displaying Owner Information in the Today Screen is
recommended and allows someone to return the device to its owner in
case it’s lost.
Tap Start > Settings > Personal tab > Owner Information.
In the Identication tab, enter your personal information.
If owner information is displayed on the Today screen, you can open and edit the
information directly from the Today screen. Just tap that section of the screen.
START MENU
The Start menu, located at the top left corner of the Today screen, displays
a list of programs. It lets you close a screen and switch from one program to
another. You can start a program by scrolling through the programs list and
then pressing ENTER, or by tapping a program with the stylus.
You can choose which items appear in the Start menu:
Tap Start > Settings > Personal tab > Menus.
Select the check boxes of the items you want to appear in the Start menu. You can select
up to seven items.
1.
2.
1.
2.

14 i-mate | User Manual
To create folders and shortcuts
You can also create folders and shortcuts to appear on the Start menu.
Open ActiveSync®on your PC, click Explore. In the Mobile Device window,
double click My Windows Mobile®- Based Device > Windows > Start Menu,
then create the folders and shortcuts that you want. You will see the added
items after you synchronise.
Table of contents
Other i-mate Cell Phone manuals


