i-milk mini User manual
i-milk mini Operating Manual
Please read thoroughly before use

i-milk V1 Operating Manual July 2018
2
i-milk Pty Ltd warrants equipment sold against
defects in parts other than consumables and
workmanship for a period of twelve (12) months
from the date of installation.
The warranty will be void if not installed in
accordance with the directions from I-milk or if not
used in accordance with the operating instructions
in this manual.
i-milk recommend cleaning products which
are proven to clean milk residues which may
accumulate and stop your system operating.
Failure to use a recommended cleaner will void
this warranty.
Consumable Items included in the parts box are not
covered by your warranty.
Your warranty will also be voided if:
1. Milk pumps may be damaged due to running
them dry for extended periods.
2. Freezing the milk lines or even the milk in the
pumps may also cause damage to the pumps
and this will also void the warranty. Ensure your
refrigeration is correctly adjusted to a temperature
between 1 – 5 C.
If a warranty claim is to be made, please contact
your distributor for further information or
i-milk is manufactured in Sydney, Australia by i-milk Pty Ltd.
For all operating and service enquiries please contact your distributor or i-milk.
24 hour hotline number: +61 3 9877 3995
Email: [email protected]
The machine is not for outdoor use.
Warranty

i-milk V1 Operating Manual July 2018 3
Contents Page
Warranty ....................................................................................................................................... 2
1. Familiarisation......................................................................................................................4-5
2. Essential Maintenance.......................................................................................................... 6
3. Loading Milk Bladders........................................................................................................... 7
4. Operating Instructions.......................................................................................................... 8
5. Cleaning Instructions ...................................................................................................... 9-11
6. Trouble Shooting..................................................................................................................12
7. Technical Adjustments..................................................................................................13-14
8. Maintenance Records .........................................................................................................15

i-milk V1 Operating Manual July 2018
4
Dispensing Head
Pump Box
Power Supply
This dispenses the milk and should be installed on a at
horizontal surface.
This should be installed in a refrigerated environment,
either oor or wall mounted. Installing in a non-refrigerated
environment will void your warranty.
Each i-milk mini is supplied with a 110/220v converter with a plug
suitable to use in the country of sale. These plugs are earthed
and must not be substituted with non-earthed plugs.
The converter produces 24VDC 5A that operates the i-milk mini.
ARemovable Milk Filter
BMilk Font
CVariety A Milk Button
DVariety B Milk Button
EOutlet for milk line and signal cable. Also accessible
on opposite side of dispenser and underneath
ALITE IN
BFULL IN
CLITE OUT
DFULL OUT
EPump Box Input
Familiarisation
1
360
185
50
235
120
A
B
E
D
C
A B
DE
C

i-milk V1 Operating Manual July 2018 5
Milk is supplied for the i-milk system in many
dierent formats. In Australia the most common is
the 10 litre bladder available from milk processing
companies. There are several storage systems
available.
This manual describes the bladder system,
but instructions relevant for using other bulk
systems are available on request from:
The Milkstak system consists of crates that
stack on top of each other and hold the milk
bladders. This system is designed to be installed
into existing refrigeration.
These systems must be installed in a permanently
refrigerated environment that can hold temperatures
between 1c – 5c constantly.
Emergency Taps
Two manual taps are supplied with each
i-milk for emergency use so milk can
be conveniently accessed direct from
the bladders in the event of power or
system failure.
Milk Filter Housing
i-milk is designed to pour a uniform,
steady, non-turbulent stream of milk.
Milk Storage Systems
Familiarisation cont.
1

i-milk V1 Operating Manual July 2018
6
Daily Cleaning
Complete the required daily cleaning. Refer to page 10.
Weekly Maintenance, suggest each Monday
Inspect Milk Font Filter Housing. See page 11
Monthly Maintenance, suggest 1st Monday of each month
Lubricate “o” rings in each cleaning assembly point, located:
• in the tting on each cleaning bucket
• in the pouring font – lter head connection point
• inside each cleaning sock
Use the Inox Food Grade lubricant supplied in a tube with your
i-milk. Lubricate the “o” rings by applying the lubricant to the milk
spigot or stem as you insert it in the tting.
Essential Maintenance
2
i-milk V1 Operating Manual July 2018 7
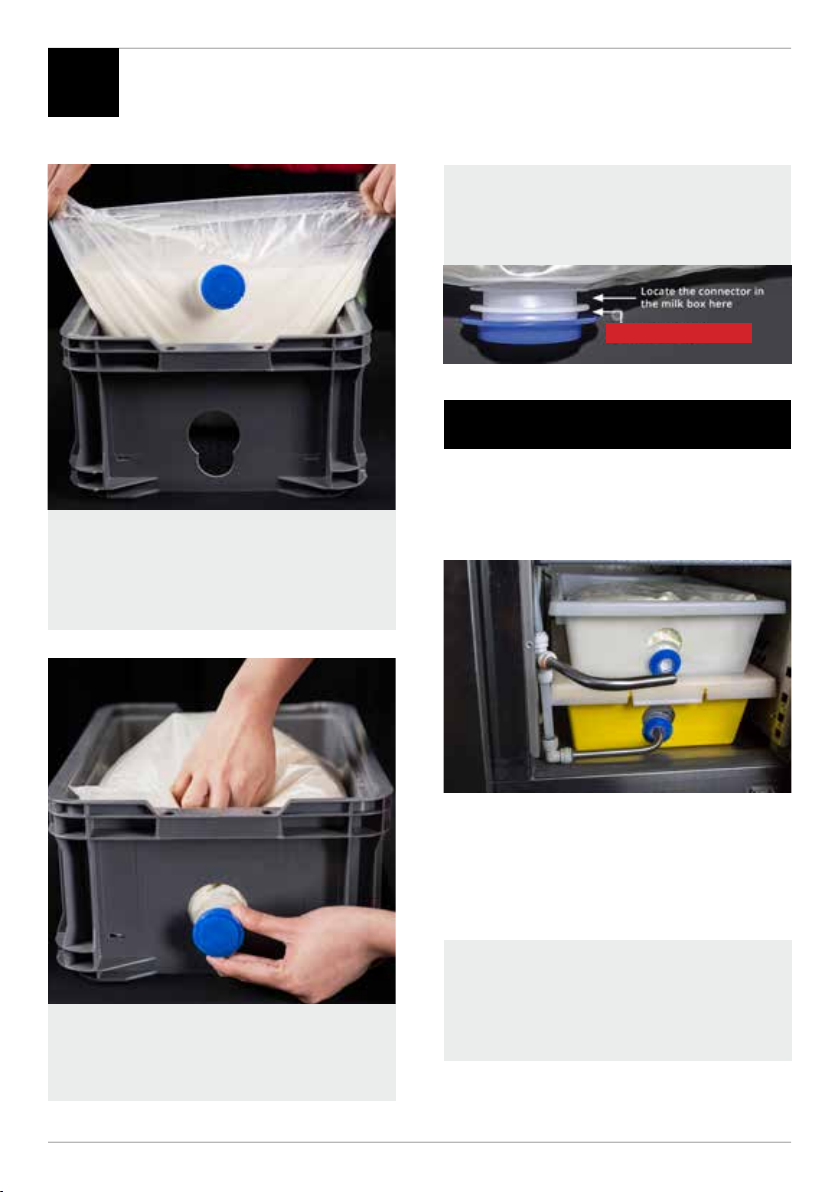
Settle the bladder at on the base of the
container with the connector nearest the
cutout slot, face down. The bladder seal
must be above the connector.
Connect to Milkstak
Stack the tubs adjacent to the daisy chain
of spigots. Nesting tubs should be rm.
Remove (and retain) the black safety cap
from the spigot, remove the travel cap
from the bladder connector and push the
spigot rmly into the connector.
Overlled bags in Milkstak tubs may cause
the stack to become unstable. This will
rectify as milk is removed by the milk pumps.
Take care when sliding bladder connector
into slot. Otherwise the cap may be pulled
o resulting in a loss of milk.
Lift the bladder to position and slide the
bladder connector into the slot pushing it
to the bottom of the slot as shown.
Loading The Milk Bladders
3
DO NOT LOCATE HERE
i-milk V1 Operating Manual July 2018
8
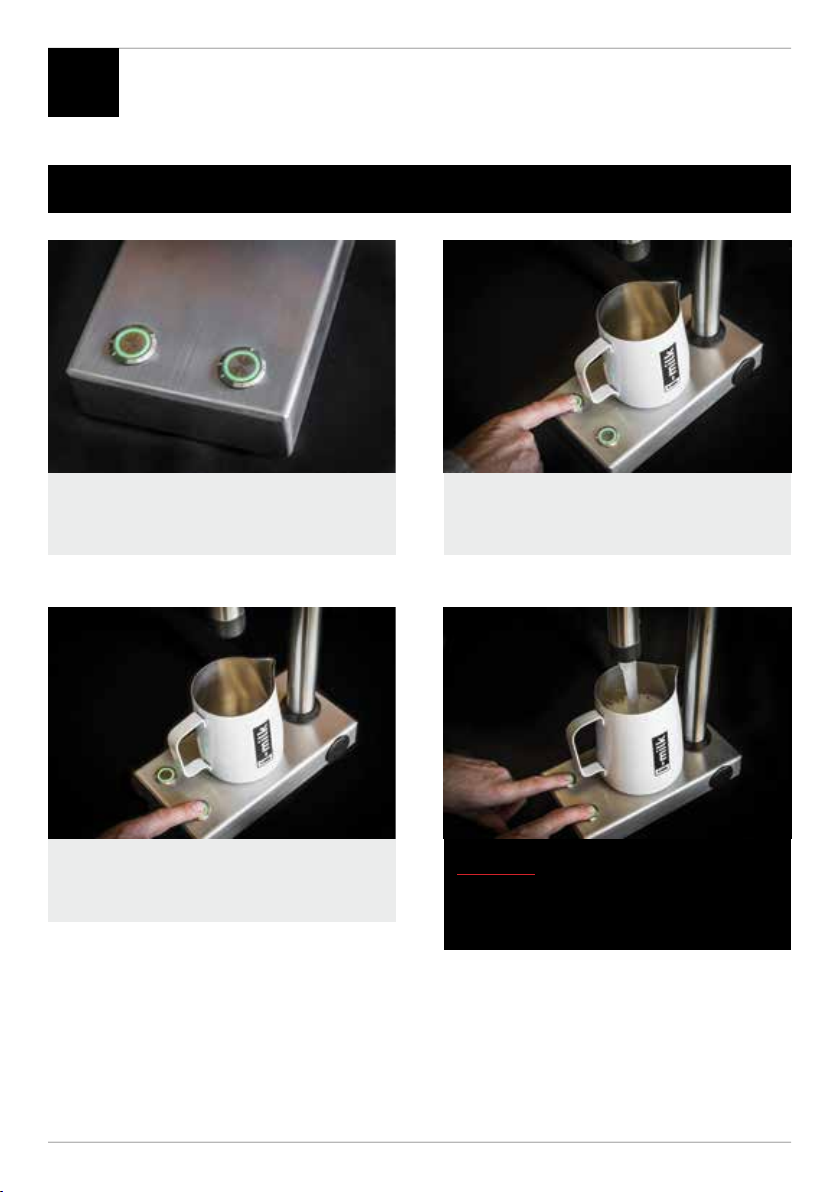
To Pour Milk
When i-milk mini is connected to power the
buttons will illuminate.
To pour milk variety B push the right button
and release to stop the pour.
To pour milk variety A push the left button
and release to stop the pour.
WARNING
Do not push both at the same time. As it
will deliver 2 milk types at the same time.
Operating Instructions
4
i-milk V1 Operating Manual July 2018 9
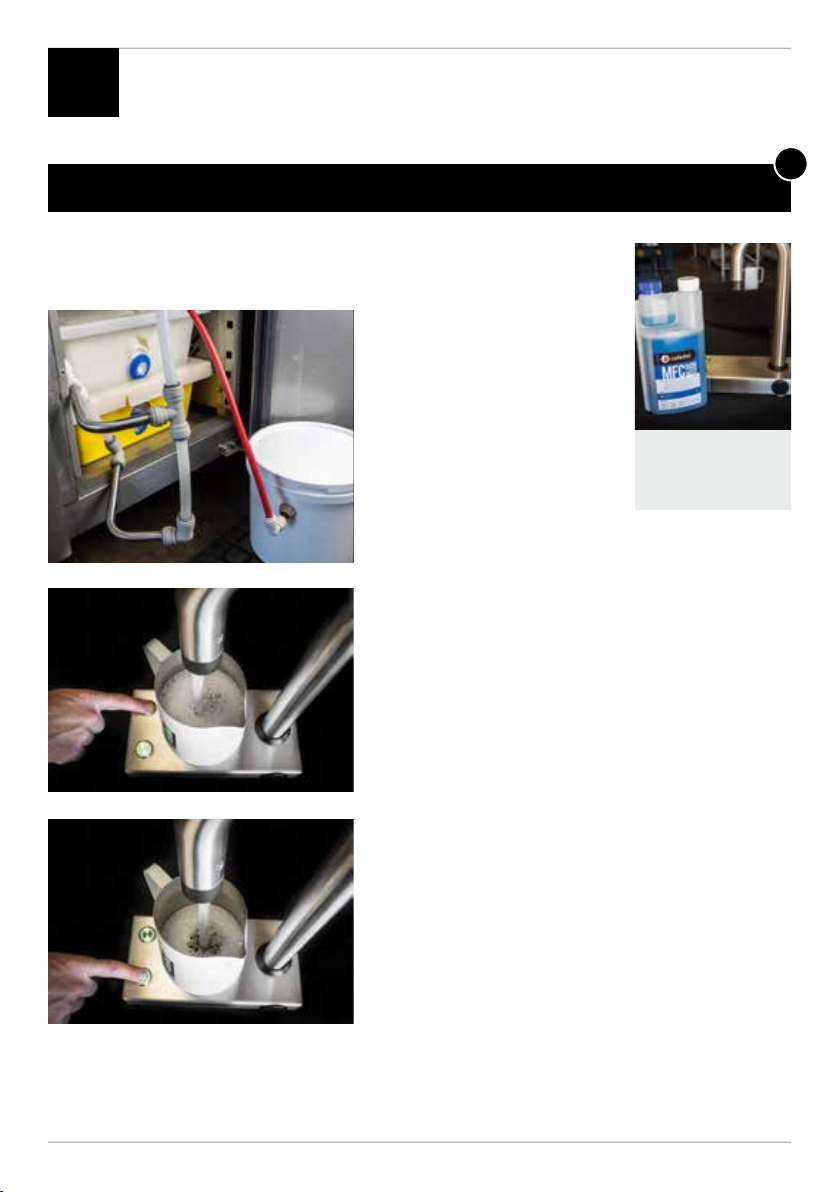
Cleaning Instructions
Preparation Flush out milk lines with COLD water
Remove each milk spigot and reseal the
bladder connector using the milk transport
seal. If this still leaks use the ½” bung
supplied in your Parts Kit.
To remove all milk residue from the
plumbing, place a large container under
the font.
Fill BLACK cleaning bucket with COLD
(NOT HOT) water and connect as shown.
Press the left button to pump all milk
from that source. Keep pumping until
water runs clear.
Press the right button to pump all milk
from that source. Keep pumping until
water runs clear.
Disconnect the cleaning bucket and pump
lines until water ow stops.
Clean each spigot thoroughly with food
grade sanitiser spray using a clean single
use paper towel.
Connect each milk spigot into its cleaning sock.
Leave the milk tubs in the fridge
Complete for all spigots.
12
5
i-milk V1 Operating Manual July 2018
10
Cleaning Instructions cont.
HOT Chemical Soak
Make up enough Cafetto Chemical Solution for the daily clean (50ml
chemical for 1L water) with HOT (60C) water in White bucket.
Leave Chemical to
soak for 5 minutes.
Suggest use timer on
phone as a prompt.
3
5
Recommended
chemical to use.
Connect milk lines from
both sources to bucket
of chemical.
Pump the cleaning solution
using the left button until
the chemical starts to pour
into the jug. Push the right
button to pump chemical
into the other milk line.

i-milk V1 Operating Manual July 2018 11
Rinse Out Chemical
Disconnect the White chemical bucket and
replace with Black bucket relled with cold water.
4
Press left button until all chemical is removed and
clear water is being pumped (empty jug)
Place a jug under the font.
Push right button until all chemical is removed
and clear water is being pumped (empty jug)
Wipe the dispenser to complete the daily clean.
Cleaning Instructions cont.
5

i-milk V1 Operating Manual July 2018
12
Issue Comments And Possible Solution
i-milk is pouring frothy milk
i-milk is squirting milk into
the jug
Possibly caused by the system sucking air when the pumps
are active. Check that all quick t plumbing connections are
rm. Sometimes disconnecting and reconnecting is best as
the leak may be hard to detect.
Ensure that there is no hole in the wall of one of the milk
bladders attached to the system.
Possibly caused by something blocking the lter housing on
the end of the pouring font.
Remove the milk lter and clean it by following the
instructions on page 10.
Trouble Shooting
6
i-milk V1 Operating Manual July 2018 13
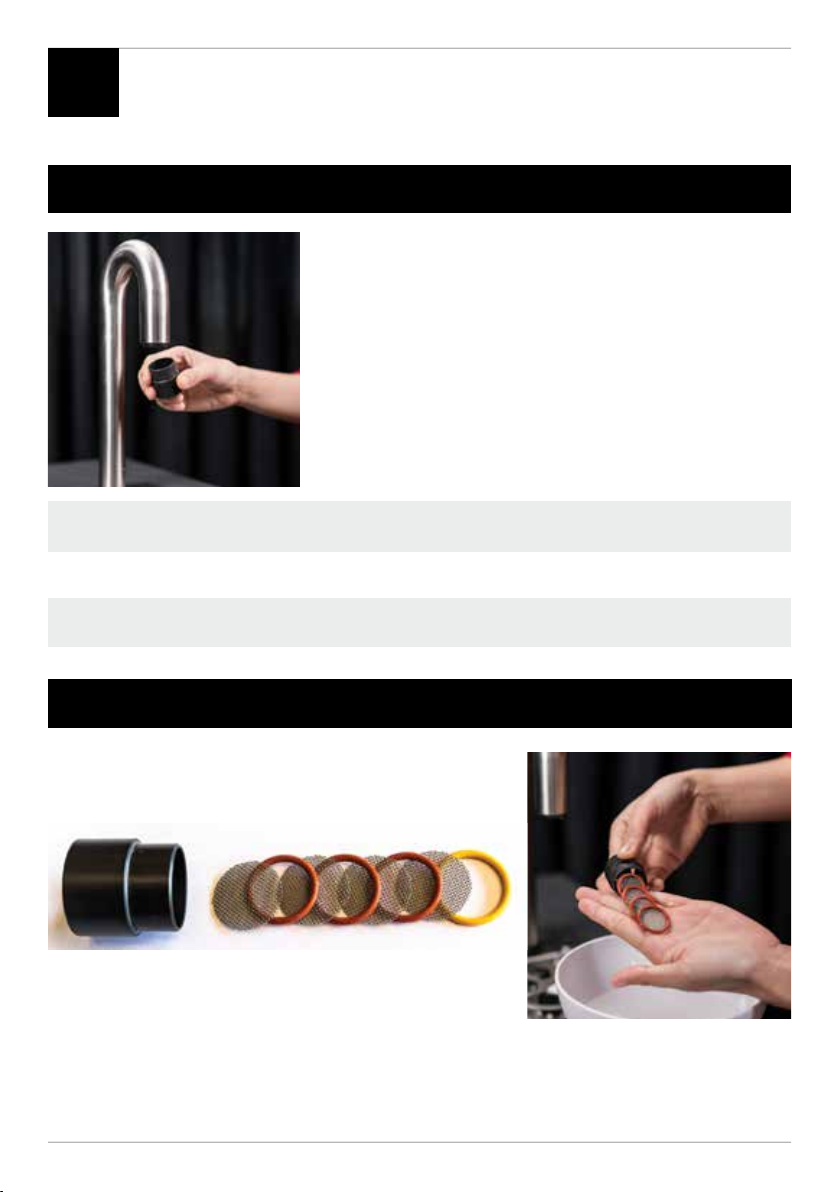
To Clean the Milk Filter Housing
Monthly Milk Filter Cleaning
i-milk has a milk filter located on the font outlet. This black
fitting delivers a uniform, steady, non-turbulent stream of
milk. If the filter mesh becomes blocked it may cause the
milk to squirt or froth.
To remove the milk filter rotate it as you pull it down.
If debris has collected on the visible lter mesh carefully reverse ush it.
Replace the lter into the font rotating it as you push it in place and test the milk ow.
If the milk ow is still not satisfactory carry out the monthly cleaning process outlined below.
As shown in the picture below, the lter is made up of
4 stainless steel mesh lters each separated by 1 of 3
smaller “O” Rings. The must be in this sequence.
To disassemble gently push the
lters and “O” Rings out of the
lter housing into a large bowl
so as not to lose any parts.
1 black lter housing
4 identical stainless steel mesh lters
3 smaller “O” Rings that separate each mesh lter.
These drop freely into the black lter housing.
1larger “O” ring that is inserted last. It needs to be
pushed in place as it holds the mesh assembly in
the lter housing.
Technical Adjustments
7

i-milk V1 Operating Manual July 2018
14
Cleaning The Mesh Filters
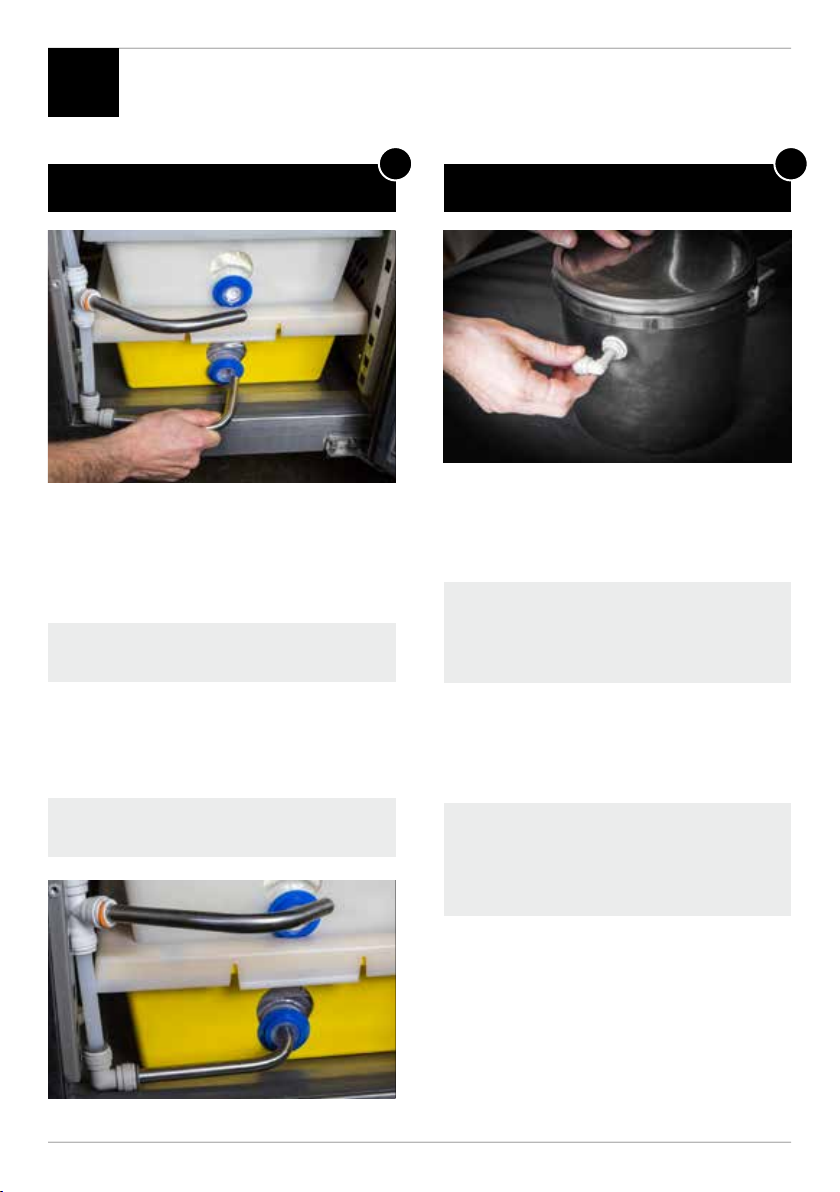
To Use Emergency Taps
Gently clean each mesh lter in warm soapy water and then
re-assemble in the order as shown in the picture, taking care
to insert the large o-ring as the nal piece of the assembly.
Your i-milk has 2 manual
taps located in your Spare
Parts box. These taps allow
you to manually pour milk
from bladders in the event
that your i-milk cannot
dispense milk.
To use, load a bladder in
a drawer or tub as normal
but do not locate the
connector.
Insert the spigot of the
manual tap into the bladder
and secure the manual tap
into the key hole in the tub
or drawer. This secures the
tap and allows for it to be
operated with one hand.
Position the drawer or tub at
the edge of a bench to pour
directly into a jug.
After use ensure the manual
taps are thoroughly cleaned
and stored back in the spare
parts box for any future use.
Technical Adjustments cont.
7
i-milk V1 Operating Manual July 2018 15
Maintenance Records cont.
8
DATE NAME CHECK MILK FILTER
Please duplicate this page to extend your recording.

www.i-milk.com.au
Table of contents
Other i-milk Dispenser manuals

Popular Dispenser manuals by other brands

Nordson
Nordson Asymtek X-1000 Series Training guide

ZURN
ZURN Z6900-SD-WM Installation, operation, maintenance and parts manual

Gardebruk
Gardebruk 102619 instructions

START International
START International LD2000 instructions

Henkel
Henkel Loctite Machine manual

Tork
Tork Performance Maxi W2 Service and parts manual


