ZURN Z6900-SD-WM User manual

NOTICE: READ ENTIRE MANUAL PRIOR TO INSTALLING PRODUCT.
NOTE: The information in this manual is subject to change at any time without notice. Installations may
be performed at dierent times of construction by dierent individuals. For this reason, these instructions
should be left on-site with the facility or maintenance manager.
LIMITED WARRANTY
All goods sold hereunder are warranted to be free from defects in material and factory workmanship for a period of one year from the
date of purchase. Decorative nishes warranted for one year. We will replace at no costs goods that prove defective provided we are
notied in writing of such defect and the goods are returned to us prepaid at Sanford, NC, with evidence that they have been properly
maintained and used in accordance with instructions. Zurn shall not be responsible for any labor charges or any loss, injury or damages
whatsoever, including incidental or consequential damages. The sole and exclusive remedy shall be limited to the replacement of the
defective goods. Before installation and use, the purchaser shall determine the suitability of the product for his intended use and the
purchaser assumes all risk and liability whatever in connection therewith. Where permitted by law, the implied warranty of merchantabi-
lity is expressly excluded. If the products sold hereunder are “consumer products,” the implied warranty of merchantability is limited to
a period of one year and shall be limited solely to the replacement of the defective goods. All weights stated in our catalogs and lists are
approximate and are not guaranteed.
WARNING: Cancer and Reproducve Harm - www.P65Warnings.ca.gov
ADVERTENCIA: Cáncer y daño reproducvo - www.P65Warnings.ca.gov
AVERTISSEMENT: Cancer et eets néfastes sur la reproducon - www.P65Warnings.ca.gov
Z6900-SD-WM / Z6900-FSD-WM
Sensor Operated Battery Powered Liquid or
Foaming Wall Mounted Soap Dispensers
Installation,
Operation,
Maintenance,
and
Parts
Manual

This Page Intentionally Left Blank

FV761 Rev. B 10/22/20
Page 1
Z6900-SD-WM / Z6900-FSD-WM
Power supply:
Power Consumption:
Sensing Distance:
Liquid Bottle Volume:
Dispensed Volume:
Soap Viscosity (liquid):
Operating Temperature:
DC 9V (6 AA Batteries - Included)
Standby 0.4W; Operation 1.2W
2-6” adjustable
650 ml (22 l.oz)
0.8 - 6.5 ml (liquid); 10 - 25 ml (foam) adjustable
100 - 3800 cPs
34° - 110°F
Cover for Can
Key
Upper Cover
Battery Case
Mounting
Plate
Sealing
Ring
Can
Peristaltic Pump
Sensor Controller
Bottom
Outlet
Hand Drill
1/4” or 6mm
Drill Bits
Phillips Head
Screwdriver
Parts List Required Tools
Specications

FV761 Rev. B 10/22/20
Page 2
The dispenser is mounted directly to the wall with the
suggested distances if mounting near a sink basin.
To ensure the longevity and correct function of the dispenser, please read the following:
1. Please read the manual before assembly and installation
2. Use 6 new AA alkaline batteries and do not mix old and new batteries
3. Install dispenser on a smooth wall and clean the area before installation
4. Ensure the distance from bottom of dispenser to sink basin or the nearest object below is more then 10 inches (25cm).
5. Please keep the manual for the life of the dispenser
6. Do not put objects such as stainless steel objects or photoelectric sensors underneath the sensor window of the dispenser
7. Please install the dispenser in an area with little sunlightv
WARNING:
1. The dispenser must be set in dormant state before its operation. The dispenser must be run once per 72 hours to ensure
no loss of performance from the silicone tube.
2. Press the setting button and hold the button for more than 2 seconds when operating dispenser for the rst time. The
indicator will be on 3 seconds as it goes into its normal working state.
3. The setting button can be pressed 5 times continuously to set the dispenser into its dormant state
Cautions Before Installation
Installation Overview
10 inches
8 inches

FV761 Rev. B 10/22/20
Page 3
1. Place the mounting plate at the desired location and transfer
the hole locations to the wall
2. Drill the three 6mm or 1/4” holes according to the mounting plate
and attach the mounting plate to the wall using the plastic anchors
and screws.
3. Attach the dispenser by the mounting plate’s hook.4. Press the dispenser down to attach it to the hook tightly.
5. Open the upper cover using the key. 6. Fix the dispenser to the mounting plate with a screw.
Soap Dispenser Installation Instruction

FV761 Rev. B 10/22/20
Page 4
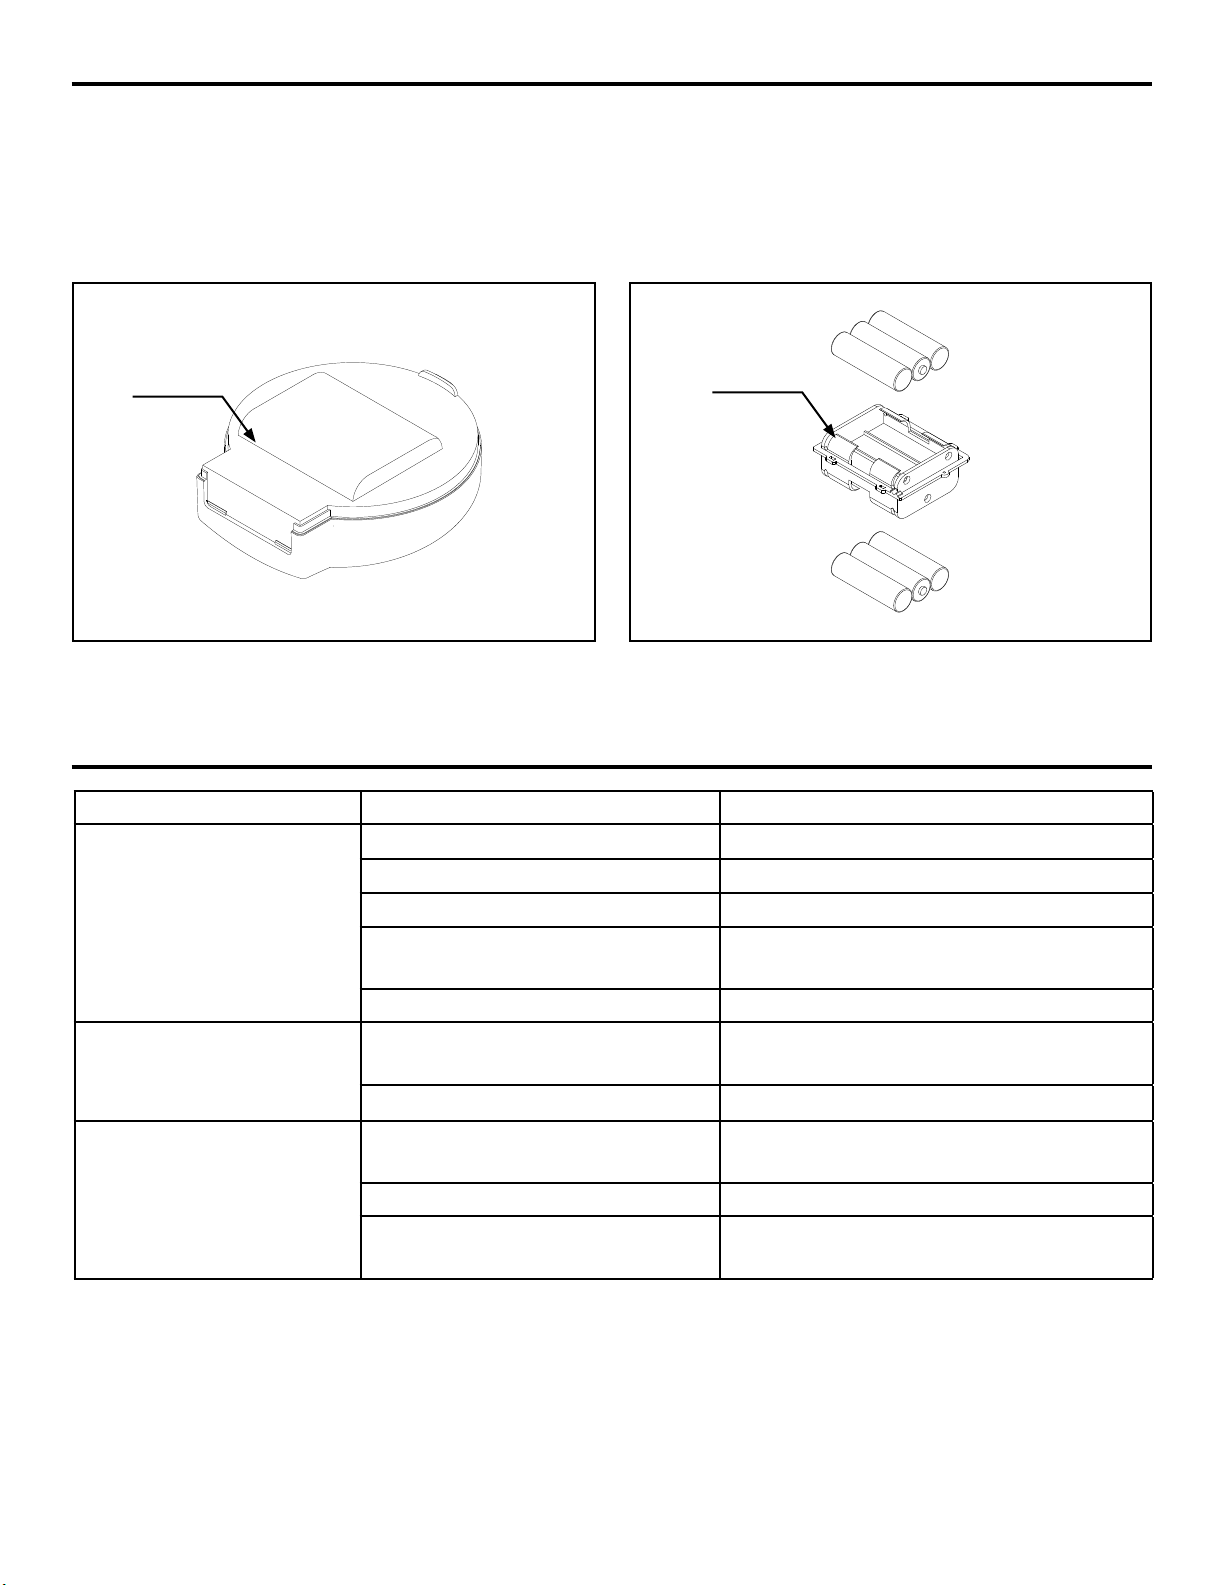
1. Open the upper cover with the key
2. Unplug the connector from the battery case
3. Open the liquid container, and pour liquid/soap. Please clean
any excess liquid/soap
4. Attach the connector back into the battery case, put the upper
cover back and lock it with the key
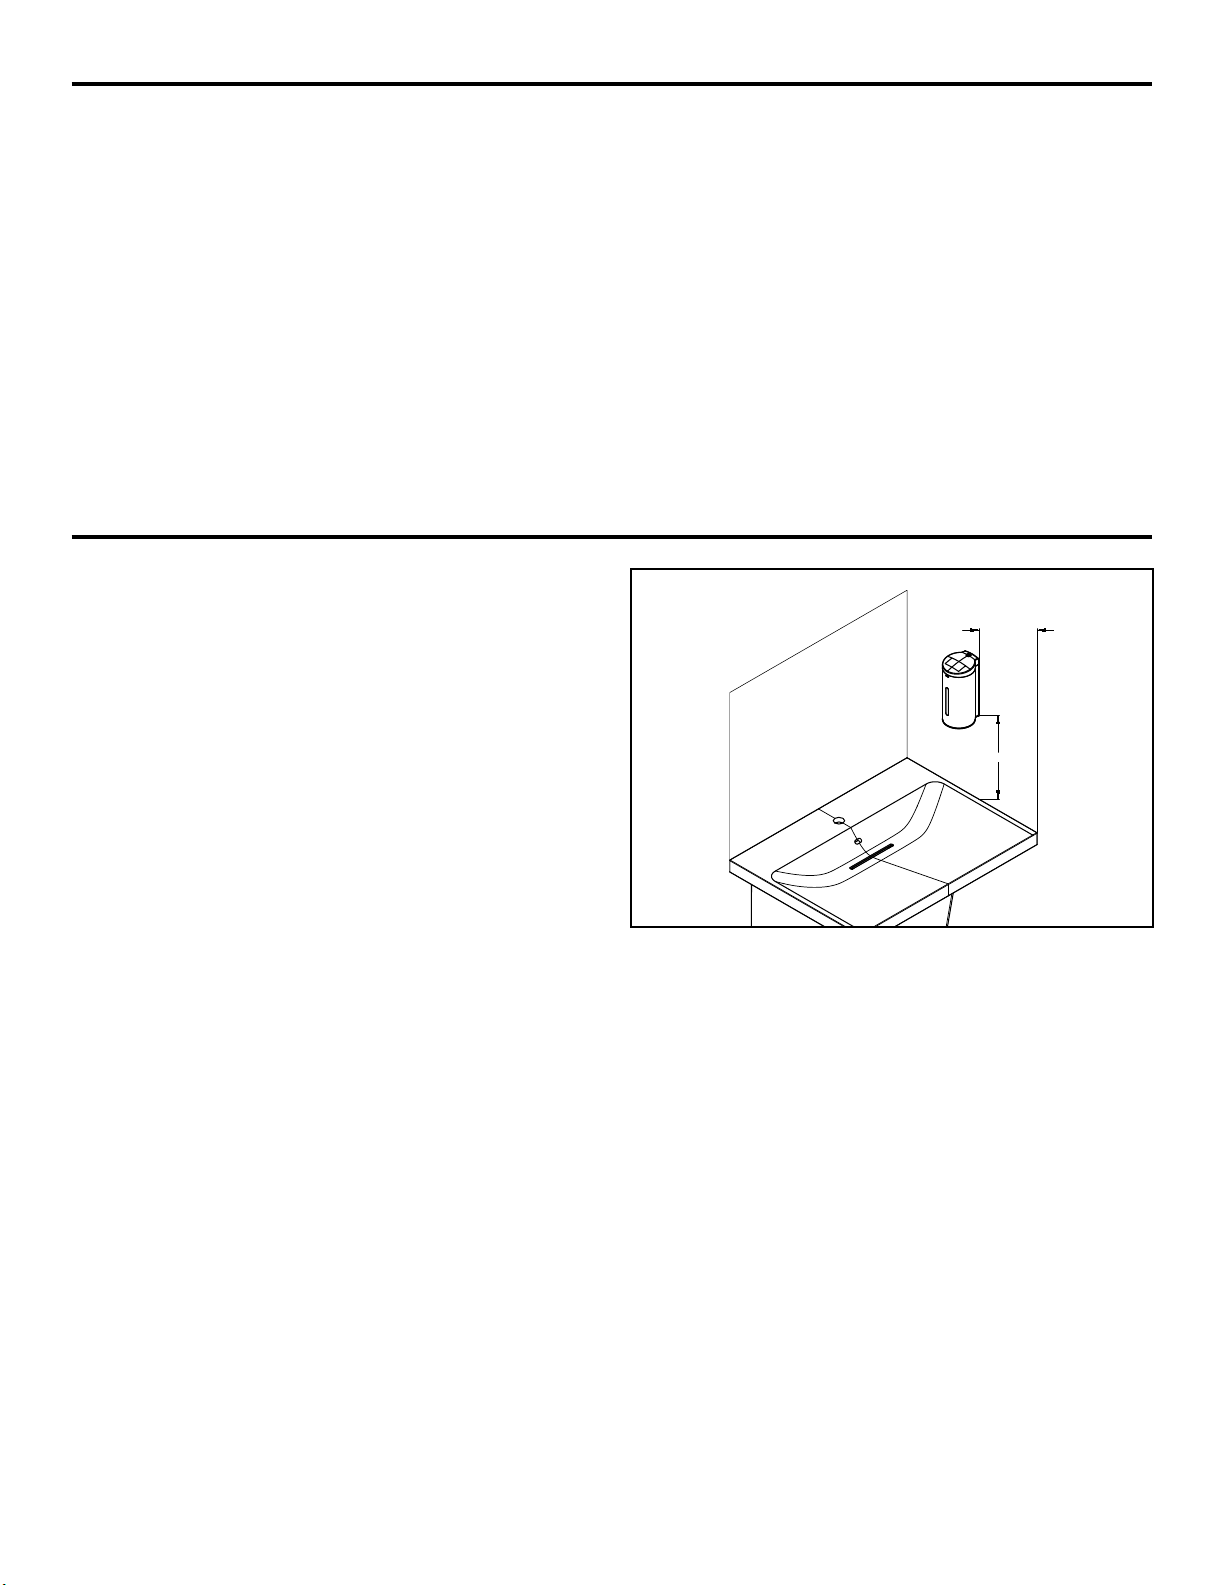
First mount the dispenser onto the wall. Power on the dispenser and the indicator will ash 5 times. If there is no object in front of the
sensor for 30 seconds, the setting function will be locked and will go into the factory setting.
Adjustment of sensor distance:
Adjustment of liquid/soap volume:
1. Press and hold the setting button for 15 seconds, the indicator will ash 5 times. The dispenser has entered the setting state.
2. Press and hold the setting button again for 5 seconds and the indicator will start ashing
3. When the indicator starts ashing, put your hand under the dispenser at the distance that you want to set
4. Leave your hand at the same postion until the indicator is o
1. Press and hold the setting button for 15 seconds, the indicator will ash 5 times. The dispenser has entered the setting state.
2. Press the setting button 2 times (The indicator will ash once after pressing the button the rst time, press the setting button once
the light is o)
3. The indicator will ash 5 times. Place your hand underneath the dispenser.
4. There are 7 dierent levels for the dispenser and the moment it dispenses the perfect amount of soap, move your hand away from
dispenser.
Note: Please make sure that all the adjustments of liquid volume and and sensor distance are complete within 30 seconds. Otherwise
the setting function will be locked and the setting button will need to be pressed again for 15 seconds and the procedure will have to be
repeated.
Liquid/Soap Fill and Startup Instruction
Bottom of Dispenser
Outlet
Sensor Window
Setting Button
5. Place hand under sensor window. The LED indicator will ash
and liquid will be dispensed.
6. Press the setting button and keep hand underneath sensor for
more than 2 seconds until uid is dispensed
Adjust Distance and Liquid Soap Volume
Note: If using the gel type (Z6900-SD-WM), and the liquid is highly viscous, it is recommended to mix a small amount of uid with
water to thin the solution to properly prime the pump. Once priming has occurred (see step 6), ll reservoir with liquid of choice
Note: Remove the mask on lens before operating

FV761 Rev. B 10/22/20
Page 5
1. The indicator will ash continuously when the battery is
depleted
2. Change the batteries in time when the indicator ashes
3. Select 6 AA Alkaline batteries, do not mix old and new
batteries
4. Remove the battery cover by lossening the screws
Battery Replacement Instruction
TroubleShooting
Battery Cover Battery Holder
5. Open battery holder and remove the old batteries and
replace all old batteries with new ones
6. Make sure the batteries are installed in the right direction,
the + and - sides are indicated in the battery holder
7. Close the battery holder, place the cover back in place and
tighten the screws
8. Follow the instructions for setting the sensor range if
required
Caution:
1. Avoid using excess force during installation and handling as the dispenser contains precision electronic components
2. To avoid damage to product surface or corrosion to inner electric components, please use cloth with a neutral liquid to clean
the surfaces. Then use a damp cloth to wipe o excess liquid and dry the surfaces with a dry soft cloth. Avoid submerging the
dispenser or spraying water on the dispenser. Do not use soap detergents or liquids with high acidity or high alkalinity. Avoid using
nylon brushes or rough cleaning devices.
3. Do not damage the sensor window as the sensitivity wll be reduced.
Phenomenon Problem Solution
Indicator does not work Sensor failure Change the sensor
Power supply is abnormal Check the adaptor or battery
Sensor distance is too short Increase the sensor distance
The cable of battery/adapter doesn’t con-
nect well
Recheck the cable or change the batteries
Sensor window is not clean Clean sensor window
Indicator works but no liquid is
dispensed
Sensor is induced continuously Remove the possible object in front of sensor
Sensor distance is too long Shorten sensor distance
Not enough liquid/soap is dis-
pensed
Dispensing time is too short Adjust dispensing time according to the manual
Liquid/soap is too thick Add water to liquid
Liquid/soap is freezing or blocking ow Clean reservoir and ush with warm water

US 1.855.ONE.ZURN CANADA 1.905.405.8272
ZURN.COM
ZURN INDUSTRIES, LLC
511 W. Freshwater Way, Milwaukee, WI U.S.A. 53204 · Ph. 1-855-ONE-ZURN, Fax 919-775-3541
In Canada: ZURN INDUSTRIES LIMITED
7900 Goreway Drive, Unit 10, Brampton, Ontario L6T 5W6, Ph. 905-405-8272, Fax 905-405-1292
Rev. A Date:
10/22/20
C.N. No. 143132 Prod. | Dwg. No. FV761
This manual suits for next models
1
Table of contents