I-View HD-104 User manual

iVIEW HD104 Quick Start Guide (6-12-2010)- p1
HD-104 Quick Start Guide
1. Packing........................................p2
2. Hard Disk Installation.................p3
3. Front Panel Controls...................p5
4. Rear Panel Connectors...............p6
5. Live Operations...........................p7
6. Playback Operations................p10
7. PTZ Operations.........................p11

iVIEW HD104 Quick Start Guide (6-12-2010)- p2
1. DVR
2. Quick Start 3. IR Remote Control 4.Batteries x2
5. CD 6. Hard Disk Mount x2 7.Screws x8
8. Power Adaptor 9. SATA Cord x 1
Note: Standard shipping products do not include HDD

iVIEW HD104 Quick Start Guide (6-12-2010)- p3
Step 1) Fix the HDD to rack mount with the screws as indicated.
Step 2) Place the HDD on the HDD plate and screw it as indicated.
Step 3) Connect the power and the SATA cables as indicated.
Note: After installation, please initialize Hard Disk before starting to record. For more detailed
information, please check out User Manual 4-9 System Tools for reference.

iVIEW HD104 Quick Start Guide (6-12-2010)- p4
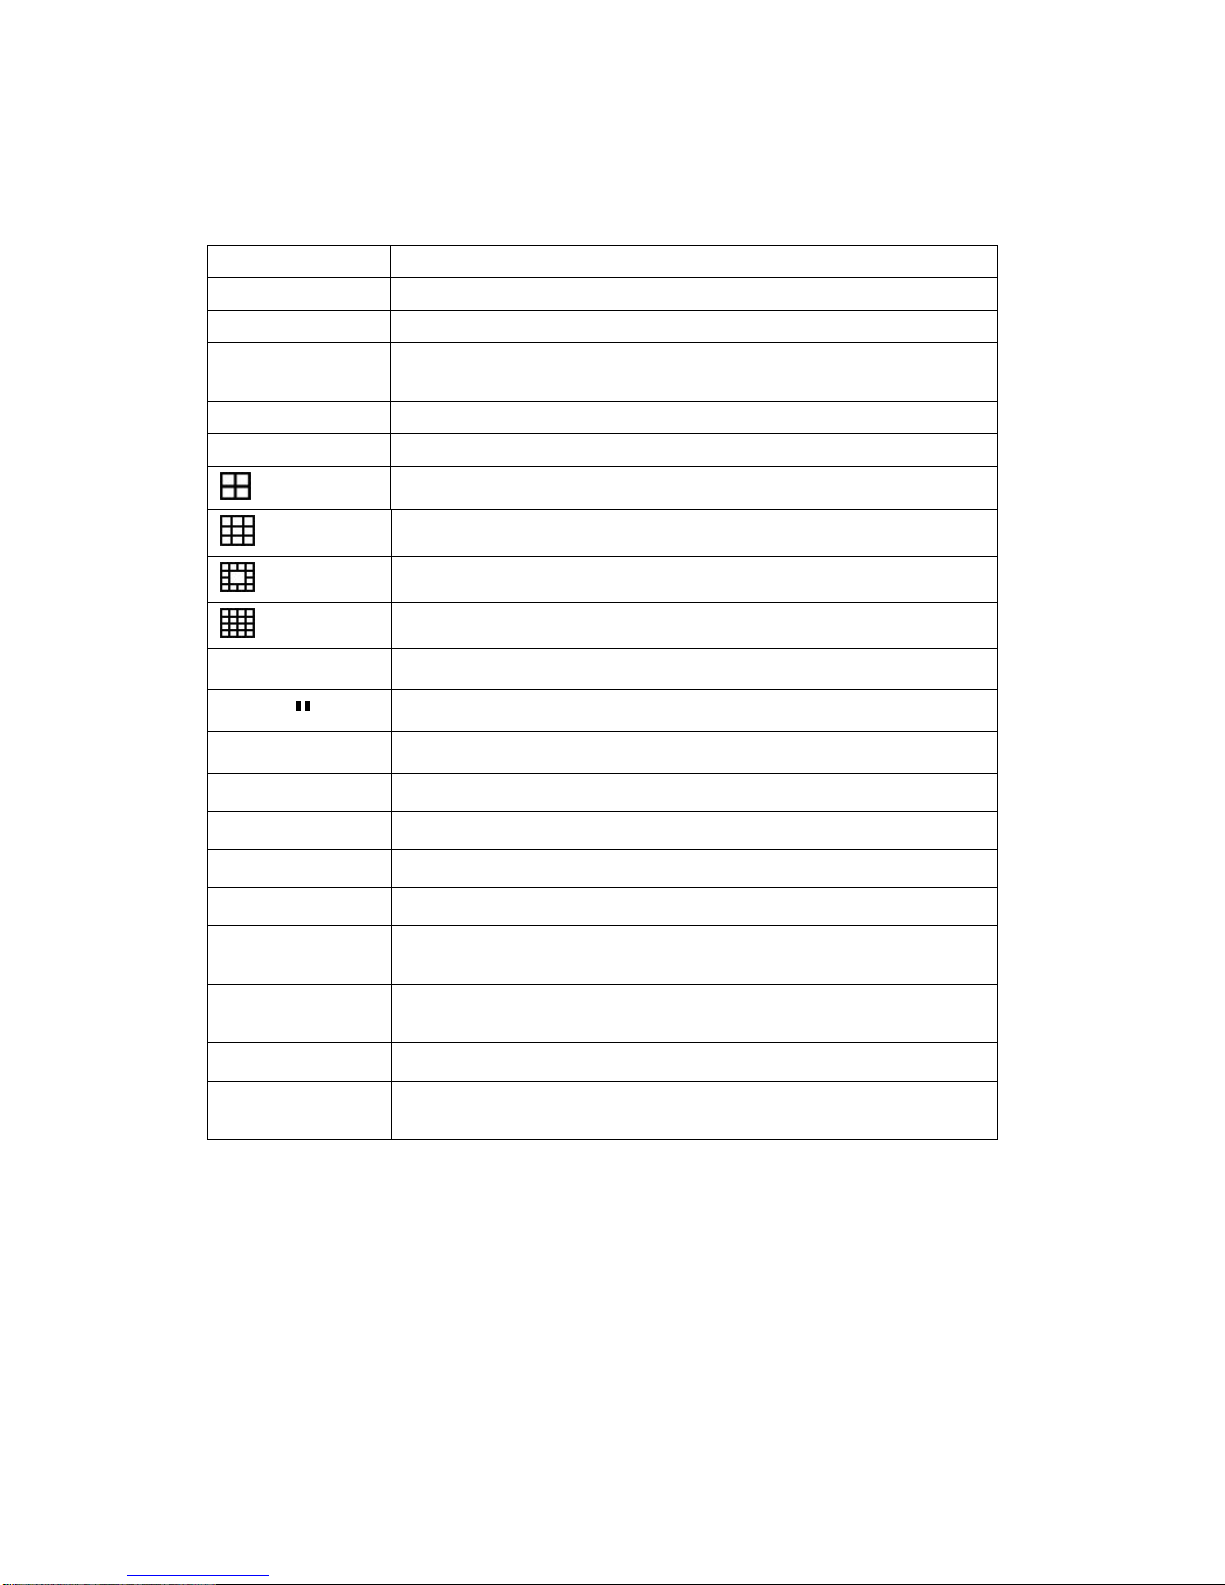
⑫⑬⑭⑮⑯⑰⑱
①②③④⑤⑥⑦⑧⑨⑩⑪
①USB 2.0
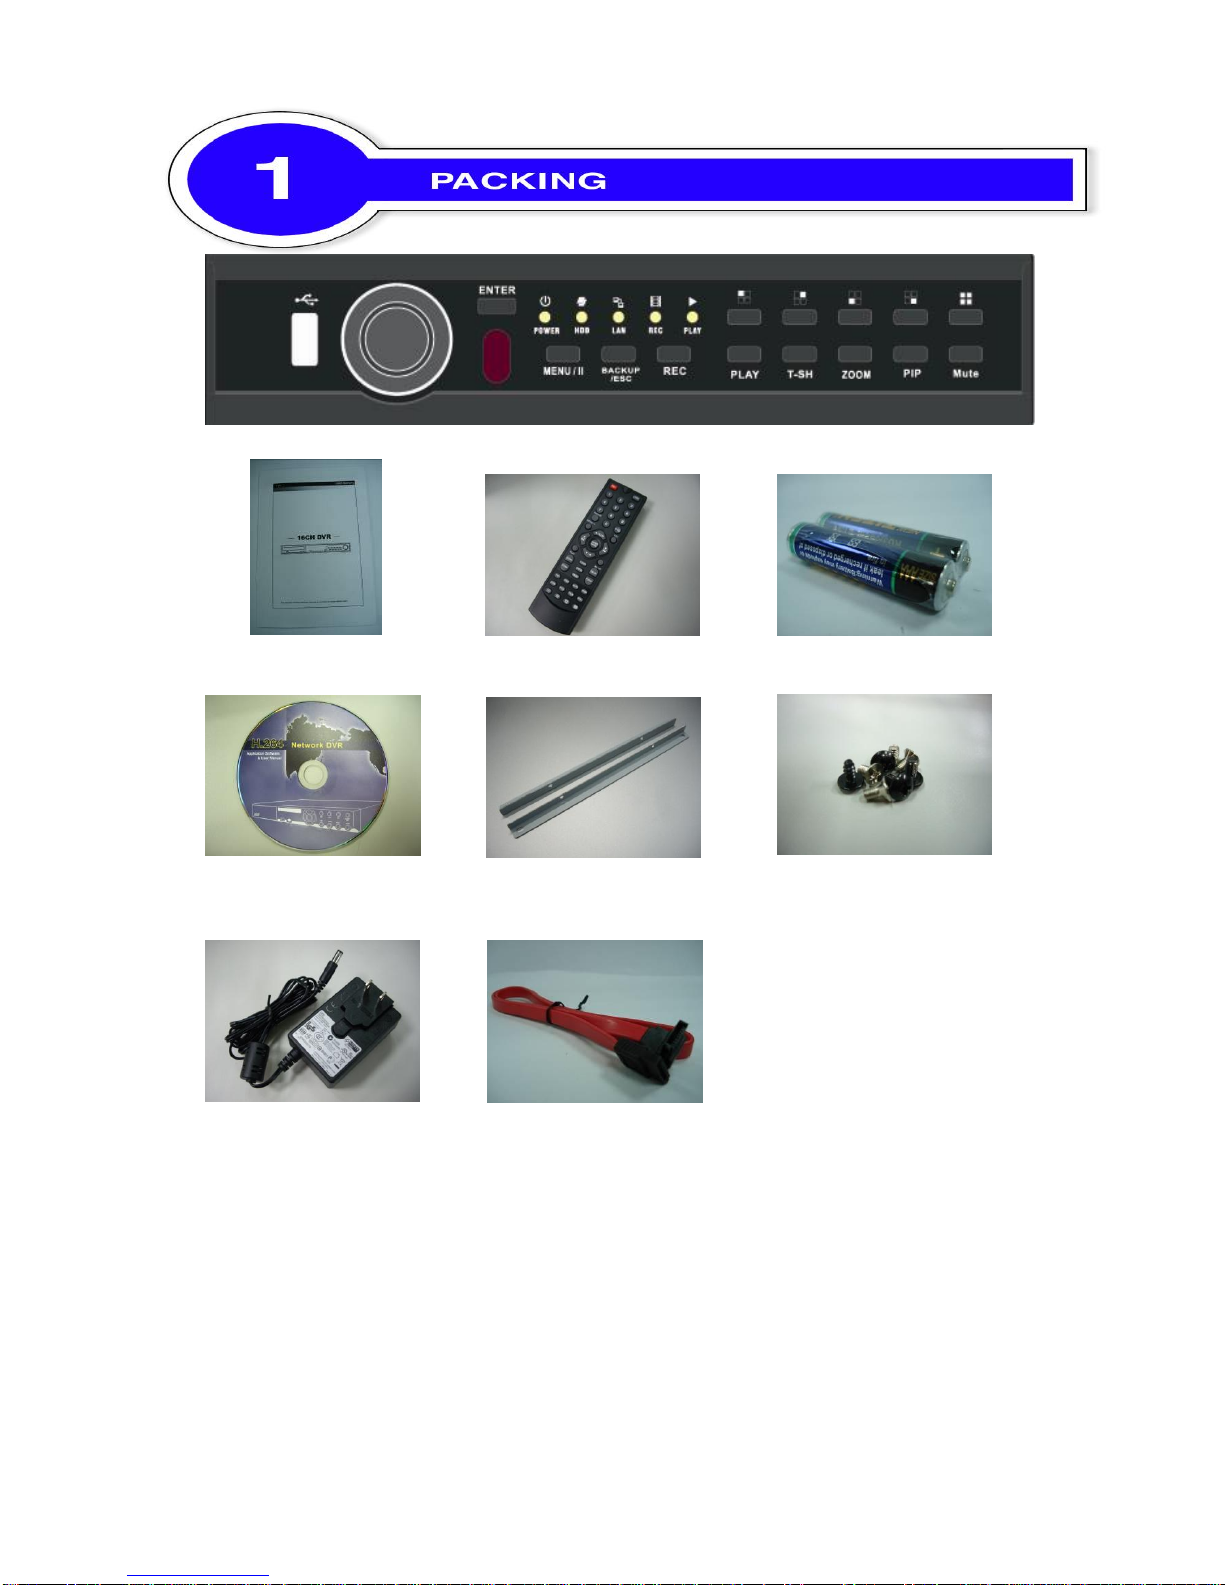
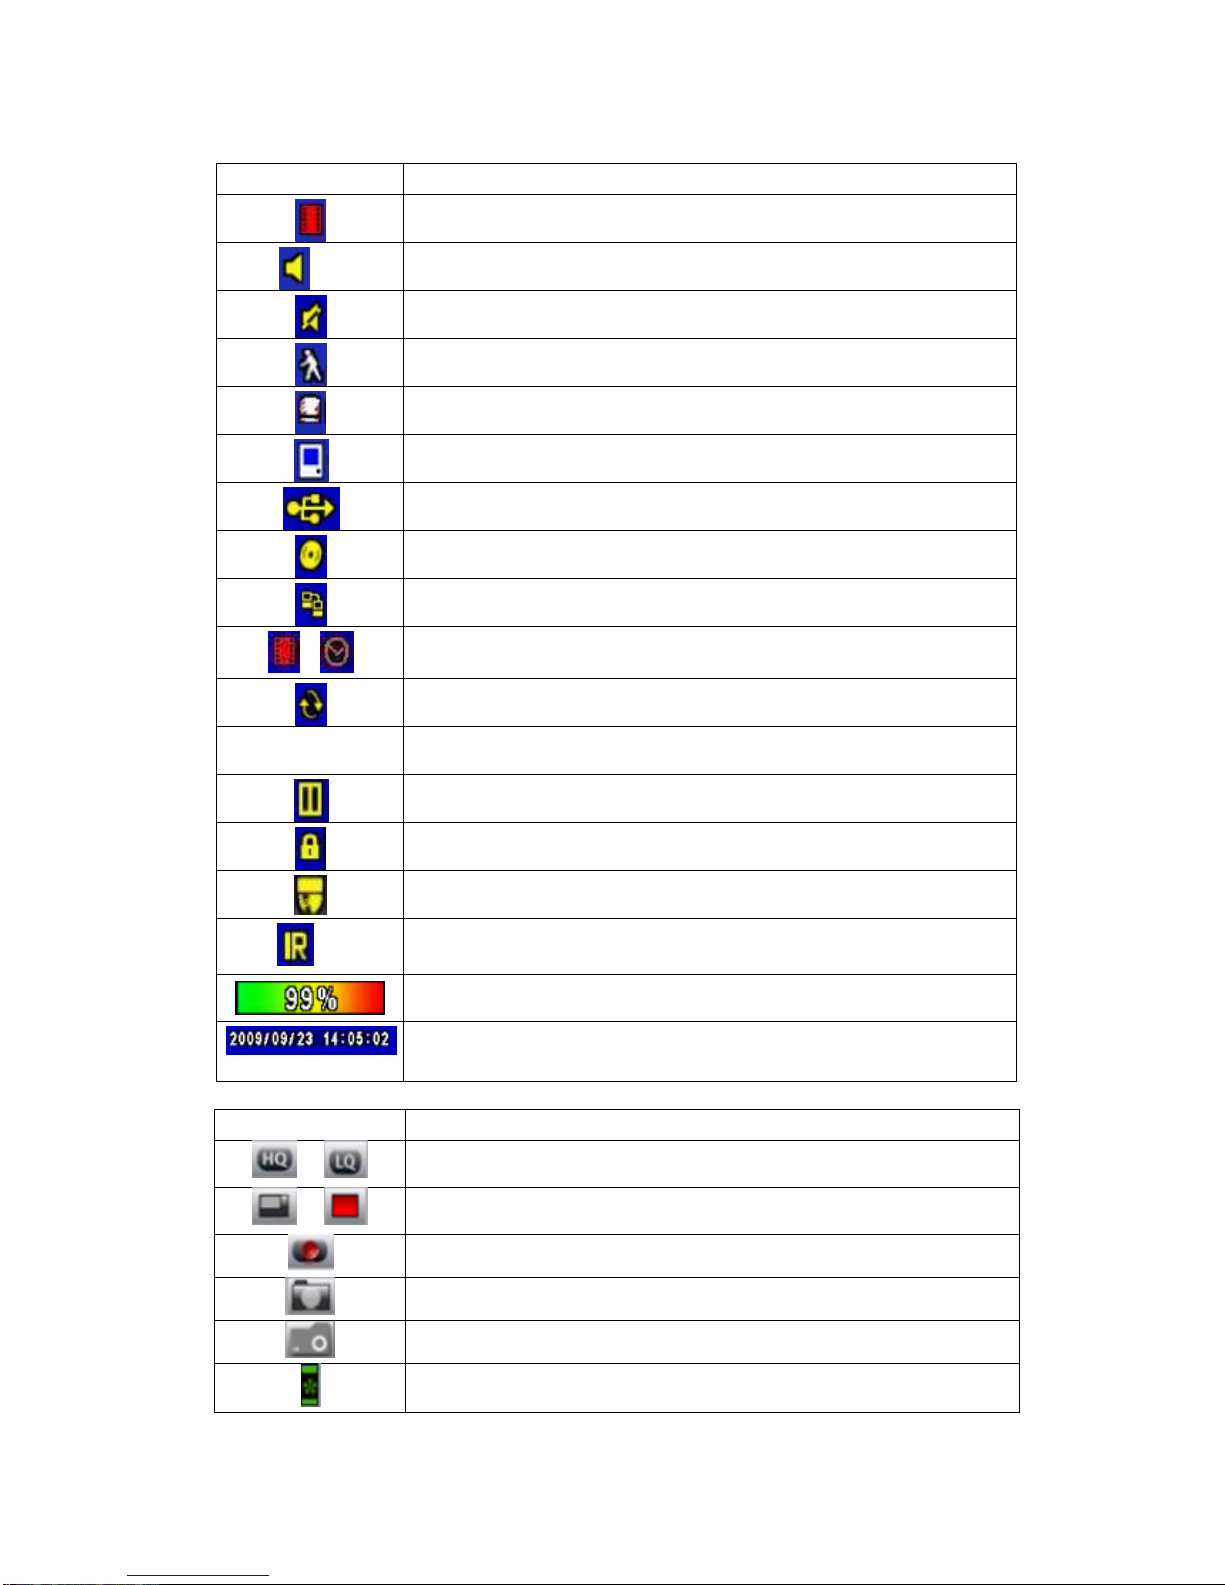
Port for USB external devices.
②/
In SETUP mode, press to move cursor down. In PLAYBACK mode,
press to stop playing back.
/ SLOW
In SETUP mode, press to move cursor up. In PLAYBACK mode,
press to slow down.
/
In SETUP mode, press to increase value. In PLAYBACK mode
press to play forwards.
/
In SETUP mode, press to reduce value. In PLAYBACK mode,
press to play rewind.
③IR Sensor
Input sensor for the remote control.
④MENU
In LIVE mode, press to display menu. In PLAYBACK mode, press
to pause playback.
⑤BACKUP/ESC
In LIVE mode, press to display the BACKUP menu. In SETUP
mode, press to return to previous page.
⑥REC
Start or stop recording.
⑦PLAY
Play back in normal speed.
⑧T-SRH
Display the search menu.
⑨ZOOM
In LIVE or PLAYBACK mode, enlarge the display of a channel.
⑩PIP
In LIVE mode, display with picture in picture format.
⑪MUTE
Enable / Disable Key Tone.
⑫ENTER
In SETUP mode, press to enter values. In PLAYBACK mode,
switch between full, quad, 9-channel, 16-channel display in order.
⑬LED Display
(From left to right)
Power: Power is on.
HDD: Hard disk is in use.
LAN: Connected to the internet (in red): Remote user logged in.
REC: Recording.
PLAY: Playing back.
⑭
In LIVE or PLAYBACK mode, switch to CH1。
⑮
In LIVE or PLAYBACK mode, switch to CH2。
⑯
In LIVE or PLAYBACK mode, switch to CH3。
⑰
In LIVE or PLAYBACK mode, switch to CH4。
⑱
In LIVE or PLAYBACK mode, switch to 4-channel display。

iVIEW HD104 Quick Start Guide (6-12-2010)- p5
①③⑤⑥⑧
②④⑦⑨⑩⑪
①VGA
VGA port
②DC 12V
Socket for a DC 12V input.
③SPOT monitor
BNC port to display full screen image of all installed cameras in
sequence.
④MAIN monitor
BNC port for the main monitor.
⑤VIDEO IN
BNC input ports for cameras, 4 in total.
⑥AUDIO IN
RCA input port for audio signal.
⑦AUDIO OUT
RCA output port for audio signal.
⑧USB
USB port.
⑨NTSC/PAL
Switch between NTSC and PAL format.
⑩LAN
Network port
⑪EXTERNAL I/O
EXTERNAL
Under LIVE mode, you can watch all channel displays, receive live audio, and operate

iVIEW HD104 Quick Start Guide (6-12-2010)- p6
display changes.
Table 5-1 Description of the remote control functions under LIVE mode.
Button
Description
REC
Start/Stop recording.
PLAY
Start playing back the most recently recorded segment.
LOCK
Enable/Disable the Keypad function on the front panel, the remote
control and the mouse.
1,2,3,4
Select the channel to monitor in full screen from channel 1 to 4.
FREEZE
Turn on/off screen freeze function.
Switch to quad display.
Switch to 9-channel display. 4ch DVR doesn’t feature this function.
Switch to 13-channel display. 4ch DVR doesn’t feature this function.
Switch to 16-channel display. 4ch DVR doesn’t feature this function.
ENTER/MODE
Switch to full screen, quad display.
MENU/
Enable/ Disable setup Menu.
BK-UP/ESC
Enable/ Disable backup menu.
SRH
Enable/ Disable search menu.
MUTE
Switch channel 1 output audio / turn off LIVE audio
STATUS
Enable/ Disable Status.
OSD
Turn on/off the screen display
ZOOM/ZOOM-
Enable/ Disable double screen size display. You can click on the
channel name for choosing a specific channel.
PIP/ ZOOM+
Turn on picture-in-picture format. Click on the channel name can
switch to other channels.
PTZ
Enable PTZ control.
AUTO
In AUTO mode, all available channels will be cycled through in full
screen.

iVIEW HD104 Quick Start Guide (6-12-2010)- p7
Table 5-2 Graphical icons displaying after right-clicking your mouse under LIVE mode.
Icon
Description
Resting the cursor on this icon will bring up the following four menu icons.
Main menu.
Search menu.
Backup menu.
PTZ mode.
Turn on/off recording.
Playback.
Resting the cursor on this icon will bring up the following five display icons.
FREEZE.
PIP, picture in picture
ZOOM, double the screen size
AUTO-sequence
LOCK, activate the key lock.
Full screen display.
Quad display.

iVIEW HD104 Quick Start Guide (6-12-2010)- p8
Table 5-3 Description of on screen graphical icons in LIVE mode
Icon
Description
Recording is on
1~4
Live Audio is on
Live Audio is off
Motion detected on the channel
Sensor triggered on the channel
Video loss detected on the channel
USB device detected
DVD burner is detected
Connected to the LAN cable.
Film:Normal Recording
Clock:Schedule Recording
AUTO-seq is on
2X
2X zoom in is on
Freeze is on, screen is frozen
LOCK is on
PTZ control is on
1~4
IR remote signal has been set to 1-4 to correspond to your 1-to-4
remote control.
Shows the current hard disk space has been used
(99% mean used 99%, remain 1%)
Lower right of each CH will show the current time
Icon
Description
/
Image quality (High/Low)
/
Full screen
Record
Snap shot
Record and snap shot file saving path setup
Enable / Disable Shortcut Toolbar

iVIEW HD104 Quick Start Guide (6-12-2010)- p9
Under LIVE mode, press PLAY to playback (default setup is quad display.) When the icon
is shown on the screen, the function icons will appear in the right down corner on the screen.
The icon can be dragged by mouse to other location on the screen.
Table 6-1 Remote control functions under the PLAYBACK mode
Icon
Description
ENTER/ MODE
Switch to full screen, quad display.
MENU /
Turn on/off PAUSE.
PLAY
Play back at normal speed.
/ SLOW
Play back at slower speed. The speed will be slowed to 1/2, 1/4, 1/8,
1/16 by each pressing of the button till the slowest limitation of 1/16 of
the normal speed. Current playback speed is shown in the upper right
corner.
/
Fast rewind. Each press increases the speed to the next level. There are
six speeds: 2x, 4X, 8X, 16x, 32X and 64X.
/
Fast forward. Each press increases the speed to the next level. There
are six speeds: 2x, 4X, 8X, 16x, 32X and 64X.
/
Stop playback.
Table 6-2 The mouse operation under the PLAYBACK mode.
Icon
Description
「/ 」Fast rewind
「/ 」Fast forward
/
Play/pause
「▲/ SLOW」, slow playback
「▼/ ■」stop playback
Playback channel by channel with snap shot display
Full screen display
Quad display
Zoom-in display
P.S. If playback of a single channel is wished to be viewed, please double click on
left key of the mouse on the channel video image.

iVIEW HD104 Quick Start Guide (6-12-2010)- p10
Under LIVE mode, press PTZ to enter PTZ camera mode. When the PTZ icon is shown in
the left upper on the screen, the function icons will appear right down corner on the screen,
which can be dragged by mouse to other location on the screen.
Table 7-1 Remote Control functions under the PTZ mode
Button
Description
/ SLOW
Move PTZ up.
/
Move PTZ down.
/
Move PTZ to the left.
/
Move PTZ to the right.
ZOOM +
PTZ zoom-in.
ZOOM -
PTZ zoom-out.
FOCUS +
PTZ focus-in.
FOCUS -
PTZ focus-out.
IRIS +
PTZ iris-open.
IRIS -
PTZ iris-close.
TOUR
Activate PTZ pre-set tour. *
PRESET +
NUMBER
To go to a preset location, press PRESET and a number key. DVR will save
the current location.
PLAY +
NUMBER
Move to a preset location, press PLAY and a number key. DVR will move to
the current location.
PIP
Set current PTZ location as the start of the line-scan. *
FREEZE
Activate line-scan. *
ZOOM
Set current PTZ location as the end of the line-scan. *
*PTZ communication protocols from different PTZ came
era manufacturers are not 100% compatible. As a resul
ult, some operations in PTZ functions provided by iVIE
W may not work. Please contact your PTZ camera man
anufacturer for appropriate protocol updates.

iVIEW HD104 Quick Start Guide (6-12-2010)- p11
Table 7-2 Mouse operation under the PTZ mode in RemoteAP
Icon
Description
Leave PTZ Mode,back to the LIVE mode
Pre-set number N. (1~64)
Go to pre-set number N.
Set current PTZ location at pre-set number N.
「TOUR」, press to activate pre-set tour*
「PIP」, Set current PTZ location as the start of line-scan. *
「FREEZE」, Activate line-scan. *
「ZOOM」, Set current PTZ location as the end of line-scan. *
To move PTZ in 360°
PTZ zoom in; PTZ zoom out
PTZ focus in; PTZ focus out.
PTZ IRIS open, PTZ IRIS close.
Below functions need support from specific PTZ manufacturer. Please check us
er manual of your PTZ for more detail.
to
AUX 1~8,「AUTO」Key +Number key「1~8」
「Backup」, Customized function。
*PTZ communication protocols from different PTZ came
ra manufacturers are not 100% compatible. As a result,
some operations in PTZ functions provided by iVIEW
may not work. Please contact your PTZ camera manufa
cturer for appropriate protocol updates.
Other manuals for HD-104
1
Table of contents
Other I-View DVR manuals