IAT TXRX Operating and safety instructions

WiFi Transceiver Surveillance System for Smartphone and PC
Setup and Installation Guide
www.peephole-store.com www.iat101.com
P1

Setup and Installation Guide
The setup and installation guide for a WiFi Surveillance System is divided into following 3
sections:
1.) Understand the WiFi Transceiver (TXRX) --- ------------------------------ Page 3 - 5
2.) Software Installation and Operation ---------------------------------- Page 6 -7
3.) Examples or Hardware Installation:
a.) for Door Camera Application --------------------------------- Page 8 -10
b.) for Dental Camera Application ---------------------------------- Page 11 -16
c.) for Portable Applications --------------------------------- Page 17 -19
In case there are any question, please email us
www.iat101.com www.peephole-store.com
P2

1. Understand the WiFi Transceiver (TXRX)
This WiFi TXRX is with a High-quality Aluminum housing
design to prevent interference from other RF signal
1. Wi-Fi Antenna
2. A/V input (from A/V source)
3. DC 5V in
4. A/V output ( to TV / Monitor)
5. Power On/Off
1
2
3
Wi-Fi
Audio /Video
Transceiver 4
5
www.iat101.com www.peephole-store.com
P3
Video in
Video out

1
2
3
Wi-Fi
Audio /Video
Transceiver 4
5
The WiFi Transceiver (TXRX) is a device allowing you input analog A/V signal into the device ( ports 2) ,
and the WiFi TXRX device will convert it into digital A/V and transmit the digital A/V signal from antenna (1)
into free space as a wireless WiFi signal. This WiFi signal is to link with the WiFi in your iPhone, iPad,
Android Phone, or PC.
• This link is a WiFi peer to peer (P2P) Wi-Fi direct IP address connection using ad-hoc mode.
• It is not a WiFi device operated in infrastructure mode for internet connection
• Different from conventional analog RF wireless (2.4GH or 5.8GHz) A/V signal, the WiFi signal is
secured with password. Other people will not be able to use a receiver to steal your video / audio signal.
1. Wi-Fi Antenna
2. A/V input (from A/V source)
3. DC 5V in
4. A/V output (TV / Monitor)
5. Power On/Off
There are additional analog A/V output (4) at other side of the WiFi TXRX. This is allowing you to view the A/V using a TV /
Monitor or connect it to a DVR (digital video recorder) for recording.
www.iat101.com www.peephole-store.com
P4
Basic Concept of the WiFi Transceiver (TXRX)

1
2
3
Wi-Fi
Audio /Video
Transceiver
4
5
Typical ire connection of a WiFi surveillance system
1. Wi-Fi Antenna
2. A/V input (from A/V source)
3. DC 5V in
4. A/V output (TV / Monitor)
5. Power On/Off
Wall Plug
Analog A/V output
can be connected to
a TV / Monitor, or a DVR
WiFi signal to
smartphone, ipad, and PCs
Analog A/V input
from a camera
www.iat101.com www.peephole-store.com
P5

2. Software Installation and Operation - Smartphone
a.) Software download, please go to
• Google Play ( Android)
• APP Store (iSO) (check Note2)
to install “Mi-Cam” software ,and the icon should shown in your apps list.
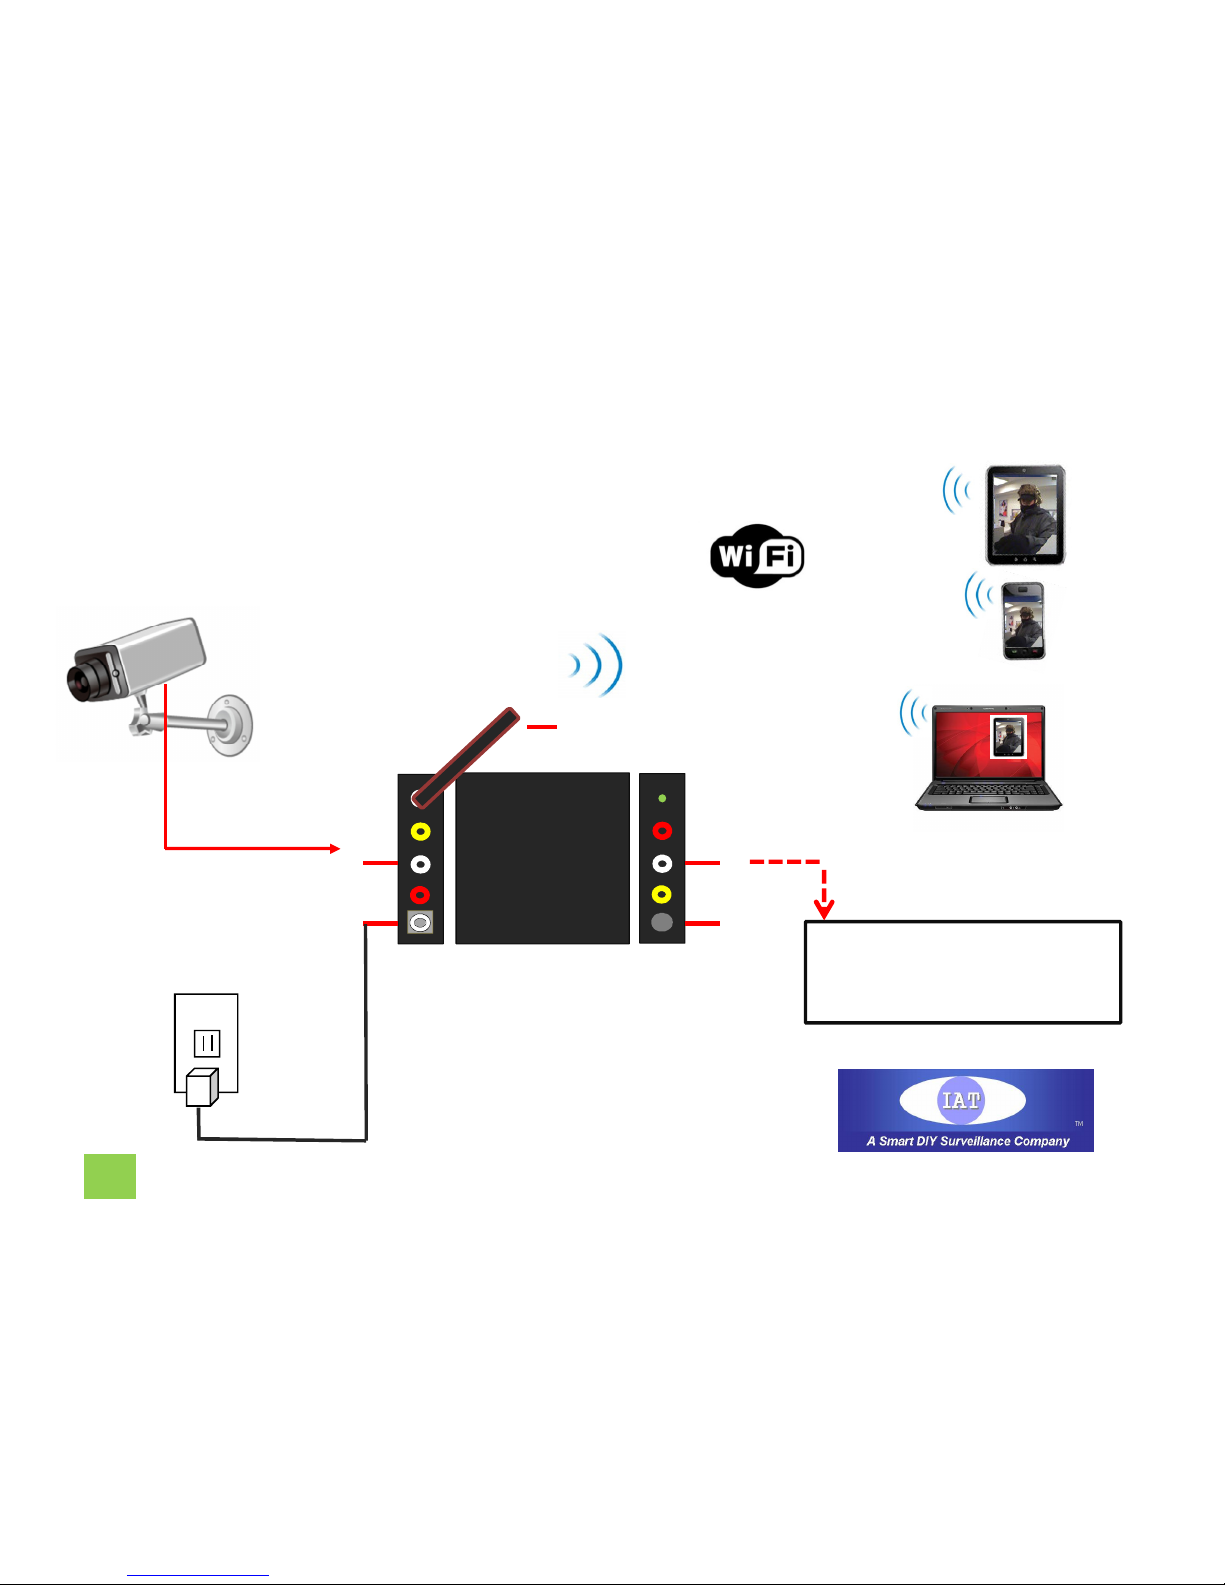
b.) Turn on your Smartphone / Tablet’s Wi-Fi setting, Search and
Select SSID: AV2Pad-WiFi, and then input password.
(Default SSID: AV2Pad-WiFi / Password: 12345678)
c.) Go to your apps list, and click “Mi-CAM” icon in your Smartphone / Tablet
Now you should be able to enjoy the A/V on your Smartphone / Tablet. You may change
Wi-Fi password, video settings, etc.
Note 1: If you want to change the default password to your own password, you must write down your
own password and don’t forget it. There is no way to reset password, if you forgot your password.
Note 2: New update( 04/27/2015): due to there is new version Apple iOS8, the new iOS8 may cause
video freezing in Mi-Cam, Apple users please use a different software called: “Wi-Viewer” download
from APP Store.
For Smart Phone and Tablet PC
P6 www.iat101.com www.peephole-store.com

2. Software Installation and Operation for PC
For Window Based PC
Please download the compressed IPCameraViewer.rar file, uncompress the file into your PC, and then click
the application file “ IPCameraViewer” to run the program .
Download site
http://www.ia-tecs.com/download/IPCameraViewer.rar
Step 1: Turn on your PC Wi-Fi setting, and select SSID: AV2Pad-WiFi (SSID: AV2Pad-WiFi / Password:
12345678)
Step 2: Click to run the IP camera viewer in your window.
Step 3: Click Add Camera, and choose the type of camera: Network IP Camera
Step 4: IP Camera Settings: Camera Brand: Generic IP Camera
Image URL: /media.live?videocodec=mjpeg&resolution=qvga
IP Address: http://192.168.30.1 Port: 80
Step 5: Click Test Camera, then click OK
www.iat101.com www.peephole-store.com
P7

3. Examples of Hardware Installations -a.) for Door Camera Application
Wiring Diagram for a wired Door Peephole Camera and WiFi TXRX using
single AC adapter
www.iat101.com www.peephole-store.com
Model: WiFi-DC_1
P8

DC Do er
Splitter
Video /Po er
Connector
Mini Camera
WiFi TXRX
unit
5V DC
Part list of a Model: WiFi-DC_1
Part list: WiFi TXRX, DC po er Splitter, Video / Po er connector, Mini Camera,
5 meter long Video / Po er cable, 5 V AC adapter (not sho n in the photo)
P9
www.iat101.com www.peephole-store.com
5 meter long Video /
power cable with mini
connector

Installation steps for Door Camera Model: WiFi-DC_1
Note: We recommend you check all ire connection, soft are do nload, and WiFi
connection is orking before you install the door camera on your door.
1. Connect all ires based on the connection sho n in and
2. Setup the soft are and ireless connection based the steps in or
P10
P9 P8
P6 P7
www.iat101.com www.peephole-store.com
In case there are any question, please email us
ia-tecs@hotmail.com or shop@iat101.com

peephole-store
iPad
SmartPhone
(iPhone / Android )
Windo based PC
3. Examples of Hardware Installations - b.) for Dental Camera Application
P11

peephole-store
a Portable Wireless WiFi Dental Camera Set
Rechargeable battery will not included in the shipping package due to Air Flight shipping safety
regulations. We can provide you the information to buy a compatible battery .
X
P12

peephole-store
Po er On /Off
AC adapter to recharge the dental camera
LED light brightness
High / Lo
5V DC input
for built-in battery
Video Output
Camera has 6 LED
P13

Battery recharged using 1.) a PC / Notebook USB port or 2.) an AC
adapter (included in the package)
1
peephole-store
peephole-store 2
P14
Note: Rechargeable battery will not included in the shipping package due to Air
Flight shipping safety regulations. We can provide you the information to buy a

peephole-store
WiFi Video
Transceiver
Rechargeable Battery
Dental Camera
On / Off
Button
P15

Installation steps for Dental Camera Model: WiFi-D1
Note: We recommend you check all ire connection, soft are do nload, and WiFi
connection is orking before you install the door camera on your door.
1. Connect all ires based on the connection sho n in and
2. Setup the soft are and ireless connection based the steps in or
P16
P13 P15
P6 P7
www.iat101.com www.peephole-store.com
In case there are any question, please email us
ia-tecs@hotmail.com or shop@iat101.com

Mini Camera
WiFi TXRX
unit
Note: This photo is for model #: WiFi-MC1-55,WiFi-MC1-90,WiFi-MC1A-55, and WiFi-MC1A-90
Note: Rechargeable battery will not included in the shipping package due to Air Flight shipping
safety regulations. We can provide you the information to buy a compatible battery .
P17
Connector
Strip
Battery
A/V in
5 V DC in
From Battery
3. Examples of Hardware Installations - c.) for Portable Application

Connection guide for Portable Applications
1. Connecting one end of the Audio/ Video /Power Connector to Mini Camera
2. Connecting “connector strip” to WiFi TXRX directly, and then plug the mini 2.5mm 4 poles plug to the
“connector strip” as shown.
3. Plug the battery power to the “connector strip” as shown, and then power on the WiFi TXRX.
Connector Strip
P18
www.iat101.com www.peephole-store.com
Note: Rechargeable battery will not included in the shipping package due to Air Flight shipping safety
regulations. We can provide you the information to buy a compatible battery .
123

Installation steps for portable Solutions
Note: We recommend you check all ire connection, soft are do nload, and WiFi
connection is orking before you install the camera in a hidden location.
1. Connect all ires based on the connection sho n in to
2. Setup the soft are and ireless connection based the steps in or
P19
P17 P18
P6 P7
www.iat101.com www.peephole-store.com
In case there are any question, please email us
ia-tecs@hotmail.com or shop@iat101.com
Please check your portable version is a ne or an old version.

Models of Mini Hidden SPY camera / WiFi Surveillance System in our store
Available model #:
WiFi-MC1-55: ultra mini camera (video) 55 degree viewing angle+ WiFi Transceiver
WiFi-MC1-90: ultra mini camera (video) 90 degree viewing angle + WiFi Transceiver
WiFi-MC1A-55: ultra mini camera (video/audio) 55 degree viewing angle+ WiFi Transceiver
WiFi-MC1A-90: ultra mini camera (video/audio) 90 degree viewing angle + WiFi Transceiver
WiFi-MC1-xx_DVR1: ultra mini camera (video) + WiFi Transceiver + Motion Detect DVR
WiFi-MC1A-xx_DVR1: ultra mini camera (video/audio) + WiFi Transceiver + Motion Detect DVR
WiFi-MC1-55 WiFi-MC1-90 WiFi-MC1A-55 WiFi-MC1A-90
For ordering item please email us
P20
Table of contents