manuals.online logo
Brands
  1. Home
  2. •
  3. Brands
  4. •
  5. Ibanez
  6. •
  7. Music Pedal
  8. •
  9. Ibanez PENTATONE GATE User manual

Ibanez PENTATONE GATE User manual

OWNER’S MANUAL
ENGLISH
Before using this device, be sure to read this manual thoroughly for safe use of it.
After that, keep this manual in a safe place and read it whenever necessary.
Safety Precautions
===
Be sure to observe the following precautions
===
In order to use this device properly, the contents to be observed are explained,
classified as follows.
 The severities of the injury and damage due to incorrect usage by ignoring
the written contents are explained by the following classified indications.
Warnings
Indicates a potentially hazardous situation which, if not avoided,
will result in death or serious injury.
Cautions
Indicates a potentially hazardous situation which, if not avoided,
will result in injury or property damage.

The contents to be observed are explained, being classified by the following
pictograms.
…
This pictogram shows a compulsory action, something that you must do.
…
This pictogram shows a prohibition, something that you must not do.
…
This pictogram shows a notice, something that you need to be alerted to.
Warnings
Never disassemble or modify the device.
In case of an abnormality such as smoke, burning smell or abnormal
sound, immediately stop using the device.
Immediately unplug the AC adapter from the outlet.
Do not operate with wet hands.
<<A short circuit or an electric shock may occur.>>
Cautions
Be sure to use the specified AC adapter.
<<Using an unspecified AC adapter may cause a fire or an electric shock.>>
Do not store or use the device in places such as a bath or outdoors
where water splashes. Also do not use it in places of high humidity,
places with a lot of dust, or at high temperatures.
<<A fire, an electric shock or a failure may occur.>>
Do not store in places of excessive vibrations. <<It may cause a failure.>>
When not in use for a long time, be sure to unplug the AC adapter from
the outlet for safety. <<A fire may occur.>>
Do not apply excess force, drop nor give strong physical impact.
<<A failure or injury may occur.>>
Do not use thinner, alcohol, and the like for cleaning.
<<It may cause a failure.>>
= = = = Observe the following instructions with a product that uses a battery = = = =
Warnings
Do not throw a battery into a fire.
<<A burst, heat generation and a fire may occur.>>
Cautions
Mount a battery with its polarities +/- set correctly.
<<It may cause a failure.>>
Remove the battery when not in use for a long time.
<<Liquid leak may cause a failure.>>
HOSHINO GAKKI CO., LTD.
No.22, 3-Chome, Shumoku-Cho,
Higashi-Ku, Nagoya, Aichi, JAPAN
SPECIFICATIONS
Input Impedance
Connection
example 1 GUITER IN: 200k ohms
Connection
example 2, 3
GUITER IN: 270k ohms
GATE IN: 460k ohms
Output Impedance 1k ohms
Maximum Output Level +15.3 dBu
Power Supply One 9 volt battery (006P) or external
AC adapter (Use DC9V )
Required Current 45 mA@9V
Size [mm] 70 (W) x 116 (D) x 63 (H)
Size [inch] 2.8 (W) x 4.6 (D) x 2.5 (H)
Weight 455g, 1lbs (Including Battery)
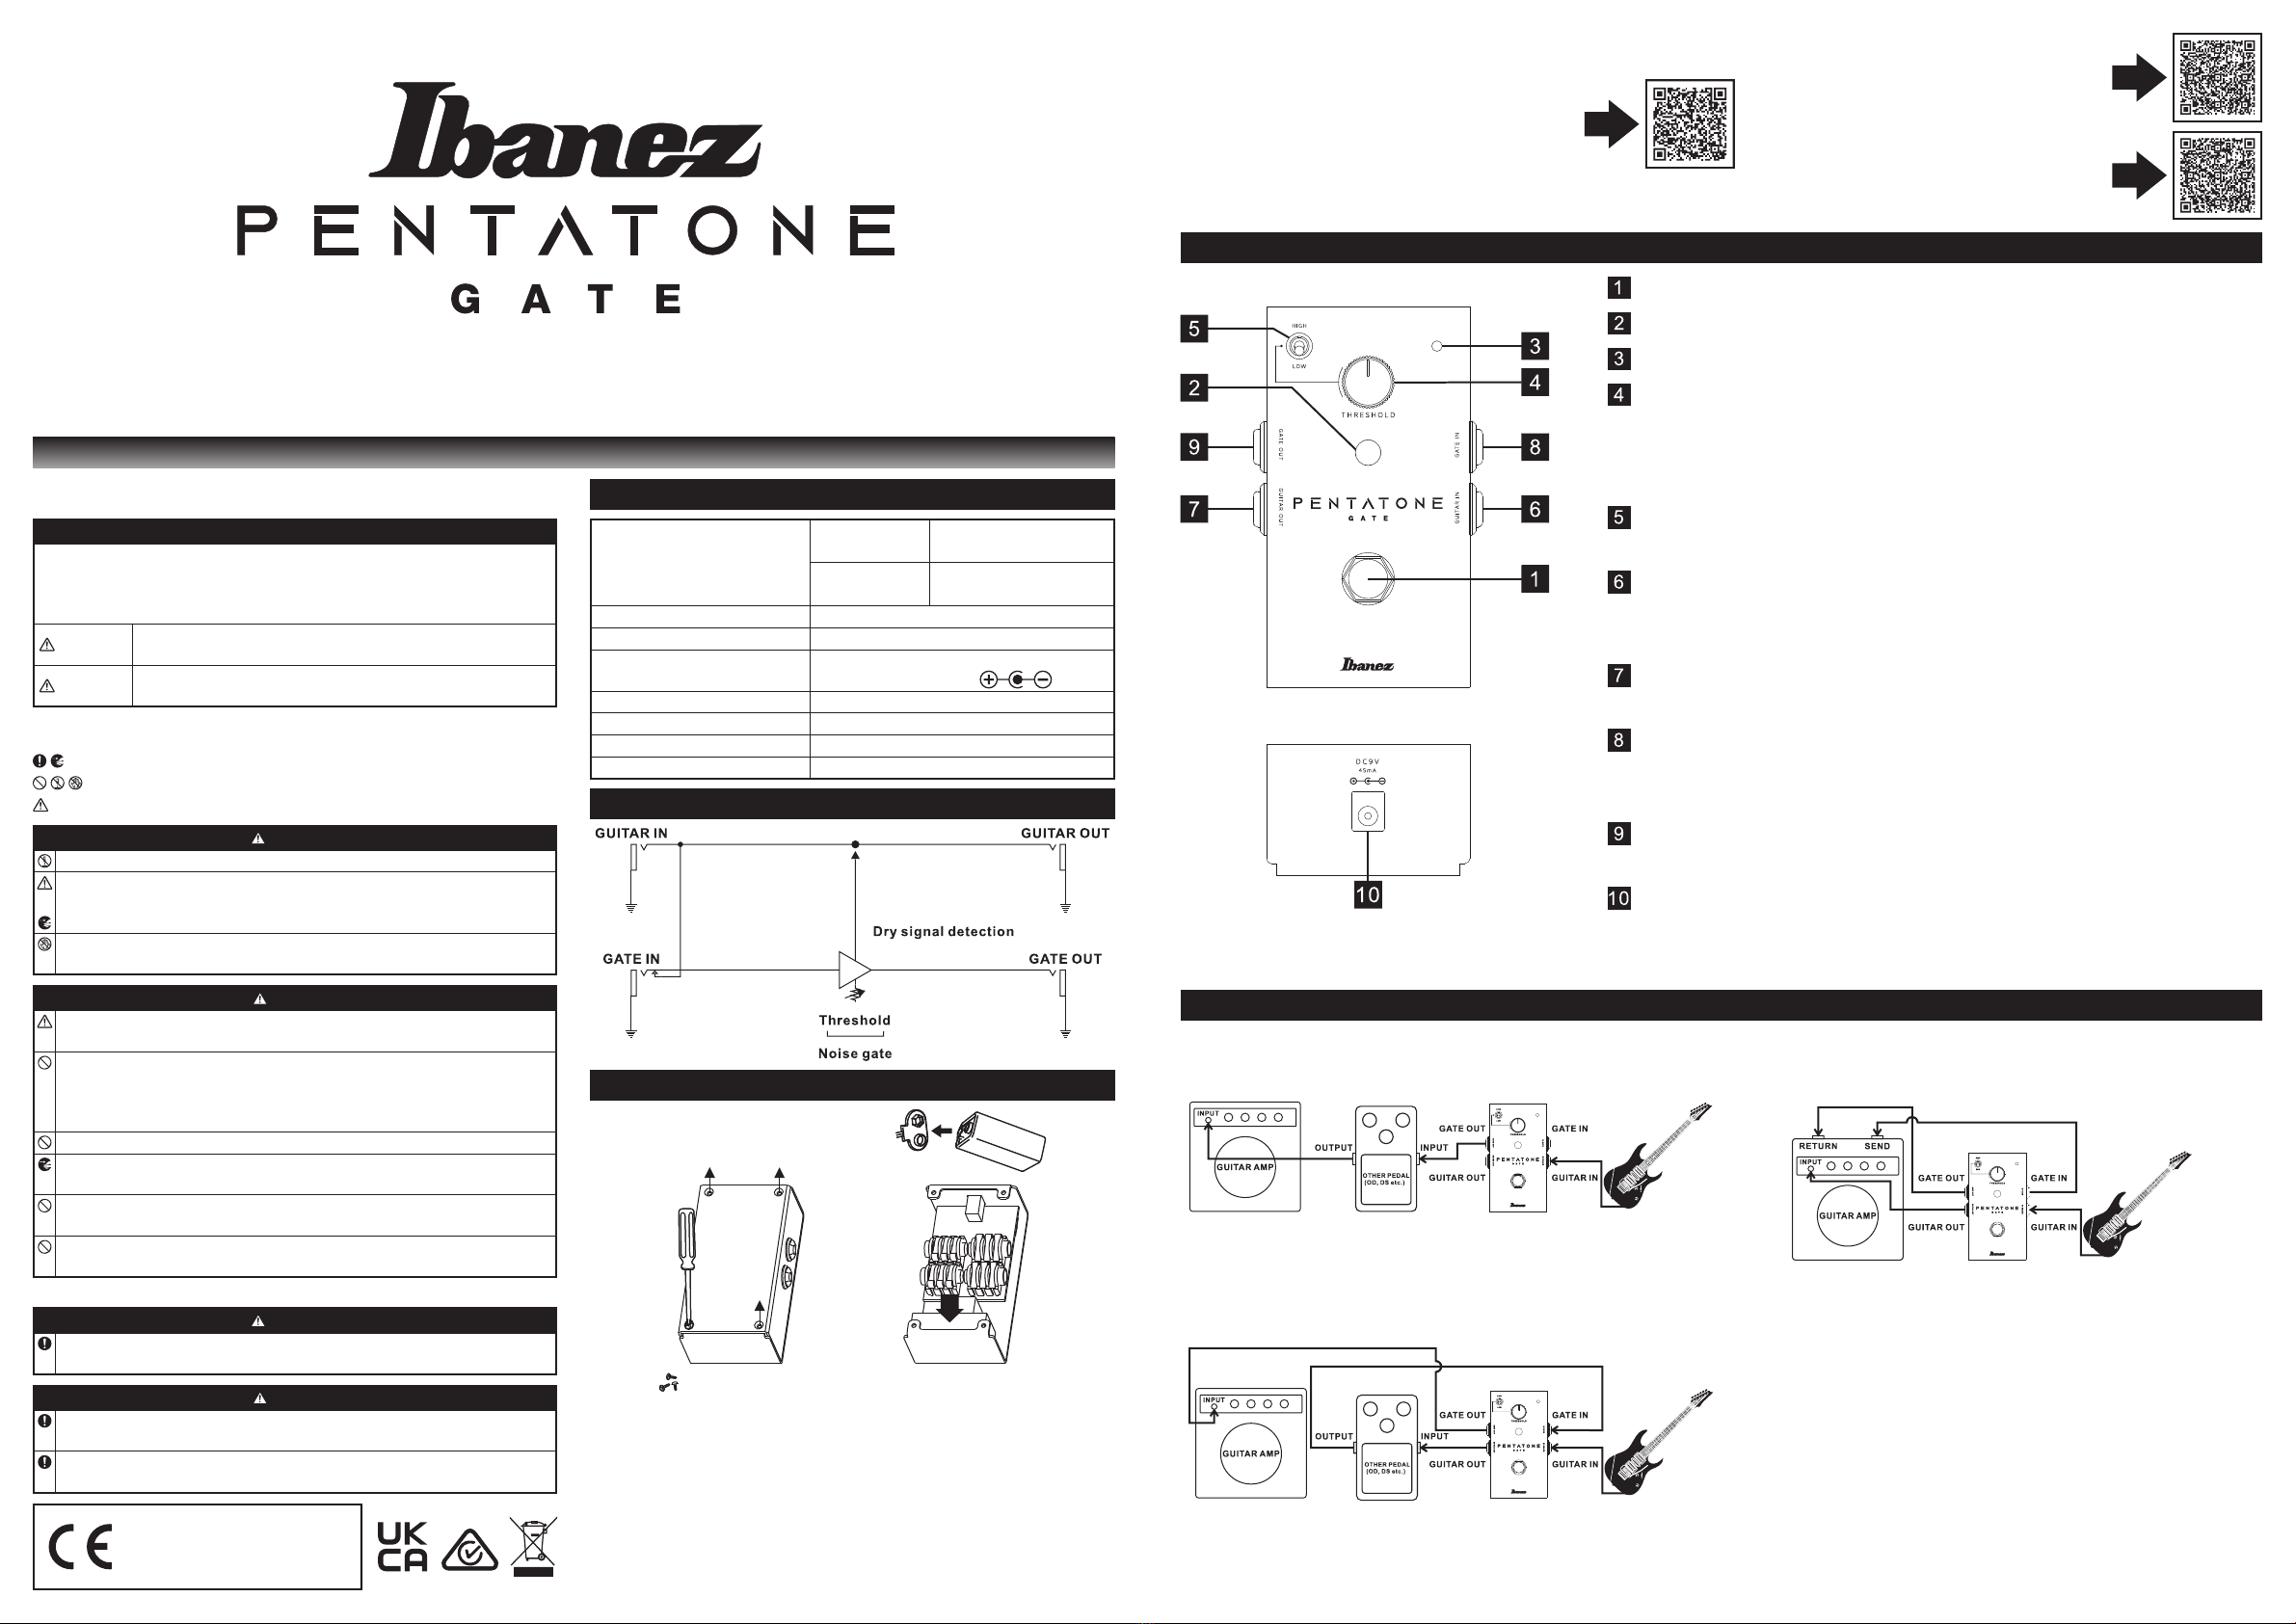
SYSTEM BLOCK DIAGRAM
CHANGING THE BATTERY
Figure A
●Replace the battery with a 006P 9 volt battery ONLY.
●
When opening the rear panel for battery replacement, make sure the AC
adapter is not connected. When the rear panel is opened, PCB (green board
on which parts are soldered) appears. Do not touch this board with a conductor
such as metal or it may cause damage to the equipment or electric shock.
1.
Remove the four screws of the rear panel with a Phillips-head screwdriver.
2. Connect the new battery and place it in the case. (See Figure A)
●Unplug the instrument when not in use to prolong the battery life.
●When battery power is running low, LEDs on the top panel gets dim or
does not light. Replace the battery.
●DEUTSCH / BEDIENUNGSANLEITUNG
●FRANÇAIS / MANUEL DE L’UTILISATEUR
●ESPAÑOL / MANUAL DEL USUARIO
●ITALIANO / MANUALE D’ISTRUZIONI
●NEDERLANDS / GEBRUIKERSHANDLEIDING
●РУССКИЙ / РУКОВОДСТВО ПОЛЬЗОВАТЕЛЯ
●POLSKI / INSTRUKCJA OBSŁUGI
●PORTUGUÊS / MANUAL DO PROPRIETÁRIO
https://www.ibanez.com/world/support/manual/
●ENGLISH / OWNER’S MANUAL
●日本語 / 取扱説明書
http://www.hoshinogakki.co.jp/pdf/ibanez/
manual/en/electronics/PTGATE.pdf
●中国语 / 用户手册
http://www.hoshinogakki.co.jp/pdf/ibanez/
manual/cn/electronics/PTGATE.pdf
OPERATION
TOP PANEL
REAR PANEL
On/off switch: Turns the NOISE GATE function on/off.
Indicator red: Red LED lights up when the NOISE GATE is turned on.
Indicator green: Green LED will light up when the gate is working.
THRESHOLD: Controls the threshold level that engages the mute
circuitry. This sets the limit for when the gate will take effect and start to
decrease or mute the signal. Turning the knob clockwise increases the
threshold, which means the signal will be muted faster.
THRESHOLD mode: Switches the range, HIGH or LOW.
HIGH activates the mute circuitry at an earlier time.
GUITAR IN: Connects an instrument, such as a guitar or the output of
another device via a shielded cable.
Plugging into this jack automatically puts power to the unit.
GUITAR OUT: Sends the input signal. Connect to the input of an
amplifier or another device via a shielded cable.
GATE IN: Connect right after a device to which you’d like to add the
noise gate circuitry, such as a preamp in of an amplifier or a distortion
pedal. Refer to the connection examples. (See Figure B)
GATE OUT: Sends the gated signal. Connect to an amplifier or another
device via a shielded cable.
EXT DC input: Be sure to use a center negative external DC 9V power
supply. (AC/DC adapter etc.)
When using this jack, the internal battery is switched off.
CONNECTION EXAMPLE
Connection example 1 Connection example 2
Connection example 3
Figure B
取扱説明書
日本語
機器を安全にご使用いただくため、ご使用前にこの取扱説明書を必ずお読み
ください。そのあとは大切に保管し、必要になったときにお読みください。
安全上のご注意== 必ずお守りください ==
機器を正しくご使用いただくために、必ずお守りいただくことを次のように
区分して説明しています。

表示内容を無視して誤った使い方をしたときに生じる危害や損害の程度を
次の表示で区分して説明しています。
警告 この表示の欄は、「人が死亡または重傷などを負う可能性が想定
される」内容を示しています。
注意 この表示の欄は、「傷害を負う可能性または物的損害が発生する
可能性が想定される」内容を示しています。
 お守りいただく内容の種類を、次の絵表示で区分して説明しています。
…この絵表示は、必ず実行していただく「強制」の内容を示しています。
…この絵表示は、してはいけない「禁止」の内容を示しています。
…この絵表示は、気をつけていただきたい「注意喚起」の内容を示しています。
警告
機器を絶対に分解・改造しないでください。
煙が出たり、異臭や異音がする場合、直ちに機器の使用を中止してください。
直ちにコンセントから AC アダプターを抜いてください。
水滴のついた手で操作をしないでください。
《ショート・感電の恐れがあります。》
注意
必ず指定の AC アダプターをご使用ください。
《指定以外の AC アダプターを使用すると火災、感電の原因になること
があります。》
風呂場や屋外など水のかかる所、湿度が高いところ、ほこりの多い所、
温度の高い所では保管や使用をしないでください。
《火災・感電や故障の原因になることがあります。》
振動の多い場所で保管しないでください。
《故障の原因になります。》
長期間機器を使用しないときは、安全のため、必ず AC アダプターを
コンセントから抜いてください。
《火災の原因になることがあります。》
本体に無理な力を加えたり、落としたり、強くぶつけたりしない。
《故障・けがの原因になります。》
お手入れにはシンナー・アルコール類は使用しない。
《故障の原因になります。》
= = = = 電池を使用する商品のみ、以下の指示を必ずお守りください = = = =
警告
電池を火の中に入れない。
《破裂・発熱・発火の恐れがあります。》
注意
電池は +/- を正しく装着する。
《故障の原因になります。》
電池は長時間使用しないときは外す。
《漏液等で故障の原因になります。》
主な仕様
Input Impedance
Connection
example 1 GUITER IN: 200k ohms
Connection
example 2, 3
GUITER IN: 270k ohms
GATE IN: 460k ohms
Output Impedance 1k ohms
Maximum Output Level +15.3 dBu
Power Supply One 9 volt battery (006P) or external
AC adapter (Use DC9V )
Required Current 45 mA@9V
Size [mm] 70 (W) x 116 (D) x 63 (H)
Size [inch] 2.8 (W) x 4.6 (D) x 2.5 (H)
Weight 455g, 1lbs (Including Battery)
システムブロック図
電池交換
Figure A
●006P 型 9V 電池 1 本をお使いください。
● 電池交換のため裏蓋を開けるときは AC アダプターが接続されていないことを必ず
確認ください。また、裏蓋を開けた際、PCB(部品が半田付けされている緑色の板)
に金属など電気が導通するものを接触させないようにしてください。機器の破損や
感電する恐れがあります。
1. 本体の裏蓋を取り付けてある 4 本のビスを、+ ドライバーで取りはずします。
2. 電池にスナップを接続し、ケース(Figure A 参照)に納めます。
●電池を長持ちさせるため、使用しない時はインプット・ジャックからプラグを抜い
ておいてください。
● 電池が消耗すると、トップパネルの LED が暗くなったり、点灯しない場合があります。
早めに電池交換をしてください。
操作説明
トップパネル
リアパネル
オン / オフ スイッチ:ノイズ・ゲート機能のオン / オフを切り替えます。
赤色 LED インジケーター:ノイズ・ゲート機能がオンの時に赤色 LED
が点灯します。
緑色 LED インジケーター:ゲートが作動しているときは緑色 LED が
点灯します。
スレッショルド:ミュート回路を動作させるスレッショルド・レベルを
調節します。このノイズ・ゲート回路は、入力信号のレベルがどの程度
小さくなったかを検知し、ゲート・アウトプット・ジャックの直前で出力
信号をミュートします。時計回りに回すと、スレッショルドが高くなり
ます。つまり、信号が早くミュートされます。
スレッショルドモード:スレッショルドの範囲を切り替えます。
High モードは Low モードよりも、早いタイミングでミュート回路
が作動し、より強くゲートを掛けられます。
ギターイン:ギター等の楽器や、他のエフェクターのアウトと
シールド・ケーブルで接続します。プラグを挿すと電源が供給されます。
ギターアウト:入力信号を出力します。アンプや他のエフェクターの
インプットにシールド・ケーブルで接続します。
ゲートイン:アンプのプリアンプやディストーション・ペダルなど、
ミュート回路を作動させたい機器の直後に接続します。接続例を参考に
してください。(Figure B 参照)
ゲートアウト:ゲートを通して信号を出力します。アンプや他の
エフェクターをシールドケーブルで接続します。
DC ジャック:電源は必ずセンターマイナスの外部 DC 9V 電源を使用
してください。(AC/DC アダプターなど )
このジャックの使用中、内部の電池はオフになります。
接続例
接続例1接続例2
接続例3
Figure B
© HOSHINO GAKKI CO., LTD. PRINTED IN CHINA SEP231235

Other Ibanez Music Pedal manuals

Ibanez WH10V2 User manual

Ibanez

Ibanez WH10V2 User manual

Ibanez LF7 User manual

Ibanez

Ibanez LF7 User manual

Ibanez WD7JUNIOR User manual

Ibanez

Ibanez WD7JUNIOR User manual

Ibanez Tube Screamer TS808HW User manual

Ibanez

Ibanez Tube Screamer TS808HW User manual

Ibanez AF2 User manual

Ibanez

Ibanez AF2 User manual

Ibanez Tone-Lok PH7 User manual

Ibanez

Ibanez Tone-Lok PH7 User manual

Ibanez OVERDRIVE OD850 User manual

Ibanez

Ibanez OVERDRIVE OD850 User manual

Ibanez TS9DX User manual

Ibanez

Ibanez TS9DX User manual

Ibanez Tone-Lok TC7 User manual

Ibanez

Ibanez Tone-Lok TC7 User manual

Ibanez Tube King Overdrive TK999OD User manual

Ibanez

Ibanez Tube King Overdrive TK999OD User manual

Ibanez TS-808 User manual

Ibanez

Ibanez TS-808 User manual

Ibanez AD9 Analog Delay User manual

Ibanez

Ibanez AD9 Analog Delay User manual

Ibanez Tone-Lok PD7 PHAT-HED User manual

Ibanez

Ibanez Tone-Lok PD7 PHAT-HED User manual

Ibanez Vemuram Tube Screamer Overdrive Pro TSV808 User manual

Ibanez

Ibanez Vemuram Tube Screamer Overdrive Pro TSV808 User manual

Ibanez Analog Delay Mini User manual

Ibanez

Ibanez Analog Delay Mini User manual

Ibanez tube king distortion TK999HT User manual

Ibanez

Ibanez tube king distortion TK999HT User manual

Ibanez Phaser Mini User manual

Ibanez

Ibanez Phaser Mini User manual

Ibanez SD9M User manual

Ibanez

Ibanez SD9M User manual

Ibanez Tone-Lok SB7 User manual

Ibanez

Ibanez Tone-Lok SB7 User manual

Ibanez Soundtank CP5 User manual

Ibanez

Ibanez Soundtank CP5 User manual

Ibanez Tone-Lok TS7 TubeScreamer User manual

Ibanez

Ibanez Tone-Lok TS7 TubeScreamer User manual

Ibanez BB9 bottom booster User manual

Ibanez

Ibanez BB9 bottom booster User manual

Ibanez Tube Screamer TS-808 User manual

Ibanez

Ibanez Tube Screamer TS-808 User manual

Ibanez Tone-Lok AP7 User manual

Ibanez

Ibanez Tone-Lok AP7 User manual

Popular Music Pedal manuals by other brands

Duncan Shape Shifter SFX-07 manual

Duncan

Duncan Shape Shifter SFX-07 manual

TC Electronic Viscous Vibe user manual

TC Electronic

TC Electronic Viscous Vibe user manual

Voodoo Lab TREMOLO II user manual

Voodoo Lab

Voodoo Lab TREMOLO II user manual

MECA EVO1 Series Setup guide

MECA

MECA EVO1 Series Setup guide

Alesis ModFX Phingr Reference manual

Alesis

Alesis ModFX Phingr Reference manual

Free The Tone AS-1R owner's manual

Free The Tone

Free The Tone AS-1R owner's manual

TC Electronic Sentry Noise Gate quick start guide

TC Electronic

TC Electronic Sentry Noise Gate quick start guide

Korg Nu:Tekt OD-S owner's manual

Korg

Korg Nu:Tekt OD-S owner's manual

aion POLYPHEMUS manual

aion

aion POLYPHEMUS manual

wave-x PXL4 user manual

wave-x

wave-x PXL4 user manual

Subdecay Variac Overdrive user guide

Subdecay

Subdecay Variac Overdrive user guide

Ross Chorus quick start guide

Ross

Ross Chorus quick start guide

aion BETA PREAMP manual

aion

aion BETA PREAMP manual

Yamaha Pedal Unit LP-5 Assembly instructions

Yamaha

Yamaha Pedal Unit LP-5 Assembly instructions

Source Audio Soundblox 2 user guide

Source Audio

Source Audio Soundblox 2 user guide

Bond Audio Supro Drive user manual

Bond Audio

Bond Audio Supro Drive user manual

BYOC Large Beaver Build instructions

BYOC

BYOC Large Beaver Build instructions

StewMac SWELL DRIVE Instruction guide

StewMac

StewMac SWELL DRIVE Instruction guide

manuals.online logo
manuals.online logoBrands
  • About & Mission
  • Contact us
  • Privacy Policy
  • Terms and Conditions

Copyright 2025 Manuals.Online. All Rights Reserved.