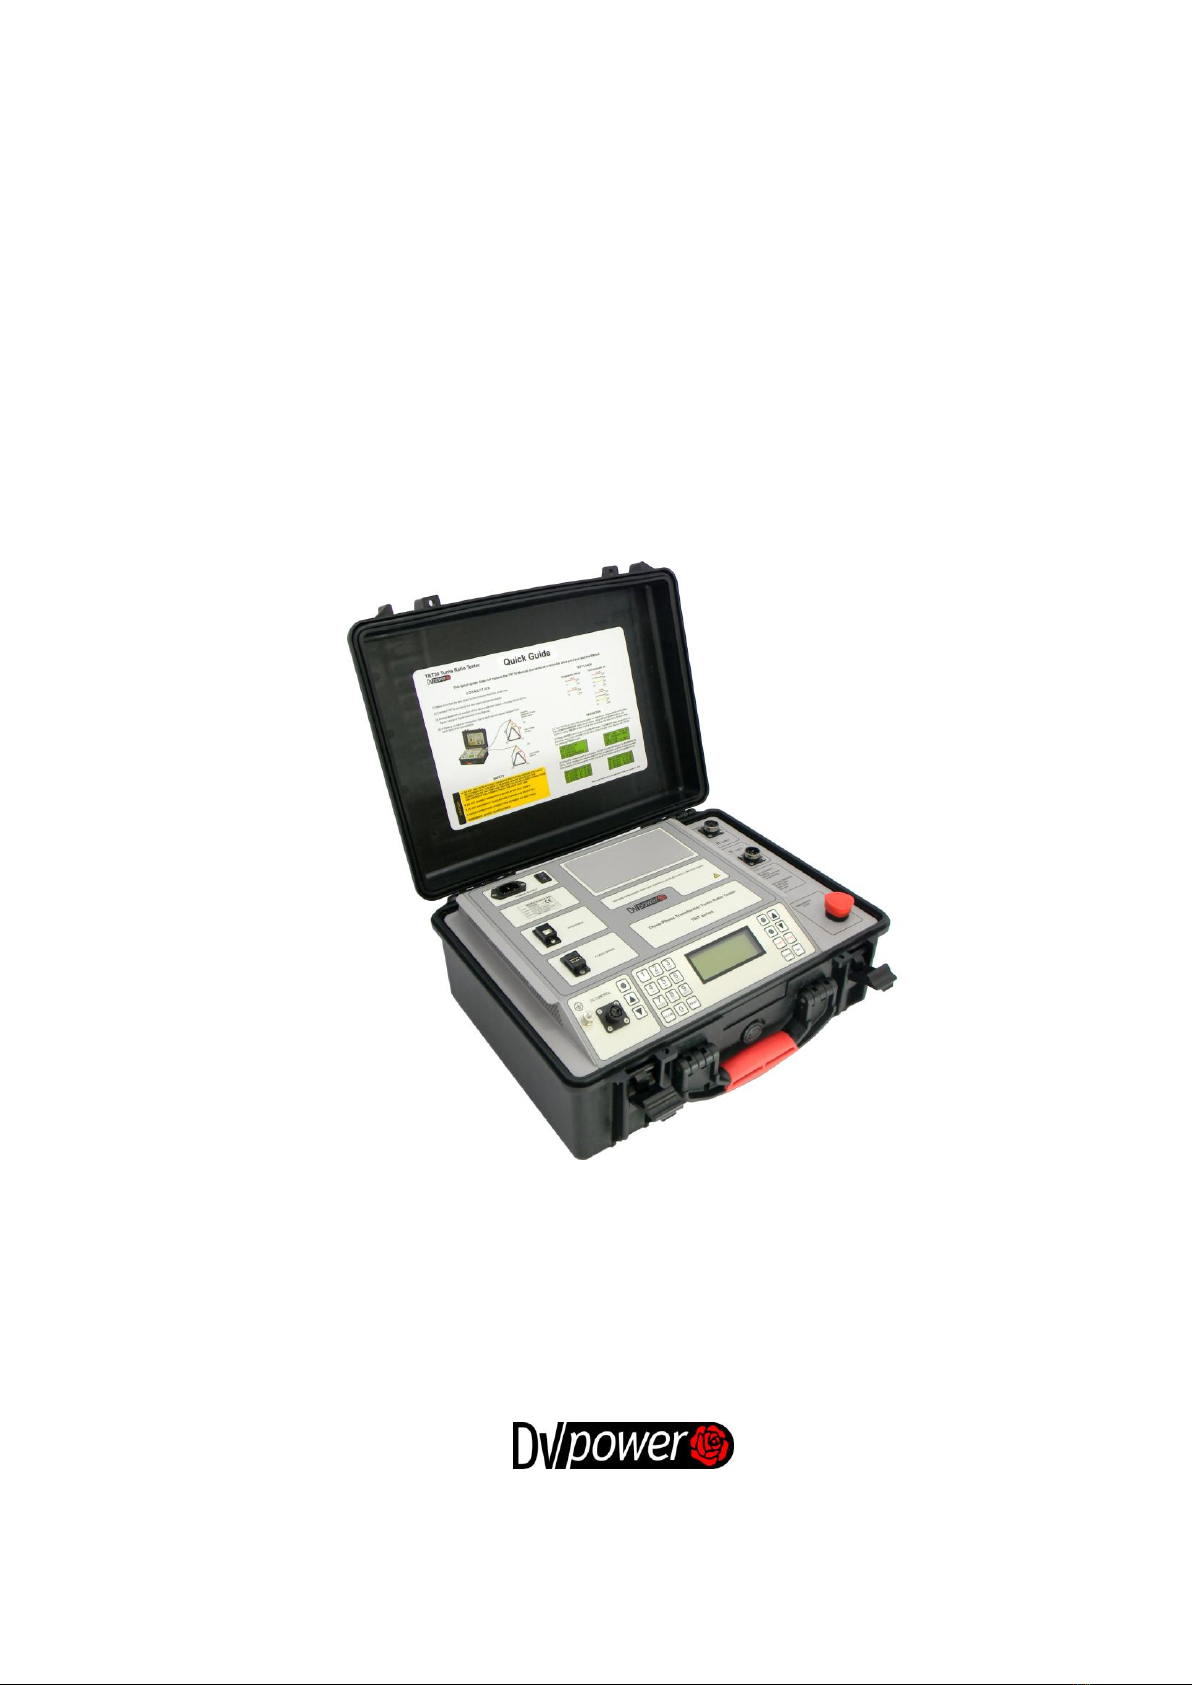
IBEKO POWER DV-Power TRT3A User manual

TRT33A
T H R E E P H A S E T R A N S F O R M E R
T U R N S R A T I O T E S T E R
Manual
IBEKO POWER AB

2
TRT33A Contents
Contents
1 Introduction ......................................................................................................................................3
2 Safety Instructions............................................................................................................................4
3 Designated Use................................................................................................................................6
4 Description.......................................................................................................................................7
5 Getting Started...............................................................................................................................11
6 DV-Win Software............................................................................................................................31
7 Error Messages..............................................................................................................................40
8 Troubleshooting .............................................................................................................................42
9 Technical Data...............................................................................................................................43
10 Accessories....................................................................................................................................44
Manufacturer Contact Information..........................................................................................................44
Manual Version: TR1A-5.00
This Manual refers to the firmware version TR1A-5.00
IBEKO Power AB 2011
This Manual is a publication of IBEKO Power AB, 181 33 Lidingö, Sweden.
All rights including translation reserved. Reproduction of any kind, e.g., photocopying, microfilming or storage in
electronic data processing systems, requires the explicit consent of IBEKO Power AB. Reprinting, wholly or in part,
is not permitted.
This Manual represents the technical status at the time of printing. The product information, specifications, and all
technical data contained within this Manual are not contractually binding. IBEKO Power AB reserves the right to
make changes at any time to the technology and/or configuration without announcement. IBEKO Power AB is not
to be held liable for statements and declarations given in this Manual. The user is responsible for every application
described in this Manual and its results.
IBEKO Power AB explicitly exonerates itself from all liability for mistakes in this Manual.
IBEKO Power AB translates this Manual from its source language English into a number of other languages. Any
translation of this Manual is done for local requirements, and in the event of a dispute between the English and any
non-English versions, the English version of this Manual shall govern.

3
TRT33A Introduction
1 Introduction
This Manual contains helpful instructions on how to use TRT33A in a safe, proper and efficient way.
Following these instructions can help you to avoid dangerous situations, repair costs and other miss
happenings due to incorrect operation. Furthermore it ensures the reliability and life cycle of your
TRT33A.
TRT33A must be used in observance of all existing safety requirements and regulations from
national/local standards for accident prevention and environmental protection.
Reading the TRT33A Manual alone does not exempt the user from the duty of complying with all national
and international safety regulations relevant for working with TRT33A.

4
TRT33A Safety Instructions
2 Safety Instructions
Safety is the responsibility of the user. Before operating TRT33A, please read carefully the following
safety instructions.
It is not recommended that the TRT33A is used (or even turned on) without the understanding of this
Manual.
TRT33A should only be operated by trained and authorized personnel.
2.1 Rules for Use
•TRT33A should only be used when in a technically fit condition. Its use should be in accordance with
the safety regulations for the actual working site and application. Always be aware of the dangers of
high voltages associated with this equipment and its environment. Pay attention to the information
provided in the Manual.
•TRT33A is intended exclusively for the application areas specified in ”Designated Use”. The
manufacturer and distributors are not liable for damage resulting from wrong usage. The user alone
assumes all responsibility and risk.
•The instructions provided in this Manual are considered part of the rules governing proper usage.
•Do not open TRT33A. All service and maintenance work must be performed by qualified personnel.
2.2 Orderly Practices and Procedures
•The Manual should always be available on the site where the TRT33A is used.
•Before using TRT33A, all personnel (even personnel who only occasionally, or less frequently, work
with TRT33A) assigned to TRT33A should read the operations Manual.
•Do not undertake any modifications, extensions, or adaptations to the TRT33A.
•Use TRT33A in conjunction with original accessories only.
•Use both TRT33A and its original accessories for its designated use only.
2.3 Cleaning
To clean TRT33A, use a cloth dampened with isopropanol alcohol or water.
2.4 Operator Qualifications
•Testing with TRT33A should only be carried out by authorized and qualified personnel.
•Personnel receiving training, instruction, direction or education on the TRT33A should remain under
the constant supervision of an experienced operator while working with the test set and the test object.
2.5 Safe Operation Procedures
•Hazardous voltages of up to 400 V can occur inside TRT33A. Therefore, it is not permitted to open
the TRT33A.
•Hazardous voltages exist on the terminals of the TRT33A when the "Red" LED is lit. Never assume
that the connections are safe if this LED is extinguished. Switch off and unplug the TRT33A before
touching the connections, particularly if a fault is suspected.
•Before putting TRT33A into operation, check the test set for any visible damage.
•Do not operate TRT33A under wet or moist conditions (condensation).
•Do not operate TRT33A when explosive gas or vapors are present.
•The serial interface of TRT33A should only have external devices connected that meet the
requirements for SELV equipment according to EN 60950 or IEC 60950.

5
TRT33A Safety Instructions
•If TRT33A is opened by the customer, all guarantees are invalidated.
•If TRT33A seems to be functioning improperly, please contact the IBEKO POWER AB (refer to
section ”Manufacturer Contact Information”), after first checking the section Error Messages.
•Before connecting the TRT33A ensure that the transformer to be tested is completely de-energized
and isolated from both line and load. Every terminal should be checked and verified before
connection of the TRT33A. Ground connections may be left in place.
•Do not use TRT33A without the extra protective ground cables for the TRT33A. It must never be
operated in a non-grounded configuration as this may result in electrical shock to the user or damage
to the TRT33A. Always establish this connection as the first one before you do any other
connections, and separate this connection as the very last one.
•Where possible the outer casing of the transformer under test should also be connected to a safety
earth to prevent the risk of shock. Where this cannot be achieved, adequate precautions should be
taken to prevent access to the transformer, such as barriers.
•Never exchange connections to the HV and LV sides of the transformer. The "H" connections must
always be connected to the High Voltage side of the transformer. The "X" connections must always
be connected to the Low Voltage side of the transformer. Interchanging any or all of the connections
may result in damage to the transformer or the TRT33A and represents a significant safety hazard
for personnel.
2.6 Power Supply
•Supply TRT33A only from a power outlet that is equipped with protective ground.
•Instead of supplying TRT33A from phase –neutral (L1-N, A-N, H1-H0), it may also be supplied from
phase to phase (e.g., L1-L2; A-B; H1-H2). However, the voltage must not exceed 240 V AC, please
refer to the section “Technical Data”.

6
TRT33A Designated Use
3 Designated Use
The Three-phase Transformer Turns Ratio Tester TRT33A is specially designed for turns ratio, phase
shift and excitation current measurement of power, distribution and instrument transformers.
The TRT33A generates single-phase and true three phase test voltage. When generating a single phase
excitation voltage, the TRT33A generates and outputs an excitation test voltage to the three transformer
primary windings, in turn. The induced voltage across the unloaded transformer winding is then
measured; the ratio of these voltages is calculated and shown on the display, for all three phases. Vector
groups measured with single phase test voltages are shown at the end of this Manual.
When generating true three phase voltage, the TRT33A generates and outputs a true three phase
excitation test voltage to the three transformer primary windings. The induced three phase voltage
across the unloaded transformer windings are measured and the transformer turns ratio is calculated.
Any other use of the TRT33A than the ones mentioned above is to be considered improper and will not
only invalidate all customer warranty claims but also exempt the manufacturer from its liability for repair
or exchange.

7
TRT33A Description
4 Description
4.1 Front Panel Components
Alphanumeric keypad
Use this keypad to enter value of memory location, nameplate voltages or set Time and Date
UP/DOWN
To select a menu, navigate in the active menu, and set test parameters.
STOP
Press to stop a test, stop the alarm buzzer, or return to previous menu.
START
Press to start a test.
Test parameters must be selected beforehand.
ENTER
Use this button to confirm the test parameters defined, change Language, Time and Date, or to view
memory location.
SET
To scroll between the CONFIGURATION and MEMORY menu, set time and date, or change memory
location.
TC CONTROL unit
To control Tap changer from the TRT33A device using UP and DOWN buttons.
Green LED
• Lights continuously when TRT33A is turned on.
• Flashes when the test can be started.
Display
UP/DOWN to
navigate and set
test parameters
ENTER to confirm the
defined test parameters
STOP to stop
a test
START to start
the test
SET to scroll
between main
menus
Alphanumeric keypad
to enter numerical value
TC CONTROL unit to
control Tap changer
Figure 4-1:
Front panel
components
HV connector
LV connector
Safety Emergency Stop
Press this button to turn off the test
voltage. Turn Clockwise to release.

8
TRT33A Description
Red LED
• Lights continuously in case of operational error.
• Lights continuously when test is started and test voltage is applied.
4.2 Mains power and connectors
4.3 Setting TRT33A’s Language
To set TRT33A‟s language, simultaneously press and hold START and SET button to enter into the
SETTINGS menu. Once there, use UP or DOWN button to select SET LANGUAGE menu. Select the
language with the SET button and confirm the choice with ENTER button.
Pressing ENTER to confirm returns you to the CONFIGURATION menu.
Pressing STOP to cancel returns you to the SETTINGS menu.
4.4 Setting TRT33A’s Time and Date
To set TRT33A‟s internal time and date, choose SET TIME AND DATE by pressing ENTER. Use SET to
scroll between hours, minutes, seconds, year, month and day. Confirm selection by pressing ENTER.
Earth/ground connector.
For protection against parasitic currents or voltages, always connect TRT33A
earth/ground connector to protective ground (PE). Use only the original cable.
For safety reasons, always establish this connection as the first one before
you do any other connections, and also disconnect it as the very last one.
Figure 4-4:
The SET
LANGUAGE
menu
Figure 4-3:
The SETTINGS
menu
Figure 4-2:
Mains power
and connectors
Connector for mains power supply
Power switch
I In this position, TRT33A is connected
to the mains power supply.
0 In this position, TRT33A is separated
From the mains power supply with both
poles.

9
TRT33A Description
Pressing ENTER to confirm returns you to the SETTINGS menu.
Pressing STOP to cancel returns you to one of the two main menus or to the SET TIME AND DATE
menu if the change is still active.
4.5 Other settings
Go to OTHER SETTINGS menu to enable ratio deviation calculation.
This option is required if you want from the TRT33A to calculate ratio deviation, comparing to the name
plate voltages. Use UP/DOWN and press ENTER to select option.
Accuracy check
In the OTHER SETTINGS menu, select ACCURACY CHECK option to check the accuracy of each
channel individually. Pay attention to connect cables successively for each corresponding channel 1U1N
- 2U2N, 1V1N - 2V2N, 1W1N - 2W2N (H1H0 - X1X0, H2H0 - X2X0, H3H0 - X3X0; AN - an, BN - bn, CN
- cn). Unused clamps and cables must be left disconnected and also left on some isolated place.
To skip the test for one of the channels, press STOP. The next channel for connection to transformer is
displayed. After connection is finished, press ENTER to confirm.
After selection of test voltage, press ENTER to confirm and go to the READY state.
If one of these values has to be changed, press STOP to return to a previous menu. To start accuracy
test, press START.
Figure 4-5:
The Set Time and Date
menu showing TRT33A‟s
internal time and date
Figure 4-5:
The SET TIME AND
DATE menu
Figure 4-6:
The OTHER
SETTINGS menu
Figure 4-7:
The RATIO
CALCULATION menu
Figure 4-8:
The ACCURACY
CHECK menu
Figure 4-9:
Next connection

10
TRT33A Description
After the results for the first channel are displayed, the display shows that the TRT is ready for the next
channel to be accuracy controlled. The measuring results are displayed after each channel is accuracy
controlled.
Figure 4-10:
Choosing test voltage
in SET menu
Figure 4-11:
Ready for test
Figure 4-12:
RESULTS menu

11
TRT33A Getting Started
5 Getting Started
5.1 Connecting a Test Object to the TRT33A
Before you connect a test object to the TRT33A, make sure that:
The test object is disconnected or separated from its circuit in accordance with the national safety
regulations and is properly grounded to protective earth.
Ensure that the transformer is completely de-energized.
The TRT33A itself should be properly grounded. To do so, connect the grounding screw on top of
the TRT33A to PE using a grounding cable.
Cable test leads are terminated with special adjusted battery clips. Test cables color and markings are
represented in the table 1.
Table 1: Test lead color and marking
Note: Australian test lead colors also apply to India, Malaysia and South Africa.
Never exchange connections to the HV and LV sides of the transformer. Interchanging any of the
connections may results in damage to the transformer or the TRT33A and also represents a safety
hazard for personnel.
Keep the HV and XV cables physically separate to minimize the effects of any capacitive coupling
between them. Also ensure that any sources of interference are eliminated from the test area if that
is possible.
IEC Test
Lead
Marking
ANSI
Test Lead
Marking
Australian
Test Lead
Marking
Transformer
Terminal
Voltage
Test Lead
Color IEC
Australian
Test Lead
Colors
1N
H0
N
Neutral
Blue
Black
1U
H1
A
High
Red
Red
1V
H2
B
High
Black
White
1W
H3
C
High
Yellow
Blue
2N
X0
n
Neutral
Blue
Black
2U
X1
a
Low
Red
Red
2V
X2
b
Low
Black
White
2W
X3
c
Low
Yellow
Blue
Figure 5-1:
Marking of test
cables

12
TRT33A Getting Started
If the primarily neutral connection does not exist, the 1N (H0; N) lead is left separate from
transformer and other connections leads. It must be placed in such a way to isolate it from other
connections or earth. Primarily pay attention that there is no possibility any personnel can touch it!
With TRT33A turned off, connect the device to the test object. Pay attention to polarity while
connecting measuring cables on single phase transformer.
To maximize accuracy and measurement repeatability make sure that all clamps have a good
connection to the test object and avoid any crossing between measuring cables.
5.1.1 Single-phase transformer
Connect the ground lead of the test set to a low-impedance earth ground.
Connect the H and X test cables to the corresponding H and X connectors of the TRT33A.
Connect clips 1U and 1N (H1 and H0; A and N) to the corresponding HV terminals of the
transformer under test.
Connect clips 2U and 2N (X1 and X0; a and n) to the corresponding XV terminals of the
transformer.
Figure 5-2:
Example of
connecting single
phase transformer
to TRT33A

13
TRT33A Getting Started
5.1.2 Three-phase transformer
Perform the following setup procedure for three-phase transformers:
Connect the ground lead of the test set to a low-impedance earth ground.
Connect the H and X test cables to the corresponding H and X connectors of the TRT33A.
Connect clips 1U, 1V, 1W, and 1N(H1, H2, H3 and H0; A, B, C and N)to the corresponding HV
terminals of the transformer under test.
Connect clips 2U, 2V, 2W, and 2N (X1, X2, X3 and X0; a, b, c and n) to the corresponding XV
terminals of the transformer.
If there is no primarily or secondary neutral connection, 1N or 2N leads (H0 or X0; N or n) must
be separated and isolated.
If the three-phase transformer has a tertiary winding, it should be tested in the same manner as it is done
for the secondary. The transformer is energized using the high voltage windings. Test leads 2U, 2V, 2W
and 2N (X1, X2, X3 and X0; a, b, c and n)are in this case connected to the tertiary.
Figure 5-3:
Example of
connecting a three
phase wye-wye
transformer to
TRT33A
Figure 5-4:
Connection
diagram of Dd
vector group

14
TRT33A Getting Started
5.1.3 Current transformer Testing
The largest number of windings are on the „‟X‟‟ or “S” (secondary) side of the current transformer. The
primary has only one or two turns, or you have to make one using the test cables. Therefore, when
testing current transformer the „‟H” leads are connected to the secondary CT terminals. TRT33A applies
the voltage from the „‟H‟‟ leads and measures induced voltage (in the primary of the CT) through the „‟X‟‟
leads.
Connect the H and X cables as on the figure 5-4 described below.
Press UP/DOWN in CONFIGURATION menu to choose CT option. This option enables measurement of
CT transformers, and is available in HV CONFIG field. In that case LV CONFIG and PH
DISPLACEMENT fields become automatically inactive.
In some cases, where the inductance of the current transformer is lower than the power available from
TRT33A, an over current error will be displayed. To avoid that, choose a lower test voltage for testing
current transformers.
Current transformers with multiple secondary taps are tested similar to single secondary taps. After each
specific ratio is tested, the HV leads can be moved to the next pair of secondary contacts of the
transformer.
Polarity of a CT can be checked. From the measured phase angle, we can see the polarity of a CT. If the
phase angle is close to 0 degrees, polarity is correct. If the phase angle is close to 180 degrees, then the
polarity is not correct.
5.1.3.1 Unmounted CT
Connect ground cable of the device to the earth ground.
Use the TRT33A H and X leads to connect as shown in figure 5-5.
5.1.4 Autotransformer
To test a single-phase autotransformer, perform the following setup procedure:
Connect ground cable of the device to the earth ground.
Connect the H and X test cables to the corresponding H and X connectors of the TRT33A.
Connect clip 1U (H1; A) to the lower numbered terminal and 1N (H0; N) to the higher
numbered terminal of the high-voltage winding.
2U (X1; a) and 2N (X0; n) clips connect to the lower-voltage winding.
Figure 5-5:
Connection of
unmounted CT
transformer

15
TRT33A Getting Started
To test a three-phase autotransformer, perform the following setup procedure:
Connect the ground lead of the test set to a low-impedance earth ground.
Connect the H and X test cables to the corresponding H and X connectors of the TRT33A.
Connect clips 1U, 1V, and 1W (H1, H2 and H3; A, B and C) to the corresponding HV terminals
and 1N (H0; N)to the neutral terminal of the transformer under test.
Connect clips 2U, 2V and 2W (X1, X2 and X3; a, b and c) to the corresponding XV terminals and
2N (X0; n)to the neutral terminal of the transformer, together with 1N (H0; N).
If there is no primary or secondary neutral connection, 1N (H0; N) or 2N (X0; n) leads must be
separated and isolated.
C A U T I O N
FOR SAFETY REASONS, ALWAYS ESTABLISH A CONNECTION OF THE DEVICE WITH
TEST OBJECT IN THE WAY AS DESCRIBED IN THIS MANUAL.
DO NOT CONNECT MEASURING CABLES AFTER TEST STARTS.
DO NOT DISCONNECT ANY LEADS BEFORE THE END OF THE TEST.
NEVER INTERCHANGE CONNECTIONS BETWEEN THE HIGH- AND LOW-VOLTAGE
TRANSFORMER TERMINALS
Figure 5-6:
Connection of the
single phase
autotransformer
Figure 5-7:
Connection
diagram of YNa
autotransformer

16
TRT33A Getting Started
Note: The TRT33A protects against a wrong hook-up to a transformer (see section 7, Error messages).
5.2 Setting the Measurement Parameters
Directly after the first message on the display, the TRT33A automatically changes to the
CONFIGURATION menu and the green LED lights up. By pressing SET you can switch between
CONFIGURATION menu and MEMORY menu. (See section 5.4 Viewing Results of Previous Tests).
5.2.1 Measurement on single phase transformers
Press UP/DOWN in the HV CONFIG field to choose SINGLE option. In that case LV CONFIG and PH
DISPLACEMENT fields cannot be selected. Available options in CONFIGURATION menu are listed in
Table 2.
Table 2: Available options in configuration menu
HV Config.
LV Config.
Ph Displ.
comment
D
displayed
displayed
delta winding
Y
displayed
displayed
star winding
YN
displayed
displayed
star winding with neutral point
Z
displayed
displayed
zigzag
ZN
displayed
displayed
zigzag with neutral point
SINGLE
hidden
hidden
single transformer
CT
hidden
hidden
current transformer (CT)
AUTO
hidden
hidden
autotransformer menu
AVGD
hidden
hidden
automatic vector group detection
TRUE 3~ TEST
hidden
hidden
only true three-phase test
Press ENTER to choose available options in the configuration menu.
If the ratio deviation calculation is enabled, the next menu to enter Name plate voltages and the tap
changer positions are displayed.
Select the following:
transformer‟s HV and LV nominal voltages and tap positions,
test voltage,
memory location (optionally).
If the name plate voltages are not entered, the TRT33A will perform the test and display result, but it will
not calculate nor display turns ratio deviation.
After the Name Plate voltages and tap changer positions are entered, press ENTER to confirm selection.
Figure 5-8:
CONFIGURATION
menu
Figure 5-9:
Input Name plate
voltages values
High Voltage Tap Changer
position
Low Voltage Tap Changer
position

17
TRT33A Getting Started
The next display is a selection of the test voltage.
The following values can be chosen for the test voltages: 1 V, 8 V, 40 V and 100 V AC. Applied test
voltage is single-phase test voltage (see figure and table below). Test voltages of 1 V and 8 V are
recommended for testing current transformers. For testing distribution or power transformers it is
recommended to use the highest test voltage, 100 V or even 40 V. Press UP/DOWN to set the value of
your choice and press ENTER to confirm.
Table 3: Applied test voltage
Applied test voltage
1 V
1U-1N\ H1-H0\ A-N
8 V
1U-1N\ H1-H0\ A-N
40 V
1U-1N\ H1-H0\ A-N
100 V
1U-1N\ H1-H0\ A-N
To scroll between Test Record and Test Reading press SET. Pres STOP to escape memory location
position.
The TRT33A automatically detect if it is connected to a DC power supply. It also automatically detect if
the power supply frequency is 50 Hz or 60 Hz. The frequency of the output voltage is the same as the
frequency of the power supply of the TRT. In case the TRT is connected to a DC power supply, user has
to choose frequency of the output voltage to be either 50 Hz or 60 Hz.
Note: As an alternative supply, in case of need, a DC source could be used to power the TRT33A.
It can be connected directly to a DC source or via an inverter. However, in that case the accuracy
can be slightly affected by some external or internal noise and we will be providing product
updates on this issue regularly as we develop solutions for noise elimination and accuracy
improvement.
The test result from an actual reading can be printed, pressing PRINT when you are in the MEM menu.
Press START+PRINT simultaneously to print all measurements from the actual Test Record. The RES
menu is displayed until you press-on any other button. After that the Test Next Tap message is
displayed.
After the test voltage and frequency are selected, you can select memory location manually (Test
Reading and Test Record). To scroll between Test Reading and Test Record use SET. Setting of Test
Reading and Test Record is performed using UP/DOWN. Press ENTER in order to confirm selection.
Test Reading can contain, for example, all test results obtained in one tap changer position of a
transformer.
Figure 5-11:
Setting the test voltage
Test Record
Test Reading
Figure 5-10:
Applied test
voltage

18
TRT33A Getting Started
Test Record can contain results of all tap changer positions, or complete results obtained on one
transformer.
Note: Manual selection of record/reading will delete results from existing memory locations.
Once these parameters are defined, press ENTER to change to the READY state.
The READY state displays the selected test voltage, test frequency, transformer configuration and
memory location of Test Reading and Test Record. If one of the values has to be changed, press STOP
to return to the previous menu.
The flashing green LED indicates that the TRT33A is now ready to start the test. Press START to run a
test. At the start of the test, a cable connection check is done. In case one of the cables (either HV or
LV) is disconnected on the TRT33A side, an alarm is activated and the error message is shown on the
display.
During the test, the red LED lights continuously symbolizing that the test voltage is applied.
If you want to abort the test, you can press STOP. The CONFIGURATION menu is displayed.
Viewing the Test Results
Once the test is finished, TRT33A automatically changes to the RES menu to display the test results.
If you choose YES option, next measurement procedure will start from Name Plate HV and LV selection.
If you choose NO option, the TRT33A will return you to the CONFIGURATION menu. Test Readings will
be automatically saved in the current Test Record.
Test voltage
Measured ratio of the test objects
Phase displacement error
Excitation current
Ratio error
Figure 5-12:
The READY state
before the test
Figure 5-13:
Test in progress
Figure 5-15:
Message after
results display
Figure 5-14:
The RES menu showing
the test results

19
TRT33A Getting Started
5.2.2 Measurement on three-phase transformers
After all connections have been made, choose an appropriate transformer vector group in the
CONFIGURATION menu. You can also select TRUE 3~ TEST if you want to test ratio by applying true
three-phase test voltage.
Available vector groups in this menu are listed in the Table 4.
Table 4: Available vector group configurations
Configuration
Displacements
D-D, D-Z, D-Zn, Z-D, Zn-D, Y-Y, Y-Yn, Yn-Y, Yn-Yn
0-2-4-6-8-10
D-Y, D-Yn, Y-D, Y-Z, Y-Zn, Yn-D, Yn-Zn, Z-Y, Z-Yn, Zn-Y, Zn-Yn
1-3-5-7-9-11
If AVGD option is selected, the TRT33A will automatically detect vector group of transformer under test.
Press UP/DOWN to choose HV configuration. To confirm your selection press ENTER. After pressing
ENTER, cursor will automatically go to the LV configuration position. Enter LV configuration and then
phase displacement number.
Note:
It is recommended to select TRUE 3~ TEST in cases when:
- the vector group of the transformer under test is not available,
- there are no regular conditions on the transformer side that TRT33A can detect vector group
correctly,
- the transformer under test has the windings distributed on different magnetic core legs,
- it is necessary to measure phase displacement of transformers with irregular vector groups like
phase shifting, rectifier, arc-furnace and traction transformers.
In such a way the TRT33A will perform the test with true three-phase voltage and show results.
Enter the nameplate voltages and press ENTER to confirm selection.
If the nameplate voltages are not entered, the TRT33A will perform a test and display the result, but it
will not calculate nor display turns ratio deviation.
The TRT33A generates single-phase and true three phase test voltage.
When generating a single-phase excitation voltage, the TRT33A supplies in turn single-phase excitation
test voltage to each of the three transformer primary windings. The induced voltages across each of the
corresponding unloaded transformer windings are then measured; the ratio of these voltages is
calculated and shown on the display. It is repeated for all three phases. Vector groups that can be
measured with single phase test voltage applications are shown at the end of this Manual.
Figure 5-16:
CONFIGURATION
menu
Figure 5-17:
The NAME PLATE
voltage selection

20
TRT33A Getting Started
When generating true three phase test voltage, the TRT33A generates and outputs a true three-phase
excitation test voltage to three transformer primary windings. The induced three phase voltage across
the unloaded transformer windings are measured and the transformer turns ratio is calculated.
Applied test voltages are explained at figures and tables below. Test voltages of 1 V and 8 V are
recommended for testing of current transformers. For testing distribution or power transformers it is
recommended to use the highest test voltage, 100 V or even 40 V. Press UP/DOWN to set the value of
your choice and then press ENTER to confirm.
Table 5: Applied single-phase voltage
Applied single-phase voltage
1 V or 1
3
V
Depends on the vector group
8 V or 8
3
V
Depends on the vector group
40 V or 40
3
V
Depends on the vector group
100 V or 100
3
V
Depends on the vector group
Table 6: Applied true three-phase voltage
Applied true three-phase voltage
1
3
V
1U-1V,1U-1W,1V-1W
H1-H0, H1-H3, H2-H3
A1-A2, A1-A3, A2-A3
8
3
V
1U-1V,1U-1W,1V-1W
H1-H0, H1-H3, H2-H3
A1-A2, A1-A3, A2-A3
40
3
V
1U-1V,1U-1W,1V-1W
H1-H0, H1-H3, H2-H3
A1-A2, A1-A3, A2-A3
100
3
V
1U-1V,1U-1W,1V-1W
H1-H0, H1-H3, H2-H3
A1-A2, A1-A3, A2-A3
Figure 5-18:
The test voltage
selection
Figure 5-19:
Single-phase
cable set
Table of contents
Other IBEKO POWER Test Equipment manuals