manuals.online logo
Brands
  1. Home
  2. •
  3. Brands
  4. •
  5. IBM
  6. •
  7. Firewall
  8. •
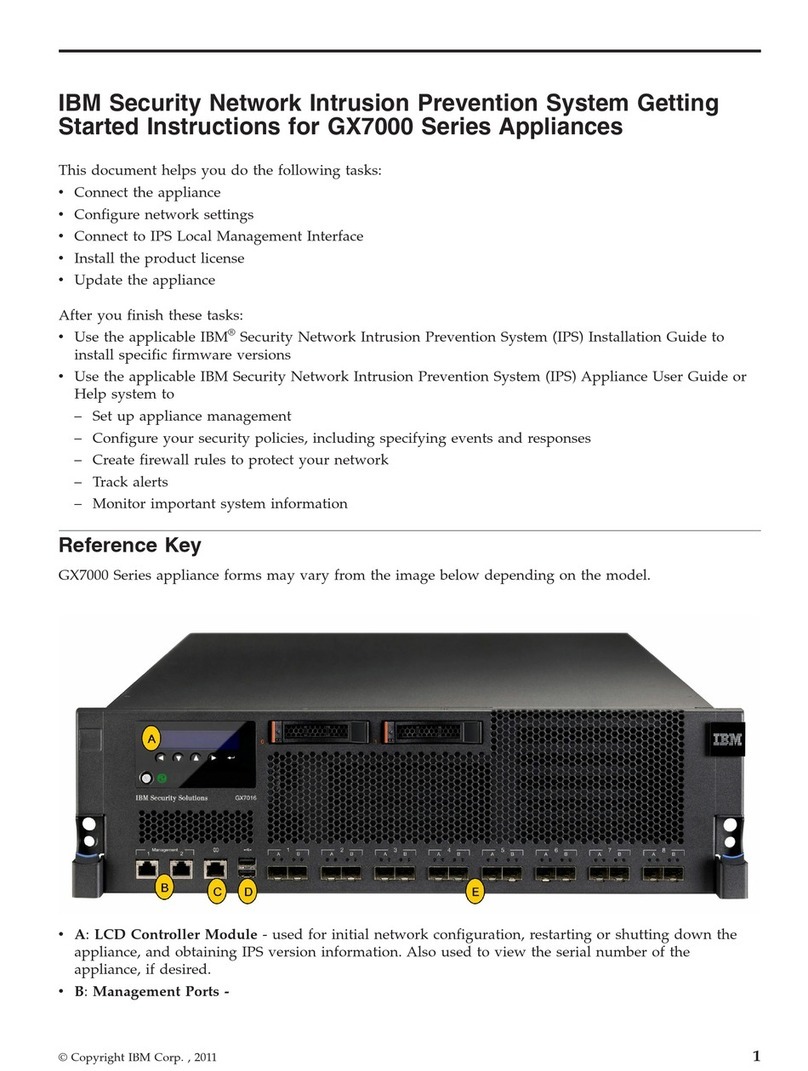
  9. IBM Proventia GX5000 Series User manual

IBM Proventia GX5000 Series User manual

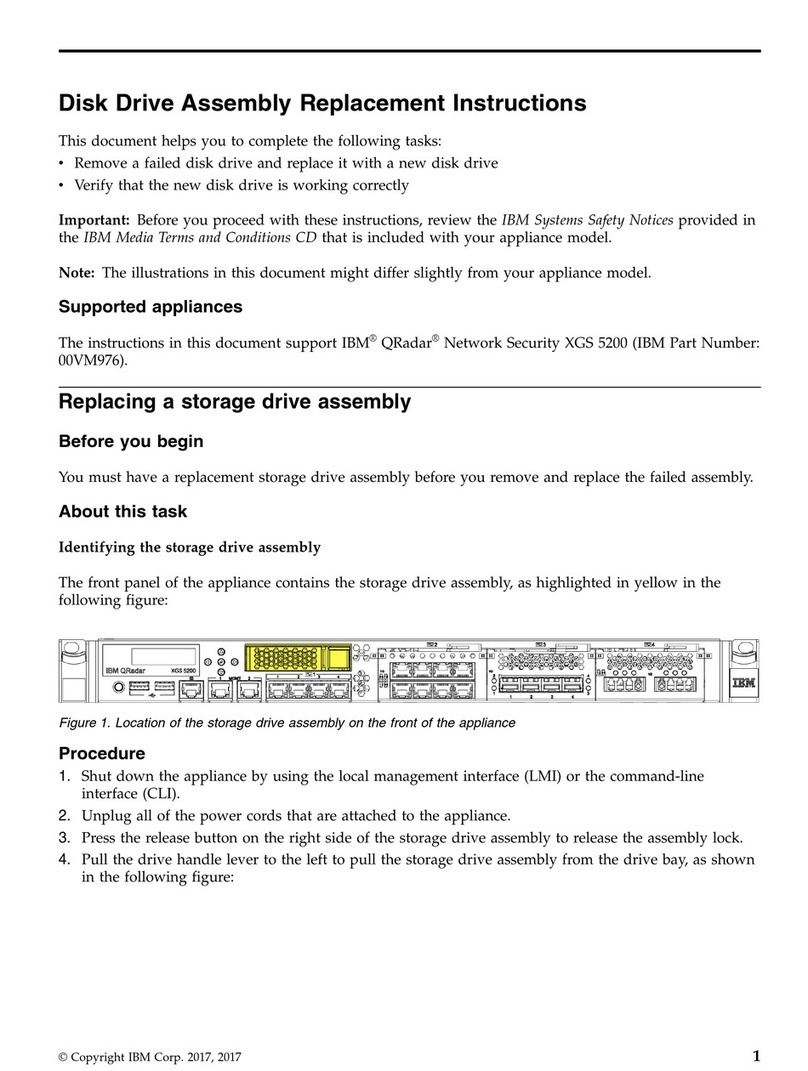
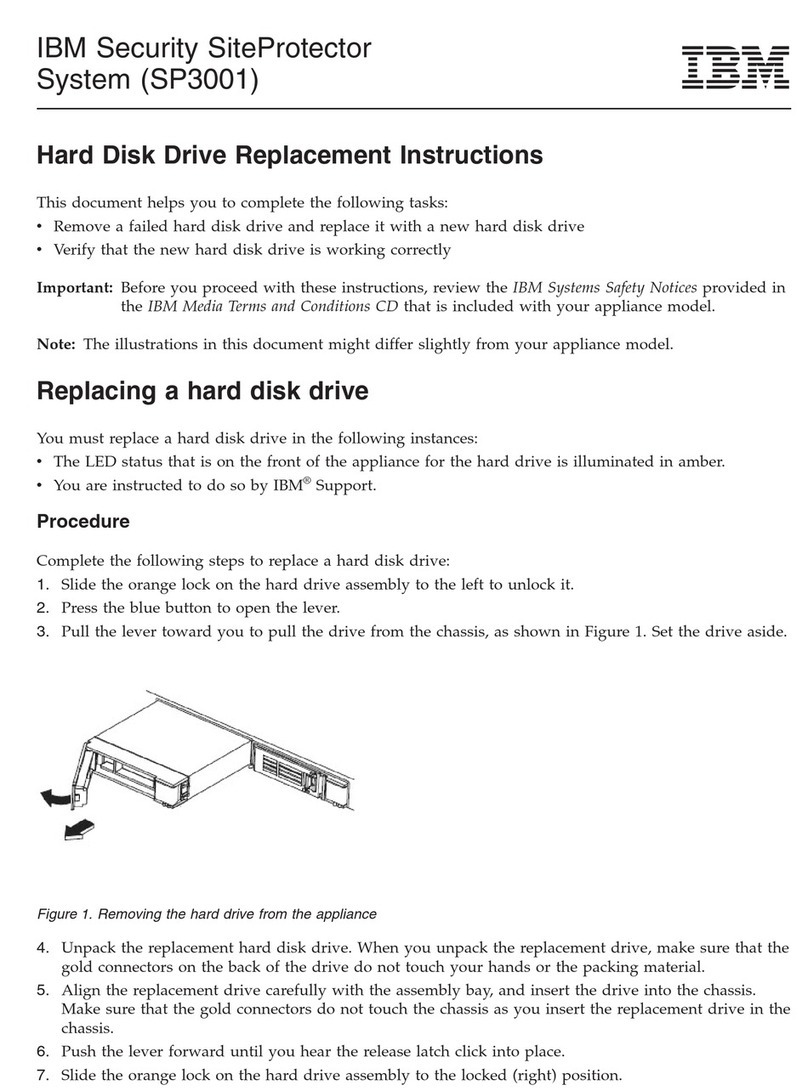
Applying Initial Updates
Download Updates
1. Select Automatic Updates.
2. Select Yes on the Export Administration Regulation page, and then click Submit. The Updates to Download
page appears.
3. Click Find Updates.
4. If updates are available, click Download Updates.
Install Updates
1. Select Automatic Updates.
2. Select Yes on the Export Administration Regulation page, and then click Submit.
3. On the Available Installs page, select the updates you want to install, and then click Install Updates.
Some firmware updates require you to reboot the appliance. Read the firmware update Readme for details.
4. View the installation status in the Update History table on the Update Status page.
Next Steps
You are now ready to configure advanced settings, including management, security, and firewall settings. Go to
the Proventia Network IPS G and GX Appliance User Guide for more information. See the note in the right sidebar
for access instructions.
Need Help or Documentation?
Online: http://www.iss.net/support
The User Guide and other deployment information for Proventia Network
IPS G and GX appliances is available at our product documentation
Web site: http://www.iss.net/support/documentation/index.php
Or Call: 1-888-447-4861
5
Appliance Updates
Ensure you have applied the latest updates to the appliance. You
can install the following:
Firmware updates. These updates include new program files, fixes
or patches, enhancements, or online Help updates.
Intrusion prevention updates. These updates contain the most
recent security content provided by the IBM Internet Security
Systems X-Force®research and development team.
Getting Started
GX5000 Series Appliance
Welcome
Congratulations on your new appliance!
This card will help you do the following:
Connect the Appliance
Configure Appliance Settings
Connect to Proventia Manager
Install the Product License
Update the Appliance
After you finish these tasks, the IBM Proventia®Network
Intrusion Prevention System (IPS) User Guide walks you
through other important tasks, such as:
• Setting up appliance management
• Configuring your security policies, including specifying
events and responses
• Creating firewall rules to protect your network
• Tracking alerts
• Monitoring important system information
Requirements:
• Power cord(s)
• Proventia serial console cable (blue)
• Ethernet crossover cable (red)
• For each inline segment:*
- A pair of Ethernet cables, straight-through or
crossover, depending on your network type
- A crossover adapter
• Additional Ethernet cables as needed
• PC with Internet Explorer and Internet connection
*IBM provides one crossover adapter and two one-foot Ethernet cables
(green) per segment.
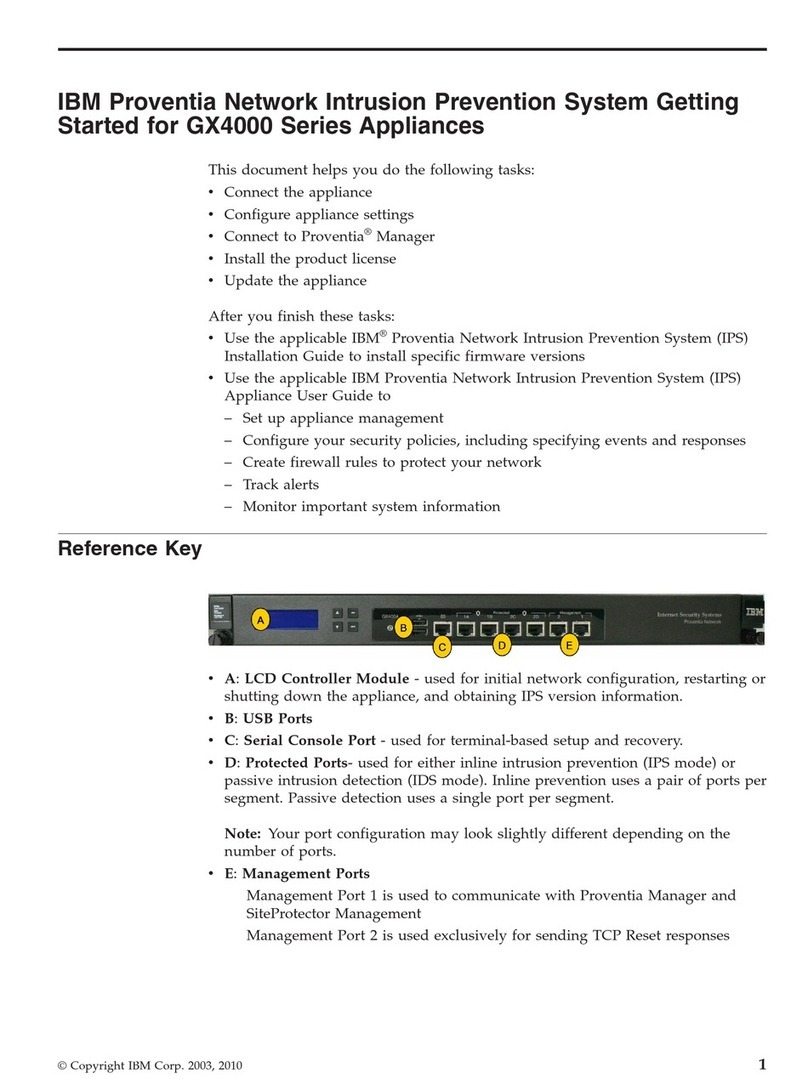
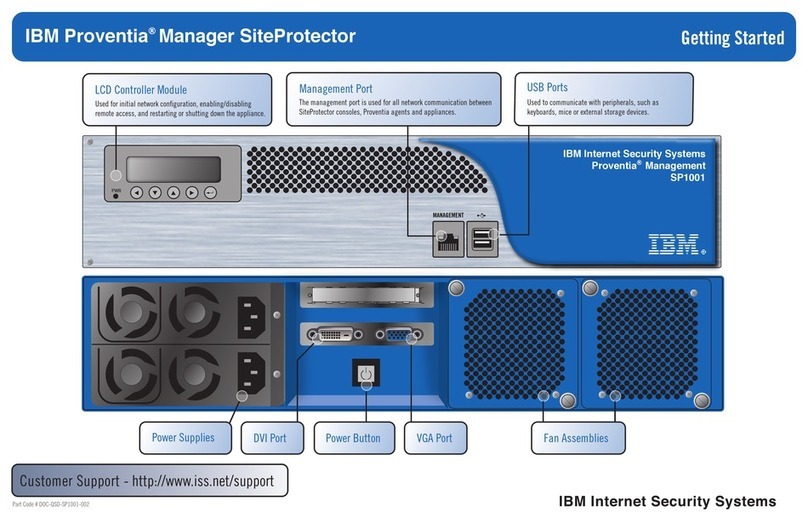
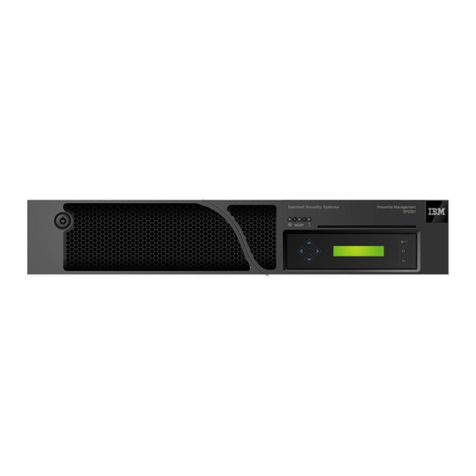
LCD Controller Module
Used for initial network configuration, restarting or shutting
down the appliance and obtaining IPS version information
Protected Ports
Used for either inline intrusion prevention (IPS mode) or
passive intrusion detection (IDS mode). Inline prevention
uses a pair of ports per segment. Passive detection uses a
single port per segment.
Note: Your port configuration may look slightly different depending on the
combination of fiber and copper you selected.
Serial Console Port
Used for optional terminal-based setup and recovery
Reference Key
USB Ports
Management Ports
Management port 1 is used to
communicate with Proventia Manager
and SiteProtector®Management System
Management port 2 is used exclusively
for sending RSKill (TCP Reset) responses
Power Supplies
Power Button
Fan Assemblies
A
A
E
D
F
G
H
B
C
B
C
D
G
H
F
E
1
2
3
4
5
IBM Proventia®Network Intrusion Prevention System
© Copyright IBM Corporation 2007. Produced in the United States of
America. All Rights Reserved. IBM and the IBM logo are trademarks or
registered trademarks of International Business Machines Corporation in
the United States, other countries, or both. Ahead of the threat, Proventia,
SiteProtector, X-Force and X-Press Update are trademarks or registered
trademarks of Internet Security Systems, Inc. in the United States, other
countries, or both. Internet Security Systems, Inc. is a wholly-owned
subsidiary of International Business Machines Corporation. Other company,
product and service names may be trademarks or service marks of others.
Specifications and content are subject to change without notice.
Part Code # DOC-QSD-GX5-001
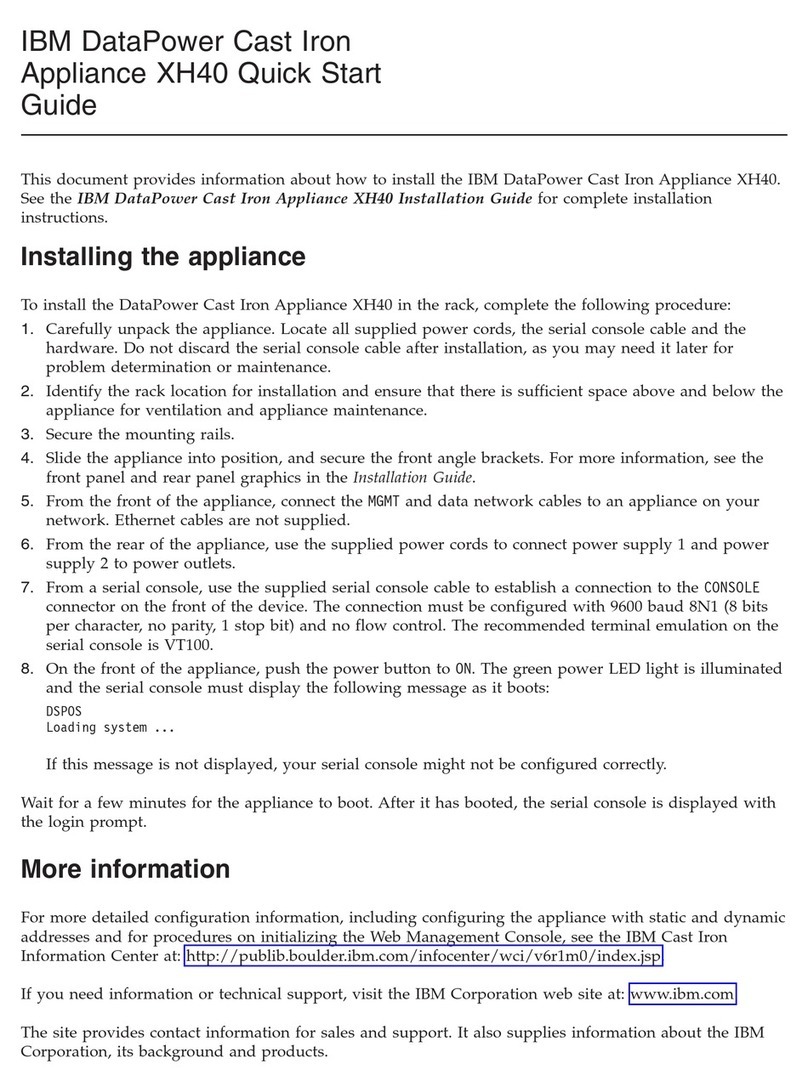
Connect the Appliance
Keep management and monitoring communication separate so network traffic can pass uninterrupted through
the appliance’s network interface card (NIC).
Cable the Appliance
1. Connect the power cord(s) to the appliance. If your appliance has two power cords, you must connect both.
2. Connect Management port 1, on the left, to the network you will use to manage the appliance.
3. (SFP-capable appliances only) Populate the Protected ports with SFP modules as necessary. For each port pair,
SFP modules must be the same media type; for example, if port 1A is copper (TX), then port 1B must also be
copper (TX).
4. Connect the network cables to the Protected ports. To run the appliance in passive mode, only connect the first
Protected port in the pair to the network.
5. Turn on the appliance.
Connect to the Network
1. Determine and record your IP Address, Subnet Mask, and Default Gateway.
2. Press the Enter button on the LCD panel. The LCD displays a message asking if you want to set up
the network.
3. Select OK, and then press the Enter button.
4. Press the Enter button again on the LCD panel to display the IP Address screen.
5. Press the UP and DOWN buttons to select a number, and then press the RIGHT ARROW to move to the next field.
6. When you have completed all the fields, press the Enter button.
7. Select OK to move forward, and then press the Enter button to confirm your selection.
8. Complete these steps again to provide the Subnet Mask and Default Gateway.
9. Once you enter all your network information, a final conformation screen appears. Select OK to save all network
information and enable the Management port, or select Cancel to return to the ISS Proventia screen without
saving any information.
10. After you confirm the settings, the appliance generates a temporary, case-sensitive password.
Record this password; you must use it when you log on to the appliance.
Configure Appliance Settings
Configure Network Settings
1. Connect the serial Console cable to the appliance and a computer to complete the initial configuration.
2. At the unconfigured login prompt, type admin, and then press the Enter button.
3. Type the case-sensitive password the appliance generated for you, and then press the Enter button.
4. Select Start, and then press the Enter button.
5. Accept the Software License Agreement.
6. Follow the on-screen instructions to provide the following required information. See the Proventia Network IPS
G and GX Appliance User Guide for more detailed information.
Information Description
Change Password Change the Admin, Root, and Proventia Manager passwords that control
access to each of these appliance areas.
Network Configuration Information The IP Address, Subnet Mask, and Default Gateway you entered through
the LCD panel appear here. You can change this information as needed.
Host Configuration Specify the Hostname and Domain Name for the appliance.
Time Zone Configuration Set the time zone for the appliance.
Date/Time Configuration Set the date and time as you want it to appear in the management interface.
Agent Name Configuration Type the appliance name as it will appear in the management interface.
Port Link Configuration Port link settings determine the appliance’s performance mode, or how the
appliance handles its connection to the network. Select link speeds and
settings compatible with your network and in relation to the other devices that
bracket the appliance. If you are not sure about your network settings, select
Auto to let the appliance negotiate speed and duplex mode with the network.
Adapter Mode Configuration The Adapter Mode determines how the appliance behaves within the network
in order to protect it.
Connect to Proventia Manager
Proventia Manager is the Web-based management interface for the appliance. You use Proventia Manager to
monitor the appliance status, configure and manage settings, and review and manage appliance activities.
1. Start Internet Explorer.
2. Type https://xxx.xxx.xxx.xxx (where xxx.xxx.xxx.xxx is the IP address for this appliance).
3. Log in using the user name admin and the Proventia Manager password.
4. If necessary, install the Java Runtime Environment (JRE).
5. Select Yes to use the Getting Started Procedures.
6. Click Launch Proventia Manager.
Install the Product License
Proventia Network IPS requires a properly configured license file in order to run at full capability. You must save
the license file to the appropriate location so the Proventia Manager software can locate and acknowledge it.
1. Register your customer license.
2. Download the license from the ISS Registration Center.
3. In Proventia Manager, select System>Licensing.
4. Click Browse.
5. Locate the license file you downloaded.
6. Click OK.
7. Click Upload.
1
2
3
4
TCP Reset
Management port 2, on the right, is the RS Kill (TCP Reset) port.
The appliance does not send kill responses until you configure
TCP Reset. See “Configuring TCP Reset” in the Proventia
Network IPS G and GX Appliance User Guide.
Information for Serial Connection
You can connect to the appliance using Hyperterminal or another
terminal emulation program. Follow the instructions listed in the
documentation for the program you choose. Use the settings
listed below to connect:
Setting Description
Communications Port Typically COM1
Emulation VT100
Bits per second 9600
Data bits 8
Parity None
Stop bits 1
Flow control None
IPS Modes
Inline protection mode monitors the network and actively blocks
malicious traffic. Includes the Block, Quarantine, and Firewall
responses.
Inline simulation mode monitors the network without affecting
traffic patterns to help you baseline and test your security policy.
Includes simulated Block and Quarantine responses.
Passive monitoring mode replicates traditional intrusion detection
technology and monitors traffic without sitting inline. Includes
the Block response.
Continued on reverse >
Network Information
Record the network information you need to configure
that appliance:
IP Address: _________ - _________ - _________ - _________
Subnet Mask: _________ - _________ - _________ - _________
Default Gateway: _________ - _________ - _________ - _________
Record the Proventia Manager password:
Temporary Password: ______________________________________
( )
( )
( )
( )
( )
( )
( )
( )
Applying Initial Updates
Download Updates
1. Select Automatic Updates.
2. Select Yes on the Export Administration Regulation page, and then click Submit. The Updates to Download
page appears.
3. Click Find Updates.
4. If updates are available, click Download Updates.
Install Updates
1. Select Automatic Updates.
2. Select Yes on the Export Administration Regulation page, and then click Submit.
3. On the Available Installs page, select the updates you want to install, and then click Install Updates.
Some firmware updates require you to reboot the appliance. Read the firmware update Readme for details.
4. View the installation status in the Update History table on the Update Status page.
Next Steps
You are now ready to configure advanced settings, including management, security, and firewall settings. Go to
the Proventia Network IPS G and GX Appliance User Guide for more information. See the note in the right sidebar
for access instructions.
Need Help or Documentation?
Online: http://www.iss.net/support
The User Guide and other deployment information for Proventia Network
IPS G and GX appliances is available at our product documentation
Web site: http://www.iss.net/support/documentation/index.php
Or Call: 1-888-447-4861
5
Appliance Updates
Ensure you have applied the latest updates to the appliance. You
can install the following:
Firmware updates. These updates include new program files, fixes
or patches, enhancements, or online Help updates.
Intrusion prevention updates. These updates contain the most
recent security content provided by the IBM Internet Security
Systems X-Force®research and development team.
Getting Started
GX5000 Series Appliance
Welcome
Congratulations on your new appliance!
This card will help you do the following:
Connect the Appliance
Configure Appliance Settings
Connect to Proventia Manager
Install the Product License
Update the Appliance
After you finish these tasks, the IBM Proventia®Network
Intrusion Prevention System (IPS) User Guide walks you
through other important tasks, such as:
• Setting up appliance management
• Configuring your security policies, including specifying
events and responses
• Creating firewall rules to protect your network
• Tracking alerts
• Monitoring important system information
Requirements:
• Power cord(s)
• Proventia serial console cable (blue)
• Ethernet crossover cable (red)
• For each inline segment:*
- A pair of Ethernet cables, straight-through or
crossover, depending on your network type
- A crossover adapter
• Additional Ethernet cables as needed
• PC with Internet Explorer and Internet connection
*IBM provides one crossover adapter and two one-foot Ethernet cables
(green) per segment.
LCD Controller Module
Used for initial network configuration, restarting or shutting
down the appliance and obtaining IPS version information
Protected Ports
Used for either inline intrusion prevention (IPS mode) or
passive intrusion detection (IDS mode). Inline prevention
uses a pair of ports per segment. Passive detection uses a
single port per segment.
Note: Your port configuration may look slightly different depending on the
combination of fiber and copper you selected.
Serial Console Port
Used for optional terminal-based setup and recovery
Reference Key
USB Ports
Management Ports
Management port 1 is used to
communicate with Proventia Manager
and SiteProtector®Management System
Management port 2 is used exclusively
for sending RSKill (TCP Reset) responses
Power Supplies
Power Button
Fan Assemblies
A
A
E
D
F
G
H
B
C
B
C
D
G
H
F
E
1
2
3
4
5
IBM Proventia®Network Intrusion Prevention System
© Copyright IBM Corporation 2007. Produced in the United States of
America. All Rights Reserved. IBM and the IBM logo are trademarks or
registered trademarks of International Business Machines Corporation in
the United States, other countries, or both. Ahead of the threat, Proventia,
SiteProtector, X-Force and X-Press Update are trademarks or registered
trademarks of Internet Security Systems, Inc. in the United States, other
countries, or both. Internet Security Systems, Inc. is a wholly-owned
subsidiary of International Business Machines Corporation. Other company,
product and service names may be trademarks or service marks of others.
Specifications and content are subject to change without notice.
Part Code # DOC-QSD-GX5-001

Other IBM Firewall manuals

IBM Proventia Network GX4004 User manual

IBM

IBM Proventia Network GX4004 User manual

IBM Proventia Management SiteProtector SP1001 User manual

IBM

IBM Proventia Management SiteProtector SP1001 User manual

IBM QRadar XGS 5200 Guide

IBM

IBM QRadar XGS 5200 Guide

IBM QRadar XGS 5200 Guide

IBM

IBM QRadar XGS 5200 Guide

IBM GX7000 Series User manual

IBM

IBM GX7000 Series User manual

IBM GX7 Series Guide

IBM

IBM GX7 Series Guide

IBM Proventia User manual

IBM

IBM Proventia User manual

IBM Proventia User manual

IBM

IBM Proventia User manual

IBM Proventia Management SiteProtector SP2001 User manual

IBM

IBM Proventia Management SiteProtector SP2001 User manual

IBM SP3001 User manual

IBM

IBM SP3001 User manual

IBM Proventia Management SiteProtector SP2001 User manual

IBM

IBM Proventia Management SiteProtector SP2001 User manual

IBM SP3001 Guide

IBM

IBM SP3001 Guide

IBM QRadar XGS 5200 Guide

IBM

IBM QRadar XGS 5200 Guide

IBM SP3001 Guide

IBM

IBM SP3001 Guide

IBM 1G User manual

IBM

IBM 1G User manual

IBM DataPower XH40 User manual

IBM

IBM DataPower XH40 User manual

Popular Firewall manuals by other brands

Cisco ISA3000-4C-K9 Hardware installation guide

Cisco

Cisco ISA3000-4C-K9 Hardware installation guide

NETGEAR FVS318 - ProSafe VPN Firewall Router installation guide

NETGEAR

NETGEAR FVS318 - ProSafe VPN Firewall Router installation guide

NETGEAR ProSafe FM114P Specifications

NETGEAR

NETGEAR ProSafe FM114P Specifications

IBASE Technology FWA6604 series user manual

IBASE Technology

IBASE Technology FWA6604 series user manual

Juniper JSA7800 How to set up

Juniper

Juniper JSA7800 How to set up

Atlante Informatica Nano Cluster APU2 FIRST CONFIGURATION

Atlante Informatica

Atlante Informatica Nano Cluster APU2 FIRST CONFIGURATION

Sophos XG 105w quick start guide

Sophos

Sophos XG 105w quick start guide

Draytek Vigor2860 Series user guide

Draytek

Draytek Vigor2860 Series user guide

Fortinet FortiGate FortiGate-50R Installation and configuration guide

Fortinet

Fortinet FortiGate FortiGate-50R Installation and configuration guide

NetComm VPN100 user guide

NetComm

NetComm VPN100 user guide

Hirschmann EAGLE 20 TX/TX user manual

Hirschmann

Hirschmann EAGLE 20 TX/TX user manual

HP F5000-S user manual

HP

HP F5000-S user manual

Kerio Control NG100W quick start guide

Kerio

Kerio Control NG100W quick start guide

Moxa Technologies NPort 6150 Series Quick installation guide

Moxa Technologies

Moxa Technologies NPort 6150 Series Quick installation guide

Fortinet FortiGate 300C quick start guide

Fortinet

Fortinet FortiGate 300C quick start guide

D-Link DFL-200 - Security Appliance Quick installation guide

D-Link

D-Link DFL-200 - Security Appliance Quick installation guide

Fortinet FortiGate FortiGate-50 Installation and configuration guide

Fortinet

Fortinet FortiGate FortiGate-50 Installation and configuration guide

NETGEAR FVL328 - Cable/DSL ProSafe VPN Firewall... Reference manual

NETGEAR

NETGEAR FVL328 - Cable/DSL ProSafe VPN Firewall... Reference manual

manuals.online logo
manuals.online logoBrands
  • About & Mission
  • Contact us
  • Privacy Policy
  • Terms and Conditions

Copyright 2025 Manuals.Online. All Rights Reserved.